Cubase Tips & Techniques
Technique : Cubase NotesEven a handful of knobs and sliders on a MIDI master keyboard are enough to give you hands‑on control of your Cubase mix.

John Walden
If you just want to make use of some faders and knobs on your MIDI master keyboard, the Generic Remote is the controller you need to select.
If you want to mix in Cubase using physical faders, but can't afford, or don't have the space for, a dedicated hardware controller, the faders and knobs built into many MIDI master keyboards offer a capable, low‑cost alternative. In this article, I'll explain how to mix in Cubase using your master keyboard's controls.
For the purposes of illustration, let's assume we have a basic MIDI master keyboard that includes eight faders and eight rotary knobs. The most obvious way to exploit these controls for general mixing duties would be to assign them to volume and pan for a series of eight tracks in your Cubase project. So, assuming your keyboard is already connected to a suitable MIDI port for MIDI note entry, how do we configure these hardware controls for mixing duties in Cubase?
Remote Places

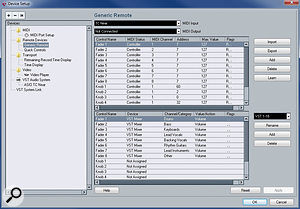
The upper table in the Generic Remote dialogue tells Cubase what controls your surface has, while the lower lets you assign these to mix parameters.
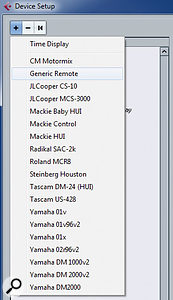
The first step is to get Cubase to recognise your keyboard as a remote control device, using the Remote Devices section of the Device Setup dialogue (accessed via the Devices menu). Clicking on the '+' button at the top left of the window opens a list of dedicated hardware controllers that Cubase supports, such as the Mackie Control. We require the 'Generic Remote', and once clicked, this is added as an item underneath the Remote Devices folder. When this is then selected, the centre‑right section of the Device Setup dialogue changes to show a range of default settings.
 For most standard MIDI master keyboards, you'll need to specify the MIDI input (in my system, TC Near via my TC Electronic audio and MIDI interface) but can safely leave the MIDI output as 'not connected'. All this means is that Cubase will not be sending MIDI data back to the keyboard (which is not necessary unless your controller features motorised faders or some form of visual feedback). The bulk of the display is dominated by two tables. The upper table is used to define what controllers your hardware surface has. By default, it includes a combination of faders, knobs, mutes and sends. This is fully editable, and it makes sense to adjust the list so that it only contains entries suitable for the actual physical controls you have on your hardware surface — that's eight faders and eight knobs in this example. As you edit the upper table, the lower table changes to display the same list of controls.
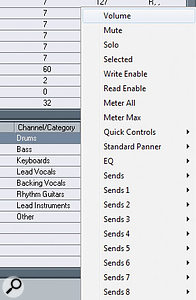
Clicking on any entry in the lower table (in this case, the Value/Action column for fader 1), brings up a list of the possible assignments.The lower table is used to map a specific hardware control to a specific parameter in Cubase. This can be almost anything from a track fader to a particular effects parameter, but some care is needed, as these controls are 'fixed' to that single parameter until you return to the Device Setup dialogue to change them. The flexibility is considerable, but there is not much point is assigning controls to an effects processor that might not be used in your next project, so for a basic mixing setup the obvious candidates are volume and pan for some mixer channels. The question is which mixer channels?
If, as described in SOS March 2008, you tend to submix your various audio and VSTi tracks to a series of group channels, these make a good target. In this example, I have eight group channels in the project (drums, bass, keyboards, lead vocals, backing vocals, rhythms guitars, lead instruments and a catch‑all called 'other'). As shown in the screenshot, clicking in the Device, Channel/Category, Value/Action or Flags column for any of the controllers in the list produces a list of options that can be assigned. In this case, I've assigned each of the eight faders to control volume of one of the group channels in the VST Mixer.
Learn Control
In the second 'bank', the eight faders and knobs have been assigned to volume and pan for the first eight audio tracks.
The second stage is to link each of your hardware controls to Cubase, using the Learn button, which makes the process very straightforward: simply select a control in the list contained in the upper table (for example, Fader 1), move the appropriate fader or knob on your hardware surface and then press the Learn button. The hardware controller is then linked to that virtual controller and, via the entry in the lower table, to a specific parameter in Cubase. You then simply repeat this process for each of the controls on your keyboard.
Bank Interest
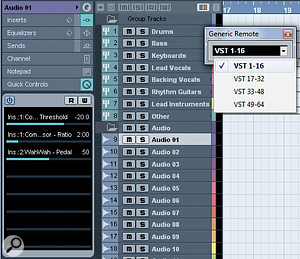
While eight faders may be better than none, if you want to do more than mix a set of group channels, you'll need to use the four 'banks' of controls offered in the Generic Remote configuration. As shown in the screenshot above, the alternative banks can be accessed via the small drop‑down list. In this example, I've configured the three other banks to provide volume and pan control for a series of 24 audio channels, but other targets, such as VSTi outputs, are possible.
Once this configuration is complete, if you open the (tiny!) Generic Remote window (from the Devices menu, as shown in the screenshot, right), you can toggle between the four banks as required – in this case giving us control over four banks of eight channels (the bank of eight group channels, and three banks of eight audio channels). Hey presto! You now have hands‑on control of a key part of the mixing process. Combine this with recording your fader movements as automation data (a topic for a different column) and those complex mixes can suddenly seem to be much more manageable!
Project Translation

The tiny Generic Remote window allows you to switch your hardware device to control multiple banks of parameters. As described in the main text, the Generic Remote configuration is sensitive to the Track List order. Here, the eight group channels are followed by 24 audio tracks. Also note the Quick Control on/off button in the Inspector pane — which is useful for disengaging the Quick Control system when required.
The Generic Remote settings are global in nature: once configured, the settings apply to every project. This has positives (you don't have to repeat the configuration process from scratch for each project) and negatives (not all your projects will require the same configuration). The approach also has a number of quirks, perhaps the most significant of which is that it is sensitive to the order in which tracks are placed in the Track List of the Project window.
Consider the example used above where the eight group channels happen to appear at the top of the Track List. If, for instance, an audio track were to be added above these group tracks, it would bump down all the hardware controller assignments by one. Fader 1 of bank 1 would now control this audio track, rather than the first of the group channels. At first, this can cause some confusion, but once you are aware what's happening, it's easy to work around the problem: it simply requires a consistent approach to ordering your tracks in the Track List. I often place group channels at the top, followed by audio tracks. The latter can be put into folders if required; it's the overall track order that's important.
Thankfully, the Generic Remote configuration options include import and export buttons. If you do need to configure your hardware controls in different ways for different project types, these can be saved and subsequently recalled, allowing you to develop any number of different configurations as required.
Generic Remote, Or Quick Controls?
Whereas a Generic Remote setup is most suited to mixing operations, the Quick Control system (SOS July 2009) is targeted at hardware control of individual tracks, with up to eight parameters in the currently selected track capable of being tweaked via a hardware controller. The two systems therefore complement each other very well.
One quirk is that it is possible to have both systems operational at the same time, and thus have the same hardware control linked to two different and unrelated parameters in Cubase. If you are not careful, you might find yourself inadvertently changing two parameters with one controller movement! Thankfully, the Quick Control system can easily be disabled via the Quick Control panel of the Inspector, allowing you to use your Generic Remote configuration. The most straightforward way to temporarily disable the Generic Remote system while you use Quick Control is to open the Generic Remote dialogue box from the Device Setup window, and then deactivate the MIDI input to the Generic Remote. Although this approach may be a little clumsy, it does at least do the job.
No comments:
Post a Comment