Tuesday, May 31, 2016
Monday, May 30, 2016
Hot Fuzz! | Media
Cubase Tips & Techniques
Technique : Cubase NotesCubase’s unique Quadrafuzz v2 plug-in is useful for so much more than guitar processing...
John Walden
These files accompany the Cubase Notes article in the February 2016 issue of SOS
Download
7.2 MB
Cubase’s Quadrafuzz v2: Audio Examples
These audio files accompany the Cubase feature that appears in SOS February 2016. As with all this sort of processing, how much of the effect is ‘right’ is very much an artistic decision made in the context of the full mix, and there are plenty of different sounds to be had by experimenting, but the examples below are illustrative of the range of possibilities Quadrafuzz v2 offers.
Example 1a (Electric guitar): The same guitar part is heard five times: (1) unprocessed, (2) single-band operation using the Tape option, (3) single-band mode using the Tube option, (4) single-band mode using the Amp option and (5) multi-band mode using the Tube option for both the lower-mid and upper-mid bands with the other bands bypassed.
Example 1b (Bass guitar): The same bass guitar part is heard four times: (1) unprocessed, (2) single-band operation using the Tube option, (3) single-band mode using the Amp option and (4) multi-band mode using the Tube option, for both the lower-mid and upper-mid bands and with the other bands bypassed.
Example 2 (Stereo drum loop): The same drum part is heard four times: (1) unprocessed, (2) multi-band mode as per the screenshot shown in the main article with the three upper bands using the Distortion option, (3) as for (2) but using the Amp option for the lower-mid and upper-mid bands and with the high band bypassed, (4) using the Scene feature to switch between different Quadrafuzz v2 configurations.
Example 3 (Vocals): The same song extract (from Cristina Vane’s ‘So Easy’ Mix Rescue article in SOS September 2013) is heard twice: (1) with the vocal unprocessed, (2) with the vocal processed as per the screenshot in the main article using multi-band mode, but with only a single-band operational.
Example 4 (Stereo mix mastering): The same song extract (again, from Cristina Vane’s ‘So Easy’) is heard twice: (1) with mix unprocessed, (2) with the mix processed as per the screenshot in the main article using multi-band mode but with only the lower-mid and upper-mid bands subject to processing and using the tape option in both cases. The processing is perhaps a little over-cooked here to make the effect more obvious.
Saturday, May 28, 2016
Friday, May 27, 2016
Hot Fuzz!
Article Preview :: Cubase Tips & Techniques
Technique : Cubase Notes
Quadrafuzz v2 offers a basic single-band mode, and it’s well worth exploring. Quadrafuzz v2 offers a basic single-band mode, and it’s well worth exploring.
Cubase’s unique Quadrafuzz v2 plug-in is useful for so much more than guitar processing...
John Walden
Many users were sad when Cubase lost its Quadrafuzz plug-in a few versions ago, but in Cubase 8 this popular little plug-in was re-incarnated — and Quadrafuzz v2 looks like it’s been working out, because it boasts both a bigger GUI and some impressive new features! It offers both single and multi-band operation, five different distortion types (Tape, Tube, Dist, Amp and Dec), gate (more on this in a minute), delay and stereo-width sections per band, and a ‘scene’ system for instant switching between complete configurations of the plug-in. So, if you only think guitar or bass when someone says ‘fuzz’, it might be time you broadened your sonic horizons — let me take you through a few examples.
Stomp On It
Of course, guitar and fuzz do go together like Keef and Satisfaction, so it would be remiss of me not to at least mention guitar applications. Some fairly conventional ‘warm up and crunch’ guitar sounds seem a good place to start exploring this plug-in, so that’s what we’ll do, but bear in mind that Quadrafuzz v2 can run the full gamut, from gentle warming through to bee-in-a-bottle fizz.
After inserting an instance of Quadrafuzz v2 on your guitar track, click the SB button to switch from the default setting to the simpler, single-band format. This single band’s control set is the same as that in each band in multi-band mode, which makes this a good place to accustom yourself to the Tape, Tube and Amp modes, which are the most guitar-friendly choices.
Published in SOS February 2016
Thursday, May 26, 2016
Wednesday, May 25, 2016
Tuesday, May 24, 2016
VCA Team
Article Preview :: Cubase Tips & Techniques
Technique : Cubase Notes
VCA faders have been created for each sub-section of a drum kit, with these VCA faders then ‘nested’ underneath a ‘Drums master’ VCA fader on the far-right.VCA faders have been created for each sub-section of a drum kit, with these VCA faders then ‘nested’ underneath a ‘Drums master’ VCA fader on the far-right.
Make mixing in Cubase Pro 8 that little bit easier with VCA Faders.
John Walden
Back in SOS October 2014 (http://sosm.ag/cubase-vca-1), Matt Houghton expressed a wish for a true VCA-style fader/automation system in what was then Cubase 7.5. Matt devised a workaround solution that still applies for anyone using a ‘lite’ or older version of Cubase, but Cubase Pro 8, which was released shortly after that article was published, includes VCA fader facilities. These provide some useful options for streamlining your mix and automation processes, and are well worth exploring.
VCA Rules!
There’s no great mystery to the advantages of voltage-controlled amplifier (VCA) faders. In suitably equipped mixers (hardware or software) you can link any group of standard channel faders to a VCA fader: adjust the VCA fader and it automatically applies the same gain change to any of the linked channels while preserving the relative level differences between those linked channels. Used to manage levels of particular instrument groups (drums, guitars, bass, vocals and so on), it means far fewer faders to worry about when setting your overall mix balance. And, in systems where the VCA faders can be automated, the process of creating your mix automation is also made that much easier.
Published in SOS January 2016
Monday, May 23, 2016
Saturday, May 21, 2016
Backup To The Future
Cubase Tips & Techniques
Technique : Cubase NotesYour Cubase project is recorded, mixed and mastered... but is it secure?
John Walden
Any long-standing SOS reader will be only too aware of the evolutionary nature of recording technology. Whether it’s two-inch multitrack tape, four-track cassettes, ADAT, dedicated hard-disk systems, SD cards or — as is currently the case for most of us — hard drives or solid-state storage within desktop computers, this evolution includes changes and redundancy in recording formats over time. This is a significant issue and, while digital hard-disk-based recording might be ‘better’ in terms of convenience and flexibility, I’m not so sure it is ‘better’ in terms of longevity or portability. Fortunately, Cubase 8 has a pretty comprehensive set of tools to both back up and future-proof your projects. Matt Houghton last looked at this topic in September 2010, when Cubase was at version 5.5. Five years is a long time in Cubase and computing terms and while some things have remained the same, there are some new options. So, if you’re using Cubase 8 and want to back things up so you can revisit them in the future, read on...
The Prepare Archive command will ensure you have (almost!) all your project data in one place.The Prepare Archive command will ensure you have (almost!) all your project data in one place.
Strategy Meeting
 all your project data in one place.")
When it comes to your (recording) data security, there are two aspects to address. First, you want to ensure that your entire recording project exists in a self-contained form in at least two discrete places (that is, on your primary computer’s hard drive and on a second, physically separate, hard drive) in case the primary drive fails; in other words, you need a backup. Ideally, you want a third backup somewhere off-site — otherwise, if, perish the thought, your studio suffered a fire, you’d lose everything.
Second, you need protection against incompatibilities caused by upgrades or casualties with your OS, audio plug-ins and virtual instruments; you need to future-proof your project. Creating an audio-only render of each track within your original project is probably the best current solution. It also brings the added benefit that you would also have a version of your project that could, with minimum fuss, be imported into another DAW should you need to work with it on another computer system or in a different studio.
Copy Right
The backup phase can, itself, be split into two main stages. Before you can actually create the backup copy, you have to ensure all the media (audio, MIDI and video) associated with the project resides in a single folder. With the project open, execute the Media/Prepare Archive command. When executed, Cubase checks to ensure that all the media files used within the project actually reside within the project folder and, if not, you are offered the opportunity to copy them to the project folder.
Music-to-picture composers often stream their video files from a dedicated drive so, by default, they may not reside within the project folder. If that’s the case, a ‘copy to project folder?’ prompt appears. Be careful though; video files can be large and, once copied, if you continue to work on the project, the clip will stream from the project folder rather than any dedicated video drive.
Having formed your self-contained project folder, the second step is to execute the File/Back up Project command. The dialogue box allows you to specify a new folder location for your backup copy (preferably on a dedicated, separate drive used for backup purposes) and to rename the backup copy of the project. It also provides an opportunity to spring clean the project’s media files. The combination of the Minimise Audio Files option (which excludes any portions of audio files not currently used in the project) and Remove Unused Files option (unused media files are removed from the working project and, therefore, are also not included within the backup version) can pare the project’s size down considerably. The downside is that the process is non-reversible; once those unused takes are gone, they’re gone. Whether you apply these options will depend on how decisive/ruthless you are about a project being ‘finished’.
The Back up Project dialogue can both create a backup and tidy up some media-file clutter.The Back up Project dialogue can both create a backup and tidy up some media-file clutter.There’s a further catch. If your project contains any of Steinberg’s VST Sound content (held in the VST Sound folders you can view from MediaBay and including, for example, any Steinberg loop packs or LoopMash content), note that this is copy-protected and not present in either your project folder or any backup copy. If you eventually have to use the backup copy on your own system, this should not be an issue. However, if you try to open it on a different host system, you will need to ensure that the same VST Sound content is installed for things to work smoothly.
Limited Shelf Life

The backup process described above provides you with security against hard-drive failure. However, it will not protect you — a few years down the line, perhaps — from the possibility that several of the virtual instruments or effects plug-ins used in a project may no longer exist.
While it’s not a completely future-proof solution, rendering out each track of your finished project as a standard audio file (including any track-level plug-ins) is probably as good as it currently gets. If you use the ‘Pro’ version, Cubase offers you two ways of doing this; the channel batch option within the Export Audio Mixdown (EAM) system or the newer Render In Place (RIP) options. I touched on the latter in SOS October 2015 and as I mentioned then, there’s some overlap between the older EAM and newer RIP functions, so let’s consider their differences for the task at hand — a track-level audio archive of our project. (Incidentally, Cubase also has the Track Archive function but this is a somewhat different beast and a topic for another day.)

The Channel Batch Export option in the Export Audio Mixdown dialogue box makes audio-only archives very easy to generate.The Channel Batch Export option in the Export Audio Mixdown dialogue box makes audio-only archives very easy to generate.While EAM provides a suitable means of generating your final stereo mix file from a finished project, or for creating stems from any Group Channels, it can also be used to generate a full, track-level, audio-only version of your project. And, if you’re using the full (Pro) version of Cubase, the Channel Batch Export option within EAM allows you to create all those channels in a single pass.

There are a few things worth noting. First, the EAM dialogue doesn’t allow you to mix and match audio file formats. In the screenshot, I’ve created stereo files for each track but you can also opt for mono or split stereo. If your original project includes a mixture of stereo and mono audio tracks, you could easily do two passes to render the stereo and mono tracks separately in their correct formats. Second, note that this is an audio-only process so, while it works with Audio, Instrument, Group and FX tracks, if your project includes a video track, you’ll have to handle that manually.
Render In Place gives you more control than Export Audio Mixdown but is perhaps better suited to audio-only archives that are only intended for use in Cubase itself.Render In Place gives you more control than Export Audio Mixdown but is perhaps better suited to audio-only archives that are only intended for use in Cubase itself.Finally, it’s worth noting that the created audio files are rendered with all the track-level processing (Pre-section, Inserts, EQ and Channel Strip) applied but without any send effects or master channel processing. This is probably a good thing but it does mean that, should you have to use this audio-only archive at some stage, you will need to reapply any main stereo output processing in order to fully recreate the original mix, and that you’ll not have access to the send effects for individual tracks — if two vocal parts have been sent to a reverb, you can print that FX channel, but you can’t separate the reverb for the two parts.
I covered the basics of the alternative RIP approach in SOS October 2015 so I’ll not repeat that here, but it’s worth highlighting the differences between the two methods. On the plus side, RIP provides more control over how far you can go down the effects processing food chain than EAM (although, that said, the Channel Settings option is still the most sensible for this application) when rendering. In addition, RIP handles the mono/stereo status of the original tracks in a single pass.
On the downside (well, a downside if you’re looking to create an audio-only archive to open in something other than Cubase), unlike EAM, the rendered audio files don’t all start at bar 1 and finish at the end of the project; they only span their length/position in the original project. Cubase will time-stamp WAV files, so they can be aligned in another DAW, but relying on this method will make your backup that bit less bullet-proof! Finally, like EAM, RIP will not deal with any video files used in the project so you’ll need to manage these manually. On the whole, while I like the direction that Steinberg are heading with RIP, for this kind of total project audio rendering, at present, I think EAM is still the more efficient solution.
Insurance Policy
Bad stuff beginning with ’s’ happens even in the most well-looked-after computer recording system. When it does, if your projects are securely backed up, and also exist as audio-only archives, at least you can ensure that ‘bad’ doesn’t go to ‘worse’. The one loose end to tie up is to recommend that you also export all the MIDI data from Cubase as a MIDI file. Amongst other things, that will enable you to revisit instrument sounds in the future, and to quickly establish the project’s tempo, should you wish to add new parts to your audio project.
Friday, May 20, 2016
Thursday, May 19, 2016
Space Race
Cubase Tips & Techniques
Technique : Cubase Notes
Efficient management of Cubase’s Workspaces can be a great help when you need to work quickly.
John Walden
Sometimes, when you need to be able to work quickly in Cubase, you find yourself instead bogged down with what feels like a gazillion windows. If you wish to achieve Cubase Ninja Master status, you’ll need to put some time and effort into designing an efficient workflow. There are many ways in which Cubase can help you with this — customisable keyboard shortcuts, macros, the Project Logical Editor and so on. Another, and the subject of this workshop, is Cubase’s Workspaces facility, which is a significant time-saver. It gives you instant recall to fixed (and familiar) screen layouts: even if you resize things or make other adjustments, unless you ‘update’ the Workspace to reflect those tweaks, it will default to its original settings the next time you switch to it. Neat!
Back To Work(space)
We last looked at this topic way back in SOS July 2005, when Cubase SX3 was still in diapers, but Steinberg have tweaked this functionality in each release since. In v8 Workspaces were given their own entry on the main menu and the ‘global’ versus ‘project’ Workspace concept has been refreshed and refined. As will become clearer below, these two types of Workspace may be better tools for different purposes.
Creating a new Workspace is simply a matter of organising the various window layouts as you desire, and then selecting the Workspaces/Add Workspace command to ‘capture’ the current layout. Having created a Workspace, if you change it and wish to save it, overwriting the current entry, use the Workspaces/Update Workspace command. This is assigned, by default, as an Option+U (Mac) or Alt+U (Windows) keyboard shortcut.
Any Workspace(s) you create will appear in the Workspaces menu, with Global ones positioned above a horizontal line and Project-level ones below. You can switch between Workspaces either via this menu or using key commands. The first nine Workspaces are automatically assigned default key commands starting at Option (Alt)+Num 1 and continuing up to Option (Alt)+Num 9. If using a laptop without a numeric keypad it’s well worth acquiring one, or else customising these commands.
Another option is to use the Workspace Organiser dialogue, accessible via the Workspace menu, but the main function of this is to let you manage (re-order or delete) your Workspaces. Note that you can’t move a Workspace between the Global and Project categories in this way; the easiest way to achieve this is to create a new Workspace based on an existing one and assign it to the other Workspace group. Note also that the Workspace Organiser shows the key command associated with each Workspace. These commands are defined dynamically, so moving a Workspace or adding a new one may change the key commands assigned to other Workspaces in the list. I’ll come back to this later.
Elect Your Candidates
Creating a Workspace, then, is easy enough, but if you want to improve the way you work with Cubase you’re going to have to develop some sort of strategy or system for using them. Perhaps the first thing to consider is which windows you most commonly find yourself using in a typical project, as these make obvious candidates for inclusion in a Workspace. My ‘top two’ Global Workspace choices are likely to include ‘as much as I can see’ of both the Project and MixConsole windows; essentially full-screen Project or MixConsole windows but with (for my personal preference) the Transport Panel occupying a thin strip at the base of the screen. I suspect most people have a default layout that’s something like this. Beyond that, though, it will depend a little on the way you make music.

For example, I regularly use both multiple VST instruments and audio loops in my projects. I’ve therefore set up a Global Workspace that combines a more compact Project window with the VST Instrument Rack and MediaBay open. Note that you can include these windows either as separate ‘floating’ windows or by toggling on the Racks display option for the Project window. I prefer the latter, as I can then easily get at my VSTi windows for editing, have easy access the VSTi Quick Controls and can get at my audio sample library from the MediaBay.
The Workspace system now has its own entry on the main menu system.The Workspace system now has its own entry on the main menu system.If you regularly work on music-to-picture projects, assigning the Video Player, Tempo Track and Markers windows to a dedicated Workspace would probably be useful. Similarly, if you use the Score facility, then defining a Workspace featuring the Scores window should be helpful. That way, if you select a specific MIDI part and switch to your ‘Scores’ Workspace, the selected part will automatically be displayed as notation.

The Workspace organiser allows you to select, reorder or delete Global or Project Workspaces.The Workspace organiser allows you to select, reorder or delete Global or Project Workspaces.These Global-level Workspaces will be built around your most frequently used window arrangements, but you might find that you need some more specific layouts within an individual project, and this is where Project-level Workspaces come in handy. I frequently assign two types of tool to these: VST instruments and VST effects plug-ins. If any are a key Project component and I need regular access, I find that it’s worth creating one or two Project-level Workspaces for easy recall.
Workspaces can be defined for Global- or Project-level applications.Workspaces can be defined for Global- or Project-level applications.In practice, you can often fit two or more VSTi GUIs in a single Workspace. For example, Halion Sonic, Groove Agent (two of my go-to instruments) and the VST Instruments Rack all sit nicely together on my single-screen system — depending on your screen setup different things will be possible. It’s possible to arrange a number VST effects windows in a single Workspace so you can instantly get at the parameters for what might be your key send or creative effects for a specific project. What you don’t appear to be able to do is bring up insert effects for the currently selected channel. (To achieve that, configure the Generic Remote along the lines described by Matt Houghton in SOS Jan 2015 (http://sosm.ag/cubase-channelstrip).
Workspace Wiz

I’ll finish off with a few tips to help you make the most of Workspaces. First, while Cubase offers various ways to zoom in and out of your Project and Mixer windows, Workspaces can be used to quickly switch between zoom levels. For example, in the Project window a Workspace will store the zoom level used when the Workspace was created or last updated. Thus, I have Global Workspaces based for ‘zoomed out’ and ‘zoomed in’ views. This is really useful if you often find yourself wanting to switch between, say, sample-level and full arrangement views.

While the same is not true of the Mixer, Cubase (unlike most other DAWs) has long offered you three different MixConsole windows, each of which can be set to different ‘zoom widths’. These can be accessed from the Devices menu and assigned a keyboard shortcut. On my system, I’ve set the first MixConsole to have fairly narrow channel widths, so I see plenty of channels, and have configured MixConsole 2 to have much wider channels, so I can see more detail in each channel. By building separate Workspaces around these different MixConsoles, I can easily switch between two otherwise identical Mixer window screen layouts to see different channel resolutions on the mixer.
By exploiting the three alternative MixConsole views, you can easily create Workspaces that allow you to switch between different channel-width settings for different mixing tasks.By exploiting the three alternative MixConsole views, you can easily create Workspaces that allow you to switch between different channel-width settings for different mixing tasks.Second, once you’ve established your top Global Workspaces, don’t change the number and/or order of them unless you really have to. As mentioned earlier, the key commands for Workspaces are dynamic, which makes them potentially volatile: if you delete one at the top of your list, everything else can get shuffled up the key command sequence. This isn’t particularly helpful for a time-saving feature, as you can suddenly find a significant number of Workspaces don’t appear exactly as you expect them to! You’d be better off overwriting ones you no longer need with a new option.
Third, Global Workspace presets are stored in the Window Layout XML file. You can search for this in your file system (I’m on OS X, so for me this is in the /Users/username/Library/Preferences/Cubase 8/Presets folder) and it’s worth making a backup of this file once you have spent time crafting your Global Workspace presets. If you want to take your Workspace layouts to a different system you can overwrite this file with your own (remember to back up the original before you overwrite it!), although how well your Workspaces will travel depends on how closely the two systems’ screen resolutions match.
Finally, while Steinberg have ironed many of the previous wrinkles out of the Workspace feature set in Cubase Pro 8, there’s still the odd quirk. Even so, as part of your own Cubase efficiency drive, Workspaces can be an essential tool, particularly for anyone working on laptops or single-screen systems.
Wednesday, May 18, 2016
Sony Acid Pro 7
DAW Software For Windows
Reviews : Software: ALL
Acid Pro has always offered a fabulous environment for loop‑based music creation, but version 7 sees it making a bid for fully fledged DAW status.
John Walden
If you make extensive use of loops in your music, and you work on a PC, the odds are that you will have tried Acid at some point. Acid Pro has always offered a powerful and creative platform for loop‑based music creation, and with versions 5 and 6, Sony expanded its features for audio and MIDI recording. Version 7 of Acid Pro is now with us and, again, the new features suggest that Sony are still keen to position Acid as a fully fledged DAW. So is Acid Pro now a viable alternative to products such as Cubase or Sonar for PC‑based musicians?
Those new to Acid Pro might like to look through the earlier SOS reviews (see the April 2005 and July 2006 issues) for some background, as all the previous functionality is retained in the new version. In essence, Acid Pro's long‑standing focus has been its ability to provide real‑time pitch‑shifting and tempo‑matching of audio loops. This capability is now built into most mainstream DAWs, but Acid is pretty much where it started, and it is fair to say that the quality of this real‑time process in Acid is about as good as it gets. And thanks to its very straightforward user interface, even non‑musicians can put together plausible results given a suitable collection of pre‑recorded loops — although whether that's good thing is another matter! Other key features include an excellent audio groove quantise function, a range of audio effects, a video window for music‑to‑picture work and the ability to act as a Rewire host or client.
As with most software updates, Acid Pro 7 offers a number of headline additions and numerous smaller refinements. For me, four new features fit into the headline category: the provision of an Input Bus system, a full audio and MIDI mixing window (something that was on my personal wish‑list when I reviewed version 6), improvements to the time‑stretching engine, and the impressive bundle of added extras from Garritan, iZotope, Native Instruments and Submersible Music (see box on the next page).
Also notable, but a bit less dramatic, are features such as MIDI track freeze, the ability to create tempo curves, real‑time rendering of projects (allowing external sound sources to be mixed down as part of the Acid project) and, amongst a range of user‑interface tweaks, customised labelling for ASIO devices and ports.
Mixing Acid
Acid has always had a Mixer window, but until now, its features have been somewhat limited. Although this didn't stop users from undertaking complex projects with mix automation, it did mean that mixing usually involved both the Track List and the Mixer window. The fully featured audio and MIDI Mixing Console window is, therefore, an obvious highlight in the new release.
As shown in the screenshot above, the general appearance of the mixer channels retains the classic Acid style, which is very functional if perhaps not a thing of great beauty. As well as the output, preview, bus, effects and soft synth mixer channels, the new Mixing Console window now also includes audio and MIDI channels for each track within the Track List, plus the new Input Bus channels. The user can toggle different track type groups or individual tracks on and off via the View pane or Channel List, and both of these options make it easy to configure the mixing environment to suit particular types of task.
Aside from the usual channel fader, level meter and pan controls, tracks now include slots for insert effects and sends, where appropriate. These two areas can be contracted and expanded to show fewer or more slots, as required. Clicking on an empty insert effects slot produces a drop‑down list from which effects can be selected, while clicking on an already filled slot opens the window for that effect so that its parameters can be adjusted. Other features include mute, solo, automation mode, a phase switch, record arming, input monitoring, insert effect chain editing, track freeze and an insert pre‑/post‑fader option, the selection of which depends upon the track type. This is now a well‑specified mixer, and having faders for all track types in one place makes it easier to focus on basic mixing tasks such as fader automation. In version 6, this required working in both the old mixer window (for master outputs, buses and so on) and in the Track List (for the audio and MIDI tracks).
In terms of making Acid a more credible environment for serious audio recording, the new Input Bus tracks are a big plus.The new Mixing Console window including an equally new Input Bus. They provide the ability to quickly configure which hardware input(s) are to be used, what effects (insert or send) are to be applied to the input signal and whether the input bus is to be returned to an output for monitoring purposes (which, as in most DAWs, works fine if your audio device can function at low enough latency levels).
Best Of The Rest

A few of the other new features are worth highlighting. Like most mainstream DAWs, Acid Pro 7 now includes a Freeze option for MIDI tracks. This simply renders the soft synth output to a WAV file, hence reducing the CPU load when working with a project that is stressing the host computer. This works well and the operation is pretty much invisible to the user. Tracks can be unfrozen if further editing is required.
Acid has always allowed tempo changes within projects, but version 7 sees the introduction of tempo curves for the first time. The approach used offers a number of pre‑defined shapes of tempo change between two tempo markers — not a full‑blown tempo track but a considerable improvement, and easy to use, too. As before, Acid will follow tempo changes (including tempo curves) from another application via Rewire.
For users with hardware MIDI sound sources, the new real‑time rendering option will be welcome. This enables a project to be bounced in real time rather than as quickly as the CPU allows, with MIDI tracks transmitting data out to any hardware sources and the audio being returned via an Input Bus for inclusion within the mix. One other nice detail in this release is the ability to customise the labels for your various ASIO‑based audio inputs and output. These then appear in all the I/O drop‑down options (within the Mixer, for example) — all much neater than the sometimes cryptic default names that appear for some devices.
Seventh Time Lucky

Effects management is much easier with the new Mixing Console.
As a long‑standing user of Acid, I'm obviously something of a fan. In use, I found Acid Pro 7 immediately familiar and, small changes to the interface aside, still a working environment I find simple, efficient and downright fun to use. Sony have made some changes under the hood in terms of the pitch- and tempo‑shifting algorithms (including the new Zplane 'Élastique Pro' time‑stretching that can be used with Beatmapped files), but these are generally invisible to the user. The bottom line here is that the real‑time pitch and tempo manipulation is still as good as it gets, and pretty much effortless when used with pre‑recorded loops.
For anyone familiar with virtual mixers, the new Mixing Console is very easy to find your way around, and it does make final project mixing much easier, both in terms of managing your use of effects plug‑ins and creating track‑level automation data. The new Input Bus system is well implemented and immediately makes Acid an easier environment for standard multitrack audio recording. Having run both version 6 and 7 on the same test system during the course of the review, I didn't see any noticeable difference in performance, and the v7.0a release used for testing seemed very stable.
So is Acid now the perfect DAW? Well, not quite. Rival products such as Cubase and Sonar still have tools for audio and MIDI editing that are missing here. For example, I'd love to see the equivalent of the Cubase 'Detect Silence' command available, as I find this a real time‑saver when I'm editing together multiple takes of vocals. Equally, however, there are areas where Acid outshines the competition, particularly in the mixing and matching of pre‑recorded loops.
In recent years, my impression is that Acid hasn't had quite the profile of some of its obvious competition, particularly in the UK, and this has always been a bit of mystery to me. Perhaps it's something to do with its PC‑only status but, as a tool for working with loops, I think Acid is just about as good as it currently gets. This upgrade is evolutionary rather than revolutionary but I'm sure the majority of existing users will see it as well worthwhile.
What is perhaps more interesting is whether Acid Pro 7 might now be seen as a more serious competitor for the mainstream PC‑based DAWs such as Cubase and Sonar. Sony have continued to move Acid forward in that respect, and it is now also a very capable multitrack audio and MIDI recording and mixing environment. As a regular user of Cubase, I hesitate to undertake a predominately loop‑based project in Cubase knowing I've got Acid on my PC. Equally, if I'm creating a complex MIDI‑based project, I still go with Cubase, simply because I'm more familiar with the MIDI tools it offers. However, for projects that mix and match all three elements — loops, audio tracks and MIDI — I would previously have used Cubase with Acid Rewired in, but now Acid Pro 7 is perfectly capable of handling it all. PC users looking to buy into the top end of the workstation market should certainly give Acid Pro 7 some serious consideration, because this is now a very good DAW that also happens to be great fun to use.
Alternatives
While Acid started life as a loop‑based music production tool, Sony's addition of further mainstream DAW features makes version 7 a credible alternative to the likes of Steinberg's Cubase and Cakewalk's Sonar. The choice may depend upon a combination of price and how you intend to make music, but if loops are likely to feature prominently, Sonar and Ableton Live are perhaps the most obvious competitors for Acid Pro 7.
Bundled Effects, Sounds & Processors

For those interested in recording electric guitars, the new Input Bus channels will be particular useful, allowing users to take full advantage of the Native Instruments Guitar Combos that are part of the bundled extras.The Twang Combo is one of three supplied with the NI Guitar Combos bundle.Garritan's ARIA for Acid Pro is also supplied.Submersible Music's KitCore add some very useful drum sounds.The Analog Delay is a highlight of the iZotope Acid Pro Effects Rack. These provide three very decent amp models — AC Box, Plexi and Twang — and each is supplied with a good number of presets. The clean and crunchy sounds are all very useable, although I did find myself taking a little top‑end off some of the high‑gain presets to reduce some of the fizz.

A special version of Garritan's ARIA sample player is also included. This VSTi includes a range of orchestral, jazz/big band, marching band and GM‑type sounds, all subsets of samples taken from Garritan's other products. The player itself is simple but offers some nice features and, although there are not huge numbers of instruments provided, what is here is very good indeed. This includes some nice key‑switched string samples (full strings and sections) and very useable Steinway jazz piano, vintage electric piano and upright bass.
The third element of the bundle is the KitCore drum sample VSTi from Submersible Music. This is a cut‑down version of their flagship DrumCore package and it includes a range of different drum kits and MIDI loops taken from the various DrumCore libraries. While it perhaps serves as a taster for the full product, as with ARIA, the basic set of drum and percussion sounds supplied are good.
The final freebie is the Acid Pro Effects Rack from iZotope. This includes a flanger, phaser, 'analogue' delay and dynamics processor, all of which will be familiar to anyone who has used any of iZotope's full products such as Ozone. I particularly liked the delay, which is both well specified (it offers, tube, tape and 'bucket brigade' models), easy to use and sounds great.
Tuesday, May 17, 2016
Monday, May 16, 2016
Cubase: Advanced Vocal Compression — Audio Files
Hear For Yourself
Technique : Cubase NotesWe explore some of the advanced parallel compression techniques used by top mix engineer Michael Brauer — and how you can recreate them using Cubase.
Mike Senior
Vox Raw File voxraw.wav
VoxRaw.peak — please Download the ZIP file below
VoxCompression.cpr — please Download the ZIP file below
ZIP of all 3 files: Download
Published in SOS April 2009
Saturday, May 14, 2016
Friday, May 13, 2016
Advanced Vocal Compression
Steinberg Cubase Tips & Techniques
Technique : Cubase NotesWe explore some of the advanced parallel compression techniques used by top mix engineer Michael Brauer — and how you can recreate them using Cubase.
Mike Senior

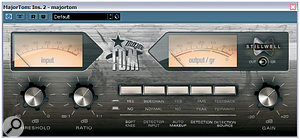
One of the secrets behind the vocal sounds of world‑famous mix engineer Michael Brauer is his unusual parallel compression technique. Here you can see a configuration in Cubase that simulates his setup. Five Group channels are fed via post‑fade sends from the 'LV Source' audio track containing the original vocal recording, and each of the Group channels contains a compressor with its own unique sound. The outputs of all these compressors are then mixed to the LV Master Group channel for any further communal insert processing or send effects.One of the secrets behind the vocal sounds of world‑famous mix engineer Michael Brauer is his unusual parallel compression technique. Here you can see a configuration in Cubase that simulates his setup. Five Group channels are fed via post‑fade sends from the 'LV Source' audio track containing the original vocal recording, and each of the Group channels contains a compressor with its own unique sound. The outputs of all these compressors are then mixed to the LV Master Group channel for any further communal insert processing or send effects.
Back in SOS November 2008's 'Inside Track' feature, we interviewed Michael Brauer, a mix engineer who has mixed records for established megastars such as the Rolling Stones, Paul McCartney, Aerosmith and Bob Dylan, and seems equally in demand today by the likes of KT Tunstall, James Morrison and Coldplay. From a personal viewpoint, I was interested to read about his vocal processing techniques, because I'd been very impressed with the vocal sounds he'd achieved for James Morrison's first album, Undiscovered.
The article didn't disappoint! It turns out that Brauer uses a very unusual compression approach for vocals, whereby he feeds the vocal in parallel to five different compressors at once, mixing their outputs to create the final sound. But what's the point of doing that when it'd be a lot easier just to insert a compressor directly into the vocal channel? The first reason, as Brauer explains, is that if you use five different models of compressor, each will, by virtue of its compression character and processing side‑effects, alter the timbre of the vocal. Mixing these compressors together therefore gives you access to a range of tonal enhancements that can be matched to what the specific vocal needs. When using this multi‑compressor tactic for my Mix Rescue of 'Big Dummy Shake' in SOS March 2009, I realised that Brauer hadn't mentioned a second reason why the technique works so well: it's because the compressors are connected in parallel, a technique that tends to be very good at bringing about serious dynamic‑range reduction without stamping on level peaks as heavily. So in this month's Cubase column, I'm going to look at how you might take advantage of this advanced compression technique in Cubase.
Advanced Vocal Compression

Here are the five compressors you can see in use in the first screenshot. They have been chosen and set up to achieve sonic contrast between them, something that's a crucial element of this compression technique.Here are the five compressors you can see in use in the first screenshot. They have been chosen and set up to achieve sonic contrast between them, something that's a crucial element of this compression technique.
There are a few different ways you could set up the multiple parallel compressors in Cubase. In some ways, the simplest method is just to duplicate your audio track and insert different compressors on each duplicate, but this can get tedious if you need to edit the audio at a later date. A better approach is to have your audio on one track and send from that to a selection of different compressors, much as you would send to effects such as delays and reverbs. You may, therefore, like to use Cubase's dedicated FX Channels to host your different compressors, so that you keep all your send effects tidily together in one area of the screen. However, the restricted routing to and from FX Channels until recently may stop those with versions of Cubase prior to v4.5 from creating the necessary routing, so instead I'd recommend setting up separate Group Channels for each compressor.
In this case, we'll follow Michael Brauer's example and create enough for five different models running simultaneously. Right‑click the Project Window's track list and select Add Group Channel Track from the Add Track submenu, increasing the number in the subsequent dialogue box's Count field to five to save time. The new Group Channels should then show up as available destinations if you select the lead vocal's audio track in the Project window and click in any spare Sends slot within the Inspector. Set up separate sends here for each of the Group Channels you've created, and then make sure they're all switched on and faded up to the same level. This might as well be the 0dB mark, as it's quick to set just by holding the Control key while clicking the little horizontal send‑level control. It's also best to leave these set to post‑fader operation, for reasons I'll come back to later...
The lead vocal should now feed all the new Group Channels at the same level when you play back, and if you reassign the Audio Track's output in the top Inspector pane to Stereo Out to No Bus, then that will stop any uncompressed vocal reaching the mix. The final stage is to create one more Group Channel labelled something like 'LV Master', and reassign the outputs of all five Group Channels to it from their default Stereo Out setting.
Choosing The Compressors
Advanced Vocal Compression
That completes the basic audio routing; now you need to choose your compressors. The problem, though, is that all of Cubase's built‑in compressors sound quite similar, so sticking just to those would defeat the object of the exercise. The point is that you want the compressors to have contrasting characters, to increase your tonal options. Many recording musicians have a variety of additional commercial third‑party plug‑ins on their systems, and there are also many good freeware 'character' compressors available, so there shouldn't be any shortage of alternatives for you to try — and all you really need to do is compare the sounds of different ones side by side and choose a subset that provide a good variety of timbres.
The differences between the sounds of compressors can initially be difficult to latch onto as a listener, so when auditioning different contenders, it's worth driving them moderately hard so that their side‑effects become more apparent. Whatever it is that seems to make a specific compressor interesting, experiment with the different compression controls to try to heighten this character, without thinking too much about whether it's actually what you want for the vocal in question. In my experience, even if one type of compressor doesn't seem to give a particularly appealing sound on its own, it can actually end up working magic once it's mixed in with the sound from another model.
Advanced Vocal CompressionSo what kinds of things should you be listening for? Well, in the first instance consider how the specific gain‑reduction style affects the feel of the performance. Some compressors will make the sound seem more animated, while others will smooth it out and make it feel more restrained. Tonal changes are inherent in some compressors, and distortion side‑effects of different flavours are probably even more important, in my opinion, although I suppose that depends on what kind of music you're mixing and how hot you plan on running the compressors.
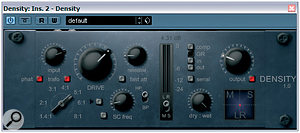
For the purposes of this column, I'm going to use five plug‑ins that Cubase users can download and try out without parting with any money, so that it'll be pretty easy for you to replicate my setup if you want a ready‑made starting point for your own experimentation and reference. The first two compressors give a comparatively clean sound, with Cubase's Vintage Compressor offering a brighter and more natural sound next to the rounder and more obviously compressed effect from Stillwell Audio's Dbx 160‑inspired Major Tom. The other three all offer different distortion sounds: Bootsy's Density has a nice, breathy, high‑frequency enhancement, Buzzroom's Grancomp contrasts this with a slightly telephony presence bite, and Antress Modern's VHME (an obvious homage to the Empirical Labs Distressor) gives a stodgier tone. If you prefer, you could select alternative compressor plug-ins — but make sure you use a similar array of 'flavours'.
Advanced Vocal CompressionNow you've got all the compressors set up, you can try mixing and matching them to get a tone you like. There are no real rules here, as you can afford to be fairly intuitive when it comes to vocal tone, and the compressed signals don't always seem to combine in the way you think they might. A little trick I find useful, though, is using the 'M' key on the keyboard to toggle the mute status of different compressor channels. For example, let's say I have one compressor I really like, but two others that I am thinking of mixing in, and I can't quite decide between them. If I mute one of the channels in question, and then select both of them, pressing 'M' then toggles between them instantaneously.
One thing to bear in mind is that the overall vocal level will affect your tonal judgements, so you may need to adjust the 'LV Master' channel's level to compensate for any increases in level you get when combining different compressors. However, if you have a hardware fader controller you should be able to do this compensation very quickly and instinctively from the compressor-channel faders while the track is playing, as long as you can get your hands on all these faders at once.
Some Refinements

Advanced Vocal Compression
If you've tried the idea out this far and like the results you're getting, there are a couple of further refinements to the scheme which you might also consider experimenting with. The first thing you can do is create another Group Channel, as if for a sixth compressor, but then not actually insert a compressor into it. You can then use this Group Channel to feed the uncompressed vocal into the mix alongside the compressor outputs. This can really help to maintain a little liveliness in the sound even if you need to compress quite heavily to maintain your mix balance.
Speaking of compressing heavily, if you discover, after finding your preferred vocal tone, that your compressor's gain‑reduction is a bit too gung-ho, or alternatively doesn't control the singer's level peaks enough, there's no need to go through all the compressors tweaking them individually. All you have to do is adjust the fader level on the original lead vocal audio track, which affects all the post‑fader sends to the compressors, and hence alters the amount of compression across the board. You'll need to juggle this fader with the 'LV Master' fader to keep the overall mix level the same, but that's not tricky to do.
Any other processing you carry out on the vocal can be inserted on the source audio track if you're happy with any effects that may have on the action of the compressors, but in practice I usually only high‑pass filter at this point, to remove rumbles and excessive plosives, leaving any other processing for the 'LV Master' channel's insert slots.
The most no‑nonsense way to feed any send effects such as delay or reverb from the lead vocal in the mix is to set up post‑fader sends on the 'LV Master' channel. However, don't completely disregard the possibility of feeding some effects from the original lead‑vocal audio track instead. What this will do is cause less effect to appear on quieter vocal phrases and more to appear on louder ones, something that can often work well in concert with the common 'drier verse/wetter chorus' mix dynamics of many commercial tracks.
A final issue to consider is level automation, without which it's tough to get a commercial‑sounding vocal mix, no matter what you do with compressors. The first interesting consideration here is which channel to automate for overall level control. Again, if you automate the lead vocal's audio track, you'll affect how hard the vocal hits the compressors, whereas the fader on the 'LV Master' channel will affect only the post‑compression signal. Although you might think that it would therefore be better to avoid tampering with the compression, in reality I've discovered that it often sounds more musical if you automate into the compressors for most of your fader rides, and only turn to the 'LV Master' channel if the compression suffers as a result of a specific pre‑compressor fader move.
The second automation issue is that you can, of course, adjust the relative levels of the different compressors to suit different sections of your song, something that Michael Brauer refers to specifically in the interview I mentioned. This is particularly relevant if you have any of the uncompressed signal passing through to the 'LV Master' channel, as this will often suit sparser sections of your arrangement better.
Beyond Compressors

Any of the processors in the plug‑in menu's Distortion submenu can be used in place of a compressor in this article's parallel vocal processing setup, but in addition to those you can also get some useful tonal colours out of the Grungelizer plug‑in if you turn the Crackle, Noise and AC controls down to get rid of the background noise.Any of the processors in the plug‑in menu's Distortion submenu can be used in place of a compressor in this article's parallel vocal processing setup, but in addition to those you can also get some useful tonal colours out of the Grungelizer plug‑in if you turn the Crackle, Noise and AC controls down to get rid of the background noise.
Although this column focuses on the idea of combining compressors, that's not the end of the story. A couple of other processes also affect both the tone and the dynamic range of a signal simultaneously: limiting and clipping. Mixing in a limiter working at full tilt can be really useful for bringing up the levels of half‑swallowed syllables. You could try Cubase's Limiter plug‑in if you like, but the mastering‑style Maximiser felt like it did a smoother job of levelling out the peaks when I tried it out.
When it comes to clipping, you're spoilt for choice in Cubase, so there's little need to venture out in search of third‑party plug‑ins if you don't want to. Amp Simulator, DaTube, Distortion and Soft Clipper are all options (although I'd probably be wary of the last's harsh‑sounding and rather unpredictable third harmonics), as long as you don't drive them too hard and you mix them in low. You might also feel the need to pop an EQ after the distortion to shape it more, or a compressor before the distortion to make its tone more consistent. Grungelizer is another quirky option that you might look at (shown in the screenshot), but there's nothing useful to be gained from Bitcrusher, as its digital distortion artifacts aren't musically related.
Thursday, May 12, 2016
Wednesday, May 11, 2016
Tuesday, May 10, 2016
Ducking At Mixdown
Steinberg Cubase Tips & Techniques
Technique : Cubase Notes
Learn how to avoid frequency clashes in your mix, with our tutorial on advanced ducking techniques in Cubase.
Mike Senior

Here you can see Cubase's compressor set up to achieve the ducking effect in our demo project: note the very low Threshold and Ratio settings, and that the Make‑up control's Auto button is switched off. The mouse is currently hovering over the Activate Side‑chain button, which needs to be lit if signals from other audio channels are going to trigger the compressor's gain reduction.Here you can see Cubase's compressor set up to achieve the ducking effect in our demo project: note the very low Threshold and Ratio settings, and that the Make‑up control's Auto button is switched off. The mouse is currently hovering over the Activate Side‑chain button, which needs to be lit if signals from other audio channels are going to trigger the compressor's gain reduction.
In mixing these days it seems that more is always more: more vocals, more guitars, more drums, more bass... more everything! Clearly, though, there's only so much space and headroom available in any given mix, so it's not really possible to just keep turning things up. The only way, in fact, that you can make the most important elements of your mix stand out is to turn down something less important to make space.
However, there is a way you can, to an extent, have your cake and eat it too. Let's take an example of an all‑too‑common mixing difficulty to illustrate what I mean. You have electric guitars in your mix, which you want to be big, bright, and powerful, but you also want your vocals to cut through them and be audible. You've tried what you can to separate these conflicting parts with EQ, panning, and effects, but no matter what you do you can't shake the nagging urge to keep shunting one or the other fader upwards.
One of the issues here is likely to be that the guitars need to be louder when the vocalist isn't singing (to remind everyone how much of a rock god your guitarist is), but then they need to be a little quieter when the vocals are delivering those all‑important melodic and lyrical hooks. Not too tricky a concept to grasp in principle, but it'd be a pain in the arse to put into practice if you had to keep dipping the guitar faders for every vocal phrase, even if you fired up Cubase's automation facilities. Fortunately, you can set up this kind of level‑riding so that it happens automatically, a process often called 'ducking', and in this column I'm going to demonstrate a couple of different ways you can do this in Cubase.
Ducking At Mixdown: Using A Compressor
. After switching the send on and fading it up, it's worth clicking the Pre‑fader switch (bottom screen, right) to avoid problems with the ducking should you alter vocal fader levels later.")
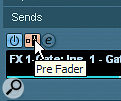
Once the Guitars track's compressor plug‑in's side‑chain is activated, you can access it from the Sends pane on the Vocals track's Inspector (top screen, right). After switching the send on and fading it up, it's worth clicking the Pre‑fader switch (bottom screen, right) to avoid problems with the ducking should you alter vocal fader levels later.Once the Guitars track's compressor plug‑in's side‑chain is activated, you can access it from the Sends pane on the Vocals track's Inspector (top screen, right). After switching the send on and fading it up, it's worth clicking the Pre‑fader switch (bottom screen, right) to avoid problems with the ducking should you alter vocal fader levels later.
To remain with our vocals/guitars example, the basic requirement is to be able to turn down the guitars in response to the vocals. The first way you can do this is to route all your guitars through some kind of processor and then send vocal signal to the processor's side‑chain inputs to trigger gain reduction whenever the vocalist is singing. Although there is a dynamics processor, called a ducker, which is specially designed for this task, no sequencer I've ever used (Cubase included) has ever provided one built‑in. As a result, most people who pull this stunt in software tend to use the next best thing: a compressor.
In order to show you how to set this up, I've put together a little demo project which you can download from /sos/may09/articles/cubasetechmedia on the SOS web site. This contains four submixes from my recent Mix Rescue remix of James Elder and Mark M Thompson's song 'English Actor', which I wrote about back in SOS February 2009: dry lead vocals, lead vocal effects, electric guitars, and the rest of the backing track. The first thing to do is select the Guitars track in the Project window and put a Cubase Compressor plug‑in in one of its insert slots. When the plug‑in window pops up, click the little Activate Side‑chain button, which is parked to the left of the preset selector in the top bar of the plug‑in window.
Now highlight the Vocals track in the Project window and open its Sends in the Inspector. Click in any free slot and you should see your freshly activated side‑chain available as one of the available destinations. Once you've created this Send allocation, switch it on in the Inspector and set its little fader to unity gain with a swift Control‑click. I'd also recommend that you set the Send to pre‑fader mode using the switch to the right of the Send on/off button. What this means is that if you decide to adjust your global vocal levels after setting up the guitar compressor (perhaps to create a 'vocal up' version of your final mix) it won't impact on the amount of guitar ducking taking place.
Suggested Settings
Ducking At Mixdown
Using a compressor as a ducker usually requires slightly different settings than you'd expect when compressing normally. First of all, you'll want your compressor to reduce the guitar gain pretty much whenever the singer opens their mouth, so you'll want to use a pretty low threshold. As long as the noise floor of the vocal parts is low enough, this could be down at the ‑60dB extreme of the control's travel if you like. While you're at it, switch off the Auto button alongside the Make‑up control, otherwise the compressor will attempt to compensate for its anticipated gain reduction, and although this can be handy in some situations it'll just mess with the overall guitar levels in the mix here.
There's only so much you want the compressor to turn down the guitars underneath vocal phrases, because if you overdo the gain reduction not only will the guitars seem too weedy during those moments, but there'll also be obvious and unmusical transitions between the compressed and uncompressed guitar levels as the vocalist begins and ends phrases. On this basis, it makes sense to go for a very low ratio, and something like 1.04:1 makes a good starting point with the ‑60dB threshold in our demo project. Of course, if you try this technique within your own mixes you'll probably need a different ratio setting, but as long as you aim for a reading of no more than 2dB on the compressor's gain‑reduction (GR) meter you shouldn't overcook things.
The only other control you need to worry about now is Release, which, at a default of 500ms, is way too long for this kind of subliminal mix balancing. Instead, pull it all the way anti‑clockwise to its minimum 10ms setting, so that it tracks the vocal levels as quickly as possible. Now you should be able to play the track and hear the effect in practice. If you're not sure what you're listening for, then whack the guitar‑track's compression ratio up to 2:1. This will pretty much mute the guitars whenever the vocals come in if you've set everything else up correctly. As long as you can hear that things are working, you can then progressively turn down the compression ratio to see how different amounts of gain reduction work within the mix. Remember that it's quick to compare the ducked and un‑ducked guitar levels by clicking the compressor's bypass button. Double‑check that you have the Make‑up control's Auto button switched off, though, or you'll get a distracting overall level change when you do this.
A More Powerful Method: The Gated Send

In these screens, you can see a more flexible and powerful way of implementing side‑chained ducking within Cubase, by setting up a Gate plug‑in in an FX Channel, to operate as a send effect.In these screens, you can see a more flexible and powerful way of implementing side‑chained ducking within Cubase, by setting up a Gate plug‑in in an FX Channel, to operate as a send effect.
If you wanted to duck multiple tracks in your arrangement from the same source, you could expand the setup we've just looked at quite easily. However, a disadvantage of this approach is that you need to set up a compressor plug‑in for each track to be ducked. Although it's unlikely that this CPU load will topple your machine (given the CPU efficiency of Cubase's built‑in plug‑ins), setting up all these compressors, sends, and side‑chains quickly becomes a bore. Furthermore, ducking using compression isn't really ideal functionally, because in our example the guitar gain‑reduction will kick in less when the vocals are quietest, and this is the opposite of what you'd want in some respects.

For these reasons, I usually use an alternative ducking approach, which also offers some even more advanced processing options. The way it works is by using a Gate plug‑in set up in an FX Channel, with the gating triggered from the vocal signal via the plug‑in's side‑chain input. You then send from your guitar tracks (and anything else you want to duck) to the FX Channel. Doesn't this do exactly the opposite of what you want, though? Yes, of course it does, but if you then invert the signal polarity of the FX Channel, this gated signal cancels out the direct signals from the guitar tracks, bringing about the desired ducking effect. Let's look at the specifics in a bit more detail by working through this rig in our demo project.
Create an FX Channel by right‑clicking on the track list and, in the FX Track Configuration dialogue box, open the Effect pull‑down menu, and choose Gate from the Dynamics sub-menu. The plug‑in window's Activate Side‑chain button can be enabled as before, but you might as well turn off the button labelled Sidechain in the plug‑in's interface — that just engages side‑chain filtering, which shouldn't be necessary here. Set up a Send to this effect's side‑chain from the vocal channel, switch the send on and set it to unity gain. Now head over to the guitar track and set up a send to the FX Channel itself, again checking that you've switched the send on and set it to unity gain.
Ducking At MixdownThe final stage is to flip the polarity of the FX Channel, which you can do from the routing pane in the Mixer window. The button you're after has a Greek letter Phi on it (like an 'o' with a diagonal line through it) and will display an 'Input Phase' tool tip if you hover your mouse pointer over it — you may need to use the little arrow at the top left of the Mixer window to show you more controls if you can't see this button straight away. The polarity of the gated signal needs to be inverted, so make sure the Input Phase button is lit for the new FX Channel.
If you now just play back the demo mix, you should already be able to hear the vocal ducking the guitar levels after a fashion. (You might want to mute the backing track in the Project window if you want to hear more clearly what's going on.) However, there's a bit we can still do to refine the way the gate is responding. First we need to set the Threshold so that it opens for all the vocal sections, and turning it down to ‑40dB pretty much does the job for the demo audio.
. You can access this button from the Mixer window, although you may have to click the Show Routing arrow at the top left of the window first if you can't spot it straight away.") Then we need to reduce the release time again to track the vocal levels more quickly, as with the compressor, and you can go down to around 40ms here, I reckon. You'll notice with these settings that the gate isn't triggering particularly cleanly (the odd little bit of guitar occasionally breaks through during the vocal line), but that doesn't matter a tremendous amount in practice, because once we've toned down the ducking effect to more reasonable levels this won't be nearly as audible as it is while the guitar track is being completely muted by the vocal.
Then we need to reduce the release time again to track the vocal levels more quickly, as with the compressor, and you can go down to around 40ms here, I reckon. You'll notice with these settings that the gate isn't triggering particularly cleanly (the odd little bit of guitar occasionally breaks through during the vocal line), but that doesn't matter a tremendous amount in practice, because once we've toned down the ducking effect to more reasonable levels this won't be nearly as audible as it is while the guitar track is being completely muted by the vocal.Having confirmed that the ducking action is working as required, you can dial in more moderate gain‑reduction settings. The way to do that in this setup is to adjust the level of the send from the Guitars track to the ducker FX Channel: the higher the level, the more ducking, which is why at unity gain we're getting complete muting of the guitars when the vocal signal is detected. Without going into the maths, in practice you'll find that a send level of around ‑20dB will give you around 1dB of ducking, while a ‑11dB send will yield around 3dB of ducking, so you'll typically be looking for a figure somewhere between these two in most cases.
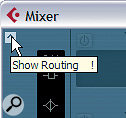
In order for the gated‑send ducking setup to operate correctly, you need to invert the signal polarity of the gated FX Channel track using its Input Phase button (top). You can access this button from the Mixer window, although you may have to click the Show Routing arrow at the top left of the window first if you can't spot it straight away.In order for the gated‑send ducking setup to operate correctly, you need to invert the signal polarity of the gated FX Channel track using its Input Phase button (top). You can access this button from the Mixer window, although you may have to click the Show Routing arrow at the top left of the window first if you can't spot it straight away.Because you're using a gate, not a compressor, the gain‑reduction will be the same for both high‑ and low‑level vocal signals — still not the perfect state of affairs, but better than you'll get when using the compressor‑based ducking method. However, this is where the power of the send configuration begins to become apparent, in letting you tweak the way the ducking occurs. If you wanted to achieve the ideal 'less ducking for louder vocal signals', you could follow the gate in our FX Channel with a compressor, again triggered via its side‑chain from the vocal channel. Set this to compress a few decibels on the loudest vocal notes and its gain‑reduction will reduce the FX Channel level, and hence the amount of ducking.
Ducking At MixdownBut it doesn't end there, by any means. Perhaps you only want to cancel out the centre of a synth pad sound when the vocals come along: use a similar setup in a mono FX Channel, and this will only duck the mono component of the synth pad. Another variant would be to use a high‑pass filter in the FX Channel so that it only ducks the high‑frequency content of any tracks conflicting with the lead vocal. This stuff can get pretty freaky pretty quickly...
So if your Gate plug‑in has been gathering the virtual equivalent of dust, then here's a great excuse to bring it out of retirement. You may not need these kinds of powerful ducking techniques on all your mixes, but once you get the hang of how they work, you'll be surprised how often they can help you out of a jam.
Other Ducking Combinations
I've used this article to concentrate on a specific example of where you might want to use ducking within your mix, but lead vocals and guitars aren't the only conflicting instruments that can benefit from this approach. Kick drums can often be encouraged to poke through your mix better if you duck various other elements to clear the way, particularly as the most audible part of a kick drum in a lot of listening systems can actually be found in the mid-range frequencies where there's a lot of competition from other instruments. If you're working in commercial dance and rock styles, you may also find it desirable to go for more clearly audible ducking in this instance, both by increasing the amount of gain reduction and by lengthening the release time so that you begin to hear a more audible 'swell' between kick hits as the ducking resets. This loudness‑simulation effect is similar to the 'pumping' effect you can get from a mix‑bus compressor, but I find it more controllable in a lot of ways.
Snare drums could also be used to trigger a ducker when you need them to cut through. I'd advise against ducking the other drum parts in a multitrack drum recording, though, as a lot of the snare sound comes from the overheads in these situations — so you'll risk throwing the baby out with the bath water that way.
Effects returns are another potential candidate for ducking, particularly where lead vocals are concerned, because heavy delays and reverbs, in particular, can have a tendency to blur the consonants and articulation that make any lyrics intelligible. Now that you can freely send from one FX Channel to another (in Cubase 4.5 onwards), ducking a delay effect shouldn't be any more difficult to achieve than ducking a recorded track, but if you have problems in a previous version of Cubase, you might need to set up the delay effect in a Group Channel Track, which will give you the ability to send on to the gated FX Channel.
And, of course, if you're after more adventurous effects, you might consider a ducking fuzz. Or should that be a fuzzing duck?
Subscribe to:
Posts (Atom)