Welcome to No Limit Sound Productions

Company Founded
2005
Overview

Our services include Sound Engineering, Audio Post-Production, System Upgrades and Equipment Consulting.
Mission
Our mission is to provide excellent quality and service to our customers. We do customized service.

Monday, June 30, 2014

Q Can 'Green Glue' help me improve my garage-studio?

Sound Advice : Recording


Hugh Robjohns


As I've been researching how to convert my garage into a studio, I keep seeing mentions of something called Green Glue, which is supposed to reduce noise leakage somehow. Not trusting the marketing blurb, I wanted to know: does this stuff actually work, and if so what is it doing?


Joseph Jackson, via email.


Green Glue does do the acoustic damping job its manufacturer's claim, and their web site offers plenty of practical advice on how to use it to best effect in your DIY studio builds.SOS Editor In Chief Paul White replies: Green Glue is a specially formulated, water-based adhesive that, unlike most types of 'squeeze on' adhesive, remains flexible once set, helping it provide both damping and improved acoustic isolation when used to bond two surfaces together. Described by its manufacturers, the Saint-Gobain Corporation, as 'viscoelastic', Green Glue is applied using a standard mastic gun and can be used, for example, between layers of plasterboard (drywall) or in the construction of floating floors, where its damping factor is some 20-times greater than for rigid adhesives.


When using this glue to enhance the isolation properties of a structure, it's best not to 'short circuit' the glue by also screwing the two pieces together, though if you have to do so for mechanical reasons, the damping properties of the glue should not be too compromised. One tube can cover around 16 square feet at full coverage and remains workable for around 30 minutes. However, you don't have to cover the full surface area with glue for it to work — most people squeeze it on in a zig-zag pattern and also go around the board close to the edges. The glue then sets over a time

Green Glue does do the acoustic damping job its manufacturer's claim, and their web site offers plenty of practical advice on how to use it to best effect in your DIY studio builds.Green Glue does do the acoustic damping job its manufacturer's claim, and their web site offers plenty of practical advice on how to use it to best effect in your DIY studio builds. that's dictated by the conditions (temperature and exposure to air), achieving a full cure in around a week. It costs a little more than standard board adhesive but the improvement in performance is very worthwhile.


SOS Technical Editor Hugh Robjohns adds: Just to elaborate on what Paul's already said, the idea when using it in studio wall construction is that as sound waves strike the wall's front surface it moves slightly in response, and so the front drywall layer moves fractionally relative to the rear drywall layer. The Green Glue between them not only allows that movement to happen, but also converts that movement energy (in the form of mechanical shearing forces), into heat. So it acts to damp the wall vibrations and thus reduce the onward transmission of sound.


However, Green Glue isn't magic and, on its own, it won't provide a complete or perfect solution. It has to be used intelligently as part of a careful overall acoustic design of the whole room, taking into account the wall and ceiling constructions, and dealing with issues like 'flanking sound' and the efficiency of the door and window seals. The amount of noise isolation that can be obtained is limited by the weakest link in the design, and it's very easy to introduce design errors that undo all the good intentions! The Green Glue web site offers some helpful — and trustworthy! — advice on using the company's products, and constructing studio walls correctly, but if in doubt I'd strongly recommend consulting an experienced studio acoustics designer to avoid wasting a lot of money and effort by doing things the wrong way!   .

Published in SOS December 2013

Q How do shotgun mics work?

Sound Advice : Miking


Hugh Robjohns


How do shotgun mics achieve such a tight polar pattern compared with other designs? And how come they seem to be getting shorter every year?


Gavin Burley, via email
Shotgun principle — showing how off-axis sound arrives at the capsule diaphragm via different path lengths, and thus different phases.


Shotgun principle — showing how off-axis sound arrives at the capsule diaphragm via different path lengths, and thus different phases.Shotgun principle — showing how off-axis sound arrives at the capsule diaphragm via different path lengths, and thus different phases.The 'industry standard' MKH416 shotgun mic. Physically longer designs such as this may seem unwieldy but their frequency response extends lower than shorter models.The 'industry standard' MKH416 shotgun mic. Physically longer designs such as this may seem unwieldy but their frequency response extends lower than shorter models.SOS Technical Editor Hugh Robjohns replies: Shotgun or rifle mics are more properly called 'Interference Tube' microphones, and they are often assumed to have magically tight polar patterns that simply don't exist in reality. Shotgun mics do have their uses, of course, but have to be used intelligently to avoid the significant compromises associated with them.

The 'industry standard' MKH416 shotgun mic. Physically longer designs such as this may seem unwieldy but their frequency response extends lower than shorter models.

All shotgun mics employ a standard directional capsule — usually a supercardioid — but with a long, hollow, slotted 'interference tube' attached to its front surface. Although this arrangement inherently moves the capsule further away from the sound source — thus making the direct/reverberant ratio slightly worse — the hope is that the tighter directionality (at high frequencies), which reduces the ambient noise, outweighs this disadvantage.


The idea of the interference tube is that the wanted on-axis sound passes straight down the length of the tube to the capsule diaphragm unimpeded, but the unwanted off-axis sound has to reach the diaphragm by entering the side slots. Since this unwanted sound will enter multiple slots, and the distances from those slots to the diaphragm vary, the off-axis sound will arrive at the diaphragm with varying phase relationships and so partially cancel one another out — this is why it is called an 'interference tube'! Consequently, off-axis sounds are attenuated relative to the on-axis sounds, and hence the polar pattern is narrower towards the front than would be possible with a simple super-cardioid mic on its own.


However, this is actually a pretty crude solution because the actual amount of cancellation depends on the wavelength of the sound, its angle of incidence, the length of the tube, and the slot spacing. Most standard-length shotgun tubes don't have much effect below about 2kHz, and are no more directional than the basic supercardioid capsule design they employ below that frequency. While very long rifle mics do exist and are directional to lower frequencies, (for example, the Sennheiser MKH816), they are unwieldy to use and the longer tube necessarily moves the capsule even further away from the sound source, negating to some extent the enhanced directional benefits.


Moreover, if you look at the real polar plot of an interference tube mic at different frequencies — rather than the idealised versions many manufacturers print — it looks like a squashed spider, with multiple narrow nulls and peaks in sensitivity at different angles for different frequencies. This is the direct consequence of the interference tube principle, and the practical consequence is that off-axis sound sources are inherently very coloured. Worse still, if an off-axis sound moves (or the mic moves relative to a fixed off-axis source), the colouration varies and becomes quite phasey-sounding.


So, shotgun mics work best when the unwanted off-axis sounds are significantly different from the wanted on-axis sounds — and nothing moves! Shotgun mics don't work well at all in small rooms or in highly reverberant spaces, because the on- and off-axis sounds are inherently very similar. Neither do they work well where there are well-defined off-axis sounds moving relative to the mic, or where the mic has to move, to track the wanted sound with static off-axis sources. In these cases, the directionality may not be as narrow as one would hope and off-axis attenuation will be significantly worse than expected, and/or the off-axis sounds will become noticeably and distractingly coloured.


The apparent shortening of shotgun mics is largely about style over function, and marketing an apparently 'pro' approach with consumer convenience. It's a con, because the length of the interference tube is determined only by the physics of the wavelengths of sound, and there's no getting around that. Short shotguns inherently only work at higher frequencies and are pointless if the sound source you plan to record comprises mid and low frequencies.


Having said that, the adoption of digital technology has allowed some improvements to be made in shotgun performance, and the Schoeps Super CMIT is a good example of what can be done. This mic uses a supercardioid capsule at the base of a standard interference tube, as normal, and a second cardioid capsule facing backwards just behind it. The two capsule outputs are combined using some clever DSP processing to increase the directivity significantly at lower frequencies — a process Schoeps call 'Beamforming' — which maintains a tighter polar pattern across a much wider bandwidth than is customary.   .

Published in SOS December 2013

Saturday, June 28, 2014

Q Are back-electret mics any good?

Sound Advice : Miking


Hugh Robjohns


Is there any practical difference between a conventional capacitor microphone and a back-electret type? I always get the impression that the back-electret is the poor cousin of the 'true' capacitor mic.


Martin Metcalfe via email
Q Are back-electret mics any good?


SOS Editor In Chief Paul White replies: The short answer is no, back-electrets are not the poor relations anymore. Certainly electret mics had a bad reputation in the 1970s and '80s, but the technology was pretty crude back then. It has advanced massively since, and today some of the very best mics are electret designs — including all of the small-diaphragm models from DPA, some large-diaphragm AKG mics and many Audio-Technica models.


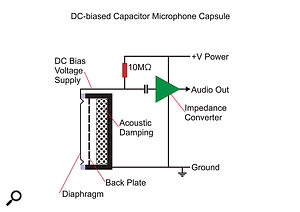
The difference between a traditional capacitor mic and a back-electret model is in the way the capsule is polarised. Any capacitor microphone needs to have an electrical charge applied to the capacitor, formed by a conductiveQ Are back-electret mics any good? diaphragm that's placed in close proximity to a fixed backplate in order to produce any signal. As the diaphragm moves relative to the backplate, whenever it's forced into vibration by sound waves, the electrical value of the capacitor changes. As the diaphragm gets closer to the backplate, the capacitance value increases, and as it moves further away it decreases. A simple formula, Q = CV (where Q is charge, C is capacitance and V is voltage between the two plates), states the relationship between the three key electrical parameters. From this it can be seen that if Q is kept essentially constant (through the use of a charging circuit with a very long time constant), then as C is modulated by air movement, so must V be modulated. This variation in the voltage between the diaphragm and backplate is amplified to produce the audio signal, but to avoid draining away the vital electrical charge from the capsule, a very high-impedance preamp is required, usually involving either a FET (Field Effect Transistor) or a valve.


In a true capacitor mic, the electrical charge is invariably derived either from phantom power or from a separate power supply, as is the case with the vast majority of valve microphones. However, the electret microphone uses a different method of keeping the capsule charged. An electret material is one that carries a permanent electrical charge sealed within an insulating film, and its manufacture involves high temperatures and very high voltages. Early electret mics used this material to form the diaphragm but, as it is both thicker and heavier than aQ Are back-electret mics any good? typical gold-coated Mylar diaphragm, high-frequency performance and sensitivity were compromised. These simple electret mics are used extensively in all manner of consumer devices, including mobile telephones.


The quality breakthrough came when the electret material was fixed to the backplate (hence the term back-electret), allowing it to be used in conjunction with a conventional gold-on-Mylar diaphragm, providing designers with the means to achieve the same performance as from a conventional capacitor mic but without the need for an external polarising voltage to maintain the charge. This allows some live back-electret mics to be powered from batteries when phantom power isn't available, as only the preamplifier needs power and this can often be run at a much lower voltage than a typical capsule's polarising voltage.


A good back-electret mic can perform every bit as well as a traditional capacitor design, and in some cases a little better, though the electrical charge sealed in the electret material can leak away very slowly over a period of several decades, resulting in a slight decrease in sensitivity. In reality, though, this leakage is generally so small as not to be a practical issue.  

Alesis ProTrack - NAMM 2009

Friday, June 27, 2014

Numark HDMIX - NAMM 2009

Q Why are Reflexion Filters used behind the mic if the mic picks up sound from the front?

Sound Advice : Miking


Hugh Robjohns


I've noticed that a lot of companies now market a variation on the curved screen theme to go behind a vocal mic, with the claim that these devices exclude the room acoustics and give you a cleaner recording. But surely, most vocal mics are cardioid pattern, which means they pick up sound only from in front — so how can a screen behind the mic help? Am I missing something or are we being sold smoke and mirrors?

Why are Reflexion Filters and similar devices placed behind a directional mic?

Fred Savage via email


SOS Editor In Chief Paul White replies: If you look at the polar pattern of a cardioid pattern mic, you'll see that, although they are indeed most sensitive at the front as you suggest, the sensitivity doesn't fall by much by the time you're 90 degrees off-axis so they can also pick up quite a lot of sound from the sides. Furthermore, their HF response falls away once you're off-axis so what comes in from the sides can end up sounding somewhat dull. Indeed the only place that approaches being completely 'deaf' is a very narrow angle directly behind the mic.


A curved screen reduces the amount of reflected sound reaching the sides and rear of the microphone so 'room reverb' can significantly be reduced. However, such screens can't intercept sound reflecting from walls behind the vocalist, which is why we always suggest combining these screen, with anWhy are Reflexion Filters and similar devices placed behind a directional mic?Why are Reflexion Filters and similar devices placed behind a directional mic? absorber of some kind hung behind the performer. This could be acoustic foam, mineral wool or a good old thick and cheap polyester duvet, and if you can arrange your screen in a curve or V shape so that it also intercepts some of the sound approaching the microphone from the sides, this combination of a commercial screen behind the mic and an improvised screen behind the performer can be extremely effective. In low ceiling rooms we sometimes go one further and suggest a foam panel above the mic and vocalist to prevent ceiling reflections from reaching the mic.


While such lightweight screens have little effect at low frequencies, they actually work very well in the vocal frequency range and the same tactic can be applied to non-bass acoustic instruments where necessary, such as acoustic guitar. Smaller curved screens are also available to fit behind instrument mics where space is tight, and these can be useful fitted to drum overheads to reduce the effect of ceiling reflections.


As you may well have discovered already, a bad-sounding room reverb can't be disguised by adding a good-quality artificial reverb, so any technique that helps dry up the sound at source is worthwhile, especially in the smaller rooms that tend to get used for home studios. So, the short answer to your question is that such screens are not just smoke and mirrors, but they do benefit from a bit of help from a duvet or two.  

Allen & Heath iLive 80 - NAMM 2009

Thursday, June 26, 2014

Q Can I plug my keyboards into my audio interface's line-level inputs?

Sound Advice : Miking


Hugh Robjohns


I've noticed that a lot of companies now market a variation on the curved screen theme to go behind a vocal mic, with the claim that these devices exclude the room acoustics and give you a cleaner recording. But surely, most vocal mics are cardioid pattern, which means they pick up sound only from in front — so how can a screen behind the mic help? Am I missing something or are we being sold smoke and mirrors?


Fred Savage via email
The output of most synths and keyboards like this Roland Gaia, for example, will work fine with most audio interface line inputs, without the need for a DI box.


SOS Editor In Chief Paul White replies: If you look at the polar pattern of a cardioid pattern mic, you'll see that, although they are indeed most sensitive at the front as you suggest, the sensitivity doesn't fall by much by the time you're 90 degrees off-axis so they can also pick up quite a lot of sound from the sides. Furthermore, their HF response falls away once you're off-axis so what comes in from the sides can end up sounding somewhat dull. Indeed the only place that approaches being completely 'deaf' is a very narrow angle directly behind the mic.


A curved screen reduces the amount of reflected sound reaching the sides and rear of the microphone so 'room reverb' can significantly be reduced. However, such screens can't intercept sound reflecting from walls behind the vocalist, which is why we always suggest combining these screen, with anWhy are Reflexion Filters and similar devices placed behind a directional mic?Why are Reflexion Filters and similar devices placed behind a directional mic? absorber of some kind hung behind the performer. This could be acoustic foam, mineral wool or a good old thick and cheap polyester duvet, and if you can arrange your screen in a curve or V shape so that it also intercepts some of the sound approaching the microphone from the sides, this combination of a commercial screen behind the mic and an improvised screen behind the performer can be extremely effective. In low ceiling rooms we sometimes go one further and suggest a foam panel above the mic and vocalist to prevent ceiling reflections from reaching the mic.


While such lightweight screens have little effect at low frequencies, they actually work very well in the vocal frequency range and the same tactic can be applied to non-bass acoustic instruments where necessary, such as acoustic guitar. Smaller curved screens are also available to fit behind instrument mics where space is tight, and these can be useful fitted to drum overheads to reduce the effect of ceiling reflections.


As you may well have discovered already, a bad-sounding room reverb can't be disguised by adding a good-quality artificial reverb, so any technique that helps dry up the sound at source is worthwhile, especially in the smaller rooms that tend to get used for home studios. So, the short answer to your question is that such screens are not just smoke and mirrors, but they do benefit from a bit of help from a duvet or two.  

SE Electronic RNR1 Microphone - NAMM 2009

Q Why won't my mixes translate better?

Sound Advice : Mixing


Hugh Robjohns


Tracks that I mix in my home studio tend to sound really bad in my car, but when I correct the mixes so they sound good in the car, they sound awful over my monitors. I've got OK monitors and some acoustic treatment at the mirror points, so what's going wrong?


Just how do you make sure your mixes translate to consumer systems such as car stereos?Jake Ramirez via email


SOS Editor In Chief Paul White replies: That's a question with many possible answers. While car stereos aren't going to be the most neutral-sounding replay systems in the world, they're not likely to be the cause of this problem and mixing specifically to sound good on them is not the best approach: you need to be able to trust what you hear in the studio. So — skipping politely over the questions of the skill level of the mix engineer! — I suspect you need to look more closely at your existing acoustic treatment and room setup.


It's great if you already have adequate acoustic treatment at the mirror points (by adequate I mean 50 to 100 mm foam or mineral wool, not carpet!); the room should behave reasonably well in the mid- and high-frequency ranges. But be aware that such treatment has little effect below 300Hz or so. Things that can compromise your mid and HF response, even when the room is treated, include having hard, reflective objects in front of the speakers, such as the sides of computer monitors, or having the speakers placed far back on a hard desktop that is able to bounce sound back to your listening position. Wobbly speaker stands also cause problems, though this will be mainly at the bass end.


Most of the serious mix-translation problems are due to large peaks or dips in the bass response of the monitors, and to help you minimise this sort of problem I'll run through a few key points.


Firstly, always have the monitors facing down the length of a domestic-sized rectangular room, not across its width, and make sure the tweeters are aimed at or just behind your head. If you work across the room, the bass will usually be very inconsistent, and will appear to change in balance as you move around the room. We've never found any practical way around this in smaller rooms (especially those with solid brick orJust how do you make sure your mixes translate to consumer systems such as car stereos?Just how do you make sure your mixes translate to consumer systems such as car stereos? concrete walls) so my advice would be that, whatever the inconvenience, aim your monitors down the length of the room at least while mixing, even if you have to move them to get through the door!


Small rooms that force you to sit close to the centre of the floor are often a problem too, as a large bass null often occurs at that point, especially in near-square rooms, or ones where either wall dimension is similar to the height of the room. In cube-shaped rooms the lower octave or so of the bass often vanishes completely when you sit in the centre of the room, so make sure you move from that spot when evaluating mixes.


For similar reasons, try not to sit with your chair very close to a wall when mixing, as the bass reinforcement there will fool you into thinking there's more bass in your mix than there really is; sitting close to corners is even worse.


If you can avoid the above situations, then placing your speakers on speaker platforms or solid stands will help firm up the bass end, and you can always check for bass problems by running a simple chromatic sine-wave test by playing a sine tone over the bottom couple of octaves from, say, 50 to 200 Hz. If you hear any significant peaks or dips, then try moving the speakers a few inches in any direction and run the test again. Small changes here can often make a useful improvement.


Another thing to check if you're using small studio monitors is that you don't have a lot of low end in your mix that you can't hear on your speakers. A spectrum analyser plug-in will show you what's going on, even if you can't hear it, while double-checking your mixes on decent headphones is always a good way to confirm that the balance is right and that the room isn't influencing the sound.


Once you get things in the right ballpark, active-speaker correction EQ systems such as IK's ARC can help tame excessive peaks. Finally, if you want to be sure what your studio sounds like, make a point of listening to commercial material in your studio, and get used to the way it sounds. Mike Senior's article on what to look for when creating a reference CD (http://sosm.ag/sep08-reference-cd) is well worth looking up in this respect.  

Wednesday, June 25, 2014

TC Electronic BMC 2 - MusikMesse 2009

Q Can I balance my mixing desk inserts using a patchbay?


Hugh Robjohns

I recently bought an old analogue mixing desk, where all the channel and bus insert points are unbalanced, which is quite common, I think. But all my outboard gear has balanced inputs and outputs! I want to bring all the inserts out on to a patchbay for obvious reasons, but am not sure how best to avoid noise or signal-loss issues. There are 40 inserts in total, so putting transformers on every channel would get expensive!


Preston Baker, via email.


SOS Technical Editor Hugh Robjohns replies: There's no simple off-the-shelf solution here, as you may have to employ different strategies for different devices, depending on the nature of their balanced I/O interfaces. You'll certainly have to break out the soldering iron, too, and make up some custom interface cables. The easy bit is that the patchbay should be a standard balanced type, and all the outboard connected to it in the conventional way.


When connecting unbalanced devices there's always a risk of creating ground loops and suffering unwanted noise and hum as a result. The best way to avoid that in the situation you describe is to wire the unbalanced insert sends to the patch bay in a 'pseudo-balanced' form, using the same basic idea as the SOS pseudo-balanced cables we offer for connecting unbalanced synths and the like to balanced inputs. Basically, the unbalanced sends are wired to the patchbay socket tip terminals, and the unbalanced send sleeves to the patch-bay ring terminals. The patch-bay sleeves are left isolated. In this way, the balanced outboard will receive the unbalanced send signal across its differential inputs — so it gets the full signal — but there will be no direct ground path to create ground loops.


Dealing with the Wiring transformers to your patchbay is one option for balancing a few channels when required, but commercial transformer-isolators such as ART's T8 will be a more convenient option for many people.insert returns is slightly more complicated, because it depends on how the outboard equipments' balanced outputs are designed. You'll need to check with the outboard manufacturers' manuals for the preferred wiring format when interfacing with unbalanced destinations — it will vary depending on the type of output circuitry involved. In most cases you will need to wire the unbalanced insert return to the patchbay tip and link the insert sleeve to the patchbay ring and sleeve.


It's possible that some outboard devices will cause problems with ground loops, and in those cases you may need to consider using isolation transformers to provide balanced/unbalanced conversion, as well as galvanic isolation. However, rather than wire isolation transformers permanently into these specific signal paths, the more flexible approach would be to wire them into spare patch-bay sockets so that you can then patch through them only when necessary. In this way the transformers also become available for other purposes — such as introducing some deliberate 'iron saturation' when mixing or mastering, perhaps!


You could use one of the commercial line-isolation transformer boxes like those from ART, for example (the T8 or multiple CleanBox 2s, perhaps) or install individual line transformers from Sowter, Lundahl or whoever directly into the patchbay itself if your DIY skills allow it (just make sure they are protected from stray external magnetic fields!). The transformers would be wired balanced in/out in the usual way, as the insert return sockets' wiring (as described above) will enforce the required format conversion.  

SSL MX4 - MusikMesse 2009

SSL X-Desk - MusikMesse 2009

Tuesday, June 24, 2014

Q Should I pad or DI a line-level signal?

Hugh Robjohns

Q Should I pad or DI a line-level signal?


I keep reading advice that it's bad for a padded line signal to be run through a mic preamp input, and that it's better to use a dedicated line input — but you're not always given the option! So, what exactly are the benefits and problems inherent in either approach? Also, is padding any different from using a DI box?


Julian Marshall, via email.


SOS Technical Editor Hugh Robjohns replies: To be honest, there is no absolutely right answer here: practicalities usually outweigh the geeky technical arguments. As a general preference, though, it is better to connect a balanced line-level source directly to a dedicated line-level balanced input, if you have that option. This will maintain the best possible signal quality and the least possible noise.


In theory, it really isn't the smartest idea to attenuate a line-level signal and then run it through a mic preamp, because both the attenuator and the preamp will introduce some noise and distortion — and all just to return the signal back to line level, where it started! Thankfully, the quality of modern electronics is such that, in practice, the amount of added noise and distortion are usually negligible. For the vast majority of applications you just won't notice the difference between the 'pad-and-preamp' and 'direct-line-buffer' approaches, Running a padded line signal through the mic preamp is a common practice in many modern preamps. Does it really compromise your sound?and it is a fact that most budget and mid-level mixing consoles and interfaces use the 'pad-and-preamp' technique to save cost and design complexity. So even if you do connect your live-level source to what appears to be a line-level input, it may well be that it is actually being padded and routed through the mic preamp anyway!


A DI box does also attenuate the line-level signal to mic level, and so you still run the risk of potentially introducing some noise and distortion. But again, such vices are usually negligible and are far outweighed by the convenience and safety benefits. DI boxes are generally intended to interface unbalanced line sources, and so passive DI boxes employ a transformer which not only performs the attenuation, but the conversion to a balanced mic-level output, too. Importantly, it also provides galvanic isolation between the input and output grounds, which can be very helpful if you have ground-loop hum problems.


So in summary, use a dedicated line-level input if you have one, but if not then padding the signal and running it through a preamp, or using a DI box, are both perfectly acceptable alternatives, which may well be more practical and convenient.  

SSL Duende V.3 & X-Verb - MusikMesse 2009

Q What sort of double glazing do I need?

Paul White


Q What sort of double glazing do I need?


I have double glazing but it's quite old, and I notice that other people's double glazing seems to cut out more sound. Would it be better to replace my existing double glazing, or to fit additional secondary glazing? Is it worth me installing triple glazing, from a sound-reduction point of view? I have emailed double-glazing companies asking for information about noise reduction, but they are not forthcoming.


Via SOS web site


SOS Editor In Chief Paul White replies:


Modern UPVC double glazing can be very effective in reducing sound leakage, though older systems may not work so well, for a number of reasons. Double-glazed units work well at reducing sound leakage because they combine an airtight seal with a window assembly that includes an air gap between the two panes of glass. This reduces the amount of sound energy transferred from the inner sheet to the outer one — but it's still not perfect, because the trapped air between the panes still transmits some sound energy. This double-layer-with-gap arrangement provides better sound and heat isolation than one thicker sheet of glass, though. The heavier the glass and the wider the air gap, the more effective the sound isolation.


Early double-glazed units invariably had a smaller air gap than the newer type, which might explain why you're window isn't isolating as effectively, and it's also quite possible that the seals on your window have deteriorated with age. This requirement for an airtight seal is often overlooked (doors with gaps underneath and so on), and in my own studio I initially had a noticeable amount of sound leakage due to sound passing through the studio toilet's cistern overflow pipe! I have since changed the plumbing to the more modern type with an internal overflow arrangement, and blocked the old pipe, but this serves to illustrate that what might seem to be an insignificant opening can actually leak more sound than you might imagine. Even an open keyhole can compromise an otherwise well-designed door.


It follows, then, that where a window is not absolutely airtight when closed, sound will simply leak around the edges of the opening section. It can also be the case that large one-piece windows can resonate, allowing sound to pass through more easily at certain frequencies, so having a window comprising two or three separate sections may be more effective than a large one-piece window.


If you can get your original window serviced to restore the seals to their former glory (and also check that there are no gaps between the window frame and the wall into which it is fitted), then adding another layer of thick glass (or heavy perspex) at some distance from the first can work extremely well, as the much larger air gap will A simple DIY glazing panel with a large air gap can be very effective in reducing noise.make the isolation considerably better and you should notice rather less low-frequency leakage. You could even seal the original window with silicone sealant, to prevent it opening and to ensure that it is airtight, if you don't need whatever you do to be easily reversible.


I did something very similar in my own studio, in which a standard double-glazed unit was already fitted flush with the outer face of the wall in the usual way. I added a sheet of 6mm glass, fixed into a frame which I fitted to the inner face of the wall, leaving an air gap between this and the existing window of almost the full thickness of the wall. I used a simple wooden frame with self-adhesive neoprene draught excluder between the glass and the wood on either side to produce the required seal. This is something that's well within the capabilities of anyone who can handle basic DIY.


The downside to this approach is that you will no longer be able to open the window — unless you arrange for the inner glass and its frame to be removable. However, commercial secondary glazing products, many of which are designed to open, tend to be much less effective because they rarely produce a perfect seal, and they also use thinner domestic glass, rather than the 6mm thickness recommended for this application.


In a commercial studio, the windows normally comprise much heavier glass than you would find in domestic double glazing, and it's also common practice to combine different thicknesses of glass so that the resonant frequencies of the two sheets don't coincide. That's especially important in control-room windows, which are usually large and may only comprise one piece of glass per side. The two pieces of glass may also be angled to control internal sound reflections. There's really no advantage in triple glazing when building a window from scratch; adding another sheet of glass in between two widely spaced pieces simply trades one large air gap for two smaller ones, which can actually reduce the isolation at low frequencies. In your case, however, the existing double-glazed unit is relatively thin compared with the wall thickness, so adding that extra-heavy glass layer on the inside of the wall will make a very significant difference. One final tip is that to prevent the windows steaming up, you can place a few bags of silica gel (dry them out on top of a hot radiator for a few hours first) in the gap to mop up any trapped moisture.


If you need still to be able to open the window, then forget the extra inner glazing and just fit a more modern double-glazed unit with the widest possible air gap. I haven't noticed much difference in isolation between the various brands, as the sealed-unit glass assemblies tend to be pretty similar (assuming the same-width air gap), and that's where most sound leakage still occurs.  

Monday, June 23, 2014

Q Can distortion plug-ins achieve the same sonic effects as tape emulations?

Various


I've listened to music recorded on tape and the way the sound changes seems to be very subtle: the 'warmth' seems to be largely due to the soft-saturation characteristics of the tape and other non-linear components in the signal chain. This being the case, won't a simpler valve emulation or mild overdrive plug-in achieve pretty much the same result, as both really just 'squash' the signal peaks? Why do tape emulation plug-ins cost so much more than overdrive plug-ins?


George Roque, via email


SOS Editor In Chief Paul White replies: You're right in pointing out that the effects of recording to tape can be pretty subtle, but they become less so when you drive the tape harder, causing deliberate saturation. However, although it's true that saturation is a big part of what makes tape sound the way it does, it's far from the only factor.


To maximise signal-to-noise ratio, an equalisation curve such as NAB or CCIR is applied when a signal is recorded to tape, and the inverse EQ applied on playback. This means that the tapeAnalogue tape machines are complex things and there's an awful lot of work involved in recreating their sonic effects authentically — there's more to it than just a bit of harmonic distortion and saturation. saturation is applied to the equalised signal, with all its attendant phase-shift implications, rather than to the flat signal. The outcome is that the spectrum of added 'saturation' harmonics will be a little different from those produced when a flat signal is fed via a simple non-linear saturation device. The equalisation means tape machines will, for example, distort at far lower levels for high-frequency sounds such as hi-hats than for lower-frequency sounds.


Other factors also come into play, such as the 'head bump' bass boost, which is a function of tape speed and head gap design, as well as subtle pitch modulation which we term wow and flutter. Even the best analogue tape transports are far less stable than a digital clock. All these elements add up to produce the analogue tape 'sound', but even that changes depending on the tape recorder model and its alignment, the tape speed and the formulation of the tape being used.


There are also other effects that may be considered more or less important such as modulation noise (a sine wave recorded to an analogue tape machine can sound alarmingly crunchy!) and the position of other non-linear devices such as transformers and valves in the signal path.


Tape machines also introduce significant phase shifts, as you'd see if you recorded a square wave and then checked the output on an oscilloscope. You might expect to see some integration or smoothing of the sharp rising and falling edges of the waveform because of the limited frequency response of the tape machine, but the reality is that the square wave often appears bent almost beyond recognition, thanks to different frequencies being shifted in phase relative to each other during the recording and playback processes.


In some cases, a simple valve emulation plug-in may well deliver the necessary warmth, but to design a plug-in that takes into account all the variables of tape machines including tape width, tape speeds, recording levels, tape hiss and tape formulation is a very complex task, which is why the best of these tape emulations (as in the most authentic recreations) don't come cheap. However, most still cost rather less than an album's worth of two-inch tape — and there are some surprisingly good freebies available too, such as Jeroen Breebaart's Ferox and Variety Of Sound's Ferric!  

JoeCo BlackBox - MusikMesse 2009

Saturday, June 21, 2014

Q What's the best way to add sub-bass?

How do I add sub-bass easily to my tracks? I have a nice core 'bass' tonal synth but it lacks the low-frequency weight I'm looking for.


Antonio Sagese, via Facebook


SOS contributor Rob Talbott replies: In any computer-based tracks where you already have the MIDI information for the other parts, there are two core ways to go about this. The simplest would be to add a dedicated sub-synth channel, with your plug-in synth of choice set to output a pure sine wave — usually with infinite sustain but zero release, so that it immediately plays at full volume and just as quickly stops upon triggering/release, unless a longer release is required dynamically — and then copy the MIDI part for your bass track onto that track. You'll probably need to transpose the notes to the correct octave or to set your sub-synth's ocillator pitch internally, to make sure that it sounds in the octave below the original bass line.


However, this simple approach can lose some of the articulation of the original synth pattern, so I often find a second method to be better in many ways. If the soft synth you used for your main bass sound has the ability to generate a simple sine wave, create another instance A simple sine wave is often all that's needed to add a smooth, warm sub-bass part. If your main bass synth doesn't allow that, there are plenty of free tools that are dedicated to the purpose. of that synth on a new channel with the same patch, and then change its settings so that it is outputting a basic sine wave, as in the previous method — but don't touch settings such as envelope attack or release, or portamento. This way, you'll have a clean sine-wave sub-bass channel, but with dynamic characteristics identical to those of your original bass patch, so the two should layer seamlessly.


Where you don't have the original MIDI parts and need to recreate them to add sub-bass, it can be difficult to hear the low notes accurately. A good tip is to play or draw in the notes a few octaves higher up, so that you can hear the notes more clearly, and then pitch them back down to the octave that gives you the nice warm sub-bass tone you're looking for. Sub-bass shouldn't really need any processing, as a straight sine wave creates nice, round bass, but sometimes driving it gently with a tube distortion plug-in can add some harmonics that fill a gap between the sub-bass and the more tonal elements of your existing bass. It's very much a case of trial and error here, but do use your ears and a decent monitoring setup to make sure it sounds good.  

Vicoustic Vari Panel - MusikMesse 2009

Friday, June 20, 2014

Q Does the centre of an image suffer with the ORTF recording technique?

I keep reading in your mic reviews about the sound being more natural when hitting a mic on-axis. Does this mean that there's a risk of coloration with the ORTF technique right in the centre of the stereo image? (And are there any other problems I should know about when using this technique?)


Stefan Mantere, via email.


SOS Technical Editor Hugh Robjohns replies: The short answers are no, no and no, in that order! The ORTF technique was developed in France in the early 1960s by the Office de Radiodiffusion Télévision Française (which later became Radio France). It employs a pair of cardioid microphones mounted at a mutual angle of 110 degrees, and with their capsules spaced by 170mm. In this way sources placed around the microphone array are captured with both level differences between the two channels (like a conventional coincident array), and timing differences (like a spaced array). Not surprisingly, then, the ORTF system combines the imaging precision of an X/Y array with the more naturalistic and spacious sound of a spaced A/B array, and many recording engineers feel this offers the best of all worlds.


The capsule spacing is very modest in comparison to most spaced mic arrays, and so the inter-channel timing differences are small and certainly not enough to generate the 'hole in the middle' that can afflict larger spaced arrays. Neither is it sufficient to cause comb-filtering problems in summed mono. Similarly,The short inter-capsule distance means comb-filtering isn't a problem with ORTF, and a source in front of the array won't be a significantly off-axis to either mic. the microphone mutual angle is slightly greater than common coincident arrays, but again not sufficient to cause significantly worse off-axis problems. However, small-diaphragm microphones are strongly recommended for this configuration, because their off-axis response tends to be far more uniform than that of large-diaphragm mics.


It should be remembered that the ORTF array is intended for large-scale sources such as orchestras and choirs, where the aim is to capture the entire ensemble with a natural balance and perspective. With a stereo recording angle of 96 degrees (only fractionally wider than a Blumlein array of crossed figure-8 mics) the ORTF rig must be placed quite a long way back from the source, and so centre focus is rarely an issue, given the relatively distant perspective anyway. Usefully, the cardioid-pattern mics provide less ambient pickup than a Blumlein array at a similar distance from the source. I like and use the ORTF format a lot, using Sennheiser MKH40 or Neumann KM184 microphones, and have never had any concerns about coloration of the centre image.   .

Published in SOS March 2014

20 Year Anniversary Special Edition Album Single


Coming Soon!

No Limit to the Skies*

20th Anniversary Album Single by Jordan

 Where Jordan got his start and where we got our company (No Limit Sound Productions) name. These are some of his original concepts. The album was not released until now. (*Album Single Special Edition 1994-2014) Look forward to spending some money soon!


Q How do I recreate the vocal sound of Haim?

Various


I'm really interested in the vocal sound on Haim's debut album, Days Are Gone, and I've been following your Mix Review column (which is great by the way!) — could you tell me about what sort of processing might be involved in this album?


Drew Jackson, via email.


SOS contributor Mike Senior replies: Thanks for the kind words! You haven't said exactly which songs from the record you're most interested in, so I'll tackle this question by focusing on the biggest hit so far: 'The Wire'. I don't actually know anything concrete about how this track was mixed, so I won't try to speculate. Instead, I'll explain how I might try to create similar effects if someone asked me to emulate this vocal sound.


The first thing that struck me when listening to this is thatHow would you emulate the vocal production of Haim's debut album? there appears to be some sort of very tight zero-feedback 'slapback' delay effect going on, giving that subtle impression of there being a reflective wall behind the singer. This kind of effect is always a popular choice when you want to give any vocal a slightly alternative 'recorded in a garage' vibe, and in this instance I'd probably go for a delay time of around 50-60 ms myself. The delay return would probably require some processing to avoid the audible flamming of short, sharp consonants, though, and while this might amount to nothing more complicated than a simple HF cut, I might favour de-essing and/or limiting instead, in order to retain as much of the timbral airiness in the effect as possible. Beyond that slapback patch, I'd be very wary of adding any other delay or reverb, because it'd quickly stop the voice sounding as up-front as it does here.


There's also a widening effect in action, perhaps something akin to the classic stereo pitch-shifted delay patch I've often described in Mix Rescue (for example in July 2012), but it could also be some kind of stereo modulation process such as chorusing/flanging. Initially I thought it might just have been fed directly from the dry vocal track, but listening to the Sides component of the stereo mix, the widening effect feels like it's lagging behind the beat slightly, so I reckon that the widener's actually taking its signal from the slapback delay return instead. This is a canny move where pop vocals are concerned, because it means that any mono incompatibility incurred by the stereo-widener patch will afflict only the level/tone of the delay, not that of the core vocal signal.


Turning to the vocal timbre itself, there's a slight enhanced 'furriness' and frequency density that implies to me that additional harmonics have been added to the raw recording to flatter it in one way or another. There are lots of ways this can be achieved, but knowing the identity of the engineer responsible for this mix (Mark 'Spike' Stent), I suspect that we may be hearing the sound of several desirable classic compressors working in parallel, and probably working fairly hard as well, to squeeze more tonal character out of them. For my money, I'd include some kind of Urei 1176 clone in the line-up if I were trying to emulate this in a DAW (there are plenty to choose from these days), but this kind of thing is very much a case of 'suck it and see'. The sibilance is very well controlled, despite what sounds like fairly hefty compression gain-riding, so you'll likely have a ton of de-essing to do unless you happen to have recorded your singer very carefully with a favourably voiced mic. And bear in mind that you don't get this grade of balance, consistency and lyric intelligibility without a good few hours' level-automation work...


From the perspective of EQ, the glib advice would be that you shouldn't need very much as long as you get hold of a classy mic which suits the singer. However, dealing with the practical realities of most project-studio vocals I hear, I'd say that you'll probably want to add a good dose of HF boost in the top octave of the spectrum (+3dB with a gentle shelf at 15kHz will usually a safe bet), and you'll also want to experiment carefully with low-frequency contouring to try to get a consistent low mid-range response despite any proximity-effect bass boost the mic may have imposed during recording — as a benchmark, notice how smooth the 100-300 Hz zone is during the vocal breaks at 0:20 and 0:38. If you want to retain a comparatively full-bodied sound like Haim have here, it's critical that the levels in this spectral zone are well managed, otherwise you'll quickly run into problems with overall muddiness. In this respect, notice how the electric guitars and keyboards in 'The Wire' use this region of the frequency range fairly conservatively, so be ready to apply EQ cuts in this region on the backing parts of your own mixes if you're trying to make room for a similar vocal sound.  

Thursday, June 19, 2014

Euphonix MC Transport

Q What's the best way to upgrade my audio computer's system drive?

Sound Advice : Maintenance


Martin Walker


I want to replace my Windows 7 PC's system drive with a solid‑state drive, but I have a lot of software on there that I'd rather not reinstall! Last time I did something like this (changing the system drive) half my software decided I had a new computer and wanted me to relicense/re‑register it! Is this likely to be the case now — and if so, is there an easy way to clone my system without having to reinstall or re‑license all my software?Jake Bunting, via email.


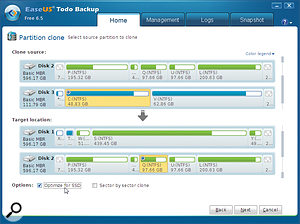
SOS contributor Martin Walker replies: I'd always advise someone changing their Windows operating system to start with a clean slate, both to minimise the chances of future problems and to achieve maximise performance. However, if you simply want to move your existing Windows installation onto another partition/drive, cloning it makes a lot more sense.Cloning an existing Windows system hard drive onto an SSD (using a utility like EaseUS TodoBackup shown here) not only speeds up boot time and application launches, but will also save you several days of reinstalling Windows and all your applications.


A 'clone' is generally regarded as a snapshot of the entire structure of an existing drive (including arcana such as its master boot record and file allocation table) saved to another internal/external drive, so that in the event of a calamity you can simply power down, unplug the damaged drive, plug in your 'spare', reboot and carry on. An 'image' of a drive/partition on the other hand copies all the same data in a compressed (and hence smaller) format to an internal or external destination of your choice. This makes it easier to save multiple backup images for security.


You could clone your existing Windows 7 system drive straight across to a new solid‑state drive, or save an image of it elsewhere, unplug the existing system drive, install your new SSD and then restore that image. I'd be inclined to do the latter, if only so you always have that image to return your Windows system drive to its previously saved state (just in case anything goes wrong in the future).


Popular third‑party disk imaging software includes the low‑cost Acronis True Image (www.acronis.com) and Macrium Reflect (www.macrium.com/reflectfree.aspx), available in a free version for home use, as well as in more sophisticated Standard, Pro and Server versions for commercial and business use. My personal choice is EaseUS Todo Backup (www.todo‑backup.com), again available in a free version for home use as a successor Symantec's much‑missed Norton Ghost utility. All run on Windows XP, Vista, 7 and 8. Whichever you choose, just select the relevant Partition or Disk Clone option, point it at your Windows system disk/partition and destination location, and let it get on with the job. The only thing to watch out for is any 'Optimize for SSD' options that ensure proper sector alignment when saving the data: some utilities do this for you automatically, while others may need a box ticking.


The only other aspect to consider when cloning an existing Windows 7/8 hard drive to an SSD is (as I reported in SOS January 2014) to make sure that support for the Windows TRIM command is enabled. It will be after a fresh install on an SSD, but not if you've cloned an existing Windows install from a non-solid‑state drive. To check, run the free DriveControllerInfo utility (download it from http://download.orbmu2k.de/files/DriveControllerInfo.zip) and look for the telltale TRIM enabled on its top display line. If it's not there, you'll need to right‑click the CMD utility from the Windows Start menu and choose its 'Run as administrator' option, then type in the somewhat arcane 'fsutil behavior set disabledeletenotify 0'. This will counter any SSD performance drop over time.


When it comes to the world of software, there are sadly no hard-and-fast rules, so whether or not a particular product will throw a wobbly after its files have been surreptitiously shunted onto another drive can often only be determined by doing it. Having said that, it's highly likely that you'll experience business as usual with most software that's protected by hardware dongles (eLicenser, iLok and so on), which, despite the slight inconvenience, is one reason I don't mind using them. Many products protected by simpler serial number protection may also survive the transition, as this information will still be stored somewhere either in the cloned Windows Registry files or tucked away in encrypted form inside a cloned folder.


Casualties are more likely to be those that use challenge/response security, where the original challenge is generated by polling some unique combination of hardware in your PC. If you have installed software that asks you to click a button to generate a challenge, then click another button to go online and retrieve the corresponding response, you are entering a twilight zone. Moving your entire Windows partition from one drive to another may leave this software entirely functional, or it may upset the challenge and demand you generate another and get a further response. However, the chances still are that you won't have to reinstall that software, and if your PC is online, re‑registering will probably only take a matter of seconds for each product that requires it.


If you're unlucky, and find any software that refuses to run after its migration, just use the standard Windows uninstall option in Control Panel, avail yourself of any Repair options it offers (this may get your application up and running without your having to reinstall from scratch) and if all else fails, just uninstall and then reinstall to the same location. Whatever happens, cloning your system drive is likely to save you several days of extra effort compared with starting from scratch.  

Novation 25SL MkII - Frankfurt MusikMesse 2009

Wednesday, June 18, 2014

Q Should I use high sample rates?

Sound Advice : Recording


Various


Is it worth using 96kHz or 192kHz sampling rates? Or do they just mean that my interfaces have exciting-looking numbers emblazoned on them, while I consume more disk space?


SOS Forum post. SOS Technical Editor Hugh Robjohns replies: There are advocates of 192kHz (and higher) sample rates, but I don't hear any benefit, and there are good engineering arguments why such rates are actually detrimental, rather than beneficial. Higher sample rates only provide a greater recorded bandwidth — there is no intrinsic quality improvement across the 20Hz‑20kHz region from faster sampling rates — and, in fact, jitter becomes a much more significant problem. So I would suggest that you forget 192kHz altogether unless you need to do specialist sound‑design work where you want to slow recorded high‑frequency sounds down dramatically.The question of whether to use a 96kHz sample rate is less clear-cut, because it can prove useful in some specific situations. Yes, it creates larger files and higher Even high-performance converter chips aren't perfect. Take the Cirrus Logic CS5381 as a fairly typical example: figure 1 describes the stop band rejection or, in other words, the attenuation above the Nyquist frequency; while figure 2, a detail of the same plot, demonstrates what happens at the turnover frequency. processing loads, but it also removes the possibility of filtering artifacts in the audio band and reduces the system latency compared with lower rates. Many plug‑in effects automatically up‑sample internally to 96kHz when performing complex non‑linear processes such as the manipulation of dynamics.The filtering issue is that the digital anti‑alias filter in most A‑D converter chips doesn't actually comply with the Nyquist requirement of removing everything at or above half the sample rate. Simplifications in the filter design typically prioritise a maximally flat response to a little over 20kHz, rather than ensuring complete Nyquist compliance. The result is a filter slope which, although very steep, is often only 3dB down at the Nyquist frequency (see the two diagrams).Anything above half the sample rate that gets through the anti‑alias filter will alias back into the audio band at a lower frequency, producing anharmonic distortion which our sense of hearing can detect quite readily, even in very small amounts. However, the A‑D chip designers work on the presumption that, in general, there isn't much energy at extreme high frequencies in most recorded music, and so the aliasing artifacts will be minimal and (hopefully) inaudible to most people most of the time. And broadly, that is the case, especially with mastered material.Where the presumption falls down is in situations involving the close‑miking of sources with strong HF harmonics and noise: things like cymbals, brass and orchestral string instruments, for example. If you're working at a 44.1kHz sample rate and using capacitor microphones with a strong HF response, it's not uncommon to perceive aliasing problems which create a harsh and gritty top end, especially if the signal is peaking close to 0dBFS. This is entirely because the anti‑alias filter isn't doing quite what it should, and allowing some material to alias. Source instrument harmonics at 23kHz will appear at 21.1kHz, for example, slightly attenuated, but definitely present and very unmusical! In those kinds of conditions, shifting up to 96kHz sample rate will move the anti‑alias filter turnover far above the wanted audio band, and completely resolve the problem. (The natural roll‑off above 20kHz in most microphone designs will ensure that they do not capture significant energy anywhere near 48kHz.)So, for these reasons, a 96kHz sample rates can be a useful engineering option. It's also very handy if you're involved in audio restoration work, since record clicks and the like areThe results of two different applications' sample-rate conversion (96kHz to 44.1kHz) compared. The x axis is time and the y axis frequency. The white line is the swept test signal, which continues up and out of sight to the right, all the way to 48kHz. A perfect sample-rate converter should display a black background, and all else is anharmonic aliasing distortion. In other words, the tartan chart displays some major problems! easier to detect and process.
But for normal applications that don't involve close‑miking trumpets with wide‑bandwidth capacitor mics, the 44.1kHz sample rate is entirely fit for purpose — as is 48kHz, for working with video. SOS Reviews Editor Matt Houghton adds: Even if you do feel the need to record at 96kHz for the reasons Hugh describes, you don't need to stick with that sample rate for mixing: it should, after all, be a lot easier to perform sample‑rate conversion offline in your DAW software. Note, though, that not all software is particularly good at sample‑rate conversion, with even some expensive and well regarded DAW software resulting in noticeable aliasing. You do, of course, need to judge results subjectively, but if you're curious how well your software performs in this respect — or whether any free software performs this function any better — then check out Infinite Wave's database at (http://src.infinitewave.ca) which compares results from a huge number of applications, and includes test files so you can perform your own tests too.

Spectrasonics Trilian - MusikMesse 2009

Q How best can I clean up old cassette tape recordings?

Sound Advice : Recording


Various


I have several cassette tapes of concerts and recitals recorded when I was at music college in the '70s, which I want to transfer to CD, cleaning up the recordings in the process. The tapes are in good condition, the only sign of ageing being the odd loose pressure pad, which can easily be fixed. The recordings were made on good‑quality stereo cassette decks, some with and some without Dolby, some standard ferric tapes and some chrome‑dioxide. The main problem is that in a lot of the recordings the mics were quite a long way from the performers, so on playback the levels need to be high, making tape hiss quite prominent.


I realise these recordings are never going to be perfect, but I'd like to clean them up to the best standard I can. My recording setup is based on a Mac running Cubase 7, but I'd be willing to invest in any other software which might be more dedicated to this job. I'd appreciate any advice or tips you can give me regarding settings, any available plug‑ins or even specialist applications. Mark Dawson, via email.


Sound Soap remains an easy-to-use and accessible tool for basic noise-reduction tasks, but there's a huge range of alternatives with more sophisticated processes on offer.


SOS Editor In Chief Paul White replies: Probably the most effective type of software for your needs is what is generally termed multi‑band noise removal or reduction. Most of these products work by learning the spectrum and level of the hiss from a supposedly silent section of the tape, for example between tracks. This information then sets the thresholds in what is essentially a multi‑band expander, so that whenever the signal falls below the threshold level in each band (which, after learning the noise sample, is set automatically just above the noise floor), that band is reduced in level. The more noise reduction you apply, the more likely it is that 'chirpy' side‑effects will be heard, so setting is always a compromise between retaining sonic purity and reducing the background hiss, with the more expensive systems generally producing better results. Suitable solutions range from the free WavePad software (Mac and Windows) to more serious tools such as those offered by companies such as Waves, Sonnox and iZotope. Companies such as CEDAR and Sonic Solutions produce the very best in noise-reduction solutions but these tend to be (very) professionally priced.


I used find that BIAS's Sound Soap software offered an affordable and easy‑to‑use approach, and while BIAS may be no more, you can still get hold of Sound Soap for Mac from Soundness (www.soundness‑llc.com), and a Windows version is planned. If you do a Web search for any of these packages, you will inevitably come across similar products, and again, some of the lower cost or free ones may be suitable for your needs: WavePad is certainly a good place to start. Using any of these systems effectively requires a little patience, but it doesn't take long to get a handle on what they are capable of and how best to apply them.  

Tuesday, June 17, 2014

Unity Audio The Rock - MusikMesse 2009

Akai MPC5000 - NAMM 2009

Q Do I need to think about matching mic and preamp impedances?

Sound Advice : Miking


Hugh Robjohns


I have some vintage Tweed mic preamps which have an input impedance of 1kΩ, and I know most mics have an output impedance of 150-200Ω. I understood that the input impedance should be 10 times greater than the source impedance, but that's clearly not the case here. Will it be a problem?


SOS Forum post


SOS Technical Editor Hugh Robjohns replies: Pretty much all analogue audio these days is designed to work in a 'voltage transfer' mode, where the source is 'low impedance' and the destination is 'high impedance' — the difference between them, as you suggest, notionally being a factor of 10. It is for that reason that the typical mic output impedance is 150Ω (in Europe) or 200Ω (in the USA), and the standard mic preamp input impedance is about 10 times higher, typically ranging between 1.5 and 2kΩ. However, this is just a handy rule of thumb, to avoid 'loading' the source, and it's certainly not cast in stone. Some would argue that anything above a 5:1 ratio is fine — and your situation certainly meets that requirement.


In fact, there can be benefits in using a higher input impedance to reduce the source loading even more; Rupert NeveNot all mics expect to be plugged into preamps with the same input impedance — and while most expect to be greeted by an impedance many times their output impedance, many older designs, including the ubiquitous Shure SM57, were intended to work with a much lower input impedance. employed a 5kΩ input impedance in many of his preamp designs, for example, and many dedicated ribbon-mic preamps present 18kΩ or more. Then again, some dynamic mics designed back in the era of 'impedance matched' interfaces quite like to see much lower impedances, typically around the 600Ω mark. The SM57 is one such antiquity!


When it comes to line-level devices, the receiving input impedance is generally designed to be far higher — typically 100 times higher — than the source impedance, specifically so that multiple devices can be connected to one source without dragging the overall level down. A 10kΩ 'bridging' impedance is standard, and 47kΩ is not unusual. With this arrangement, a signal can be split to feed three paralleled destinations with less than 0.25dB loss in signal level, and six parallel splits would only cause a 0.5dB loss. It would take more than 10 splits to reduce the level by 1dB.


I discussed the whole topic of impedance as it relates to microphones, electric guitars, loudspeakers and so on, in some depth in an article in SOS January 2003 (http://sosm.ag/jan03-impedance) and if you're still wondering about all this, that article is well worth checking out.


SOS Reviews Editor Matt Houghton adds: Magneto Audio Labs' Variohm allows you to change the input impedance 'seen' by the mic, which enables you to press different mic-and-preamp combinations into service, as well as to experiment with existing ones.Hugh has hit the nail on the head when it comes to using mics in their intended applications, but it's worth discussing the subjective impact of 'mismatching' mic-output and preamp-input impedances, because when it comes to moving-coil and ribbon dynamic microphones in particular, this can open up some useful tonal options. Several mic preamps, such as those in the Focusrite ISA range, allow the user to select different input impedances. Obviously, this enables you to select an input impedance that is 'appropriate' for the mic in question, but it also allows you to experiment more creatively. With some mics, changing the preamp's input impedance will result in quite a noticeable tonal change. With others it will be hardly noticeable. Which is 'right' will depend entirely on the material you're working with and what you're trying to achieve. Of course, most mic preamps do not offer such a facility — and that means that if you like the sonic characteristics of one preamp but that preamp doesn't allow your mic to give of its best, then you'll need some other way of altering the input impedance. The Magneto Audio Labs Variohm, reviewed back in SOS Jan 12 (http://sosm.ag/jan12-magneto-variohm) is a device which allows you to do precisely that, so could be well worth investigation.  

Cakewalk V-Studio 100 - MusikMesse 2009

Monday, June 16, 2014

Q Are hybrid solid-state drives any good for audio?

Sound Advice : Maintenance


Martin Walker


Solid-state drives (SSDs) seem expensive, and I've seen some so-called 'hybrid' drives which combine a small solid-state element with a traditional hard drive. Obviously they give you more storage, but are these any good for audio work, and better than conventional drives, or should I steer well clear?


Justin Jackson, via email


SOS contributor Martin Walker replies: The advertising makes hybrid drives seem tempting: they are sold as combining the capacity of a traditional mechanical hard drive with the speed of a solid-state drive, at a much lower price. In practice, however, the typical 8GB of flash storage in a hybrid drive can only speed up certain 'hot data' that you access frequently.


The significantly faster read/write speeds of an SSD can typically boost your operating system boot time by some 20 percent, and most other operations by a smaller amount, but it's the incredible improvement in application loading times that you'll notice most of all. These may appear 10 times more quickly than when loaded from a traditional hard drive!


As you might expect, any performance improvements you get from a hybrid drive will depend on the cleverness of the algorithm that decides how best to utilise the much smaller amount of solid-state memory. This Adaptive Memory Technology algorithm has to 'learn' how to use its 8GB buffer, and does so by monitoring which files are accessed most often when you boot up your computer and run your applications, and placing these in the SSD buffer.


The first time you run your operating system after installing it on a hybrid drive, its boot time could be half that of the traditional drive, but after a few boot,s this initial boot speed will gradually drop to somewhere near thatHybrid drives, like this Revo model from OCZ, combine a traditional mechanical hard drive with a large SSD buffer that can improve system performance, but are not really worth installing for audio or sample-streaming purposes. of a traditional hard drive. No real advantage so far. However, once the algorithm has learned which applications you use most often, they could end up loading at four times the speed of the traditional hard drive, every time you need them in future.


So where does this leave the musician? Well, a hybrid drive doesn't make much sense for a dedicated audio drive, as 8GB is peanuts in this scenario, so the solid-state buffer wouldn't improve performance. Nor would it be suitable for a drive that streams sample data, for the same reason. It would be worth considering a hybrid model if you want to fit a single hard drive in a desktop or laptop computer, providing significant application speed-up at a significantly lower price than an equivalently sized SSD.


However, in my opinion, the best approach on a desktop audio computer is to install a smaller and cheaper SSD to give you the fastest boot and application loading times (128GB or even less should be suitable), alongside a much larger traditional hard drive (or a couple of them) dedicated to audio or sample streaming. This approach also helps with your backup regime, as an image of the smaller system drive can easily be backed up onto the larger data drive to guard against future problems, while your audio/sample data is already separate from the system files, ready to be backed up onto external media to protect it for posterity.  

Q Why do Universal Audio restrict the processing bandwith of their UAD plug-ins?

Sound Advice : Mixing


Hugh Robjohns


I'm a long time reader of Sound On Sound, and a studio owner. A colleague of mine recently discovered that the suite of Universal Audio Powered Plug-ins, which we all love and use, band-limits the audio in varying degrees depending on the plug-in. As only one example, the 1176 emulation will not pass any audio above 28kHz, rendering any session that uses this plug-in on the master bus as effectively a 56kHz session, no matter the sample rate of the original project. I love the UA plug-ins, but feel there is some dishonesty at play. Engineers like myself (and I'm sure you!) are expected to deliver the highest quality product we can to our clients, and that includes high-bandwidth audio if they choose it.


Nick Lloyd, via email


SOS Technical Editor Hugh Robjohns replies: There's a small but important technical point I should make first of all: the sample rate determines the potential audio bandwidth, but the actual audio bandwidth does not alter the project sample rate. There are sometimes good technical reasons for, and benefits in, restricting the bandwidth within a high sample-rate project.


Your colleague is quite correct, though, in his assertion that some — but certainly not all — of UA's plug-ins restrict the processed audio signal bandwidth to some degree. The very short explanation is that this is a deliberate and pragmatic engineering compromise, and without it the UAD plug-ins just wouldn't sound as good as they do.


Is there any dishonesty involved? No! This is a simple disparity between intelligent and pragmatic engineering versus misguided expectations derived from marketing hype. At the end of the day it is the sound that matters, not what an FFT spectrum display looks like.


Before I explain the sensible reasons for UAD's band-limiting approach, it might be worth revisiting the real world of audio engineering, where everything is band-limited to some degree. The vast majority of microphones and loudspeakers, for example, roll off at around 25kHz (or lower), and most analogue audio equipment — preamps, dynamics processors, mixing consoles and all the rest — is also all band-limited. There are perfectly intelligent engineering reasons for deliberately curtailing the frequency response in this way and, most importantly of all, our own ears are band-limited too. For that reason, I'd hazard a very confident guess that your colleague didn't detect UAD's band-limiting just by listening!


To get the detailed explanation, I spent a very interesting 35 minutes on the phone with Bill Putnam Jr, the co-founder of UA, discussing the company's approach to plug-in design and the reasons for restricting the audio bandwidth in some cases.


Where UA need to model complex non-linearities and the characteristic artifacts of transformers, valves, transistors and other circuit components and topologies, they write the plug-in code to run internally at a fixed 192kHz sample rate, upsampling the source audio as necessary and down-sampling again after processing. However, even at 192kHz there is still a finite limit to the highest frequency at which these non-linearities can be computed accurately without creating aliases and other processing inaccuracies. The more complex the model, the greater this problem becomes.


Consequently the UAD boffins deliberately, but gently,Universal Audio model a diverse array of analogue hardware, and they tailor their modelling approach to the specific unit being emulated. This means limiting the audio bandwidth of some, such as the Neve 33609 emulation — for very sound engineering reasons — and not for others, such as the Dangerous Bax EQ, which exhibits less complex non-linearities. roll off the high-frequency audio response well above the audible range, to ensure that the modelling within the audible range is as accurate and precise as possible. This is a normal engineering trade-off, and in this cases balances achieving the most accurate modelling across the audible part of the signal bandwidth (but sacrificing the modelling of ultrasonic frequencies), against processing the entire project bandwidth but with audibly less accurate modelling. Not surprisingly, the UAD boffins choose to prioritise sound quality, and design their emulations to sound as close to the original units as they possibly can — even where that means sacrificing the ability to process ultrasonic (and thus inaudible) signal elements.


Interestingly, Bill told me that when the team are developing a plug-in (something that can easily take up to a year) they carefully evaluate how far the processed audio bandwidth can be extended while retaining the required accuracy of sound modelling. That's why different plug-ins roll off at different frequencies: every plug-in's algorithms are individually optimised, with the ear being the final arbiter. Moreover, most vintage devices are bandwidth-limited anyway, and some actually become unstable at ultrasonic frequencies. Bill cited the team's work in developing the latest Pultec EQ emulation, where they discovered an unstable filter pole around 60kHz in the hardware unit. If that had been modelled accurately it would cause serious aliasing problems for any high sample-rate project!


Logically, it might seem that processing at a higher sampling rate — 384kHz, say — would remove the bandwidth restriction, and I put that to Bill. However, he explained that although processing at a higher rate would permit a proportionally wider audio bandwidth to remain artifact-free, it would impose far less acceptable compromises at the low-frequency end of things, too. Specifically, the precision of low-frequency control parameters would suffer dramatically because the difference between, say, 20Hz and 30Hz turnover settings in a high-pass filter becomes such a small proportion of the total signal bandwidth. Retaining the required parameter precision would demand impractically lengthy filter coefficients and become very difficult to process. For these reasons UA feel that processing at 192kHz offers the best engineering compromise in maximising control parameter precision and effect modelling accuracy across the audible bandwidth.


Not surprisingly, it is the emulations involving the most complex non-linearities that are band-limited: plug-ins like the Urei 1176 and Neve 33609 compressors, and the Manley Massive Passive equaliser, for example. These emulations all roll off smoothly above 28 to 35kHz. In contrast, emulations of devices like the new Dangerous Bax EQ, where there is no requirement to model complex non-linearities, have no bandwidth restrictions at all — the processed audio signal extends right up to the Nyquist limit for the project's sample rate.


In summary, Bill and his team of engineers believe that the end results entirely justify their band-limiting tactic. Moreover, he questions the logic of anyone insisting on processing ultrasonic material that they can't possibly hear, sinc they can't know whether it forms relevant audio content or spurious noise. I must say I share that view entirely, and while there are perfectly sane reasons for digitising and processing audio at high sample rates in some situations, the audio bandwidth will always be curtailed somewhere in the signal chain, either by the microphones, the preamps, the converters, the plug-in effects processing, the speakers or the listener's ears. In reality, it will be a combination of all of them, but it is only the sound we hear at the end of the complete chain that actually matters — not what the FFT spectrum display looks like, or imprudent expectations of what a high sample-rate source should deliver.