Welcome to No Limit Sound Productions. Where there are no limits! Enjoy your visit!
Welcome to No Limit Sound Productions
| Company Founded | 2005 |
|---|
| Overview | Our services include Sound Engineering, Audio Post-Production, System Upgrades and Equipment Consulting. |
|---|---|
| Mission | Our mission is to provide excellent quality and service to our customers. We do customized service. |
Monday, February 29, 2016
Saturday, February 27, 2016
Keyboards & Other Controllers
Steinberg Cubase Tips & Techniques
Technique : Cubase NotesJohn Walden
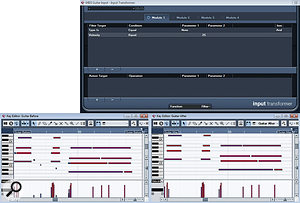
The low-velocity MIDI notes generated in this MIDI guitar performance (top) were removed using the Input Transformer. In the 'after' example (above), these changes have been made permanent simply to illustrate which notes the Input Transformer has filtered out. The low-velocity MIDI notes generated in this MIDI guitar performance (top) were removed using the Input Transformer. In the 'after' example (above), these changes have been made permanent simply to illustrate which notes the Input Transformer has filtered out.
Not everyone who uses Cubase is a competent keyboard player. Guitar, drum and wind MIDI controllers offer alternative means of getting MIDI information into a project — but all represent something of a compromise. For example, pickup‑based MIDI guitar systems, such as the Roland GK3, rely on a conversion process to translate string vibrations into MIDI pitch and velocity data. Brilliant though they can be, the conversion process sometimes gets confused by all the fret squeaks, damped notes and other incidental noises in a guitar performance. When using such controllers, therefore, you'll probably need to do a little more MIDI editing to clean up the performance than you would with a well‑played keyboard part. Thankfully, Cubase offers a collection of tools that make this 'tidy up' process less of a chore.
On The Way In
One way to reduce the requirement for post‑performance editing is to clean up the MIDI data as it is being recorded. The Input Transformer (which can be switched on via the Inspector Panel) can help here. This provides a subset of the MIDI-editing functions available in the Logical Editor. However, before looking at the Input Transformer itself, make sure you insert an instance of the MIDI Monitor plug‑in, which displays the MIDI data for a track in real‑time, and thus allows you to see 'live' what the Input Transformer settings are doing to the MIDI data input as well as events occurring on playback.
The Input Transformer window has two panels, the upper of which is used to specify what MIDI events are to be 'caught' by the Input Transformer. Events that don't meet these conditions are allowed to pass. Those that are caught can be either filtered (removed) or transformed (altered in some way). This choice is set in the Function box, which is found bottom‑centre of the Input Transformer window. If 'Transform' is selected, then the lower panel is used to specify how the events that meet the condition in the upper panel are to be changed. Up to four such configurations can be set, one in each of the Input Transformer's four modules.
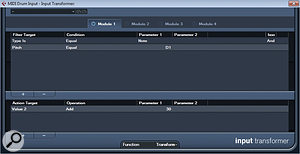
Here, the Input Transformer is being used to adjust the velocity of just the snare (note D1) from a MIDI drum controller performance. Here, the Input Transformer is being used to adjust the velocity of just the snare (note D1) from a MIDI drum controller performance. Let's look at some useful applications of the Input Transformer. First, if your MIDI controller generates a supply of unwanted extra notes, you can attempt to filter these out. For example, MIDI guitar devices often produce low‑velocity notes as a result of fingering noise and other playing artifacts. These can be automatically removed as you play, by setting one of the four Input Transformer modules to filter out all notes below a certain velocity value. To achieve the results reflected in the screenshots above, all notes with a velocity equal to or less than 25 were filtered out — you can, obviously, adjust the velocity threshold to your own needs and from performance to performance.
A second application is to filter out unwanted pitch-bend data if, for example, you're playing a virtual piano that shouldn't respond to pitch-bend. Doing so with the Input Transformer is often easier than diving into the menu system of your hardware controller to switch pitch-bend data off.
As a final Input Transformer 'quick fix' example, I find that my snare-drum trigger (purchased separately from the rest of my electronic drum kit) consistently generates rather low velocity values. To avoid having to hit the drum harder, or delve into the drum-brain's settings, the response can be adjusted by increasing the velocity of all the snare-drum notes by a fixed amount. The Input Transformer setup I used to achieve this is shown in the screenshot above.
After The Fact
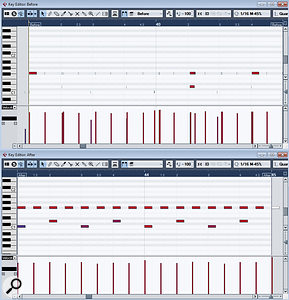
The original drum performance (before) and the processed performance (after). This example is shown for illustration; in reality, you might not wish to clean things up quite so clinically.The original drum performance (before) and the processed performance (after). This example is shown for illustration; in reality, you might not wish to clean things up quite so clinically.
There are some things that the Input Transformer cannot do, such as ignoring the very short notes which are sometimes generated by MIDI guitar systems, reducing long notes to a fixed, shorter length (my own drum controller sometimes generates such long notes), or removing 'doubles' where two notes are generated by the controller when only one note was intended. What these conditions have in common is that none of them can be recognised until after a Note Off is received.
Thankfully, the Transformer MIDI plug‑in — which looks very similar to the Input Transformer — acts after a recording has been made and can offer you more control over the result. As it operates in real time during MIDI playback, there's no risk of making unwanted permanent changes to your MIDI performance. The Transformer plug‑in includes presets for ignoring notes below a specific velocity, and for filtering out controller data such as aftertouch (this preset can easily be edited to target pitch-bend). If you don't wish to permanently eliminate such data while recording, in case some of it proves useful later on, the Transformer is a better choice than the Input Transformer for filtering.
One further useful Transformer preset is 'delete short notes'. This defaults to a setting in pulses per quarter note, but you can change the time-base to seconds, samples or frames if you prefer, and then adjust the maximum length of note that you wish to filter out. As mentioned earlier, this can often help clean up short notes that have been falsely generated by a guitar or drum MIDI controller.
Permanent Commitment
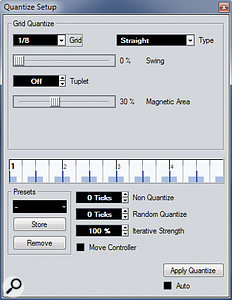
The Quantize Setup dialogue.The Quantize Setup dialogue.
Some simple clean‑up tasks require permanent changes to the MIDI data (though you can use the Undo command if things go wrong!), and these can all be achieved via the MIDI menu, using a combination of the Quantize Setup, Functions and Logical Presets options.
Let's consider an example. My MIDI drum controller has a habit of generating multiple short notes when I intended to hit a drum only once, as well as the occasional spurious long note. The first issue is more significant, as on playback it produces several sample triggers close together in time. The second simply looks a little odd in the standard Note Editor.
To get from the raw MIDI data to a suitably cleaned version there are a number of steps, but as this is going to be a destructive process it's probably best if you first make a copy of the original performance. Applying the settings shown in the Quantize Setup screenshot (below) pulls all the separate notes to the same start position. You'll need to set the grid size to suit the basic divisions of the pattern (in this instance it was eighth notes, for the hi-hat part), and the 30 percent Magnetic Area catches the most likely 'double notes'. Incidentally, once you've configured the Quantize Setup dialogue, the first step described above could also be achieved by turning on the auto-quantise option while recording.
Setting the Iterative Strength to 100 percent forces all of these notes to exactly the same start position. This is essential for the next step, where the MIDI/Functions/Delete Doubles option deletes any notes with the same pitch and start position — but it only works if the notes have exactly the same start position. Having got rid of the double notes, the varying note lengths can be dealt with. Although this is mostly cosmetic, when it comes to triggering drum samples it makes things look a lot neater, and I find that this in turn makes things much easier to edit.
Returning to the Quantize Setup dialogue, set the grid to something smaller than the smallest division in the performance. For example, for our eighth‑note pattern, a grid of 1/16 or 1/32 could be used. If you execute the MIDI/Functions/Fixed Length command, all notes will be set to the length of the chosen grid division. This process is easiest to follow in the Key Editor. It won't make any difference in the Drum Editor where note lengths are not displayed.
There is an obvious down side to doing all of this quantising, though: although you may retain the dynamics of the playing, it can easily make the performance feel rather mechanical. A quick return visit to the Quantize Setup dialogue to add a bit of swing or some random quantise (to create some subtle 'human error') can breathe a little life back into the performance, as can some groove quantising.
Friday, February 26, 2016
Thursday, February 25, 2016
Send Effects: More Than Reverb & Delay
Cubase Tips & Techniques
Technique : Cubase NotesMatt Houghton
Here, a tape-emulation effect has been set up as a send effect from the drum bus. With the high end rolled off, this can add solidity to the bottom end and mid-range of drums, leaving a more natural, airy sound from the cymbals.Here, a tape-emulation effect has been set up as a send effect from the drum bus. With the high end rolled off, this can add solidity to the bottom end and mid-range of drums, leaving a more natural, airy sound from the cymbals.

We've discussed the difference between inserts and send effects many times in these pages, but for the newbies, let's spell it out: an insert slot is typically used for processors that change the whole signal — things like compression, gating, limiting and EQ, which can alter the character of the audio on the track — whereas send effects are typically used to add effects to a signal, such as by introducing delay lines or reverberation, while leaving the sound of the original track unaffected: you decide how much of the effect you want, using either the source track's send-level controls, or the faders of the effect 'return' channels ('FX' channels, in Cubase). I say 'typically', because you can, of course, break these 'rules' — and that's the subject of this month's column.
Before I get into any techniques, I should say that I'm not sure why Cubase has both FX and Group channels. You can send to a Group just as you can an FX channel, but Groups also seem slightly more flexible in terms of routing. For that reason, I often use Group channels in place of FX channels.
Reverb & Delay
I tend not to use reverbs and delays as inserts, because (a) they're generally relatively CPU‑intensive effects — so it makes sense for multiple channels to share the same instance of a plug‑in — and (b) I often want multiple source channels to share the same virtual 'space'. I occasionally use reverb as an insert to add a bit of body to a thin sound, using an ambience-only patch, before running the whole signal through a processor — but that's about it. I do, on the other hand, often find myself using and abusing Cubase's FX and Group channels, sending individual source tracks to processors for a variety of reasons...
Parallel Dynamics
Parallel compression is a common 'send trick', and we touched on this in SOS April 2009's Cubase column (/sos/apr09/articles/cubasetech_0409.htm). The idea is that you put a compressor on a Group channel and send a signal to it. You route both the source and compressed channels to another Group, and balance the processed and unprocessed signals to taste. The aim is the sort of increased tightness or 'focus' that you'd expect from standard compression, while still letting some of the dynamics of the original through. Some plug-ins (not the native Cubase ones, though) provide a wet/dry control, which in essence achieves the same thing, but these offer you less flexibility than genuine parallel compression, as when using sends you can process the original and compressed signals differently — for example, by applying EQ. Adding a subtle 'smile EQ' before mixing the two signals back together can yield a pleasing sound, and high and low-pass filters are particularly useful. For example, I sometimes use a similar technique on a drum bus, but substituting the compressor with a tape‑emulation plug-in. I'm able to decide which frequencies go to tape: I can leave the cymbals nice and open, but get the desired solidity by low-pass filtering before the tape effect somewhere around or below the 4-5kHz region.
Gates can also be used in combination with more conventional send treatments to create interesting spot effects. For example, a lead vocal or guitar part might be sent to a gate so that only the loudest notes are allowed through, and this signal can then feed a delay line.
De-ess Success

Sending to a Group channel to create a vocal de-esser. Note the automation singling out the offending 'esses', and the orange polarity-invert button on the dedicated 'ess' track, which causes the desired ess-cancellation.Sending to a Group channel to create a vocal de-esser. Note the automation singling out the offending 'esses', and the orange polarity-invert button on the dedicated 'ess' track, which causes the desired ess-cancellation.
A reasonably good-sounding de-esser plug-in comes with Cubase, but it offers little controllability — so if you need greater precision, try this trick.
Create a Group channel and send the full source signal to it (set the send to value 0.0 and make sure it's a post-fade send).
Reverse the polarity of the Group, using the 'phase' button at the top of its mixer channel. The two signals should cancel when summed, despite the meters on both channels showing activity.
Set the original channel output to 'No Buss' to silence it (the Mute button would stop it feeding your Group), so you hear only the sent signal.
Now automate the Group's fader so that only the vocal 'esses' are playing, and the rest is muted.
Place an EQ in the first insert slot and use a high-pass filter, rolling it up the frequency spectrum until you filter out as much of the vocal, other than the esses themselves, as you can.
Finally, set the vocal-channel output to the stereo bus again, and the Group channel should now only cancel the vocal track when the esses occur.
Of course, this is cancelling the whole of the vocal ess, so you need to fine-tune the automation to reduce the amount of cancellation. While the fader's at unity gain, there's full cancellation, and rolling it back reduces the amount of cancellation.
You'll often read about a technique known as 'multing' in the pages of SOS, particularly in Mix Rescue. This is where you duplicate a track so you can apply different treatments to the two parts in different sections of the song, without having to resort to detailed automation. You can achieve much the same thing as discussed above in this way, editing the waveform to leave only the esses, rather than using automation. However, that leaves you having to revisit your esses every time you make further edits or processing tweaks to the source channel — whereas using a send dynamically links the two parts.
Cutting Through The Mix
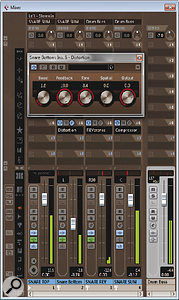
Automating the send level of a snare to a distortion processor can help the snare to cut through at critical points in the mix.Automating the send level of a snare to a distortion processor can help the snare to cut through at critical points in the mix.
I often use distortion or a harmonic enhancer as a send effect. Most enhancers, such as the Aphex Aural Exciter, for example, work at least in part by adding harmonics that are related to the source signal, and blending them back in with the source, making it appear brighter or fuller. By placing the enhancer on an FX channel, you can route the full signal to it, and then filter out the unwanted frequencies — just as I described with the tape effect.
Overdrives, distortion processors and guitar amp and cab emulations also introduce harmonics, but they can be seriously unsubtle and produce some nasty side‑effects if applied to whole sources, such as vocals or snare drums. Even on sources more usually associated with distortion, like electric bass and guitar, they'll fundamentally change the sound character, and that's not always what you want. Using these as sends, though, you can be more subtle.
In a recent mix, for example, the snare drum was just as I wanted it for most of the track. The later choruses and outro, though, were very busy, with more elements piled into the mix, and the snare was struggling to be heard. I set up a Group channel, routed the snare to it, and dialled in some distortion using Cubase's bundled 'Distortion' plug-in, before rolling off the bottom end of the distorted signal. That left me with a snare 'presence' fader that I could ride up and down during those sections to get the snare to cut through. Of course, I also used automation to mute the distortion channel in other parts of the song. The same technique — without the automation — can also be used to fake an under-snare mic (maybe you had insufficient inputs on the session, for example), to give you a lot more control over the snare tone.
Transient Design
You might also use this 'send-multing' approach to layer and sculpt sounds. Let's continue with the snare example again, but this time you want more body and less 'snap', and EQ alone isn't cutting the mustard. One possibility would be to send the snare to a Group channel and then insert Cubase's Enveloper (or, better still, a third-party transient‑design plug‑in) to roll off the attack portion of the snare. You can then add a distortion effect, a compressor or limiter and maybe some EQ to sculpt this sustain section of the snare. Finally, bring up the Group's fader to mix the original and the duplicate. You could even set the output of the original to 'No Buss' but send it to two different Groups, one to control the attack and the other the sustain. You can achieve much more precise control over the results of Cubase's Enveloper in this way.
Conclusion
If you're new to either Cubase or the mixing game more generally, I'd strongly recommend that you start out by learning to use inserts and send effects in a 'conventional' way, as described at the beginning of this article. It remains a good rule of thumb to follow. But as you become more adept at using your processors, you'll find there are definite benefits to experimentation with those send effects, whether for tonal shaping or for problem solving.
Wednesday, February 24, 2016
Vocal Comping
Cubase Tips & Techniques
Technique : Cubase NotesJohn Walden
Keep History provides the best Audio Recording Mode option when capturing multiple takes.Keep History provides the best Audio Recording Mode option when capturing multiple takes.
 Compiling — or 'comping' — the perfect vocal performance from multiple takes is one of the most common editing tasks that DAW users undertake. We've already considered this process (back in SOS July 2007), but as the upgrade to Cubase v6 brought some welcome improvements in this area, it's time to revisit the subject.
What's New?
Cubase has allowed multiple takes to be recorded onto a single audio track for quite some time, and in previous versions these takes would be displayed as a series of 'lanes' inside the main audio track. Prior to v6, to get the best results you had to record in cycle mode, typically recording one section (for example, a verse or chorus) at a time. This worked well enough, but if you decided to return to a song section and try a few more takes, things could get untidy very quickly.
In v6, the lanes-based approach is much more flexible. Any recording made on an audio track that overlaps with a previous recording on the same track simply becomes another lane, whether the recording is made with cycle mode on or off, and regardless of when the recordings were made. You can, therefore, adopt a more flexible approach to recording multiple takes. The most recently recorded take assumes playback priority, although to get the most from the new comping features with vocal tracks, it's best to record all the takes for a specific song section on a single audio track.
It's also worth noting that Steinberg have revamped the recording mode options for handling tracking of multiple takes. For audio, three options are now available in the transport panel. If hard-drive space is not an issue, the default 'Keep History' setting is safest, as it retains all audio takes, whereas the two other modes will, to different degrees, remove earlier takes on a track when you record over the top of them.
Down The Lane
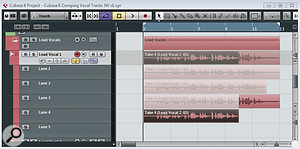
In this example, four vocal takes have been recorded, each displayed in its own lane under the master audio track.In this example, four vocal takes have been recorded, each displayed in its own lane under the master audio track.
Having captured your takes, the Show Lanes option needs to be engaged (the button goes blue in the Track List) to display them. Each take is then shown indented below the audio track, rather like the display of audio tracks that are nested inside a Folder track.
By default, the bottom-most (most recent) take has priority for playback. In the example shown below, this is in Lane 4, although note that because the take in Lane 4 is shorter than that in Lane 3, Lane 3 assumes priority for a few bars of this song section. It's also worth noting that the waveform display in the audio track itself shows the 'comped' vocal — that is, it shows the waveform from each take that has priority — in this case, a combination of take 3 (bars 3-9) and take 4 (bars 10-13).
Engaging solo on one of the individual lanes allows that lane to be heard on playback. As will become clear, this is useful if you want to audition a particular take without disturbing your existing comping. If you want to hear an individual take in isolation (that is, properly soloed without the backing track), you need to engage the audio track's solo button as well.
Cut! It's A Take
My own experience of using the new comping tools has resulted in a two-stage workflow. The first step is to split the takes into individual phrases, something the new tool set makes very easy. With the standard Object Selection tool (the arrow) selected, simply hold down the Alt (Windows) or Option (Mac) keys and then click at the position where you want to cut the take in two. This cuts all of the overlapping takes at this point, not just the currently active one. It is very neat for comping vocals, where the phrasing for a particular line is likely to be similar in each take. In the example opposite (top), note that the Snap setting is active; if you want finer control over the position of the cuts, turn this off.
If you wish to subsequently adjust a cut position for all takes simultaneously, simply hold the mouse over the cut in the upper half of one of the takes. The cursor changes into two vertical lines with arrows pointing in opposite directions and you can drag the cut point to a new position. Alternatively, if you want to change a cut in a single lane only, hold the mouse over the lower portion of a take and the usual adjust length tool icon will appear.
Having split the audio into distinct phrases, the comping process itself is easy. With the Object Selection tool selected, click on whichever take you wish to be given priority on playback; this automatically gives this take priority and mutes any overlapping sections of takes on other lanes. With playback cycling through the song section, auditioning the best combination of takes becomes an absolute breeze.
Range Finder
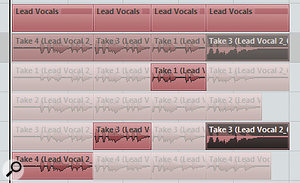
Having split the takes into suitable phrase-based sections, the various takes are then easy to select and audition using the Object Selection tool.Having split the takes into suitable phrase-based sections, the various takes are then easy to select and audition using the Object Selection tool.
The approach described above generally gets the bulk of the work done very quickly, but if you need greater control over your selection (for example, to pick specific words from different takes), a second stage of comping is required. This is best based around the Range Selection tool, and can be used whether you have already split your track into phrase sections or not.
Having selected the Range Selection tool from the main project window toolbar (the square icon positioned next to the Object Selection arrow tool), the mouse can be clicked and dragged across the section of a take that you require.
As shown in the screen shot (right), this selection will be highlighted in pale blue. Double-clicking on this selection will set it as the active take, automatically creating cuts/mutes in all of the other lanes, as required. This is a great, hassle-free way of making precise selections, and is a big improvement on the functionality of previous versions of Cubase.
Curve & Bounce
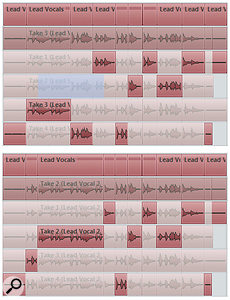
The Range Selection tool has been used to select a section of the take in Lane 2 and this is highlighted in blue (above). Double-clicking on the selection sets that portion of the take as active, creating cuts at the same positions on all lanes (beneath).The Range Selection tool has been used to select a section of the take in Lane 2 and this is highlighted in blue (above). Double-clicking on the selection sets that portion of the take as active, creating cuts at the same positions on all lanes (beneath).
Once you've compiled a 'master' take, a couple of finishing touches can really neaten things up, but before doing these, remember to save a version of your project under a different name, so that you can return later to fine-tune your selections, if you need to.
The first tidy-up task is to check for any audio glitches at transitions between the different takes. Cubase can automatically apply fades to audio clips and crossfades between clips (using the Project/Auto Fade Settings dialogue), and the default settings may be all that are required. If you still have some lumpy-sounding edits, you can also set auto fades at the track level by right‑clicking on the track in the Track List and selecting the Auto Fade Settings option. This dialogue has the option to turn off the global project auto-fade settings and create custom settings for that track. Manual editing of specific fades might also be used, but always solo the track to ensure you've dealt with any pops and clicks as cleanly as possible.
The final step is simply to bounce your selected takes from their various lanes into a single audio track. This isn't essential, as you can simply switch off the Show Lanes option to hide the lanes — but I find that this sort of tidiness helps to manage a project. Select all the events in the various lanes (both used and unused within the comp) and execute the Audio / Advanced / Delete Overlaps menu option. This removes any unused events and places all your selected sections on the top lane (a final solo audition is worth doing at this stage). Once you're happy that everything sounds hunky dory, simply turn off the Show Lanes option, select all the events you wish to combine and execute the Audio / Bounce Selection command. Click 'Replace' when Cubase asks you if you wish to replace the events and, hey presto, your ultimate vocal take exists as a single audio event.
Advanced Tips
A couple of additional features are worth a quick mention. First, if you find yourself needing to adjust the timing of part of the performance in one of the lanes, holding down the Ctrl and Alt (Windows) or Command and Option (Mac) keys allows you to 'slip edit' the audio within an individual event — which is very useful when the performance is good but the timing of certain words needs tightening.
Second, the full version of Cubase 6 also allows you to perform multitrack comping processes using the Group Editing options in the project window. This is potentially very useful for editing multiple takes from multitrack recordings of backing vocals or drums — but that's a topic to save for another day!
Monday, February 22, 2016
Liven Up Your Drum Loops, Part 3
Cubase Tips & Techniques
Technique : Cubase NotesLoopMash 2 includes a number of new tools for creative loop mangling.LoopMash 2 includes a number of new tools for creative loop mangling.
LoopMash caused quite a stir when released with Cubase 5, but it was significantly improved with LoopMash 2 in Cubase 6. While LoopMash's primary function is — well, the mashing of loops, obviously — it's also useful for other loop-based tasks, and that makes it ideal for refreshing your tired old loops. So let's get mashed...
LoopMash Basics

We took a brief look at LoopMash back in SOS October 2009, and the basic principles of operation remain the same, so I won't re-tread that ground in detail here. Instead, following a basic refresher of Loopmash's main function, we'll focus on some of the more creative possibilities the updated version presents.
Essentially, LoopMash is designed to 'mash' loops together by combining beats from one or more loops into an overall rhythmic pattern defined by a master loop. You slice sounds from up to seven other loops, and layer these over the master loop. Loopmash finds elements in these loops that are in some way sonically similar to slices in the master loop, and these similar slices are then triggered as the master loop plays back. How much emphasis LoopMash places on any of the other seven loops (that is, their relative 'similarity' to sounds in the master loop), how many slices can be triggered simultaneously, and the relative volumes of slices from each loop, are all controllable by the user.
Mashed

Using LoopMash 2's Always Solo and Exclude slice-selection modifiers for drum replacement.Using LoopMash 2's Always Solo and Exclude slice-selection modifiers for drum replacement.
If you've catalogued all your audio loops using MediaBay, as suggested in the first part of this series (in SOS September 2011), you should be able to drag and drop from there, or from the Project window, onto an empty track in LoopMash. LoopMash will usually do a decent job of recognising the loop length and tempo before slicing the loop, although I still experience the occasional glitch in this process, and find that temporarily changing the project tempo to match that of the loop before doing the drag and drop can provide a workaround in the event of problems.
The master track is identified by the lit button immediately to the left of the waveform display. Overall control of which of the additional loops might supply slices to complement the master track is set via the Similarity gain-sliders on the left of the display. A number of other performance controls remain the same as in the original LoopMash — and the Cubase 6 Plug-in Reference PDF does a much improved job of explaining how these various controls interact to create a particular 'mash'.
Sliced & Diced
The slice-selection modifiers provide some excellent ear-candy effects.The slice-selection modifiers provide some excellent ear-candy effects.
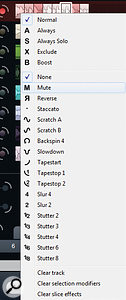
Even the shortest exploration of the supplied presets demonstrates that LoopMash is capable of performing fabulous loop mangling. However, as discussed earlier in this series, sometimes you need to be able to take sounds from a key loop or two to build your own variations, or add extra beats over an existing loop. Usefully, once loops are sliced inside LoopMash, individual slices can be auditioned (simply click on the slice) and then simply dragged and dropped on to Groove Agent One pad, so that additional hits can be triggered via MIDI notes. This process works very well and the only down side is that the rather wonderful slice-selection modifiers (described below) are not carried across. Maybe this is something that could be added in a future update (please!).

In essence, I suppose that this is not that far removed from the sort of drum replacement that can be achieved by combining beat slicing in the Audio Editor and dragging-and-dropping slices into GAO, as discussed earlier in this series. By default, LoopMash does this drum replacement in a 'with bells on' fashion, but with a few setting tweaks a more straightforward sound replacement job is possible.
Loopmash 2's Audio Parameters tab offers some new and useful tools...Loopmash 2's Audio Parameters tab offers some new and useful tools...
Once you've identified your master loop and a loop (or loops) containing the sounds you want to use, you'll need to get busy with some of the slice-selection modifiers. Right-clicking on a slice opens a menu containing a large number of these modifiers, but for this task the most useful options are Always, Always Solo (both of which are only available on the master track), Exclude and Boost. Selecting one of these applies the modifier to the current slice, and a small icon is placed on the slice to indicate which modifier is being used.
For simple drum-replacement, the trick is to first use Exclude on both the master and other track(s), so that LoopMash ignores any slices with sounds you don't want to use, and then use Always or Always Solo on your master track slices for any sounds you want to retain. This allows LoopMash to focus in on just the sounds you want to use. If you then decide you want to hear more of a particular sound, you can also apply the Boost modifier to that slice.
Finally, you simply adjust the standard LoopMash controls for wet/dry mix, track similarity, track volume, and so on. Hopefully, the result will be a loop that is rhythmically the same as your master track but which features a replacement sound set. Given the way LoopMash does its similarity processing, the results are not as predictable as with a more conventional approach to drum replacement — but, in creative terms, I find that this is actually half the fun, as there's potential for happy accidents!
Get Creative
...and its Performance Controls tab reveals plenty of fun options for live tweaking of your loops!...and its Performance Controls tab reveals plenty of fun options for live tweaking of your loops!
Simply mixing and matching loops with the similarity sliders, and varying the global controls under the Slice Selection and Audio Performance tabs, provides a wealth of 'mashing' possibilities. There are some options here that are new in Cubase 6, but for some genuine 'ear candy', the other slice modifiers and the Performance Controls are the best of the new LoopMash features.
As with the Always and Exclude slice-modifiers mentioned above, the remaining slice-selection modifiers operate at the level of an individual slice. These include mute, reverse, staccato, scratch, backspin and various types of stutter, slur and tape effects. While only one such modifier can be applied to a slice at any one time, they're stored as part of one of LoopMash's 24 scenes for easy recall. You might, example, create several identical scenes based on the same loops and then apply different slice modifiers to each scene, switching between the scenes during playback (either by clicking on the scene pads or via the MIDI key range C0 to B1), to create variations on your loop.
A similar range of effects is available via the excellent Performance Controls, but these are applied across the whole of LoopMash's output, rather than to individual slices. As their name suggests, these are intended to be 'played' (via the on-screen buttons or MIDI key range C3 to G#4). Any fan of electronic processing of drum patterns will have a lot of fun with this.
More Than Beats
I've deliberately focused on using drum loops through this short series, but it's well worth me saying that all of these tools can easily be used to breathe new life into loops of other sounds as well. Bass loops make a particularly good target: you can achieve great results from something as simple as grabbing an individual note from a loop as a slice, and then re-pitching it in a sampler plug-in so that you can play in a variation on the original bass line. Indeed, given that Groove Agent One allows you to adjust the pitch of samples held on a pad, this is perfectly possible using just the tools that we've discussed in this mini-series. LoopMash also has plenty to offer in this instance: just load a couple of different bass loops and see what happens as you adjust the similarity sliders. You might be pleasantly surprised!
Beat This!
It's not my intention to stop you buying commercial loop libraries, but I hope you won't feel the need to buy them out of boredom with your existing loop collection — because this short series should have shown you that Cubase includes an excellent set of tools for making more from whatever loops you have at your disposal.
Coming To The Third Party
The Sample Editor/Groove Agent One (GAO) combination for generating sliced drum loops and MIDI files described earlier in this series has only been available since GAO was introduced in Cubase 5. If you're using an earlier version of Cubase, and don't have access to something like Kontakt, Stylus RMX or Phatmatik Pro (all of which provide their own takes on this process), there are some freebie options. UVI Workstation (www.uvisoundsource.com), for example, is available for both Mac and PC. It offers the ability to slice WAV and REX audio loops and then drag and drop a MIDI file back into your host to trigger the slices. Unfortunately, there's no way to drag and drop individual audio slices from the loops to use in a drum sampler, but this could easily be worked around by recording individual drum hits to an audio track and working with these.
Saturday, February 20, 2016
Friday, February 19, 2016
Liven Up Your Drum Loops, Part 2
Cubase Tips & Techniques
Technique : Cubase NotesJohn Walden
If you want to breathe new life into your drum loop library, Cubase has the tools. You just need the know‑how! This is the second part of a three-part series. Read Part 1 and Part 3.
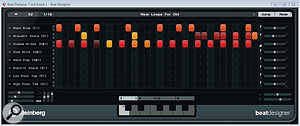
Last month, in the first part of this short series on getting more mileage out of your audio drum loops, we looked at cataloguing a loop collection in Cubase's Mediabay, slicing it using the Sample Editor and then exploiting these sliced sounds via Groove Agent One (GAO). This time, we'll run through ways to use Beat Designer to exploit sliced loops in GAO.
Beat It
The Beat Designer window has been resized to show all 32 steps used in the current pattern. The Beat Designer window has been resized to show all 32 steps used in the current pattern.
As its name suggests, Beat Designer is a tool for creating drum patterns. It can be inserted as a MIDI plug‑in on a track that's sending MIDI to GAO. Much as I like the Cubase Drum Editor, pattern‑based drum programming can often be quicker, more intuitive and allow easier experimentation. The patterns themselves are created in the central grid, where beats can be added to trigger specific drum sounds at particular positions in the pattern. Beat Designer can hold 48 patterns, organised into 12 banks of four, and selected via the mini‑keyboard‑style buttons at the bottom of the window or triggered via MIDI. Pattern Banks can be saved and then re‑used in other projects.
Names On The Map
By default, Beat Designer shows eight drum lanes, with sounds that default to GM mapping (for example, kick drum on C1, snare on D1, closed hi‑hat on F#1, and so on). When your GAO drum sounds are based on slices from a drum loop, this GM mapping is unlikely to match your GAO pads. GAO allows you to change the MIDI note associated with a particular pad but, unfortunately, this is not the best strategy, because it means that the MIDI loop created by GAO no longer triggers the original loop correctly.
There are a couple of simple ways to improve matters. First, you could create a Drum Map (see the screen shot, opposite). You'll find more detail on this back in SOS February 2009, but essentially this maps input notes ('I-notes') to output notes ('O-notes') that drive your drum module. With only three or four GAO slices/pads to configure, the process takes only a couple of minutes.
Equally as quick, another approach involves putting a second copy of your best hit for each drum sound onto the appropriate pad to fit the GM convention. However, to retain the maximum flexibility, it's also worth going back a step: make sure that when you first drag and drop your sliced loop from the Audio Part Editor to GAO, you drop it in one of the higher pad groups, well away from the key MIDI notes used for the GM drum mapping between C1 and B2. If you then re‑open your sliced loop in the Audio Part Editor you can perform a second drag‑and‑drop operation for just the best slices onto the appropriate pads to match the GM convention (the most common ones are in group two of the GAO pads). You then have access to the MIDI trigger loop (based on notes in the higher octaves) and the key individual slices. Of course, it would be easier if you could just copy a pad to another pad in GAO but, for some reason, you can't do that (only swap or move samples from one pad to another). There's something small for a Steinberg GAO programmer to work on!
In The Bank
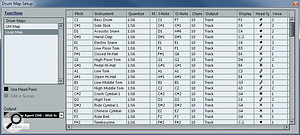
In this Drum Map, only three O‑Notes needed adjustment to use the best kick, snare and hi‑hat slices to map correctly between Beat Designer and the sliced loop in GAO. In this Drum Map, only three O‑Notes needed adjustment to use the best kick, snare and hi‑hat slices to map correctly between Beat Designer and the sliced loop in GAO.
Basic pattern creation in Beat Designer is a doddle, but two settings are worth checking before starting; the number of steps, and the step resolution. Both of these are located at the top left and, together, they dictate how long (in beats and bars) your patterns will be. For example, if you set the number of steps to 32 and the step resolution to 1/16, you end up with patterns that are two bars in length, with 16 steps in each bar. Usefully, the Beat Designer window can be resized, and if your screen real‑estate allows, it's well worth making it wide enough to show all the steps in a pattern, to avoid the tedium and confusion of scrolling while you're programming.
The best way to quickly create some patterns is to generate a basic starting pattern, copy it a few times, and then create variations using each of those copies. The drop‑down Pattern Functions menu (the downwards-pointing arrow-head located at top left) includes Copy Pattern and Paste Pattern options, so this is easy to do. Patterns can be triggered via the buttons located centre‑bottom of the window or from MIDI notes. To ensure that the MIDI note data intended as pattern‑change information is correctly interpreted, make sure the Jump button (top right) is lit. By default, Beat Designer waits until the next bar when changing patterns, but if you also engage the Now button, changes become instantaneous.
Creative Tools
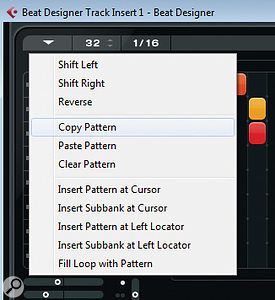
The Pattern Function menu allows patterns to be copied and pasted within the Beat Designer pattern bank or pasted into the Project window as MIDI parts.The Pattern Function menu allows patterns to be copied and pasted within the Beat Designer pattern bank or pasted into the Project window as MIDI parts.
Beat Designer includes a few tools that make it easy to do some creative experimentation with your patterns. For example, while you have some control over the velocity of a step depending on the vertical position that you click in the lane when you create it (higher velocities at the top), if you click and hold on a step and then drag vertically, you can set an exact velocity (the velocity is displayed as you move the mouse). In addition, if you hold the Shift key while dragging vertically, this will adjust the relative velocity of all the active steps in that lane — which is useful if you need to adjust the overall balance of a single drum without losing any dynamics you might already have programmed. Finally, on the velocity front, if you hold down Alt (PC) or Option (Mac), click on a step and drag up or down to change its velocity, but then also drag left or right while moving up or down, you can create velocity ramps. This is great for programming things like snare rolls that build in level towards the end of a bar.
Experimenting with the timing of the beats for particular drum sounds can also provide some useful variations. If you want to move the positions of beats in a particular lane, this can be done in whole‑step divisions by holding the Shift key down and dragging left or right. If you want a slightly more subtle positional shift, the horizontal Offset sliders (located to the right of the lanes), can be adjusted to either push or drag the beats in a lane relative to the absolute grid. These sorts of shifts can really change the feel of a pattern and are worth experimenting with.
For a somewhat more unpredictable result (well, musically unpredictable at least), holding the Alt/Option key and dragging over a lane will 'invert' it — existing steps are removed, empty steps have a beat created. It is, of course, also possible to copy an entire lane: hold down Alt/Option and then click and drag in the name column on the left of the window. This is useful for doubling things like kick drums, so you can trigger two different kick-drum slices to add some bottom‑end beef.
In this example, a velocity ramp is being added to a snare roll (the middle of the three populated lanes). Note that three of the snare beats also have flams added (indicated by the small dots), while both the snare and hi‑hat (lowest populated lane) have had both some timing offset adjustment and type 2 swing added.In this example, a velocity ramp is being added to a snare roll (the middle of the three populated lanes). Note that three of the snare beats also have flams added (indicated by the small dots), while both the snare and hi‑hat (lowest populated lane) have had both some timing offset adjustment and type 2 swing added.
Clicking right at the base of an existing step button allows a flam to be added (a tiny dot appears at the bottom of the step button. If you continue to click, this cycles through single, double and triple flams, before returning to no flams again. The small set of controls located at the bottom left of the window allow the positions of the flam relative to the beat grid, and the relative velocity of the three flams, to be set. These settings operate at the pattern level, so you can create different flam effects for each pattern.
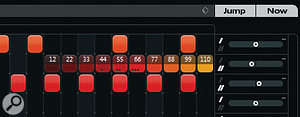
Finally, if you want to add a little swing to particular lanes, you can chose between two settings using the very small slash‑like switches located next to the Offset sliders to the right of each lane. By default, all lanes use setting 1 and, also by default, this is set to zero swing. The amount of type 1 and type 2 swing can be set using the two horizontal sliders located at bottom right. Again, these operate in a pattern‑based fashion, so there's plenty of flexibility here.
MIDI Matters
When creating drum parts from scratch, I prefer the pattern‑based approach of Beat Designer to using a MIDI editor, but your own mileage may vary. If you do create some Beat Designer patterns and have a hankering to edit them further with the MIDI or Drum Editor, patterns can be exported to your project by dragging and dropping from the pattern buttons to a MIDI track or via the drop‑down Pattern Functions menu we used earlier for copying patterns. Either way, if you want the actual MIDI data, make sure you turn off the Jump button before exporting. If you don't, the MIDI part created will simply contain a single MIDI note for triggering the pattern in Beat Designer.
And Finally…
In the final part of this series, we'll turn our attention to the new and improved Loopmash and see what tricks that has up its sleeve for… well… mashing loops.
Read Part 1 and Part 3.
Thursday, February 18, 2016
Wednesday, February 17, 2016
Tuesday, February 16, 2016
Liven Up Your Drum Loops, Part 1
Cubase Tips & Techniques
Technique : Cubase NotesJohn Walden
If you want to breathe new life into your drum loop library, Cubase has the tools. You just need the know‑how! This is the first part of a three-part series. Read Part 2 and Part 3.
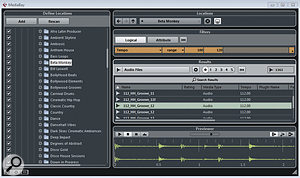
LThe MediaBay provides the best way to catalogue your audio loops for use in Cubase projects.The MediaBay provides the best way to catalogue your audio loops for use in Cubase projects.ots of musicians use commercial loop libraries, and in particular drum loops, as a key part of their creative process. Usefully, Cubase 6 provides a variety of ways to help you get a little extra mileage from your existing audio loop collection. There are some obvious items in this toolbox — Groove Agent ONE, Beat Designer and LoopMash, to name just a few. Each has something to offer in its own right, but making them work together opens things up even further.
There's too much ground to cover in a single article, so I'll start this month by looking at how to prepare your loops to make them easier to access in Cubase, and at what Groove Agent ONE can bring to the party. I'll look at some related tricks and techniques in later issues. The emphasis here will remain firmly on drum loops, but do bear in mind that many of the principles can be applied to other material.
Media Mogul
Before you can do any manipulation of your loops, you have to get them into Cubase, and for loops (drum or otherwise) probably the most efficient route is through the MediaBay. We covered this process back in the August 2008 issue of SOS and it's changed only a little since then, so before I hear cries of 'Grandma' and 'suck eggs', I'll suggest that interested readers can take a look at that piece as a quick refresher. Essentially, you just need to let the MediaBay scan your hard‑drive folders containing audio loops, so that it can catalogue them and log their original length and tempo information. If you have a lot of loops, this would be a good time to cook dinner...
As shown in the screenshot above, once they have been catalogued, loops can be browsed or searched using a combination of filters (for example, a tempo range). They can then be auditioned in the MediaBay, and if you like what you hear, you just drag and drop them straight into the Project window.
Slice, Slice, Baby
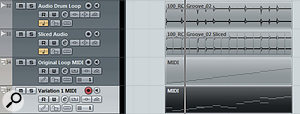
A single two‑bar audio loop shown (top to bottom) in its original form, sliced as an Audio Part, triggered via MIDI using GAO and as an edited version of the MIDI part, to create a different loop. All four tracks would adjust to accommodate any changes to the project tempo.A single two‑bar audio loop shown (top to bottom) in its original form, sliced as an Audio Part, triggered via MIDI using GAO and as an edited version of the MIDI part, to create a different loop. All four tracks would adjust to accommodate any changes to the project tempo.
When dropping loops into the Project window, you can put them onto an existing audio track, but if you drop them on an empty spot in the Project window, a new track will be automatically created. By default, the loop will be tempo‑matched to fit the Project tempo and, provided the Musical Timebase button is engaged in the Track list, the loop will be automatically adjusted to accommodate any subsequent Project tempo change — all of which is very neat.
The next step is to slice the loop into individual drum hits, along the lines of Propellerhead's ReCycled REX files. Leaving aside actual REX files for a minute, if you drop a WAV or AIFF audio loop, a standard audio event is created. This needs to be opened in the Sample Editor to start the slicing process. Select the Sample Editor's Hitpoints tab and then adjust the Threshold setting. Hitpoints will be automatically created, and for most drum loops it's usually fairly easy to catch all the main transients. If required, hitpoints can be manually adjusted, added or deleted: clicking on the Edit Hitpoints button makes them editable.
One click of the Create Slices button and the audio between each hitpoint is turned into a slice. Note, however, that you might get a warning message asking you to disable Musical mode for this audio before the slices can be created. The Sample Editor will then close, and an audio part — essentially a series of audio events (one for each drum 'slice') glued together — will appear in your project, replacing the original audio event.
Getting Groovy
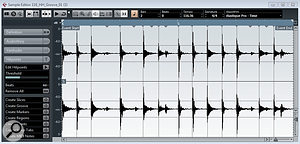
The Sample Editor hitpoint system can be used to slice your drum loop into individual beats.The Sample Editor hitpoint system can be used to slice your drum loop into individual beats.
The cataloguing and slicing processes outlined above are an essential pre‑requisite for the first of our more creative loop manipulations. Groove Agent One (GAO) is very respectable as a sample‑based drum tool, supplied, as it is, with a broad palette of drum samples suitable for various genres. However, with your favourite drum loop sliced and ready to go, GAO also becomes a very useful loop manipulation tool. There are two key possibilities here.
First, and most simply, if your drum loop audio part is opened in the Audio Part Editor, individual slices can be dragged and dropped onto one of the GAO drum pads. You might, for example, take the best kick, snare and hi‑hat slice from your audio loop, drop these onto three empty GAO pads and then use a MIDI track to trigger these pads to create a new loop, or to add extra beats over the top of the existing audio loop. Either way, you get additional loop variations but based upon the same drum sounds as your original loop.
Second, and a little more complex, if you select all the slices in the Audio Part Editor and then drag and drop to an empty GAO pad, the slices will be mapped across a series of pads, starting with the one you dropped onto (to keep things as straightforward as possible, make sure you have a suitable series of empty pads before you drop!). When you perform this multiple drag and drop, GAO also does some MIDI magic and creates a MIDI loop suitable to retrigger the original loop with all the samples played in sequence. In GAO's Exchange pane, the double‑headed arrow button should light up. If you then drag and drop back from this button to the Project window, the MIDI loop can be placed on an existing MIDI track or used to create a new MIDI track. Either way, if that MIDI track is then routed back to GAO, the MIDI loop will trigger the appropriate pads in sequence to recreate the original performance of the audio loop.
Not only does this MIDI triggering allow you greater flexibility in terms of tempo adjustment than audio time‑stretching, but you now have a fully editable MIDI loop that you can copy and edit to create endless variations on your original audio loop. This is extremely useful if you perhaps find one or two really cool loops but need to create some fills, a couple of extra variations, a breakdown part and a suitable ending to make a complete arrangement. These can all be built using MIDI and based on the original sounds in your audio loop(s).
Vexed By REX
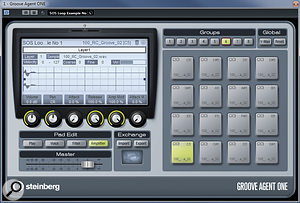
Groove Agent ONE, with a sliced loop mapped across its pads. For such a simple-looking VSTi, GAO offers a surprising amount of functionality for working with drum loops.Groove Agent ONE, with a sliced loop mapped across its pads. For such a simple-looking VSTi, GAO offers a surprising amount of functionality for working with drum loops.
Of course, this ability to slice and generate MIDI-controlled playback is, essentially, Steinberg's equivalent to the Propellerhead ReCycle/REX functionality, and if you drag and drop a REX file from MediaBay it automatically appears as a pre‑sliced Audio Part. However, rather surprisingly (surprising to me, anyway), you can't then drag these slices from the Audio Part Editor to GAO. At least, I've never been able to do that — so if you have more success with it than me, please let me know!
There is a very simple workaround, though. Having dropped your REX file into the project, select it and then choose Audio/Bounce Selection. This will create an 'unsliced' version of the audio loop, which you can process as described above for WAV and AIFF files. This is a minor additional chore but works well — although it is best to change the project tempo to something close to the loop's original recording tempo prior to executing the Bounce Selection command, as this reduces the likelihood of creating unwanted audio artifacts. Once the Bounce Selection is done, you can re‑set the project tempo.
Special Agent
Of course, having got the sounds from the loop into GAO, as well as rearranging the loop you can also tweak the sounds for each pad, using GAO's tuning, waveform and filter editing options. Finally, with the sounds in GAO and the loop controlled via MIDI, drum replacement also becomes an easy option — so if you want to take the feel of an electronic hip‑hop drum loop but play it with an arena‑style acoustic rock kit, the choice is yours.
While GAO has plenty to offer when it comes to squeezing extra mileage out of your drum-loop collection, as mentioned at the start of this column, it is not the only useful tool in the Cubase box. In the next part of this series, amongst other things, we will take a closer look at what Beat Designer can offer. Until then… happy looping!
Monday, February 15, 2016
Saturday, February 13, 2016
Using Outboard Gear
Cubase Tips & Techniques
Technique : Cubase NotesMatt Houghton
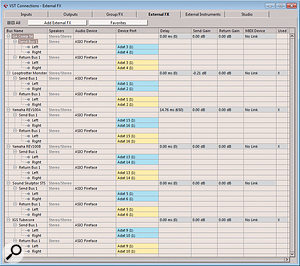
1: Cubase's External FX plug-ins are specified in the VST Connections Window. 1: Cubase's External FX plug-ins are specified in the VST Connections Window.
I've compared a lot of analogue modelling plug-ins with equivalent outboard gear recently, and while there's no doubt that some software is capable of great results, and offers superb value for money, it's plain to me that there's still a place for decent outboard in a studio. For example, even the best models from the likes of Waves, Softube and UA seem to me to be incapable of replicating precisely the complex behaviour of gear that uses audio transformers, particularly in the case of compressors and limiters that the user deliberately pushes hard for effect.
Back in SOS May 2010, I wrote an article (/sos/may10/articles/hybrid.htm) about so-called 'hybrid studios' which combine software and outboard gear, and that's well worth a read if you're new to the idea of using hardware with a computer recording system. As I explained in that article, different DAWs offer different advantages and disadvantages when working with outboard gear. Arguably, Cubase has more features dedicated to this purpose than most DAWs, but it also has some frustrating idiosyncrasies. In this article, then, I'll explore how best to integrate your preamps and outboard effects and processors in your Cubase projects, for both recording and mixing applications.
Outboard In
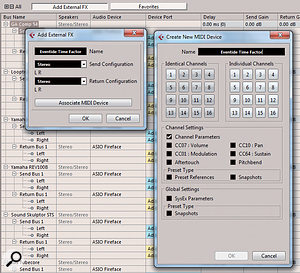
2: Creating a new External FX plug-in and associated MIDI Device.2: Creating a new External FX plug-in and associated MIDI Device.
Let's start with hooking up your gear and establishing the routing in Cubase. You'll need a multi-I/O audio interface — one with enough inputs and outputs to hook up your outboard and still have sufficient I/O left over to connect your microphones, other input sources, and speakers.
Connect the inputs and outputs of each piece of outboard to outputs and inputs on your interface. In Cubase, go to Devices/VST Connections and select the External FX tab. There are no External FX listed until you create one by clicking on the '+' symbol. Then name the new External FX with a description of the processor in question, and choose whether it's to be a mono or stereo unit. Finally, assign the I/O from the audio interface to which you've hooked up your gear. Next time you go to select an insert plug-in, your gear will be available in the drop-down list under Steinberg/External Plug-ins. You can't reassign the external plug-ins to another folder, as you can with conventional VST effects.
Obviously, you can only use one instance of each External FX plug-in. Frustratingly, though, if you have a stereo/dual mono compressor, you have to choose whether you're going to use it as stereo plug-in, or as two separate mono plug-ins: you can't assign the physical I/O to more than one external plug-in, so you don't have the option of creating both. Or rather, you could create two different versions, but you'll have to redefine the I/O settings each time you want to use the plug-in. There's no option in Cubase to use two mono plug-ins in parallel on a single stereo channel.
MIDI Control
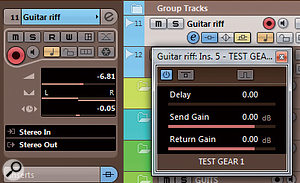
3: You might sometimes need to specify a negative latency, in which case you'll need to create a manual offset in the track's Inspector window. If you then remove the plug-in, remember to change this back to zero!3: You might sometimes need to specify a negative latency, in which case you'll need to create a manual offset in the track's Inspector window. If you then remove the plug-in, remember to change this back to zero!
You don't need to use MIDI with external processors and effects at all, but some units, particularly reverbs and delays, are automatable to some degree via MIDI. There's provision for creating a dedicated MIDI device (screen 2) when you specify an external effect in Cubase, as there is when creating an external instrument plug-in. You just click on 'Associate MIDI Device' when you create an effect. Despite the terminology used, the MIDI device you create doesn't really seem to be 'associated' with the effect, and you'll need to create a dedicated MIDI track where you can select the device. While I'd love to see the ability to program automation data from the audio channel, it's still very useful to be able to create the external MIDI device when specifying your effect's I/O.
Globalism
External FX and instruments are classed by Cubase as 'global', which means they're loaded for every project. The audio I/O for recording and playback, on the other hand, are 'local' settings, stored with each project. That makes sense in theory, but it doesn't work in practice! If you select an input or output for recording or playback that's already occupied by an external effect, the effect will lose its I/O settings, and they'll require resetting manually. Any I/O that are already in use are highlighted in the drop-down list when selecting, but it's still easy to overwrite your 'global' external effects. For example, I've had this happen when opening someone else's project where they'd used the same audio interface as me, but had defined the I/O differently.
Both External FX and External Instruments (another topic) can be saved as 'favourites', for future recall, but these presets only store the name and the latency (see later), and not the I/O settings! That's potentially a lot of resetting if you have several pieces of gear, so when you define External FX, it's a good idea to take a screen grab of the I/O settings you used.
Another consequence of this overriding of I/O settings is that you'll have to decide in advance whether to hook any preamps or channel strips up as insert effects, or simply to your input channels. That could cause confusion if you want the option to use them both as recording front ends and as insert processors. I'd recommend treating them as insert effects. When recording, you simply insert the plug-in on the relevant input channel (not the audio channel you're recording onto, as the signal will be monitored but not recorded). You can then unload the plug-in and load it again later where required in the mix.
When I shared my concerns about the limitations of External FX routing, Steinberg agreed the situation wasn't ideal, and said they'd rationalise the External FX system in a future update (probably in Cubase 7).
Latency Compensation

4: Once created, to use an External FX plug-ins, click on the desired insert slot and go to the Steinberg/External FX submenu. Any external plug-ins already in use will be greyed out and unselectable.4: Once created, to use an External FX plug-ins, click on the desired insert slot and go to the Steinberg/External FX submenu. Any external plug-ins already in use will be greyed out and unselectable.
With everything hooked up, you'll need Cubase to compensate for the latency introduced by the round-trip from Cubase, through your audio interface and gear, and back via the interface into Cubase. Most outboard won't introduce significant latency, because it's designed to operate in real time, and all-analogue gear will introduce no latency at all. However, your interface's converters and any USB or Firewire connection inevitably introduce a small delay, and if you don't compensate for that there can be audible problems. If you're performing parallel compression on a vocal part, for example, with a dry part remaining in Cubase and a copy running out through your compressor, latency will manifest itself as a phasey smearing of the sound. Similarly, a small delay on drum overheads in relation to the snare or kick could cause nasty-sounding phasing that robs your drums of impact and sucks the life out of your sound.
With standard VST plug-ins, Cubase's automatic plug-in delay compensation deals with this very neatly: the plug-in declares its latency to Cubase, and Cubase introduces the necessary offsets to compensate. With External FX, Cubase has no way of knowing what the round-trip latency is unless you tell it. There are two ways to do this... or rather there should be!
First, there's a slider with which you can specify the delay manually. That's easy if you know what the latency is, but otherwise you'll need something to measure the latency (the free NAT sampler that comes with Acustica Audio's Nebula, for example), or to use your ears to line things up as best you can. I know it sounds silly, but it is possible for an interface to report a negative latency, and Cubase's External FX can't cope with this: in this case, you'll instead have to enter a track offset in the Inspector, as shown in screen 3 — and if you remove the external plug-in you'll have to set it back to zero.
The second approach is an automatic 'ping' facility, which suffers from a bug on my Windows 7 Ultimate x64 system. It may apply on other OS as well, but I've not had chance to test that. This is supposed to fire a sound out through your interface and your bypassed gear and back, so that Cubase can measure the round-trip latency and compensate for it. You should then be able to take the effect out of bypass and use it. Unfortunately, this doesn't work at all on my system (Cubase fires the signal out, but the compensation remains set to zero), and it still can't compensate for negative latency. Again, I've mentioned this to Steinberg, who recognise that there's a bug, and have said they'll fix it in an update during the current product cycle.
Friday, February 12, 2016
Thursday, February 11, 2016
Keyboard Shortcuts
Cubase Tips & Techniques
Technique : Cubase NotesMastering keyboard shortcuts makes Cubase easier to use and is good for your health!
John Walden
The Key Commands window allows you to define key combinations for your favourite Cubase commands.The Key Commands window allows you to define key combinations for your favourite Cubase commands.
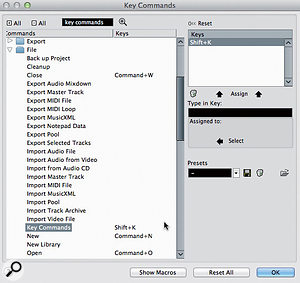
Despite the well-designed user interfaces of modern DAWs, the repetitive moving, scrolling and clicking with a mouse can often feel clunky and sluggish, and in the long run can also cause problems with fingers, wrists, elbows and so on. While I'm the first to admit that defining and learning key commands doesn't sound as exciting as, for example, getting to grips with a new soft synth (or even staying in on a Saturday night to wash your hair!), it's something that will both make Cubase easier and quicker to use and help you to avoid suffering from mouse-related physical problems.
Right On Key
Frequently performed tasks such as project navigation — moving between windows or events, moving the playhead along the timeline, zooming in and out, or something more complex — can be made more efficient using Cubase's key commands, providing you're prepared to invest a little time in setting them up and practising using them. As an example of what key commands can offer, then, let's learn how to 'navigate' using just the keys, and get there quicker.
While there are a lot of useful default key commands in the standard Cubase installation, there are also plenty of additional functions that can be assigned a shortcut via the Key Commands window, which is accessible via the File/Key Commands menu option. By default, access to this window does not have a keyboard shortcut assigned (existing key commands are shown to the right of an item within a menu), so I'll use this as a basic illustration of how to define your own key commands.
At the top of the window, the search box allows you to find specific Cubase commands in the (very!) extensive list of possibilities. In the first screenshot example, searching for 'key commands' found an entry under the 'File' section. Where an item has a key command already defined, this is shown in the panel on the left side. If you select an unassigned command, you can then enter a key combination in the 'Type in Key' box. Usefully, if the key combination you try is already assigned to another command, Cubase politely tells you, and you can choose whether to overwrite the existing assignment or not. Otherwise, pressing the Assign button links the key combination with the command and, once the Key Command window is closed, the key combination becomes available for use.
Key commands defined here are 'global', which means that they will be available in any Cubase project on the host system. Usefully, all the key command assignments that you make on your system can be saved as a preset. This is great if multiple users share the same host system and have different key command preferences. Providing you can find the file (search for it based on the preset name you used), it is also possible to move presets between computers, so you can take your key commands with you if you need to work away from your own system.
Behind The Square Window...
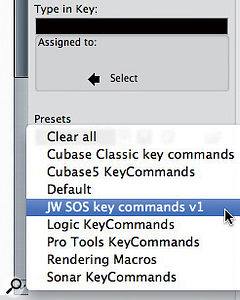
Key commands can be saved as presets to accommodate different needs or facilitate [moving between systems.Key commands can be saved as presets to accommodate different needs or facilitate [moving between systems.
Unless you're fortunate enough to use a multi-screen system (and often even then), you'll probably find that you're always switching between a number of the main Cubase windows. The Cubase 'workspace' system — with which you can define a window layout containing any combination of windows and then save them as a workspace — streamlines this process and is accessed via the Window menu. Once your workspaces are configured, the first nine can be recalled by pressing the Option (Mac) or Alt (PC) key and the assigned number key (1-9, but not zero, which is reserved for locking and unlocking the active workspace). The two obvious workspaces you might set up are a full-screen Project window and a full-screen Mixer window, although there are plenty of other possibilities. It's also worth noting that individual workspaces can be 'locked', so even if you then make some temporary changes to it (perhaps opening a further window or resizing a window) while working, the original configuration of the workspace is recalled the next time you open it.
There are other ways to open individual windows, of course. Default key commands will open the Mixer window (F3), the MediaBay (F5), the Video window (F8) and the VST Instruments list (F11), for example. (Mac users might want to check how they have the function-key behaviour configured in the System Preferences, but can still access these function key-based key commands in Cubase if they also hold down the 'fn' function key on the Mac keyboard.) Other heavily used windows also have pre-defined key commands, and a few of these are well worth memorising such as the Pool (Command-P for Mac, Ctrl-P for PC) and Marker windows (Command/Ctrl-M), as well as the Project Setup window (Shift-S).
Project Prowess
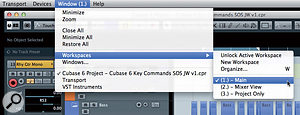
Workspaces can be defined via the Windows menu and then provide instant recall of screen configurations via key commands.Workspaces can be defined via the Windows menu and then provide instant recall of screen configurations via key commands.
For many Cubase users, the project window is where they spend the bulk of their time, and two sorts of keyboard-based 'navigation' tools can make life here a great deal easier, particularly on large projects: those for moving along the timeline and those for zooming in and out.
There are a number of ways of moving along the timeline, each with their own particular uses. If you just want to get the cursor to step forwards or backwards, the Command (Mac) or Ctrl (PC) key and plus ('+') key combination, and Command/Cntrl key and minus ('-') key combinations move the cursor forwards and backwards along the timeline in increments controlled by the Snap setting. So if Snap is set to a bar or beat, each press of the key command moves the cursor by that amount. Unless you have a penchant for working on 30-minute prog-rock epics, this is a very easy way to move around a project.
An alternative approach uses the 'N' or 'B' keys to move the cursor to the next or previous event on the currently selected track. For example, if you have an audio track containing a series of audio events, each press of the 'N' key will take you to the start of the next event, the end of the same event, the start of the following event and so on — again, an easy and useful way to step through the timeline of your project. Incidentally, the up/down cursor keys can be used to step through the used tracks in the Project window Track List, so a combination of these two key commands allows you to move the cursor to anywhere in the project.
A third approach is available to those who use the Marker Track and markers to highlight the locations of key points in the project. Shift-N and Shift-B move the cursor to the next or previous marker. So, for example, if you place markers at the start of each song section in your project, this provides a very rapid way to move along the timeline to the section you want to work on.
Zooming About
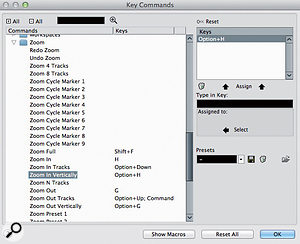
Defining key commands for your most used 'zoom' commands can speed up project navigation considerably.Defining key commands for your most used 'zoom' commands can speed up project navigation considerably.
Aside from moving around the timeline, the other operation repeated many times over in the average project session is changing the zoom level. Key commands provide access to a number of 'zooming' tools. At the most simple level, 'H' will zoom in and 'G' will zoom out horizontally. And if you want to see all of your project at once, Shift-F sets the zoom level to fit it into the current Project window — magic!
If you want to zoom in/out vertically on the currently selected track, the preset key commands Option-up arrow and Option‑down arrow (use Alt on the PC) will get the job done. However, if you want to simultaneously zoom all tracks vertically in or out, you'll need to set up some appropriate key combinations in the Key Commands window, as these are not defined by default. I've set these as Option-G and Option-H on my Mac, so that the 'G' and 'H' keys control both horizontal zoom (without the Option key) and vertical zoom (with the Option key). Of course, you could similarly use shortcuts to increase or reduce the height of the waveform within an event.
Endless Potential...
I've focused on the key commands that help you with the most common Cubase navigation tasks, because these offer the most immediate potential for streamlining your way of working with Cubase, but what's covered here is merely the tip of the iceberg. Almost any operation can be executed via a key command, so if you find yourself regularly repeating a particular operation, learn or set up a key command for it. You don't have to stop at the preset commands, either — you could create Macros (combinations of commands and processes) and assign those to a single key. It should be a simple matter, for example, to use a single key to jump 10 events forward or back on the arrange page.
Learning key commands won't make you 'sound' better, but it will let you capture and manipulate your sound more efficiently, more quickly, and with less chance of physical damage to your all-important hands and arms. John Walden.
Stickers & Keypads
If you're one of those people who finds it difficult to remember which keys control which commands, you should consider investing in a set of keyboard stickers from Editors Keys, which aren't expensive. These have both the standard QWERTY keys and shortcut labels on them. Bear in mind, though, that these will reflect the default shortcuts. The minute you start to reassign or overwrite shortcuts, the stickers will be incorrect!
You could also keep your QWERTY keyboard clear of clutter by using a second, dedicated keyboard for the task. For example, I use a USB numeric keypad, to which I've assigned different shortcuts. By default, a lot of transport controls are assigned to the numeric keypad, but there can be more than 20 keys and two modes on such devices, giving a possible 40 separate commands — and that's before adding Ctrl, Alt, Shift or other modifiers into the equation. This keypad even includes a couple of USB ports that enable me to keep my Cubase dongle and a USB pen drive with my Cubase preferences on it, so it's easy to plug into another machine and be up and running quickly! Matt Houghton
Subscribe to:
Posts (Atom)
