Cubase Tips & Techniques
Technique : Cubase NotesJohn Walden
Keep History provides the best Audio Recording Mode option when capturing multiple takes.Keep History provides the best Audio Recording Mode option when capturing multiple takes.
 Compiling — or 'comping' — the perfect vocal performance from multiple takes is one of the most common editing tasks that DAW users undertake. We've already considered this process (back in SOS July 2007), but as the upgrade to Cubase v6 brought some welcome improvements in this area, it's time to revisit the subject.
What's New?
Cubase has allowed multiple takes to be recorded onto a single audio track for quite some time, and in previous versions these takes would be displayed as a series of 'lanes' inside the main audio track. Prior to v6, to get the best results you had to record in cycle mode, typically recording one section (for example, a verse or chorus) at a time. This worked well enough, but if you decided to return to a song section and try a few more takes, things could get untidy very quickly.
In v6, the lanes-based approach is much more flexible. Any recording made on an audio track that overlaps with a previous recording on the same track simply becomes another lane, whether the recording is made with cycle mode on or off, and regardless of when the recordings were made. You can, therefore, adopt a more flexible approach to recording multiple takes. The most recently recorded take assumes playback priority, although to get the most from the new comping features with vocal tracks, it's best to record all the takes for a specific song section on a single audio track.
It's also worth noting that Steinberg have revamped the recording mode options for handling tracking of multiple takes. For audio, three options are now available in the transport panel. If hard-drive space is not an issue, the default 'Keep History' setting is safest, as it retains all audio takes, whereas the two other modes will, to different degrees, remove earlier takes on a track when you record over the top of them.
Down The Lane

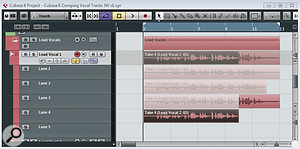
In this example, four vocal takes have been recorded, each displayed in its own lane under the master audio track.In this example, four vocal takes have been recorded, each displayed in its own lane under the master audio track.
Having captured your takes, the Show Lanes option needs to be engaged (the button goes blue in the Track List) to display them. Each take is then shown indented below the audio track, rather like the display of audio tracks that are nested inside a Folder track.
By default, the bottom-most (most recent) take has priority for playback. In the example shown below, this is in Lane 4, although note that because the take in Lane 4 is shorter than that in Lane 3, Lane 3 assumes priority for a few bars of this song section. It's also worth noting that the waveform display in the audio track itself shows the 'comped' vocal — that is, it shows the waveform from each take that has priority — in this case, a combination of take 3 (bars 3-9) and take 4 (bars 10-13).
Engaging solo on one of the individual lanes allows that lane to be heard on playback. As will become clear, this is useful if you want to audition a particular take without disturbing your existing comping. If you want to hear an individual take in isolation (that is, properly soloed without the backing track), you need to engage the audio track's solo button as well.
Cut! It's A Take
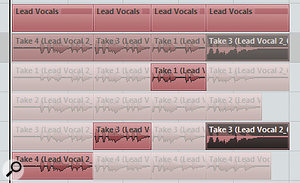
My own experience of using the new comping tools has resulted in a two-stage workflow. The first step is to split the takes into individual phrases, something the new tool set makes very easy. With the standard Object Selection tool (the arrow) selected, simply hold down the Alt (Windows) or Option (Mac) keys and then click at the position where you want to cut the take in two. This cuts all of the overlapping takes at this point, not just the currently active one. It is very neat for comping vocals, where the phrasing for a particular line is likely to be similar in each take. In the example opposite (top), note that the Snap setting is active; if you want finer control over the position of the cuts, turn this off.
If you wish to subsequently adjust a cut position for all takes simultaneously, simply hold the mouse over the cut in the upper half of one of the takes. The cursor changes into two vertical lines with arrows pointing in opposite directions and you can drag the cut point to a new position. Alternatively, if you want to change a cut in a single lane only, hold the mouse over the lower portion of a take and the usual adjust length tool icon will appear.
Having split the audio into distinct phrases, the comping process itself is easy. With the Object Selection tool selected, click on whichever take you wish to be given priority on playback; this automatically gives this take priority and mutes any overlapping sections of takes on other lanes. With playback cycling through the song section, auditioning the best combination of takes becomes an absolute breeze.
Range Finder

Having split the takes into suitable phrase-based sections, the various takes are then easy to select and audition using the Object Selection tool.Having split the takes into suitable phrase-based sections, the various takes are then easy to select and audition using the Object Selection tool.
The approach described above generally gets the bulk of the work done very quickly, but if you need greater control over your selection (for example, to pick specific words from different takes), a second stage of comping is required. This is best based around the Range Selection tool, and can be used whether you have already split your track into phrase sections or not.
Having selected the Range Selection tool from the main project window toolbar (the square icon positioned next to the Object Selection arrow tool), the mouse can be clicked and dragged across the section of a take that you require.
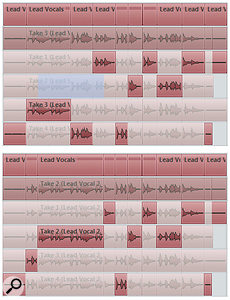
As shown in the screen shot (right), this selection will be highlighted in pale blue. Double-clicking on this selection will set it as the active take, automatically creating cuts/mutes in all of the other lanes, as required. This is a great, hassle-free way of making precise selections, and is a big improvement on the functionality of previous versions of Cubase.
Curve & Bounce

The Range Selection tool has been used to select a section of the take in Lane 2 and this is highlighted in blue (above). Double-clicking on the selection sets that portion of the take as active, creating cuts at the same positions on all lanes (beneath).The Range Selection tool has been used to select a section of the take in Lane 2 and this is highlighted in blue (above). Double-clicking on the selection sets that portion of the take as active, creating cuts at the same positions on all lanes (beneath).
Once you've compiled a 'master' take, a couple of finishing touches can really neaten things up, but before doing these, remember to save a version of your project under a different name, so that you can return later to fine-tune your selections, if you need to.
The first tidy-up task is to check for any audio glitches at transitions between the different takes. Cubase can automatically apply fades to audio clips and crossfades between clips (using the Project/Auto Fade Settings dialogue), and the default settings may be all that are required. If you still have some lumpy-sounding edits, you can also set auto fades at the track level by right‑clicking on the track in the Track List and selecting the Auto Fade Settings option. This dialogue has the option to turn off the global project auto-fade settings and create custom settings for that track. Manual editing of specific fades might also be used, but always solo the track to ensure you've dealt with any pops and clicks as cleanly as possible.
The final step is simply to bounce your selected takes from their various lanes into a single audio track. This isn't essential, as you can simply switch off the Show Lanes option to hide the lanes — but I find that this sort of tidiness helps to manage a project. Select all the events in the various lanes (both used and unused within the comp) and execute the Audio / Advanced / Delete Overlaps menu option. This removes any unused events and places all your selected sections on the top lane (a final solo audition is worth doing at this stage). Once you're happy that everything sounds hunky dory, simply turn off the Show Lanes option, select all the events you wish to combine and execute the Audio / Bounce Selection command. Click 'Replace' when Cubase asks you if you wish to replace the events and, hey presto, your ultimate vocal take exists as a single audio event.
Advanced Tips
A couple of additional features are worth a quick mention. First, if you find yourself needing to adjust the timing of part of the performance in one of the lanes, holding down the Ctrl and Alt (Windows) or Command and Option (Mac) keys allows you to 'slip edit' the audio within an individual event — which is very useful when the performance is good but the timing of certain words needs tightening.
Second, the full version of Cubase 6 also allows you to perform multitrack comping processes using the Group Editing options in the project window. This is potentially very useful for editing multiple takes from multitrack recordings of backing vocals or drums — but that's a topic to save for another day!
No comments:
Post a Comment