Cubase Tips & Techniques
Technique : Cubase NotesJohn Walden
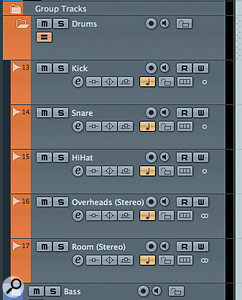
Audio tracks placed within a Folder Track ready for basic drum recording. Note that the Group Editing button has been engaged for the Folder.Audio tracks placed within a Folder Track ready for basic drum recording. Note that the Group Editing button has been engaged for the Folder.

Now that there are generations of recording musicians who've only ever worked with digital multitrack recording facilities, it can be difficult to convey just how much easier it is to 'comp' a vocal track (compile it from sections of different takes) in a typical DAW than when working with multitrack tape. Those days were truly painful! Some DAWs, though, including the full version of Cubase, offer more sophisticated comping facilities than others.
As described in this column back in August 2011, Cubase 6 added some useful improvements to streamline the comping process for lead vocals or solo instruments. Not all performances are captured using a single microphone, though, and what I didn't explore in that article were the tools that Cubase 6 offers for comping using takes from multitrack recordings.
Multi Vs Mono
When it's time to assemble the final 'master' performance from a number of takes of a multi-mic recording, such as you might have when recording an acoustic drum kit, a group of backing vocalists or a small string section, you're inevitably faced with challenges that aren't presented by single-track recordings. The key one is that sound intended for one mic is likely to be picked up by other mics as well. In other words, the sound 'bleeds' or 'spills' into these mics. For example, a kick drum may be picked up by the snare-drum mic and overheads, and the snare might be present on the kick and overhead mics. While you can, to an extent, reduce the amount of bleed using dynamics processors, it's almost impossible to eliminate it completely. When you're comping a master performance from multiple takes, bleed makes the process a little more tricky.
Imagine you've recorded several takes of a drummer playing an acoustic drum kit. You've placed close mics on the kick, snare and hi-hat, and have used a stereo pair of overheads to pick up mainly the toms and cymbals (though they'll have plenty of bleed from the snare and hi-hat) as well as a stereo pair set further back in the room, to capture an image of the whole kit. This configuration gives us seven mics, which we're recording to three mono tracks and two stereo tracks in Cubase.
Unless your drummer is the human equivalent of a drum machine, each take will contain lots of variations, some subtle, some less so — and the whole point of comping is to identify the best bits from each take to create the final 'master' performance. The presence of bleed can make it tricky to combine, say, the kick from take one, the snare from take two and the hi-hat from take three, because in each case the timing of the hits will be different (there may even be additional or omitted hits, intentional or otherwise). Thus the snare sound that appears as bleed in your preferred kick-drum take might not match the snare in your preferred snare take. This will create undesirable artifacts, such as smearing of transients or phase-cancellation, which at best will make things sound oddly inconsistent, and at worst will rob your drums of their power or character.
To avoid this, always compile your master performance using the same takes from each mic. In other words, if you like the first bar of take two best, use all the mics for take two for this bar. If you prefer take three, use all the mics from that take... and so on, even down to the level of individual hits.
You need to be able to synchronise the selection of the required sub-sections from each take across all the tracks (which doesn't arise when you're comping takes from a single lead vocal or instrument track). In previous versions of Cubase, you had to do this by hand, which (although better than working with tape!) was a laborious task. Thankfully, Cubase 6 has changed all that...
Group Work

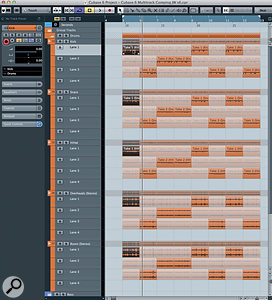
In this example, three drum takes were recorded and split into bar-length sections using the Object Selection tool. Clicking on any bar in a take automatically gives playback priority to that selection for the same take on every track. Here, this has been done for bar one, take one.In this example, three drum takes were recorded and split into bar-length sections using the Object Selection tool. Clicking on any bar in a take automatically gives playback priority to that selection for the same take on every track. Here, this has been done for bar one, take one.
There are a number of ways to group items in Cubase, and for this task we need to use Group Editing (which is only available in the full version of Cubase 6, not the 'Artist' or 'Elements' versions). Group Editing operates at the level of a Folder track, so prior to recording it's a good idea to create a single Folder track (Project/Add Track/Folder) and then populate that with the audio tracks required for each of your mics. The first screenshot shows an example where I've configured a folder to contain three mono and two stereo tracks suitably labelled for the drum-recording example described earlier. Tracks can, if you prefer, be placed into a suitable folder post-recording.
Located beneath the Folder track's mute button is the Group Editing button (the icon with two short horizontal lines, which is shown in orange on the screenshot, as it's already turned on). With this mode engaged, editing tasks performed on one track are automatically matched in the equivalent event on all the other tracks. As we'll see in a minute, this makes comping multitrack recordings almost as straightforward as comping a single-track recording. I'll offer one word of caution, though: if you edit an individual track in the folder without Group Editing engaged (perhaps changing the length of an audio event), when you come to apply editing at the group level, Cubase might not be able to work out which is the 'equivalent event' on all the tracks, scuppering your easy route to multitrack comping. It's best, therefore, to avoid the potential problem and engage the Group Editing button at all times if your folder contains a genuine multitrack recording!
Multitrack Magic
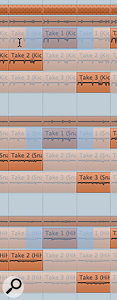
 The Range Selection tool allows you to select sections of a take for one track. With Group Editing engaged, the same section of the same take on all other tracks is automatically selected.The Range Selection tool allows you to select sections of a take for one track. With Group Editing engaged, the same section of the same take on all other tracks is automatically selected.
With Group Editing engaged, you can start to identify the best bits of each take. The basic tools available are identical to those discussed in the SOS August 2011 column on vocal comping — so, for example, with the standard Object Selection tool (the arrow) active, you can split a take at a particular position by holding down the Option (Mac) or Alt (Windows) key and clicking. Not only will this split all the takes on that audio track at the same point, it will also split the equivalent takes on the other audio tracks in the folder.
Having split the performances into suitable-sized chunks, if (as shown in the large screenshot) I then click on the first bar of the first take for the kick drum, something wonderful happens... As with standard single-track comping, bar one of the other lanes for the kick drum is muted, giving take one playback priority for that bar, but the same change also happens automatically for all the other tracks. In this case, bar one of take one is also given playback priority for the snare, hi-hat, overhead and room tracks. Magic!
If you prefer to select sections of takes using the Range Selection tool (the square icon next to the Object Selection arrow tool in the Project window toolbar), selecting part of a take on one track automatically also selects the same time-section of the same take on all the other tracks. As with single-track comping, once the Range Selection tool has been used to define a time range of a take in this way, double-clicking on the selected area will set playback priority for that range of that take on all tracks. A friend of mine who does a lot of multitrack drum recording in Cubase literally bounced around his studio the first time he saw this working, as it's such a time saver. You simply repeat the action as required until you have your 'best of' drum performance.
Bonus Track
I've focused largely on how Group Editing can help with comping multitrack drum-kit recordings, but exactly the same techniques can also be applied to other multitrack recordings, such as backing vocals, or anything recorded with complex multi-mic arrays. Of course, the Group Editing facility has plenty of other potential applications for editing and even quantising multitrack recordings — which is something we'll return to another time.
Let It Bleed!
While bleed between microphones can be an issue when comping, it's not all negative: bleed or spill between mics often adds cohesion to the sound so that the listener gets a sense of the real space in which the kit was recorded. Indeed, the whole purpose of the room mics is generally to enhance this spatial sense, when you blend their reverberant sound with the overall drum mix.
No comments:
Post a Comment