Cubase Tips & Techniques
Technique : Cubase NotesJohn Walden
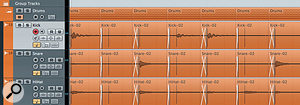
Our starting point, the mutitrack drum comp. In this case, it's a simple 12-bar drum part.Our starting point, the mutitrack drum comp. In this case, it's a simple 12-bar drum part.
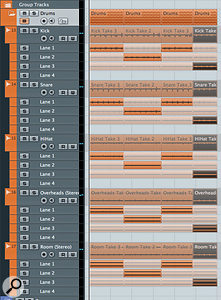
Last month, I explained how to 'comp' a performance from multiple-take multitrack recordings, using Cubase 6's Group Editing features. That's great if the takes are perfect, but there are times when even a decent drum performance can benefit from slightly tightened timing. Fortunately, Cubase 6 offers the means to do this for multitrack audio recordings.
The audio-warp facility can be used to time-stretch and quantise audio events, but for quantising multitracked drums, slicing at hitpoints provides better results. Group Editing is the key to this slicing process, because it ensures that each track is sliced at exactly the same points, and that slices from different tracks stay locked together in time — thus avoiding the pitfall of tracks being moved out of phase alignment.
Consolidate
Let's assume you've completed the comping process described last month: you've identified the best bit of each take and set the required sub-sections of each take to have playback priority. To apply some quantise options to the multitrack audio, you need to identify the hitpoints (in the case of drum tracks, the start of each drum hit) and then slice the audio. To perform these operations, it's helpful to have each track rendered to a single, continuous audio event. Check that the Folder Track still has the Group Editing switch engaged (the button that looks like an '=' symbol in the Group Track header), and then select all the audio events on the drum tracks and apply the Audio / Bounce Selection function. The sub-sections of the various takes will be combined into a single audio event for each track.
Hit Me Baby
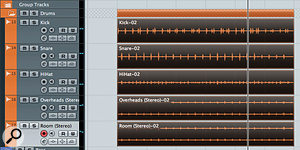
The comp after applying 'Bounce Selection'. Each track now contains a single audio event, which can be used to generate hitpoints.The comp after applying 'Bounce Selection'. Each track now contains a single audio event, which can be used to generate hitpoints.
The next step is to add hitpoints, using the Sample Editor. Kick and snare close-mic tracks are usually the best candidates, as a suitable threshold setting (one that identifies all the drum hits but is not so sensitive that the bleed from other drums also creates hitpoints) is usually easy to find. Not all cases will be simple, though, and, depending on the amount of bleed between mics, some manual editing may be required to remove hitpoints triggered by undesirable sounds. Individual hitpoints can be disabled by Shift-clicking. For maximum flexibility, add hitpoints to each track that you think controls the overall drum groove.
Nicely Sliced
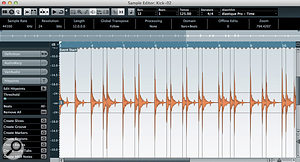
Hitpoints need to be created in the Sample Editor for each of the key drum tracks.Hitpoints need to be created in the Sample Editor for each of the key drum tracks.
Back in the Project window, select all the drum-track audio events (with Group Editing switched on, selecting an event on one track will automatically select corresponding events on the other tracks). Then open the Quantize Panel, which is accessed via the Edit menu. If all goes well, you should see at least two sections in this panel: Slice Rules and Quantize. A third (Crossfades) will appear later in the process. I say 'if all goes well', because Cubase sometimes decides that the conditions are not quite right for audio quantising via a Group edit. The key issue seems to be that the audio events on each track must be exactly the same length.
The Slice Rules section allows you to attach a different priority to each track for which you've generated hitpoints. Which tracks are attached the highest priority obviously depends on which drum element you deem to be the most important in terms of the groove, but it's well worth experimenting a little here. Hitpoints that are going to be 'active' in any slicing are displayed in red, and if you adjust the track priorities you can see these change.
The two other Slice Rules settings are Range and Offset. Range simply identifies how close two hitpoints on different tracks can be before they're considered to be the same (with the higher priority track taking precedence), and Offset determines whether the slice point will be at the exact position of the hitpoint or slightly before. The default offset is -20ms, so the slice is going to be placed before the hitpoint and, therefore, before the attack of the drum hit. (If this sounds strange, you'll see shortly that it's actually very sensible!)
Pressing the Slice button separates the audio on all tracks at each of the red hitpoints, so slicing occurs at exactly the same place on every track in the group. If you're not satisfied with the result, the double-headed arrow icon at the bottom-left of the Slice Rules section is a 'reset' button: it retains your carefully crafted hitpoints but returns the audio to its original unsliced state so you can try again.
Let's Swing
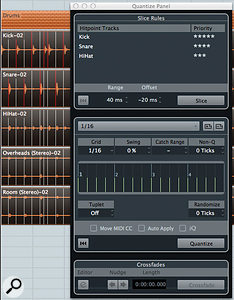
The Quantize Panel's Slice Rules set the priority given to each track's timing. Its central section allows you to define the quantisation type.The Quantize Panel's Slice Rules set the priority given to each track's timing. Its central section allows you to define the quantisation type.
Once the multitrack audio is sliced, use the central Quantize section of the Quantize Panel to adjust the timing of the performance. These controls are almost identical to those used when quantising MIDI, so they should feel familiar to most Cubase users. There's plenty to experiment with, from simple tightening of timing by setting a grid resolution, to adding a bit of swing to that grid, or applying a groove quantise based on a groove from another performance.
There are other useful controls, too. The Catch Range setting is useful for more complex material, as it allows you to restrict quantising actions to the hitpoints that are close to the major grid beats. If you want to avoid things feeling too mechanical, subtle use of the Randomize setting can help (or make your drummer sound sloppy, depending how far you take it!).
It's possible to use the Quantize button to apply the quantise settings you've selected, but engaging the Auto Apply switch means that the audio slices will move around as you change the quantise settings. Whichever way you approach this, note that when slices move, the corresponding slices on each track stay locked together — so if slice three on the kick track is moved by the quantise process, slice three on all other tracks will move with it, which keeps the phase relationships between the tracks correctly aligned. Brilliant!
Not Fade Away
The Crossfades section can smooth out the transitions between each slice and, because of the Offset setting in the Slice Rules section of the Quantize Panel, the crossfades can be positioned prior to the actual hitpoints and therefore do not interfere with the actual drum hits.The Crossfades section can smooth out the transitions between each slice and, because of the Offset setting in the Slice Rules section of the Quantize Panel, the crossfades can be positioned prior to the actual hitpoints and therefore do not interfere with the actual drum hits.
Moving slices can open up 'gaps' in the audio between adjacent slices, or make some slices overlap. A third section of the Quantize Panel, called 'Crossfades' can be seen in the example screen shot, and this only appears once you've pressed the Slice button. When you've quantised the audio to your satisfaction, a quick press of the Crossfade button will close the gaps between the slices and apply a crossfade (the length of which is governed by the Length setting) between each slice. It's at this point that the need for the Offset setting in the Slice Rules section becomes apparent: slicing a small distance before the drum hit means that the crossfades between adjacent slices can be made to fall into this area, rather than across the drum hit itself — so the hits don't suffer. In most cases, applying these crossfades tidies things up nicely.
All being well, you should now have compiled your best multitrack drum part, and enhanced it further using glitch-free multitrack quantising. If not, it's easy enough to go back and tweak the quantise settings further, as the fades will adjust themselves as you do.
All this said, making audio quantise work smoothly requires practice, so to begin with I'd suggest that a KISS (keep it simple, stupid!) approach is the right way to go: try working with some less complex drum performances at first, where there are fewer hitpoints to worry about. Once you've mastered the mechanics, you can explore the potential for correcting, or adding a little post-recording groove to more complex drum tracks.
Beware Rigidity
It's easy to overdo quantisation, particularly if you're quantising to the grid at a fixed tempo. You might want your drummer to sound like a robot, but most of us don't — so experiment with the amount of quantising you apply. If you want to go further, you could investigate the possibility of adding a more natural quantise groove to your production — but that's a topic for another month.
No comments:
Post a Comment