Welcome to No Limit Sound Productions

Company Founded
2005
Overview

Our services include Sound Engineering, Audio Post-Production, System Upgrades and Equipment Consulting.
Mission
Our mission is to provide excellent quality and service to our customers. We do customized service.

Tuesday, September 30, 2014

Q. Why do I need to use a DI box?

Sound Advice : Recording


I've been reading a fair bit about the best way to directly connect instruments to a PA recently, and I must admit I'm still a bit confused. My first question — hopefully the simple one — is why is it recommended that an instrument (say, a keyboard) is connected to a DI box, which changes the signal to low‑impedance/mic‑level, and then send it to the mixer, where it goes through a preamp to end up as a line‑level signal again? It seems that it would be simpler to send the line‑level signal and plug it into an insert on a channel, rather than a mic input.My second question is a bit more vague and has to do with connecting other instruments, such as a harp with a transducer and an electric violin. These obviously aren't microphone or line‑level signals and I'm not sure how to treat them. I have been advised to use an LR Baggs Para DI for the harp, which appears to be a preamp that then cuts the signal back down to mic level.


Via SOS web site


SOS Technical Editor Hugh Robjohns replies: Both arrangements will work but, unless the cables' lengths are very short, the DI route will usually provide better quality, despite the apparent illogicality!


Firstly, the fact is that all cables are capacitive, and that capacitance reacts with the source and destination impedances to form a low‑pass filter. The higher the impedances and the longer the cable, the worse that gets, curtailing the high end. So working with a low source impedance and relatively low microphone input impedance means you can pass signal over extremely long cables without problems. There are many reasons to use a DI box. For example, the capacitance of cables reacts with source and destination impedances, forming a low‑pass filter. When dealing with high impedances and long cables, this only gets worse, curtailing the high end of the signal. The relatively low impedance created when the signal passes through a DI box enables you to work with long cables without problems.There are many reasons to use a DI box. For example, the capacitance of cables reacts with source and destination impedances, forming a low‑pass filter. When dealing with high impedances and long cables, this only gets worse, curtailing the high end of the signal. The relatively low impedance created when the signal passes through a DI box enables you to work with long cables without problems.

There are many reasons to use a DI box. For example, the capacitance of cables reacts with source and destination impedances, forming a low‑pass filter. When dealing with high impedances and long cables, this only gets worse, curtailing the high end of the signal. The relatively low impedance created when the signal passes through a DI box enables you to work with long cables without problems.

Secondly, sending a balanced signal to a differential input means that RF and EM interference breaking into the cable can be largely rejected, which is very handy in a hostile and unpredictable environment in which there will be lighting interference and who knows what else. Mic signals are generally balanced, whereas instrument line signals are not.


Thirdly, most PA systems are set up with a mic‑level snake from stage to mixer, and it's just a lot more convenient, and faster, to rig to work entirely with mic‑level signals rather than a mix of mic and line.


Finally, the balancing transformer in the DI box also provides galvanic isolation between stage equipment and PA equipment, helping to avoid ground‑loop problems and potential electrical safety issues under fault conditions.
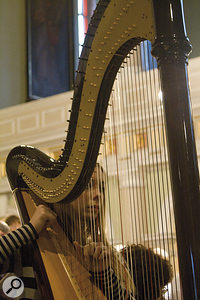
Some unusual instruments, such as harps, can be fitted with piezo pickups or contact mics, whose outputs are usually at 'instrument' level, and will therefore require a DI box.

As for your second question, regarding connecting more unusual instruments, these are generally fitted with piezo pickups or contact mics, similar to many acoustic guitars with fitted pickups. The output from the control or interface box will usually be 'instrument level', much the same as a guitar and will require a DI box again.Some unusual instruments, such as harps, can be fitted with piezo pickups or contact mics, whose outputs are usually at 'instrument' level, and will therefore require a DI box.Some unusual instruments, such as harps, can be fitted with piezo pickups or contact mics, whose outputs are usually at 'instrument' level, and will therefore require a DI box.Photo: Flickr / Alan Cleaver


A decent active DI will set you back about £100 in the UK, but many people baulk at that when they see generic 'active DI' boxes going for £20 or so. However, the difference in sound quality is often very significant, and in my experience the better boxes are built to last. If you amortise the cost of a decent box over 10 years or more, it only costs £10 a year, and that's peanuts compared to your mics and other gear.


As for recommendations, I'm a fan of the Radial J48 and the BSS AR113, but the Canford Audio Active DI box (originally designed and marketed by Technical Projects) is also excellent and remarkably versatile. The Klark Teknik DN100 is another strong contender.    

Adding a Band-Pass Filter to the Korg MS-20 Mini

Q. How should I use my new multi‑pattern microphone?

Sound Advice : Miking


Having been using a cardioid mic for some time, I've just bought an Audio‑Technica AT2050. Although my decision was partly based on the flexibility of its switchable polar patterns, I've not ventured beyond the cardioid pattern that I'm used to since I bought it. How can I use the different patterns? Are there any creative techniques I can use?


Ben Allen via email

A multi‑pattern mic, like the Audio‑Technica AT2050 shown here, provides a relatively inexpensive way to try out different polar patterns. If you already have a cardioid mic, you could use the two in conjunction to start experimenting with stereo miking techniques.

SOS Reviews Editor Matt Houghton replies: This is probably a rather broader topic than you realise, but it's great that you're showing curiosity and a willingness to learn! Generally speaking, the best thing to do is to learn through trial and error: try out the different patterns and compare the results. Even with all the theory in the world, you need to make errors in order to learn! That said, we've published several features over the years that discuss this topic in more detail (for example, there's one in SOS March 2007: /sos/mar07/articles/micpatterns.htm), and I'd suggest that you have a read of some of those.


To get you started, though, I'd recommend investigating the figure‑of‑eight pattern, which is really useful where you want to reject sounds off to the side: you point the null at the bit you want to reject, and the front (or rear!) at the bit you want to capture. Bear in mind that the trade‑off in achieving this excellent off‑axis rejection is that you pick up as much sound from the rear as you do from the front, so you either need to be working in a nice‑sounding room, and be happy to capture ambience, or to have some sort of acoustic shield placed behind it. I find that figure‑of‑eight mics often make very useful room mics: you'd set them up to pick up room ambience only, with the null pointing toward the sound source.

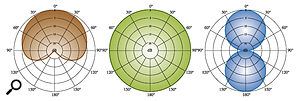
The polar patterns available from most multi‑pattern microphones include the three shown here: (left to right) cardioid, omnidirectional and figure of eight. The diagram shows where the polar pattern picks up sound and where it rejects it.

A multi‑pattern mic, like the Audio‑Technica AT2050 shown here, provides a relatively inexpensive way to try out different polar patterns. If you already have a cardioid mic, you could use the two in conjunction to start experimenting with stereo miking techniques.A multi‑pattern mic, like the Audio‑Technica AT2050 shown here, provides a relatively inexpensive way to try out different polar patterns. If you already have a cardioid mic, you could use the two in conjunction to start experimenting with stereo miking techniques.


If you have another cardioid mic handy, you could try Mid/Side stereo recording, with the cardioid mic (it could actually be an omni, figure of eight or anything in between, but cardioid is more typically used) pointing toward the sound source and the figure-of-eight rejecting the sound source but picking up from left and right. In this instance you record three tracks: the cardioid, and two signals from the figure of eight. Polarity‑invert (ie. flip the 'phase') one of those figure‑of‑eight signals, and route both to a group channel in your DAW, and you have a mono‑compatible stereo recording whose width you can alter by balancing the cardioid's fader with the figure‑of‑eight group fader. If this whistle‑stop explanation is a bit brief, you can learn more about the technique at /sos/feb02/articles/cheshire0202.asp.


The polar patterns available from most multi‑pattern microphones include the three shown here: (left to right) cardioid, omnidirectional and figure of eight. The diagram shows where the polar pattern picks up sound and where it rejects it.The polar patterns available from most multi‑pattern microphones include the three shown here: (left to right) cardioid, omnidirectional and figure of eight. The diagram shows where the polar pattern picks up sound and where it rejects it.The omnidirectional pattern is also potentially very useful. As this is a large‑diaphragm mic, it's probably not as true an omni pattern as you'd find in a small‑diaphragm capsule, but it should give you a much more 'honest' sound than you'd get from the cardioid pattern, so if you're looking to capture the sound you hear in the room, an omni is a good bet. Beware again, though, that this pattern picks up sound from all directions. That makes it great for one‑track‑at‑a‑time recordings (it's a good bet for acoustic guitar, for example), but you need to be in a nice‑sounding space — not too near to reflective surfaces — and it makes it a poor choice if you need to achieve separation between different sound sources.    

Monday, September 29, 2014

Composer Jeff Danna talks about Korg MS-20 and Kaoss Pads

Q. What are auxes, sends and returns?

Excuse the simplicity of the question, but I'm always coming across these terms in the magazine, and I don't know what they are: auxes, buses, sends and returns. Can you explain to me what are? Are they all part of the same thing or completely unrelated?


The aux sends on a mixer (whether hardware or software) allow you to send independent mixes to performers on stage or in the studio. You can also use them to feed effects processors at mixdown.

Tony Robbins via emailThe aux sends on a mixer (whether hardware or software) allow you to send independent mixes to performers on stage or in the studio. You can also use them to feed effects processors at mixdown. The aux sends on a mixer (whether hardware or software) allow you to send independent mixes to performers on stage or in the studio. You can also use them to feed effects processors at mixdown.


SOS contributor Mike Senior replies: All of these terms are related, in that they are all ways of talking about the routing and processing of audio signals. The word 'bus' is probably the best one to start with, because it's the most general: a bus is the term that describes any kind of audio conduit that allows a selection of different signals to be routed/processed together. You feed the desired signals to the bus, apply processing to the resulting mixed signal (if you want), and then feed the signal on to your choice of destination. If that description seems a bit vague, that's because buses are very general‑purpose.


For example, it's common in mixing situations to hear the term 'mix bus', which is usually applied to the DAW's output channel. In this case, all the sounds in your mix are feeding the bus, and it might then have some compression applied to it before the sound is routed to a master recorder or recorded directly to disk within the software. A 'drums bus', on the other hand, would tend to refer to a mixer channel that collects together all the drum‑mic signals for overall processing, routing them back to the mix bus alongside all the other instruments in the arrangement. Other buses are much simpler, such as those that can be found on a large‑scale recording mixer, feeding the inputs of the multitrack recorder, or those which carry audio to/from external processing equipment. Some don't even provide a level control.


An 'aux' is just a type of bus that you use to create 'auxiliary' mixes alongside that of the main mix bus: each mixer channel will have a level control that sets how much signal is fed to the aux bus in question. What you do with your aux buses is up to you: the most common uses are feeding a cue signal to speakers or headphones, so that performers can hear what they're doing on stage or during recording; and sending signals to effects processors during mixing. In the latter case, the aux bus that feeds the effects processor is usually referred to as a 'send', while the mixer channel that receives the effect processor's output will usually be called the 'return'. For more information, check out Paul White's 'Plug‑in Plumbing' feature back in SOS April 2002; you can find it at /sos/feb02/articles/plugins.asp.    

Korg All Access: Isaac Aryee from McBusted talks about Kronos

Saturday, September 27, 2014

Korg RimPitch Acoustic Guitar Tuner - Fear Not, You'll Be Ready!

Q. How do I record a double bass alongside other instruments?

Sound Advice : Recording


Having been a bass player for years, I've recently come into possession of an acoustic double bass. I seem to be getting a decent enough sound out of it that I think I'm ready to use it with my band. We're going to be recording soon, but will all be playing together in the studio. How can I record the bass alongside other musicians, reducing as much spill as possible?

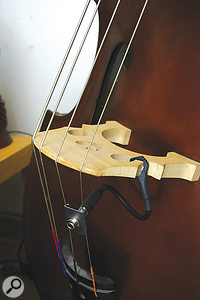
The 'modern' method of recording a double bass in the studio is to 'bug' it, often with a pickup fitted on the instrument's bridge. Any 'character' lost in the sound is then usually EQ'd back in. However, the 'vintage' way would have been to use careful mic and instrument placement, in conjunction with carefully placed acoustic treatment, to provide a degree of separation.

The 'modern' method of recording a double bass in the studio is to 'bug' it, often with a pickup fitted on the instrument's bridge. Any 'character' lost in the sound is then usually EQ'd back in. However, the 'vintage' way would have been to use careful mic and instrument placement, in conjunction with carefully placed acoustic treatment, to provide a degree of separation.The 'modern' method of recording a double bass in the studio is to 'bug' it, often with a pickup fitted on the instrument's bridge. Any 'character' lost in the sound is then usually EQ'd back in. However, the 'vintage' way would have been to use careful mic and instrument placement, in conjunction with carefully placed acoustic treatment, to provide a degree of separation.


Bradley Culshaw via email


SOS Technical Editor Hugh Robjohns replies: The obvious 'modern' solution is to fit a 'bug' — a bridge pickup or an internal mic — to the bass, which will provide a pretty high degree of separation. The sound character might not be entirely 'natural', but a little EQ should deal with that. The 'vintage' alternative is to use acoustic screens or gobos in the studio and thoughtful instrument and mic layout, with the aim of minimising spill and helping to provide some sound shadowing for mics, especially the double-bass mic, thus reducing the spill and providing a workable degree of separation from the other instruments playing in the studio. This is a well‑proven historic technique, and the remaining spill generally helps to gel the mix together and provide a great 'live' character to the mix. Of course, such spill makes it almost impossible to overdub replacement parts, but that's what practice and an unlimited number of takes are for!  


Korg Wavedrum Global Overview - Russ Miller

Friday, September 26, 2014

Q. What’s the best program for time‑stretching?

Sound Advice : Mixing


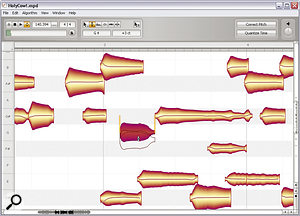
The current leaders in tempo‑matching and time‑stretching technology may be more advanced than is necessary for many people. Celemony's Melodyne is a superior piece of software for processing audio in this way, but for time‑stretching and tempo‑matching beat‑based music, something like Ableton Live may be all that is necessary.I was wondering what the latest and best program is for time-stretching. I purchased Apple Logic 9, but I don't find that quite suits my skill level. I use Audacity to change tempo, as I find it very intuitive to use, and it time‑stretches by a decent amount before degradation is noticeable. I am sure, though, that in this day and age there are better programs for this function. Are you aware of any?


Via SOS web site

Q. What’s the best program for time‑stretching?

The current leaders in tempo‑matching and time‑stretching technology may be more advanced than is necessary for many people. Celemony's Melodyne is a superior piece of software for processing audio in this way, but for time‑stretching and tempo‑matching beat‑based music, something like Ableton Live may be all that is necessary.The current leaders in tempo‑matching and time‑stretching technology may be more advanced than is necessary for many people. Celemony's Melodyne is a superior piece of software for processing audio in this way, but for time‑stretching and tempo‑matching beat‑based music, something like Ableton Live may be all that is necessary.Q. What’s the best program for time‑stretching?


SOS contributor Mike Senior replies: There are loads of bits of software that will do time‑stretching and tempo‑matching for you and, although I've no experience of the facilities in Audacity myself, I'd suspect that the current state‑of‑the‑art technology, commercially, is probably ahead of what is available as open‑source technology. You don't say what kinds of things you're trying to stretch, however, and in my experience the performance of any given tool depends a great deal on the type of audio material you feed it with. Propellerhead Recycle, for instance, is much better than most time‑stretching‑based tempo‑matching software when working on beats, drum loops, and other rhythmic material. Programs like Celemony's Melodyne or Serato's Pitch 'N' Time, on the other hand, tend to be much better at dealing with melodic phrases or full‑stereo mixes. However, all of these options may well be more complicated to get the best out of than something that's specifically set up for easy working with beat‑based music: Ableton Live, Apple GarageBand, or Propellerhead Reason, for example.    


Korg Taktile USB-MIDI Controller walkthrough with Adriano Clemente

Q. How can I use a figure‑of‑eight mic with the mid/side miking setup?

Sound Advice : Miking


I have two figure‑of‑eight Golden Age ribbon mics that I want to use as overheads for drum recording. I've read about Blumlein pairs and will try that, but I also wondered if I could try Mid/Side recording techniques. Can you use a figure‑of‑eight mic for the centre mic in that setup, and, if so, how do I get rid of the 'rear' sound from the centre mic? While I'm at it, can I ask if you know of any other neat recording tricks for using two figure‑of‑eight mics together?


Connie Buck via email

Recording a vocalist with two figure‑of‑eight mics can produce very good results. If the performer wants to play and sing at the same time, careful positioning to reject the unwanted sound from both mics (the vocals from the guitar mic and the guitar from the vocal mic) can achieve excellent separation.

SOS Technical Editor Hugh Robjohns replies: Yes, you can certainly use the M/S approach if you want to, and that does provide the potentially useful advantage of being able to adjust the stereo recording angle remotely to set the required image width.


Recording a vocalist with two figure‑of‑eight mics can produce very good results. If the performer wants to play and sing at the same time, careful positioning to reject the unwanted sound from both mics (the vocals from the guitar mic and the guitar from the vocal mic) can achieve excellent separation.Recording a vocalist with two figure‑of‑eight mics can produce very good results. If the performer wants to play and sing at the same time, careful positioning to reject the unwanted sound from both mics (the vocals from the guitar mic and the guitar from the vocal mic) can achieve excellent separation.However, the left‑right decoded signal from an M/S array comprising two figure-of-eights is essentially two figure-of-eights in an X-Y format: basically the same Blumlein array you are already familiar with. Altering the ratio of Mid and Side changes the equivalent mutual angle of the decoded X-Y mics, and distorts their polar patterns slightly. However, for matched Mid and Side levels, M/S with a pair of figure-of-eights decodes as a perfect Blumlein array. Indeed, this is precisely what Blumlein discovered and experimented with 80 years ago!


If you need to 'get rid' of the rear pickup of the Mid mic, you will have to place an acoustic absorber behind the mic; for example, the infamous SOS duvet, foam absorbers, or even some kind of reflection filter: anything to capture sounds that would otherwise head back into that rear pickup zone.


As for other neat tricks with dual figure-of-eights, there is a technique called the Faulkner Array that uses two figure‑of‑eight mics spaced about eight inches apart and facing forward. The idea is to capture a normal stereo sound‑stage in much the same way as an ORTF arrangement, but with significantly reduced sensitivity to reverberant sounds from the sides and above. It was a technique devised to deal with the acoustics of a church that had nasty side‑wall slapback issues.


Another situation in which I often use two figure-of-eights is capturing a singing guitarist. By careful placement and angling of the mics, it's possible to arrange their deep side nulls to provide a significant amount of rejection of the unwanted source: the guitar mic rejects much of the voice, and the voice mic rejects much of the guitar. If you do this carefully (and assuming the guitarist can sit still and not sway about!), you can achieve 20dB of separation or more, which is a major improvement on the usual dual-cardioid approach!


You can read more about this at /sos/1996_articles/dec96/singingguitars.htm.    

Thursday, September 25, 2014

Korg MS-20 Kit with the VOX Double Deca Delay Pedal

Q. Should I use a boundary mic when playing piano live?

Sound Advice : Miking


I play an acoustic baby grand piano and sing in a new bar. The environment fluctuates from being quiet to being 'moderately' noisy later on. There is permanent kit on top of the piano during performance (meaning, at present, that there is not the option of opening the lid). I'm ultimately not convinced that the piano is acoustically loud enough for when the room gets more noisy, but I'm more concerned about my ability to hear the piano. Due to the logistic difficulties of lack of space and inability to leave the lid open during performance, I'm thinking of getting a boundary mic to lay inside the instrument. I appreciate that this is not necessarily going to be the final word in creating a great piano sound, but at very least I'm looking to feed this signal to my monitoring, to help resolve that issue.Do you have any advice? I've never actually used a boundary mic in anger before. If it could work, it would be great if you could recommend suitable models.
At the budget end of the boundary mic market, the Audio Technica ATR9 is a decent option. This model is no longer in production, but it should still be possible to find it on sale at a low cost. If your budget will stretch further, the rather more expensive Beyerdynamic MPC65 offers excellent quality.


Via SOS web site


SOS Editor In Chief Paul White replies: I'd definitely be inclined to try a couple of boundary mics fixed under the lid so that you can get a balance between the treble and bass strings. Pretty much any model will work adequately in what you have already recognised as a less than ideal situation, so there's no point in spending too much money. As long as you can open the lid long enough to fix the mics to the underside of the lid, using double‑sided tape or sticky fixers, you should be able to bring about an improvement. Suitable models cost from around $40 to $300 each, with the inexpensive Audio-Technica ATR9 looking like a good bet. Though this is no longer in production, it may still be available from certain retailers for under $40. Further up the price range, the Beyerdynamic Opus 51 and Beyerdynamic MPC65 would also be suitable. Also, the now discontinued AKG 542 could be a good bet, if you can find it. You will, of course, need a mixer with two spare mic inputs and phantom power to run the microphones, and you may have to experiment with the mic positioning to achieve a reasonable balance between the various strings. At the budget end of the boundary mic market, the Audio Technica ATR9 is a decent option. This model is no longer in production, but it should still be possible to find it on sale at a low cost. If your budget will stretch further, the rather more expensive Beyerdynamic MPC65 offers excellent quality.At the budget end of the boundary mic market, the Audio Technica ATR9 is a decent option. This model is no longer in production, but it should still be possible to find it on sale at a low cost. If your budget will stretch further, the rather more expensive Beyerdynamic MPC65 offers excellent quality.Q. Should I use a boundary mic when playing piano live?

Q. Should I use a boundary mic when playing piano live?

SOS Technical Editor Hugh Robjohns adds: I agree that using one or two boundary mics would be a practical solution, and with careful placement should be capable of a reasonable (if inherently very close) sound quality. Boundary mics are available across a wide price range — www.microphone‑data.com lists 34 current models to choose from — and, in my experience, even the low‑price models can deliver quite usable sound quality.


The biggest problem is likely to be mic overload; a grand piano is a powerful instrument when played enthusiastically, as you're likely to be doing in a noisy environment, so look for a model with a moderate sensitivity and a high maximum SPL. I'd also recommend choosing one with a flat frequency response: many have a heavy presence boost which will tend to make a piano sound very 'shouty'.


I second PW's suggestion of the Beyerdynamic MPC65, and I've also had good results with the MBHO 621E with a closed‑lid piano. It really does pay enormously to devote plenty of time to finding the optimum location for the mic (or mics), though, as small changes of position will result in big changes to the sound.


Once you've found the best place(s) for the mics, make sure that they're fixed really securely — but flexibly — to the underside of the lid. The last thing you need is a loud clunk half way through your performance, followed by a 'honky‑tonk on a firing range' effect as the mic falls into the strings and bounces around for the rest of the number! On the other hand, you don't want mechanical vibrations from the piano mechanisms being passed directly into the mic through the mount, either. A soft rubber base or a layer of foam helps a lot here. And be careful with the cables; I've known of mic cables being badly pinched, and even completely severed, when the lid was closed again!An alternative to boundary mics for use with an acoustic piano would be a contact mic, such as the Schertler DYN‑P. This might prove easier to securely affix to the piano, and would reduce the risk of the mic falling into the instrument mid‑performance, but could be a more expensive option than boundary mics.An alternative to boundary mics for use with an acoustic piano would be a contact mic, such as the Schertler DYN‑P. This might prove easier to securely affix to the piano, and would reduce the risk of the mic falling into the instrument mid‑performance, but could be a more expensive option than boundary mics.


An alternative to the boundary mic is the contact mic, which gives stunning separation and may be easier to fit in your case. Again, some experimentation will be necessary to find the best location(s), but I've been really impressed with the quality obtained using Schertler DYN‑P (and DYN‑GP) pickups. Not cheap, but worth it in situations where isolation is the priority. The pickups are fitted to the underside of the soundboard using a 'blu‑tak'‑like putty, which is usually very reliable and might be a lot easier to install than boundary mics inside the lid, in your situation.    

KORG DS-DAC-100 : Beautiful sound and an elegant aesthetic

Wednesday, September 24, 2014

Q. How much power does my stage system need?

I'm trying to work out how much power a PA system I work with draws, and I also need to come up with a sensible 'plug‑it‑all‑in' type of procedure. (I've read the Sound On Sound December '05 article 'PA Basics'.) It's mainly small venues we play in, such as function rooms and town halls. Looking at the manual for my Mackie SA1530z, I'm kind of baffled. It says:


Line Input Power Europe: 230V, 50Hz

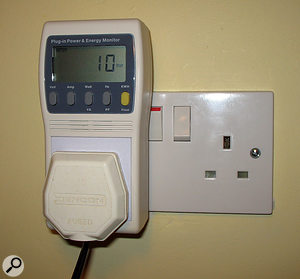
If you need to know how much current your setup is using, a simple energy monitor like this should do the trick: plug in whatever you'd like to measure and its power consumption will be displayed.

Recommended Amperage Service: 16 amps


Is this saying that a 16‑amp circuit is recommended? The spec sheet doesn't seem to list how much current the box will draw. Also, it's often stated that FOH, mixer and racks, lights and backline should be powered from their own separate sockets (three in total). Is it acceptable to power from both sides of a double socket and another adjacent socket, therefore, all being powered from the same ring main?


Via SOS web site


SOS Technical Editor Hugh Robjohns replies: The 16‑amp thing looks like a generic suggestion to me. In the UK, standard domestic outlets are nominally 13A anyway!


Essentially, what they are saying is that it needs to be plugged into a sensible supply. The typical average current will be a few amps at most, but the initial inrush current on switch‑on will be considerably higher, so don't try to turn everything on in one go!


If you need to know the real current and power‑consumption figures, invest in something like an energy monitor, such as the one I've found here: www.maplin.co.uk/plug-in-mains-power-and-energy-monitor-38343. This one is marketed by Maplin in the UK, but I'm sure you'll find similar devices from all the usual suppliers. You simply plug in the device you want to know about, and the display will give you the current and power being consumed, as well as the supply voltage and frequency. It's a really handy device and I use mine a lot when testing and checking equipment.


Regarding the use of wall sockets, assuming that you're working with a PA and backline system that is consuming less than about 4kW in total (which would be most systems for a modest‑sized venue), use a double socket to run all the audio equipment. That minimises any problems with ground loops. If you need to know how much current your setup is using, a simple energy monitor like this should do the trick: plug in whatever you'd like to measure and its power consumption will be displayed.If you need to know how much current your setup is using, a simple energy monitor like this should do the trick: plug in whatever you'd like to measure and its power consumption will be displayed.


Run all the backline from one side of the double outlet, and all the PA (FOH, racks, PA and monitors, for example) from the other side. Supplying the two systems from their own RCDs (Residual Current Devices) is essential too, particularly from the point of view of preventing a backline fault from taking out the PA. If the musicians want to use their own RCDs for their gear, that's fine too!


Running the FOH on a long mains extension from the PA power‑supply socket (or distribution board) continues the theme of 'star grounding' and will minimise the potential for ground loops in the PA system. Run lighting from a different socket (or sockets) and try to keep the dimmer racks and cabling well away from the audio cables.    

KORG volca SONG - by koishistyle

Q. Are there any panning rules for maintaining mono compatibility?

Sound Advice : Mixing


With regard to stereo image width, is there typically a 'cap' you would place on tracks to maintain a good mono sound? Perhaps there's some kind of relatively hard‑and‑fast ground rule (assuming a typical sort of track layout), such as 'never go beyond 50 percent either way'?


Via SOS web site

Flux Audio's Stereo Tool is the pick of the freeware stereo vectorscope displays currently available, and can help you head off mono-compatibility problems, especially if you're working on headphones.

SOS contributor Mike Senior replies: There are two basic issues regarding mono compatibility. The first is that panning any mono track off‑centre reduces its level in the mono balance by a maximum of around 3dB when panning hard left or right. From this perspective, the only ground rule I'd apply there is to make sure that the balance continues to function correctly in mono. If your main guitar power‑riff is panned hard left, it may struggle to fulfill its musical function in mono, simply by virtue of losing a lot of ground against things like the bass, kick, snare and lead vocal (which all typically reside close to the centre).


The second issue to be aware of is that any stereo recording or stereo effect return in your mix may contain elements in one channel that are out of phase or polarity-inverted compared to the other channel. These can phase‑cancel when summed to mono, and although this might simply result in a subjective level drop (as in the case of some M/S‑based widening effects), typically the cancellation is frequency‑selective in some way, so the tone of affected parts suffers as well. Stereo drum-overhead mics and stereo piano recordings commonly fall foul of this to some extent, on account of the widespread use of spaced‑pair recording techniques on these instruments, but almost any multi‑miked part can potentially come a cropper if you pan the individual mics independently in the stereo field. Flux Audio's Stereo Tool is the pick of the freeware stereo vectorscope displays currently available, and can help you head off mono-compatibility problems, especially if you're working on headphones.Flux Audio's Stereo Tool is the pick of the freeware stereo vectorscope displays currently available, and can help you head off mono-compatibility problems, especially if you're working on headphones.


The cast‑iron remedy to uncertainty here is to make a point of comparing your mix against commercial productions in mono. Conventions on stereo imaging vary a lot between styles, and even between engineers, so it's tricky to generalise with any validity. However, what may help you is to get hold of a stereo vectorscope display for your DAW, such as Flux Audio's fantastic freeware Stereo Tool plug‑in. Once you get used to how things look on there, it can tip you off to impending mono phase‑cancellation problems, especially if you're working on headphones, which don't give the same funny 'outside the speakers' stereo effect that's usually a clear warning sign on nearfields.


All that said, there is one little panning‑width rule of thumb that I do tend to follow personally, but this isn't as much related to mono compatibility as it is headphone listening. When you pan something hard to either side in headphones, it gives the impression that it's right by that ear, because there's no crosstalk between that earcup and the opposite ear. I've always found this a bit distracting myself, and it can make it tricky to blend the sounds in your mix convincingly, in my experience. For this reason I rarely pan mono sources beyond about 85 percent either way, because this makes them a little less dislocated in headphones and actually affects the stereo presentation very little, especially if you're feeding a selection of stereo effect returns into your mix anyway, which will still guarantee that the stereo picture is painted right out to the edges. Bear in mind, though, that this is very much an issue of personal preference, and there are lots of very famous engineers who actively prefer the extreme‑panned presentation. The only way to make up your own mind is, again, to compare your mix to your favourite records on headphones and decide which sounds best to you.


Tuesday, September 23, 2014

KORG Nuvibe - Static Demos The rebirth of a legendary effect

Q. Which of these mics is best for recording my guitar?

Sound Advice : Recording


I have a nylon‑strung Ibanez guitar, which I think I paid $200 for. The electronics in the guitar are not cutting the mustard: the lows seem to pick up too heavily, while the mids and highs are thin in tone. The guitar sounds much better played acoustically than it does recorded plugged in, which leads me to my question. Which of the following mics would be most suitable for recording my guitar: the Shure SM57 dynamic or the Sterling Audio ST51 condenser? I don't want to break the bank on a mic, and these appear to be the two options available within my budget. I'm mainly concerned with recording my guitar. The condenser mic isn't a necessity unless it's the best option of the two mics I've mentioned.Via SOS forum


Classic mic that it is, the SM57 won't usually be the first choice for acoustic guitar. However, if you're after a more percussive sound within busy arrangements, it may be just the job.Classic mic that it is, the SM57 won't usually be the first choice for acoustic guitar. However, if you're after a more percussive sound within busy arrangements, it may be just the job.


Classic mic that it is, the SM57 won't usually be the first choice for acoustic guitar. However, if you're after a more percussive sound within busy arrangements, it may be just the job.
SOS contributor Mike Senior replies: The textbook response to this question would be that a condenser microphone is the better bet, on account of its typically more extended frequency response, higher sensitivity and lower noise. Whether the textbook answer holds in your case will depend on a couple of factors.


Firstly, if you're planning on incorporating the recorded guitar within a wider arrangement, the extended frequency and dynamic range of the condenser may be overkill, depending on the nature of the arrangement. Although the dynamic will tend to give you a woodier and more percussive sound with less sparkle, and will not normally perform as well in exposed situations, if you're slotting the sound into a small space in someone else's production, or building up your own tracks primarily based around MIDI devices within a software DAW, then a less hi‑fi sound might actually be an advantage. Secondly, if your budget is extremely limited it's possible that your recording hardware may have no phantom‑power provision. If so, you'll only be able to use the ST51 if you upgrade your audio interfacing, beg/borrow a separate hardware unit of some kind, or invest in a separate phantom‑power supply (such as Sterling's own PHP1).


If you do choose the condenser option, though, my own experiences of entry‑level large‑diaphragm mics (although admittedly not the ST51 itself) suggest that you'll need to be quite careful to avoid excessive pick/fret noise, because I've always found such mics to be a little harsh‑sounding at the top end. This could be particularly relevant in your case, as the nylon strings aren't likely to be as bright‑sounding as steel strings would be, and if you decide to use any EQ to brighten the instrument at mixdown this will almost certainly emphasise any extraneous noises. If you're looking for additional hints on producing the best recorded sound, check out our April 2010 cover feature on recording acoustic guitars, which is now free to view on the SOS web site at /sos/apr10/articles/acguitar.htm. Don't forget to have a listen to the article's associated audio files as well, as these showcase a variety of different mics (including the SM57), mic positions and mix‑processing techniques.    


Korg MS-20 Mini High Five

Monday, September 22, 2014

Q. Can I pair a higher‑wattage speaker with my Marshall cab?

Sound Advice : Mixing


I have obtained a 1980s Marshall 1931 cabinet with a Fane speaker, which is rated at 75 Watts, open back. Can I put in a speaker that can handle bass and guitar rating at about 100 Watts? If so, which one is the best and can I put on a closed back?

If you want to engage in a bit of cabinet DIY and put a closed back on your speaker, be aware that this could noticeably change the quality of the cabinet's tone.

If you want to engage in a bit of cabinet DIY and put a closed back on your speaker, be aware that this could noticeably change the quality of the cabinet's tone.If you want to engage in a bit of cabinet DIY and put a closed back on your speaker, be aware that this could noticeably change the quality of the cabinet's tone.


Dave Crawley via email


SOS Editor In Chief Paul White replies: There's no mechanical reason not to do this, but be aware that if you put a closed back on the box, the sound will change and you'll probably lose some low end due to the relatively small size of the cabinet.


This may be OK for guitar — you'll just have to judge that for yourself — but it is unlikely to have enough tonal depth for bass. If you really need to handle bass, it would be better to build or buy a new cabinet to suit your new speaker, and Fane probably have design notes you can use to see how big this would need to be.  


Saturday, September 20, 2014

Korg All Access: Jon Shone, Musical Director for One Direction Talks about Kronos

Q. Is it worth spending money on new headphone cables?

Everyone keeps going on about how great the Cardas cables make headphones sound. Is there any truth about cables ever making things sound better in any situation? If you are paying $400 and above for a set of headphones, why — apart from on the basis of price — would the makers compromise? That would defeat the objective, right?Via SOS web site

While some people may wish to spend money on expensive cables for their (already good-quality) headphones, it's probably wiser to invest elsewhere. In the case of a decent pair — such as these AKG headphones — the manufacturer will almost certainly have fitted cables of the appropriate quality anyway.


SOS Technical Editor Hugh Robjohns replies: If you really want my advice, I'd say spend your money on something more beneficial to your musical endeavours. I´ve no personal experience of the Cardas cables, but I have extensive experience of after-market cables in a wide range of applications and I remain a skeptic.


At the level of headphone you are talking about (high-end Sennheiser and AKG, for example) I think it fair to say that the manufacturers have fitted what they believe to be entirely adequate cables. I've certainly never felt the need to change the cables on my AKG K702s or Sennheiser HD650s, anyway. While some people may wish to spend money on expensive cables for their (already good-quality) headphones, it's probably wiser to invest elsewhere. In the case of a decent pair — such as these AKG headphones — the manufacturer will almost certainly have fitted cables of the appropriate quality anyway.While some people may wish to spend money on expensive cables for their (already good-quality) headphones, it's probably wiser to invest elsewhere. In the case of a decent pair — such as these AKG headphones — the manufacturer will almost certainly have fitted cables of the appropriate quality anyway.


Headphone amps certainly can make a very significant difference to perceived headphone quality, though, and I would say that money spent here is usually worthwhile and easily noticeable. Headphone cables? I don't think so. But I'm sure there'll be plenty of people who have purchased expensive after-market cables and are only too happy to say how they have nothing but praise for them.


My engineering head tells me that if a different cable makes a clear difference then either the (old or new) cable, or the headphone amp, is operating outside of the intended design parameters. If the cable meets specifications for resistance, capacitance, and inductance, then it should work as intended. If it doesn't, then it won't work, and it may affect the performance of the headphone amplifier.    


Friday, September 19, 2014

Korg All Access: Producer Steve Levine talks MS-20 mini and VOX Trike Fuzz and Double Deca Delay

Q. Can you help me find the right amp-distortion freeware VST?

Sound Advice : Mixing


I'm looking for any VST freeware that can really do for amp distortion what convolution reverbs can do for sound reflection simulation. I am thinking of the work of now-defunct Johnson Amplification, where amps were modelled in some way that was a big step forward in processing technology, yielding extremely accurate digital simulation. Is there any kind of way to take the clean and amped signals of a guitar, and then replicate the sound spectrum change so that I can apply it to a recording of a clean guitar tone to simulate the same amp tone?Mike Van Wagner, via email

Although there are numerous freeware amp-modelling plug-ins available, there are also extremely affordable entry-level commercial products, such as Waves GTR Solo pictured here, which provide the 'one-stop' convenience of a range of reliable high-quality emulations within a single interface.

SOS contributor Mike Senior replies: It is possible to use convolution technology to recreate guitar-amplifier tones, but it goes well beyond the capabilities of the kind of convolution that we normally use for creating reverb effects. By the very nature of the way it works, normal static convolution can't capture dynamic effects such as compression, distortion and modulation treatments, so established freeware static-convolution engines, such as Christian Knufinke's SIR and Liquidsonics' Reverberate LE, won't be much help. Although you can find numerous impulse-response samples of a variety of guitar amps/cabs on the web, you'll find that they only model the frequency response and resonance characteristics of the source hardware, not the distortion.Although there are numerous freeware amp-modelling plug-ins available, there are also extremely affordable entry-level commercial products, such as Waves GTR Solo pictured here, which provide the 'one-stop' convenience of a range of reliable high-quality emulations within a single interface.Although there are numerous freeware amp-modelling plug-ins available, there are also extremely affordable entry-level commercial products, such as Waves GTR Solo pictured here, which provide the 'one-stop' convenience of a range of reliable high-quality emulations within a single interface.


There are more advanced dynamic convolution processes around that are better equipped to deal with these kinds of challenges (the former Sintefex Replicators, Focusrite's Liquid range or Acustica's Nebula 3 plug-in, for example), but nothing I know of in freeware that will convolve a useful range of guitar amps. Even if you do invest in something like Nebula 3 (which includes tools to make convolution presets from your own gear), this still won't do what you're hoping, though: it will need to pipe a load of specialised test signals through the amp in question and then analyse the outcome off-line before it can attempt to recreate the amp's tone. Feeding it with simple DI and amped recorded signals won't give it the right information to work with.


To be honest, though, you don't need to tangle with dynamic convolution to find decent freeware amp modelling, because there are masses of options out there. (If you want some recommendations, there's a list of my personal favourites at www.cambridge-mt.com/ms-ch12.htm.) Quality is rather variable with freeware, though, so there's a lot to be said for spending a little money on a commercial software amp emulation if you have particular amp sounds you want and you'd prefer to just get on with making music. There are very affordable offerings from almost all the major players in the field, including IK Multimedia, Line 6, Native Instruments, Overloud and Waves.    


Korg Supports The School of Rock by Backlining with the Korg Kross!

Thursday, September 18, 2014

Q. Which amp should I buy to use with some Mixcubes?

Sound Advice : Recording


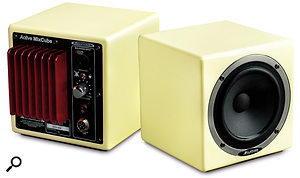
A mate is moving abroad and selling lots of his studio, which is good for me as I'm about to buy his pair of Avantone Mixcubes off him! But, unfortunately, he's taking his amp with him.I only have $200 to spend on another one. What's best? The only reference monitor amp I can find in this range is the Samson Servo 120, but I'd like to have some more choice. Do you have any other good suggestions for something suitable I could buy without spending much more money? I was thinking perhaps a hi-fi amp, such as one of the cheaper Cambridge Audio amps, like the Cambridge Audio Topaz AM1? The Avantone Mixcubes are great secondary monitors, but you'll need an amp to go with them! Something like a second-hand Rotel RA 612 should do the job for very little outlay.The Avantone Mixcubes are great secondary monitors, but you'll need an amp to go with them! Something like a second-hand Rotel RA 612 should do the job for very little outlay.Via SOS web site

The Avantone Mixcubes are great secondary monitors, but you'll need an amp to go with them! Something like a second-hand Rotel RA 612 should do the job for very little outlay.

SOS Reviews Editor Matt Houghton relpies: These aren't exactly intended to be your primary reference monitors, so an old hi-fi amp should be fine. I use a second-hand Rotel RA 612 for a similar job and that set me back about $70. Alternatively, a Cambridge Audio amp (seeing as you mention them) would also be fine if you want something that looks a little newer. Personally, while I see the value of Auratones, Avantones and similar secondary monitors, I don't see why anyone would want two of these speakers when one would do the job just fine.    

KORG All Access: Ian Peres of Wolfmother talks about his KORG keyboards

Q. Should I mix an album as I’m writing it, or all at once?

I'm in the long process of trying to write enough material to put a cohesive, album-length bunch of stuff together. I have a few ideas in 'semi-baked' state, and have got to the point where I have one track written, structured and recorded, and am ready to make a proper mix (I've already made a rough mix).My decision now is whether to go to town on mixing that one track, and then get on with the rest of the writing and recording at a later date, or to keep it at the rough mix stage, finish the rest of the material, then mix the whole lot afterwards.I'm guessing the second approach would lead to greater overall consistency, but this is my first real stab at 'doing an album', if you want to call it that. My output up to now has been rather discontinuous, so it hasn't mattered before.What approach would you take, and how do you think it could help your progress?Via SOS web site


SOS Reviews Editor Matt Houghton replies: Consistency is great if it's consistently good. Otherwise it's not such a laudable aim! There's no harm in still writing and recording stuff while you're mixing other stuff, but I would rather mix one track at a time, so that any lessons I learn can be applied to the next mix, and so on.

There's no particular reason not to continue writing while you're mixing other tracks, but it makes sense to complete a couple of mixes before getting stuck into the rest of a project if you're, say, recording an album. This means that you can apply what you've learnt from your first mix(es) to the rest of the material. It also means that any recording issues you pick up during the mixing stage won't appear in all tracks.

Also, bear in mind that, while mixing the first or second tracks, you might have one of those dawning "Oh, that would have been so much easier if only I'd recorded it like that!” moments, and that would be a bugger if you'd already tracked everything else.There's no particular reason not to continue writing while you're mixing other tracks, but it makes sense to complete a couple of mixes before getting stuck into the rest of a project if you're, say, recording an album. This means that you can apply what you've learnt from your first mix(es) to the rest of the material. It also means that any recording issues you pick up during the mixing stage won't appear in all tracks.There's no particular reason not to continue writing while you're mixing other tracks, but it makes sense to complete a couple of mixes before getting stuck into the rest of a project if you're, say, recording an album. This means that you can apply what you've learnt from your first mix(es) to the rest of the material. It also means that any recording issues you pick up during the mixing stage won't appear in all tracks.


SOS contributor Mike Senior adds: I'd second Matt on that one. It may mean that you end up redoing the first couple of mixes with the benefit of hindsight, but I think, overall, it's probably the best option if you're still feeling your way though a little bit with the mixing side of things.


It's no different from when you're mixing anything: you have to reference your work against any other material you want consistency with. Often that will be commercial releases with which you want your work to compete, but it can just as easily be other mixes you've done, which are destined for the same record. If you make sure to do that, then everything else should sort itself out in the long run.


I do tend to keep the main send effects I used for the first mix available for the second if I'm working on several things for one artist, as long as those effects met with their approval first time round! That does help to give some conformity to the sound. However, there are perfectly valid aesthetic reasons for not wanting to make all the tracks sound the same, so you should still try to make each track shine on its own terms. If that means using completely different mixing strategies, then so be it.    

Wednesday, September 17, 2014

Choosing the Right Keyboard -- Workstations vs. Arrangers

Q. What are the advantages of passive radiator design?

Sound Advice : Theory


I don't hear a lot said about passive radiator speaker technology. What are pros and cons of that design? Technically, it's still a sealed-box design and should have some benefits over a ported design, right?Via SOS web site

The Mackie HR 824 MkII is one of the the few compact studio monitors that currently uses a passive radiator, located on the rear panel behind the amplifier chassis.

SOS Technical Editor Hugh Robjohns replies: A passive radiator speaker is a sealed box insofar as you couldn't easily pour a pint of beer into the thing (should the madness take you), but as far as the air movement is concerned it isn't really sealed at all, because the internal air-pressure changes are still relieved by the passive radiator moving in and out.The Mackie HR 824 MkII is one of the the few compact studio monitors that currently uses a passive radiator, located on the rear panel behind the amplifier chassis.The Mackie HR 824 MkII is one of the the few compact studio monitors that currently uses a passive radiator, located on the rear panel behind the amplifier chassis.


What the passive radiator does, basically, is create a larger port area, without the airflow noises that might otherwise occur, and help control the frequency range over which the port is effective. More swings and roundabouts, really, but it definitely falls into the vented box camp, and doesn't have any of the positive time-domain benefits of the sealed-box team.  

Under the Hood with microKORG at Knitting Factory Brooklyn

Tuesday, September 16, 2014

Q. Should I buy a stand-alone master clock?

I'd like to know what the advantages and disadvantages are of using stand-alone word clock units, like Apogee, Lynx, Antelope, Mytek and so on, versus the old built-in word clock in a TC Konnekt Studio 48. I don't need many sockets (up to six, maybe) and I'm OK with daisy-chaining my gear as I do now, but would a separate word clock have many advantages over what I have now? I can put around £400 to £500 aside to buy something, if it's worth it. Via SOS web site


A master clock may well become necessary if working with external video machines because of the need to synchronise video and word clock. In this case, a good-value option would be the Mutec Iclock, shown here.

SOS Technical Editor Hugh Robjohns replies: If it ain't broke, why fix it? As a general point, running separately buffered clock feeds from a clock distribution unit is technically better (in terms of jitter and overall timing precision) than the daisy-chain technique. However, there's nothing fundamentally wrong with daisy-chaining either. And if it's working reliably now, there's no obvious need to change anything.


In general, converters (A-D and D-A) work better and deliver better technical performance if they run from their own internal clocks. Almost without exception, the measurable performance of most converters driven from external clocks is degraded, and the best you can hope for is that the degradation is negligible or minimal. Devices that process and pass only digital signals are not particularly critical of the clocking arrangements and quality is totally unaffected by moderate clock jitter.


So my usual recommendation is to use the internal clock of your 'master' A-D converter as the system's master clock, and distribute that via a dedicated clock distribution unit. The Drawmer D-Clock provides good value for money, for example. A master clock may well become necessary if working with external video machines because of the need to synchronise video and word clock. In this case, a good-value option would be the Mutec Iclock, shown here.A master clock may well become necessary if working with external video machines because of the need to synchronise video and word clock. In this case, a good-value option would be the Mutec Iclock, shown here.


If you're working with external video machines, then a master clock usually becomes a necessity because of the need to synchronise video and word clock, and in that situation I think the best value for money comes from something like the Mutec Iclock or Audio Design SynchroGenius. For the very few audio-only installations where a master clock is beneficial for practical reasons then, again, the Drawmer M-Clock boxes provide excellent value for money.


As I demonstrated in the article 'Does Your Studio Need A Digital Master Clock?' [go to /sos/jun10/articles/masterclocks.htm for the full article], the more expensive options like the Big Ben and the Antelope offered no detectable advantages in terms of audio quality, and few, if any, facilities that aren't available elsewhere for less.


If I were you, I'd invest that money in something else that would make a real, practical and tangible difference to your music-making activities.    

Jordan Rudess and the Korg TinyPIANO

Q. Can you help me with my viola recording setup?

Sound Advice : Recording


This month I'm planning a week's worth of recording for a commercial release of my own viola-led instrumental music, and I'd appreciate your thoughts on getting the most of my proposed viola-recording setup. The room is the inside of a 7x4-metre wooden shed, with lots of rafters to hang quilts from, and the proposed mic is a Coles 4038 ribbon design, with an SE Electronics Reflexion Filter behind the mic and two or three quilts suspended behind the performer.Simon Lyn, via SOS web site


SOS contributor Mike Senior replies: Experimentation is likely to be a big part of finding the sound you're after, and the space feels like it's big enough that you shouldn't have to put up with any boxiness. I checked out the files on your site (www.simonlyn.com); I think you want to try to capture quite a dry and up-front sound for putting together such intricate and detailed arrangements, so that you have complete freedom in terms of the ability to synthesize involving imaginary environments for them at mixdown. However, I'm sure you're already well aware that the viola (like any string instrument) often doesn't sound that great if you mic it too close; the string buzz and mechanical noises tend to dominate over the fuller and more resonant tone of the wood. This makes me think that your instinct of using a directional mic of some sort in combination with acoustic padding is eminently sound. That way you can get far enough back from the instrument to get a balanced impression of all its frequencies, but without getting too much room sound. This frequency dispersion diagram for violin and cello from SOS May 2006 also provides some useful guidelines for recording viola, given the structural similarity of the instruments.This frequency dispersion diagram for violin and cello from SOS May 2006 also provides some useful guidelines for recording viola, given the structural similarity of the instruments.


In that regard, using the Coles (naturally a figure-of-eight polar pattern by nature of its design) might not be a bad idea, as you'll get the same kind of direct/reverb balance out of that as you would out of a cardioid, but any off-axis pickup will probably be better behaved tonally. The idea of a Reflexion Filter behind the mic is also eminently sensible, in that case, to cut down on rear-arrival sound levels. The Coles will also probably give you a smoother high end to the sound than a condenser would.

This frequency dispersion diagram for violin and cello from SOS May 2006 also provides some useful guidelines for recording viola, given the structural similarity of the instruments.

Are there any possible down sides, though? Well, you might actually want a bit more forwardness at the high end in your case, to emphasise the tiny high-frequency nuances and to keep the sounds up front. Also, you'll need a good deal of gain to pick up all the internal details of your softer playing with a ribbon mic even a few feet away, and a lesser preamp design might not give you that degree of level hike without unacceptable noise levels. If you've got a good preamp, though, then the ribbon should be plenty quiet! And, speaking of noise, the one disadvantage of pulling the mic away from the performer is that you may then be in more danger of obtrusive background noise if the hut you're working in isn't soundproofed or in a reasonably isolated location.


The rest of the job will just be a question of trying out different miking positions, and there are some pointers in Hugh Robjohns' excellent 'Recording A String Section' feature back in SOS May 2006, which might be useful here, especially the dispersion diagram. One other idea to throw in is that I might actually be tempted to record in stereo, especially for the lead lines, simply because stereo recordings often seem more natural and present to me for single string instruments, and you've got more than enough room to accommodate a wider instrument image given the comparatively sparse textures you create with your arrangements. Again, though, I'd probably go for directional mics when specifying a stereo mic rig, rather than using anything involving omnis, again so that you can keep things nice a dry without having to mic too close.    

Monday, September 15, 2014

Korg All Access: Steve Levine Talks about the DS-DAC 100

Q. How do I understand a VU meter correctly?

I have recently invested in the range of UAD2 plug-ins, but am afraid I am not sure how to read the VU meters correctly. I am fine with the VU meter showing gain reduction on a compressor, but when it comes to the output reading — for example, +4dB or +10dB on the same compressor — I am not sure for what I am aiming for, output-wise? Am I right in thinking that the nominal operating level should be averaging at around 0VU?Also, I think I need to catch up on my dBus and my dBFSs. If my aim is to have the average level around or slightly above 0VU, I take it that going into the red is OK, as long as the average level is around 0VU. I think I remember reading that VU meters didn't respond to high transients very well, hence going into the red, so that would make sense.Via SOS web site


SOS Technical Editor Hugh Robjohns replies: The VU meter (and the PPM) are analogue tools designed for the analogue world. They indicate signal levels around the nominal operating level and they don't show the headroom margin at all.

A nominal operating level would be 0VU, which normally equates to +4dBu in the analogue world. As most good analogue equipment clips at around +24dBu, there is usually about 20dB of headroom to capture fast transient peaks that the meter can't show when the signal is averaging at around 0VU.

0VU is the nominal operating level and, in the analogue world, that is usually (but not always) +4dBu. Most decent analogue equipment clips at about +24dBu. This means that when signals are averaging around the 0VU point there is about 20dB of headroom to capture the fast transient peaks that the meter can't show. A nominal operating level would be 0VU, which normally equates to +4dBu in the analogue world. As most good analogue equipment clips at around +24dBu, there is usually about 20dB of headroom to capture fast transient peaks that the meter can't show when the signal is averaging at around 0VU.A nominal operating level would be 0VU, which normally equates to +4dBu in the analogue world. As most good analogue equipment clips at around +24dBu, there is usually about 20dB of headroom to capture fast transient peaks that the meter can't show when the signal is averaging at around 0VU.


Digital peak meters, in contrast, do show (most) transient peaks and do show the headroom margin. The clipping point is always at 0dBFS, and so, if you build in the same kind of headroom margin in a digital system as we've always enjoyed in the analogue world, you need to average the signal level at around -20dBFS, at least while recording (tracking) and mixing, with transient peaks kicking up to about -6dBFS occasionally.


It has become standard practice to remove the headroom margin when it is no longer required, after final post-production and mastering of the final mix, which is why commercial music averages about -12dBFS or so and peaks to 0dBFS.    


Korg AudioGate 3 - High Definition Audio Player Software

Saturday, September 13, 2014

Q. Is there a monitor controller that won’t colour the sound?

Sound Advice : Mixing


I recently spent €4000 on professionally designed and installed acoustic design and treatment. I then spent a further €4000 on a pair of Adam S3X-V Monitors. As you can see, I care about sound! I will probably also buy a TC Electronic Konnekt 48 converter. However, for correct monitoring I need to change constantly the volume of what I'm hearing, and also switch between my main monitors and an Auratone 'HorrorCube'. For this reason I was obviously thinking of buying a monitor controller. The one I have in mind is the SM Pro Audio M-Patch 2. My first question is: will this colour the sound? Obviously, I don't want any unit between my converters and my bloody expensive monitors changing the sound in any way! If this model is no good I can always buy a Mackie Big Knob, but this costs about twice that of the SM Pro Audio model and simply has 20 more connections than I need. Also, if the SM Pro Audio controller changed the sound, wouldn't the Big Knob change it as well? As you can see, I'm not very confident about putting an additional unit between converters and monitors, but this is because I have never done it. Perhaps someone with more experience than me can help.Miguel Tain Rubio, via email

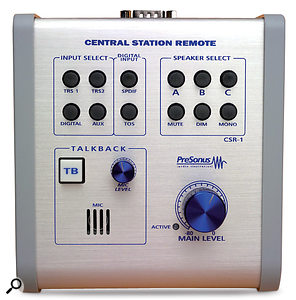
Truly transparent active controllers are inherently expensive things to buy, so a passive monitor controller could be a better-value option to consider if you are concerned about colouring the sound. The SM Pro NanoPatch+ is a simple volume control, while the Presonus Central Station offers speaker and input switching too.

SOS Reviews Editor Matt Houghton replies: First of all, it should be pointed out that an optional remote control is available for the Konnekt 48, providing volume control and the ability to switch between up to three sets of speakers, among other functions. This might well prove to be a simple, convenient and good-sounding solution for your purposes. If there's a possible down side, it's that in common with adjusting levels in software, it presumably attenuates the signal in the digital domain, which theoretically might not give the best results; it also means you have no 'hard' control over the levels reaching your speaker, so if for some reason the interface crashes and puts out full-scale noise, you risk ear and speaker damage. For that reason a separate monitor controller might still be worth investigating.


It's true that affordable active monitor controllers can 'colour' the sound slightly, though I haven't personally used the Mackie Big Knob. The M-Patch 2, however, is a passive device, so should be transparent. We reviewed it back in Sound On Sound December '06, if you want to know more about it (/sos/dec06/articles/smprompatch.htm). If I were to choose an active controller, I'd probably go for a more expensive device with high-quality onboard D-A converters, such as the DACS Headmaster (/sos/nov09/articles/dacsheadmaster.htm), Crookwood C2 (/sos/aug07/articles/crookwoodc2.htm) or Dangerous D-Box (/sos/mar09/articles/dangerousdbox.htm), amongst others. This isn't a cheap option, but you'll generally get a lot more functionality and high-quality converters that don't tie up the analogue I/O on your audio interface.

Q. Is there a monitor controller that won’t colour the sound?

Before you convince yourself of the need to splash the cash, though, I'd suggest pausing for thought: people have been making great records using the active monitor control functions on mixing consoles of varying quality for decades. In other words, it's possible to get very hung up on making everything in the signal chain technically perfect and forgetting about the business of making music!


SOS Technical Editor Hugh Robjohns adds: In my experience, budget active monitor controllers often do colour the sound slightly, and truly 'transparent' active controllers are inherently expensive beasts, and they often incorporate facilities that are simply not required in some installations.


For that reason, a well thought-out passive monitor controller is often a better solution and, provided the switches and attenuators are of good quality, they should be extremely transparent — certainly more so than an equivalently priced active controller.


Our own Martin Walker uses the M-Patch 2, and I use the same company's NanoPatch quite a lot. Other models to consider are the Presonus Central Station (although I think the remote control option can sometimes colour the sound a little), or the Coleman MPH3. This last model is quite expensive, but has the advantage of a proper switch-stepped attenuator, which guarantees inter-channel accuracy and the ability to set precise and repeatable listening levels. It is my preferred option, given a choice (and the budget)! Truly transparent active controllers are inherently expensive things to buy, so a passive monitor controller could be a better-value option to consider if you are concerned about colouring the sound. The SM Pro NanoPatch+ is a simple volume control, while the Presonus Central Station offers speaker and input switching too.Truly transparent active controllers are inherently expensive things to buy, so a passive monitor controller could be a better-value option to consider if you are concerned about colouring the sound. The SM Pro NanoPatch+ is a simple volume control, while the Presonus Central Station offers speaker and input switching too.Q. Is there a monitor controller that won’t colour the sound?


There are a couple of things to be aware of when using passive controllers, however. Their very nature makes them sensitive to the output and input impedances of the source and destination equipment (respectively), which can affect signal levels slightly, and potentially also result in subtle low-pass filtering in extreme cases. Thankfully, this is rarely a problem in practice, though. It's also best to keep connecting cables as short as possible too.    

A Legend Reborn: U2 Guitar Tech Dallas Schoo discusses the Korg SDD-3000 Pedal

Monday, September 8, 2014

Q. How can I connect hardware synths to my setup?

Sound Advice : Mixing


Currently, I have a MIDI keyboard, a Mackie Spike audio interface, an Apogee Duet interface, a UA Solo 610 preamp and a Neumann TLM103 mic. I use the Spike as a soundcard and run my MIDI through it, and the Duet for recording vocals.


I'm looking to get some hardware synths in the near future and need some advice. In preparation for the synths, I've bought a MOTU Express 128 so that I can have up to eight synths at once hooked up for MIDI. As both the Spike and Duet only have two audio inputs each, I am also looking to do away with those and get a better audio interface. However, if I get rid of them, I do not have a soundcard to produce sound via my monitors.

Expanding the number of inputs in your setup can be done at a relatively low cost. This Behringer ADA8000 can be found for well under £200</UK>$250</US> and will give you an extra eight inputs to play with.

This is where I'm getting confused. How do I set up, say, three hardware synths via audio and MIDI (I believe you need both connected to get sound in your DAW?) and also get sound from my monitors out of my DAW? Can I get an audio interface that I can record vocals through and plug hardware synths into?


Via SOS web site


SOS Editor In Chief Paul White replies: You have a couple of options, one of which is to use an external analogue mixer to combine the output of your DAW (stereo) with your hardware synths. When the mix is sounding right, you record the output of the mixer back via your audio interface onto a new stereo track, but with the playback fader turned down during recording so the signal doesn't feed back on itself. Speaker and headphone monitoring would be done from the output of the mixer. I used to work in this way and got really good‑sounding results.


The other option is to buy an interface with plenty of spare inputs, ideally one that can be further expanded using an ADAT‑compatible preamp. MOTU's interfaces are generally reliable and straightforward (most include volume controls for your monitors) and I've also used M‑Audio with no problems. Expanders are available from under £200, such as Behringer's ADA8000, which will give you eight more inputs if you need more. You'd then connect your synths up to pairs of inputs (for stereo) and record their outputs just as you'd record any other audio. Most DAWs now have the ability to set up live inputs in permanent monitor mode, so you can always hear them even when they're not set to Record Ready. Working in this way, each synth would have both a MIDI track to control it and a stereo audio track to record it. Expanding the number of inputs in your setup can be done at a relatively low cost. This Behringer ADA8000 can be found for well under £200
$250 and will give you an extra eight inputs to play with.Expanding the number of inputs in your setup can be done at a relatively low cost. This Behringer ADA8000 can be found for well under £200$250 and will give you an extra eight inputs to play with.


The advantage of working like this, rather than using an external mixer, is that you can apply plug‑ins to the synth channels if you need more effects. You can also come back to your mixes years later when the synths have been disconnected or sold.


The MOTU multi‑port MIDI interface will enable you to handle up to eight multitimbral synths at once without running out of MIDI channels, so that seems a practical choice.