Thursday, January 31, 2019
Wednesday, January 30, 2019
Q. What is the best way to reduce bleed on a drum recording?
When mixing drums, is it standard practice to try and tighten things up by getting rid of bleed on all but the overheads? I'm guessing it's genre specific. At the moment I'm recording mainly rock and indie‑style music and just wondered what the pros and cons of doing this are? Also, besides manually going through and silencing or reducing the level of bleed on these tracks, are there any better ways of doing it? I've tried noise gates but to get them at the level of noise reduction I need, they stifle the actual drum hits. I'm using Apple Logic 8.
 control make it useful for processing drum recordings to reduce spill.")
Logic's Noise Gate plug‑in's side‑chain filtering and range (Reduction) control make it useful for processing drum recordings to reduce spill.
Via SOS web site
SOS contributor Mike Senior replies: While there are a lot of ways to reduce bleed levels on close mics, and you'll often see some kind of spill‑reduction processing in mixes of multitrack drum recordings, I'd advise against trying to remove all the spill from them. Even if you could actually pull it off effectively, you'd almost certainly throw out the baby with the bathwater in the process, as the spill contributions can actually improve your complete kit sound by picking up more aspects of each instrument and by generally gluing everything together. It's much better to build a kit balance from the mics without processing (although you should pay adequate attention to the polarity settings on each of the tracks, as with any multi‑mic recording) and then only bring in spill‑reduction processing where it's needed. For example, it's not uncommon for there to be too much hi‑hat in the balance if the snare mic has picked up lots of hi‑hat spill, so that would be an argument for trying to reduce this bleed — not killing it completely, necessarily, just pulling it down enough to sort out the balance problem. Similarly, if your tom‑tom close mics are over‑emphasising the sympathetic ringing of these drums (a common problem), some reduction in the spill on those mics would probably be in order.
In terms of techniques, there are a lot of ways to deal with spill, but the primary way is via dynamics processing such as gating/expansion. It's useful that Logic's built‑in Noise Gate plug‑in has side‑chain filtering, so that you can achieve reliable triggering, and that it offers range control, which lets you reduce spill without completely muting it. Both of these facilities make life a lot easier. Some people also just use manual audio editing to deal with spill sections, but that can quickly get very laborious on anything but rarely used tom‑tom tracks. If you've got a complicated part and are really having trouble getting a gate to trigger properly, try automating the gate's threshold control for any problem sections.
Reading between the lines of your question, it sounds to me as if you might have a really tough spill problem to deal with, by nature of some problem with the recording. If you've got overwhelming levels of hat spill on your snare close mic, probably the best salvage technique I can recommend is to trigger a snare sample of some type from the close‑mic track. Much of the trouble people get with hi‑hat spill is on account of heavily EQ'ing the snare mic to brighten it, so layering in a bright (and even high‑pass filtered) sample instead may solve the problem, by obviating the need for the EQ. You could also just completely replace the close mic with the sample, of course, but it can sometimes then be difficult to blend the sample convincingly with the kit, so try just blending first.
Published September 2009
Tuesday, January 29, 2019
Monday, January 28, 2019
Q. Can you advise on recording acoustic guitar in stereo?
Just wondering if you could give me some advice on recording acoustic guitars. I'm finding it very difficult to get a clean and strong stereo sound. I am recording on to a Korg D32XD and I am using Rode M3 and Shure Beta 58 mics. Could you give me some help with mic positioning, and should I also run a direct line in? if I duplicate the tracks and pan one left and the other right and use phase, will this help with achieving a full stereo sound without making the signal too mushy?
Lennie Wiggins

As a relatively compact sound source, an acoustic guitar doesn't generate much stereo information, so miking with a single mic and then using pseudo‑stereo processing in the mix may be more effective than miking in stereo.
SOS Features Editor Sam Inglis replies: Before you start, it might be worth asking yourself why you particularly want a 'stereo' sound. Plenty of classic records have been made with a single microphone on an acoustic guitar, and just because you have two microphones and two speakers doesn't necessarily mean there will be any benefit to recording in stereo. With two microphones that are so different, many of the classic stereo miking techniques won't work particularly well, as they require two identical mics. The Beta 58 isn't a mic that would typically be used for miking acoustic guitar in any case, so unless you have some particular reason for wanting to record in stereo, I personally would focus on getting a good sound with the M3 alone.
The conventional place to start with acoustic guitars is to point the mic at the place where the neck meets the body, at a distance of perhaps 12 to 24 inches. Move further away and you will get a somewhat bass‑light sound with more room reflections and ambience; move closer and you'll get a less balanced but perhaps pleasing tone.
If you are dead set on using both mics, my initial suggestion would be to use the Beta 58 as a close mic — perhaps a foot or less in front of the neck/body join — and experiment with alternative positions for the M3. It's possible to get good results by pointing it over your shoulder, at the bridge, at the end of the neck looking towards the body of the guitar, or just somewhere in the room to pick up an ambient sound. In most cases, the acoustics of the room will make a huge difference to the resulting sound, and it may be worth experimenting by moving to different rooms in your house, or hanging up duvets or similar to deaden the acoustic.
If you duplicate a single track and pan one copy hard left and the other hard right, all you have done is effectively double the volume — it will still be mono. It is possible to create 'thickening' effects by delaying or otherwise processing one of the copies, but you would be better off getting the sound right at source. It's definitely not a good idea to simply flip the phase (polarity) on one side, as the two tracks will cancel when the song is played in mono.
If the guitar has a pickup, by all means record a DI signal to blend with the mic at mixdown, if you like the results.
SOS Editor In Chief Paul White adds: An acoustic guitar is a relatively compact sound source and so doesn't generate much stereo information — the sense of three‑dimensional space is down to the room acoustics rather than the instrument itself. To make the reverb sound seem larger than life, try delaying just one of the stereo reverb or ambience outputs by 50 to 100ms more than the other. Depending on the DAW you use, you may have to set up two identical reverbs on two sends to achieve this. Alternatively, use two very different mono reverbs, and pan these left and right. A short, bright ambience on one side and a longer decaying reverb on the other can work well if there's space in the music to allow for more than a hint of reverb.
However, you can force the instrument itself to be 'stereo' by resorting to trickery. One approach is to use two microphones aimed at radically different parts of the instrument and then pan these left and right. A popular choice is to mic the body in the usual way (mic aimed at the neck/body joint or the bridge) but then add a second mic halfway up the neck. The two sounds will be very different but work well in stereo as long as the player doesn't move too much during performance. A variation on this is to use the DI output, where a pickup is fitted, but also mic the instrument and, again, pan these signals left and right. In all cases it is advisable to check that the sound works in mono, as phase differences can cause some pretty radical tonal changes. For this reason, like Sam I wouldn't recommend using phase alone to create stereo effects, but there are phase‑related processes that are mono compatible.
The usual technique to maintain mono compatibility is to pan the original mono signal to the centre, process a copy of the sound in some way and pan this left, then take a further polarity‑inverted version of the processed signal and pan it right. If you play the recording in mono, the two processed tracks will cancel, leaving you with your original sound intact. The kind of processing you can try for the 'side' channels includes short delays, mild chorus or EQ. Adding a lot of bumps and dips to the EQ curve (for example, using a graphic EQ and pulling alternate faders up and down) can generate a neat pseudo‑stereo effect. For this to work correctly, it is vital to ensure that the two added effect channels carry exactly the same signal at the same level, and that just one of them is polarity‑inverted (using a phase switch or plug‑in). Some DAWs provide you with stereo 'faking' plug‑ins that do the EQ and phase manipulation for you, so if you have anything like that available, it's worth giving it a try.
Published September 2009
Saturday, January 26, 2019
Friday, January 25, 2019
Q. How many guitar layers should I use?
I'm doing a demo for a local act and we've tracked layer upon layer of overdubbed guitars: there are 10 rhythm parts with various chord voicings, and 10 lead parts playing variations on the solo and riff hook. A few of the layers are duplicates, but we had four different guitars, playing bar chords, open chords and power chords for the rhythm parts.

If you're mixing many layered guitar parts, consider identifying sub‑sections of each and giving them their own characters with different amp‑sim treatments and re‑amping.


Via SOS web site
SOS contributor Mike Senior replies: In my experience, unless someone's put in a fair few hours of punching‑in and/or editing, most tracked‑up walls of guitar aren't tight enough to sound punchy. Even if the timing of the individual picking transients is on the money, the lengths of the notes or the point at which the strings are damped doesn't match up nearly as well and also affects the rhythm. So my first suggestion would be to focus on the tightness of any layers of the same basic guitar part. This is especially relevant if you're stereo panning them, because human hearing is extremely sensitive to inter‑ear timing differences. If you're having trouble with mushiness, you may find that there are some tuning problems too, so be critical and ditch anything sour. The closer the tuning of your parts, the more the pitched elements of the part will reinforce, and this will help keep the harmonies of the part clear despite any layering you may do.
For a middle‑of‑the‑road rock sound, it's typical for the stereo field to be balanced by putting double‑tracked rhythm parts on opposing sides of the image, and if you're going to have more than two parts going at the same time it'll probably give you a more satisfying spread if you don't pan them all to the same two places. You'd also expect the guitar arrangement to fill out for the choruses, so you're sensible to think in terms of adding more overdubs for those sections, plus you could add more extreme‑panned layers here while leaving the verses slightly narrower. That said, while added overdubs can help increase the illusion of size, they will tend to make the composite sound more bland and homogenous, as well as pushing the guitars away from the listener: using more guitar parts means that each has to be lower in level to avoid making the rest of the mix sound small. Every producer tends to make their own compromise in this regard, so you can only make an informed judgement by comparing your mix to a few commercial tracks in the style.
Beyond that, if you've got that many parts available to you, I'd use them to bring some light and shade to the arrangement. Most riffs are made up of smaller musical figurations and fills, and you can really bring them to life if you give each of the different sub‑sections of a riff its own character, by altering the balance of the parts from moment to moment. The easiest way to do this is to line all the tracks up together with different modelled amps and then edit different bits away from each track. If you use clearly contrasted settings from Amplitube, this could make life easier. Because your guitars are DI'd, you could also use them to drive virtual stomp‑boxes and amps at different moments, by splitting the DI audio between sequencer tracks with different plug‑in settings.
You have access to the amp settings, so you shouldn't need much processing during the mix, beyond perhaps a little low cut to tame any general woofing around that might interfere with your bass part. However, in my experience, layering up parts that all use the same amp‑modelling engine seems to make it trickier to get a really solid sound, so I'd experiment with other modelling options as well (even comparatively lo‑fi ones) — or, even better, try re‑amping a few of the parts through a real amp and speaker to catch the sound of some real air moving.
Published September 2009
Thursday, January 24, 2019
Wednesday, January 23, 2019
Q. What’s the best setup for live multitrack recording?
I have been involved with our school fund‑raising events for some
years now, starting off by doing sound and lighting. Nowadays I only
get involved with recording the event, and for some time have been
wanting to break into multitrack recording. I have been taking a live
mix of the system output and a pair of ambient mics, but I would like to
do this onto a multitrack recorder, so as to be able to remix later.
Most basic multitrack recorders can only record two tracks live, so are
no good. I do have an old Yamaha four‑track cassette recorder, but this
is limited by the quality and the recording time of compact
cassettes. Four tracks live is obviously the minimum, but if we had more
available, the next step would be to use insert points on the main
mixer to be able to do a different mix than the live one. Can you give
any advice as to all this?
I understand that it's possible to do it on a laptop, but I don't know where you can get the extra equipment needed, or whether this is the most cost‑effective solution.!

Modern digital recorders such as the Zoom R16, which is capable of recording eight tracks of 24‑bit audio at a time, can be very suitable for live multitrack recording.
Geoffrey D Glass
Via email
SOS contributor Mike Senior replies: To answer the last point first, the issue of what will be most cost‑effective depends a great deal on the I/O configuration you need, whether you already own a suitable laptop, and what facilities you need or already have for mixing.
If you already own a fairly modern laptop, you may feel that it's more sensible to buy audio interfacing for that than try to find a stand‑alone hardware alternative. For eight inputs, the Focusrite Saffire Pro 40 and Presonus Firestudio Project interfaces are strong contenders, and the Focusrite has the advantage that you could easily add another eight inputs to it at a later date, via a multi‑channel preamp connected to its ADAT digital input.
That's not to say that there aren't stand‑alone options that compete at this price, though. Check out Zoom's R16, for example, which records eight tracks of 24‑bit audio at a time to solid‑state memory; Korg's D888, which records eight simultaneous tracks at 16‑bit resolution to its internal hard drive; and Fostex's MR8 HDCD, which can manage four simultaneous 16‑bit tracks of recording to hard disk. All of these machines allow you to export your recorded audio to computer systems via USB if you wish, but you can also mix (with fairly basic facilities) on board.
Those are just the models that are currently in production, and it's worth bearing in mind that you can pick up discontinued multitrack recorders second‑hand for a song, now that so many users are abandoning them for computer studios. This may be a particularly attractive option if you want lots of inputs. For example, my quick glance at the SOS readers' adverts unearthed models such as the Tascam MX2424, Alesis HD24 and Fostex D2424LV, all for under £600 in the UK. The outmoded big beasts of the digital multitracker craze (think Yamaha AW2816/AW4416 and Roland VS1680/VS2480) might also be worth a look if you want a box that can not only record, but can also provide pretty powerful audio editing, mix processing/effects and automation. Bear in mind with earlier units, however, that you need to have a plan for getting the audio out of them if you're wanting to mix the multitrack in a computer system. Options here include Ethernet transfer for some of the big modular multitrack systems, or WAV export via CD/DVD using a large‑scale multitracker's internal disc burner.
Published October 2009
Tuesday, January 22, 2019
Monday, January 21, 2019
Q. What’s the best way to get started with mastering?
I run a cheap and very cheerful recording studio in Cambridgeshire, England, and I am constantly asked whether I do mastering. I always say no, as I just run Logic 9 and have basic third‑party plug‑ins from manufacturers such as Waves and PSP. I always point clients towards a dedicated mastering studio, but I would very much like to get up to speed with mastering and wondered what the easiest and most economical way of getting good results would be.
Chris
Via email
SOS Technical Editor Hugh Robjohns replies: Mastering is, in most cases, the final point of quality control in the commercial release of music (whether that is via vinyl record, CD, download, or whatever). If you're going to offer professional mastering services it is, therefore, absolutely vital that the monitoring system and the room acoustics are beyond reproach, so that you can guarantee to hear every nuance of the material — and that inevitably means that a substantial cost is involved. A suitable full‑range stereo monitoring system will cost a few thousand dollars (and many would suggest up to 10 times that for a high‑end mastering suite), and properly designed and installed acoustic treatment will probably add as much again.

Bob Katz's seminal book is highly recommended for anyone who's serious about developing top‑notch mastering skills.
Once you have a monitoring environment that allows you to hear every detail and nuance of the material to be worked on, you'll need a range of tools to process and monitor the material appropriately. That's much less of a problem than it once was — because the job can be done reasonably well using most of the familiar DAWs or audio editing programs, and carefully chosen software plug‑in processing and metering. Most high‑end professional mastering studios still prefer to use mainly analogue signal processing, and once you have a sufficiently accurate monitoring environment you'll probably realise why, but a perfectly competent and acceptable job can be done using relatively low‑cost software tools — provided you can hear properly what you're doing with them.
There are no hard and fast rules about what tools you should or shouldn't use. What's important is that they allow you to achieve the required results. However, good compressors and limiters are obviously vital, as are good‑sounding equalisers. Multi‑band compression is useful to have, especially if you're likely to need to maximise perceived loudness, but are not essential and can easily result in more damage than benefit if not used skilfully.
But mastering is also about more than just having suitable tools to control the dynamic range and shape the tonality of the material. It's also about having the experience and technical knowledge to apply those tools effectively and artistically, and also to understand and meet specific technical delivery requirements for the final product. Accurate metering and data logging is an essential part of the latter.
I'd suggest the best starting point would be to get a copy of Bob Katz' book, Mastering Audio: The Art And The Science (second edition, Focal Press, ISBN 0240808371), and to read, re‑read and inwardly digest all that he has to say. There is no better grounding in the subject. Then you can start to hone your mastering skills.
Published November 2009
Saturday, January 19, 2019
Friday, January 18, 2019
Q. What’s special about star-quad cable?
I've just read up about star-quad cable, which has internal cores that cancel each other's interference — like a humbucker? Would you use star-quad cable in preference to ordinary balanced cable? I'm thinking in terms of microphone cables of 10 metres in length, for use at home.

Via SOS web site
SOS Technical Editor Hugh Robjohns replies: For the uninitiated, there are four cores in star-quad cable — the clue is in the 'quad' part of the name — plus an overall screen. The screen helps to prevent electrostatic interference from reaching the signal cores, just as in a conventional cable. The four cores are very tightly twisted with each other and rotate over a relatively short length, known as a 'short lay length'. This arrangement results in a magnetically coaxial structure and provides greatly improved rejection of electromagnetic interference compared to standard two‑core mic cables — perhaps by as much as 20dB.
As the diagram shows, the four cores are arranged in a cross formation, and the opposite cores are wired in parallel to form a single balanced pair. Obviously, with four wires in the cable, the core‑core and core‑screen capacitance will be much higher than in a more conventional two‑core cable, and that's the down side because it can result in a greater HF loss in very long cable runs — although it really won't be a problem over 10 metres, or even 50.

The red and blue cores are wired in parallel to form one half of the balanced pair, and the green and white cores form the other half. Some star-quad cables use two white wires for one pair and two blue wires for the other.
The up side is better rejection of very close‑source electromagnetically induced interference — the kind of interference that might come from laying a mic cable alongside something that radiates strong and nasty interference (some kinds of mains dimmer cables, for instance).
To understand how it works, consider a standard two‑core mic cable lying for a short length alongside a nasty interference source. Some of that interference will break into both cores, and to be rejected by the balanced input of whatever the cable is connected to, the induced interference must be equal in amplitude on both cores.
However, there will be slightly more energy transferred into the core that's closer to the interference source, and less into the further core. Since the two cores usually twist around each other in a fairly long lay length down the mic cable, there's a very good chance that one core will pick up slightly more interference from that close source than the other core, and the result will be some audible interference because the imbalance means it won't all get rejected.

How star-quad cable rejects electromagnetic interference.
Star-quad overcomes this problem because of the the way the four cores are wired in opposite pairs. Replacing the standard mic cable in the example above with star-quad, we can imagine that one pair of wires may be directly above one another vertically, and will therefore pick up equal amounts of interference because they are exactly the same distance from the nasty cable lying alongside. However, the other pair will be horizontal, and that means that one core will be slightly closer to the interfering cable, while the other will be slightly further away. The differences in distance of these horizontal cores relative to the vertical cores will be equal but in opposite directions, and the average interference in the two horizontal cores will therefore hopefully be exactly the same as that of the two vertical cores. Hey presto! Much better balance of interference and therefore better rejection. The very short lay length of the core twisting also helps to make sure that any interference is induced equally into the the two paired sets of wires.
The star-quad configuration was invented for use in telephone cables back in the '30s, and was adopted in the TV world in the '60s and '70s. It is widely used today, particularly where there is a likelihood of having to lay mic cables alongside strong sources of interference.
As to whether I would use star-quad in preference to ordinary balanced cable, I wouldn't, particularly. With that short a cable run, and in a domestic situation, interference isn't likely to be an issue at all. There's no reason not to buy star-quad if you can get a good deal, but I wouldn't seek it out specially, as you're very unlikely to gain any significant benefit. I'd look for a decent two‑core cable from a reputable supplier. I particularly like double‑screened cables ('Reussen' screen), which are also widely used in broadcasting.
Published November 2009
Thursday, January 17, 2019
Wednesday, January 16, 2019
Q. Should I buy a separate preamp?
I have happily been using Pro Tools for the past
decade and am currently using Pro Tools LE with an Mbox 2 interface.
I want to buy a mic preamp, perhaps a Behringer Tube Ultragain or
similar, but will this be a waste of money when using Digidesign's LE
Interfaces?

When you're on a budget, a good‑quality preamp that's clean sounding is likely to be the most sensible long‑term investment, but if you're set on 'character', there are a number of suitable devices that won't break the bank, including the original SPL Gold Mike, which can be found second-hand for £200-300.
SOS Reviews Editor Matt Houghton replies: It's difficult to say whether adding a mic preamp to your Mbox setup is a "waste of money” or not without knowing what you want to get out of it. I'm not sure which of the Behringer Tube Ultragain models you had in mind, but at the budget end of the market I'd probably avoid tubes altogether and spend the money on something good‑quality and clean‑sounding — which is likely to be of more use to you for a much longer time. You can always add 'character' after the event using plug‑ins, if you want to.
If I were in your position and could stretch the budget to around £85 ('street' price), I'd probably look at something like a Mackie 402 VLZ3 mixer, which gives you excellent preamps for the money. As well as the preamps, this would give you a few other benefits, such as line inputs, EQ and basic monitoring facilities. For more on these mixers, read Hugh Robjohns' review of their bigger brother at /sos/may07/articles/mackie1642.htm, which discusses the preamps in more detail, and Paul White's shorter review of the 402 and 802 at /sos/oct08/articles/mackie802402vlz3.htm.
In terms of other 'affordable' preamps, I picked up a second‑hand SPL Gold Mike for about £200 last year and that's a nice tube preamp. In the same sort of price range I'd probably consider the TL Audio PA2, which makes a great bass DI as well. There's also the solid state Aphex 207D, which has digital outputs to connect to the Mbox, thus bypassing its A‑D converters if they're frustrating you; or the most recent one we've been playing with here, the Golden Age Project Pre 73 (reviewed in our March issue). It's only one channel, but at £200 for something that has transformers and sounds rather like a Neve, you can't go wrong! The Focusrite Platinum range is good too, and falls into this price band.
Another option, if you're just looking for flavour and want EQ and compression, is to seek out one of the old Joemeek designs, such as the VC3Q or the VC6, on eBay or in our readers' ads. They're not valves and they're certainly not transparent, but they sound nice on some music styles and you get a compressor and EQ thrown in.
Of course, this all assumes that the preamps are the weakest point in your recording and monitoring chain: it may be that you'd get more benefit from spending some money on acoustic treatment, or upgrading your mic or speakers.
Published April 2009
Tuesday, January 15, 2019
Monday, January 14, 2019
Q. How should I set up my compressor for recording vocals?
Can you tell me how to set up a compressor for vocals while they're being recorded, and again in the mix?

Compressing vocals during recording used to be standard practice with analogue recorders, and was important to avoid distortion being caused by unexpected peaks. Now that so many of us have access to 24‑bit digital recording systems allowing large amounts of headroom, we can choose to keep our options more open, and compress after recording instead.
Via SOS web site
SOS Technical Editor Hugh Robjohns replies: Assuming you're recording to a digital system using 24‑bit resolution, I'd advise not using a compressor on the recording pass at all. Instead, leave 10‑15 dB of headroom (ie. set the level so that peaks don't go any higher than about ‑10dBFS). The danger of compressing on the way in is that if you later decide you don't like the settings you used, it's too late to change them. In the days of tape, you had to compress on the way in, because the recorder's dynamic range wasn't wide enough to cope with raw vocal recordings, but that's not the case with modern digital systems.
If you're confident that you know what you're doing with a compressor and know the sound you're going to want, there's nothing wrong with compressing on the way in — some engineers still do, and it makes it easier to use outboard analogue gear in this way. However, I get the impression that you're not at that point yet. That being the case, it's far easier and safer to record flat, and compress later during the mix stage, when you know that your recording is a clean and faithful rendition of the performance.
The compression settings then depend on the effect you're trying to achieve and what else is going on in the mix. You can't set up the compressor without listening to everything else going on, but if you would like some ball‑park figures, ratio could be anything between 2:1 and 5:1, depending on how compressed you want it to sound and what 'knee' characteristic the compressor has. Threshold will depend on recorded levels and how 'squashed' you want the vocal to be. Attack and release times depend on the style of the track and the action of the compressor, but I would start with 1‑3 ms for the attack and 250‑350 ms for the release (or, better still, use the auto-release mode). Make‑up gain depends on how much you squashed the track and how loud you want it to be, but anything from 4‑15 dB is typical.
If you want subtlety, you should probably restrict the gain reduction to no more than about 4dB. For more in‑your‑face, crushed dynamics, the gain reduction could be up to 20dB (or even more).
Published March 2009
Saturday, January 12, 2019
Friday, January 11, 2019
Q. Can USB pen drives be used as a cheap way to record audio?
Someone suggested that I could use a USB pen
drive to record audio on my laptop. Is this a good idea? How fast are
they, and is it really a cheap way to separate my system and audio
drives, or are there any problems inherent in this approach?
Mark HinterSOS contributor Martin Walker replies: USB pen drives (aka Flash drives and USB sticks) are an extremely convenient way to carry your personal data around, and to transfer data from one PC to another. They have increased in capacity over the last few years, from handy 64MB notepads to seriously capacious drives typically offering between 1GB and 8GB, at prices below $10.

With most modern operating systems, such as Mac OS X and Windows 2000, XP and Vista, they are also 'plug and play', requiring no drivers to be installed, so you can be confident that wherever you go you'll be able to plug in your USB pen drive, wait for it to be automatically detected, and then access your data.
However, recording audio is a rather more serious undertaking, and relies on the one parameter invariably omitted from USB pen drive specifications: sustained transfer rate, or — in layman's terms — speed. Although many are described as 'fast', this is invariably in comparison to older USB 1.1 compatible USB sticks that might take a couple of yawn‑worthy minutes to save a 30MB file.
But let's turn for a moment to the main reason for considering a USB pen drive: to separate your audio files from the single hard drive found on most laptops. Given that you can buy a 250GB internal hard drive for $30, it's scrimping on a Scrooge‑like scale not to install a dedicated audio drive on a desktop audio PC. However, laptops are intended to be portable devices, and carting around an external drive somewhat defeats the object, which is why I suspect folk are interested in trying a USB pen drive instead.
Many musicians expect audio nightmares when recording and/or playing back multiple audio files from a hard drive that already has Windows and all its applications installed on it. However, you shouldn't worry unduly about your operating system being on the same drive, since (as I showed back in PC Musician May 2005) Windows activity on a properly-tweaked audio PC tends to be minimal once you've loaded your sequencer application.
Ultimately, the question you should ask yourself is whether your internal laptop drive is fast enough to record and play back the maximum number of audio tracks you need. I carried out some tests on a variety of hard drives in PC Notes April 2004, including various laptop drives with speeds ranging from 4200rpm to 7200rpm and, despite slowish sustained transfer rates of between 23MB and 36MB/second, all of them were nevertheless perfectly capable of managing dozens of simultaneous audio tracks.

USB Flash Drives may be fast enough to play back a couple of dozen audio tracks, but are considerably slower than most laptop hard drives, unless you buy an expensive dual‑channel model that costs up to 10 times as much.
Let's turn our attention back to USB pen drive speed. It's tempting to assume that pen drives will have a similarly huge bandwidth to system RAM, but this isn't the case. I dug out several in my collection, and even the fastest 1GB Emtec 1GB USB 2.0 Flash drive bought just a couple of weeks ago (for about $7) only registered a modest 14MB/second, quite fast enough to manage up to perhaps 20 24‑bit/96kHz audio tracks, but still about half the speed of a typical 4200rpm laptop drive. The fastest pen drive I discovered on the Internet (an OCZ Rally2 Turbo Dual Channel Flashdrive model costing about $30) managed about 30MB/second, making it slightly slower than a typical 5400rpm laptop hard drive.
So, yes, you could plug in a USB pen drive and use it for audio recording, but simultaneous track counts are likely to be considerably lower than those of even the slowest of today's laptop hard drives, and if you're interested in performance, creating a partition devoted to audio files on the laptop's single internal hard drive will generally offer much better performance.
Published March 2009
Thursday, January 10, 2019
Wednesday, January 9, 2019
Q. Is there any point in DI-ing keyboards?
I've always stuck keyboards straight into my interface, desk or whatever: plenty of level, minimal noise (if any), and no hassle. Why use a DI box? Am I missing anything?

It's possible to connect the line outs of keyboards directly to the line inputs of your interface, mixer or recorder, and some musicians do. However, the best way to protect against ground loop, phantom power and faulty wiring problems that could arise, and even damage your equipment, is to connect the keyboard to a mic input, via a DI box, instead. If you go through the DI box to a suitable mic preamp, you can also benefit from the tonal colour the preamp offers.
Via SOS web site
SOS Technical Editor Hugh Robjohns replies: In the majority of cases, electric and electronic keyboards provide an unbalanced output at a level typically 10‑20 dB below standard line level. Not all line inputs are sufficiently sensitive to handle the output from keyboards effectively, but if your desk, recorder or interface has line‑level inputs with sufficient gain available, you can indeed connect your keyboard directly and get an acceptable signal.
However, given that many keyboards are not double‑insulated and therefore require a chassis safety earth via the mains power supply, in some cases there may also be ground‑loop problems. The only safe and practical way to cure this problem is with a coupling transformer of some kind. Line‑level transformer isolators are available, but are far less common than DI boxes, and the good ones are generally very expensive.
A DI box inherently contains a transformer and can be used to provide galvanic isolation, preventing ground‑loop issues. It also gives complete protection from phantom power. (There are some preamps and interfaces that allow phantom power to appear on supposedly line‑level and DI connectors! I came across a brand‑new one only a couple of weeks ago.) Phantom power can, and occasionally does, destroy the output stages of keyboards and other equipment, so taking simple steps to protect against an inadvertent accident might be deemed sensible.
Running a keyboard via a DI box has a number of other useful benefits. For example, some very early electronic and electric keyboards do work better into the very high input impedances (ie. well over 100kΩ) that a DI box provides, rather than the 10kΩ or so impedance of a standard line‑level input.
Another consideration is that most studios are well-equipped with mic tie‑lines and mic preamps, but less well with line‑level tie‑lines and line inputs — and unbalanced runs are more prone to interference and ground-loop problems than balanced runs.
Finally, mic preamps are capable of adding 'sonic character' to a sound through transformer, valve or solid‑state distortion artifacts, which may well be deemed beneficial and appropriate.
The bottom line is that unbalanced keyboards can often be connected to an interface or console directly without problems, but if there are signal or hum problems you'll have to go the DI or line‑isolating transformer route anyway. If the keyboard is faulty, you could even damage your interface or console because of the direct connection. If someone had removed the mains earth from their keyboard to stop it humming, for example, connecting its output directly to your interface or console could easily result in the instant and total destruction of the line input op‑amp and associated circuitry, and possibly the entire unit, because the ground‑rail would float up to 115V AC. Connecting a keyboard to a mic input via a DI box, by contrast, is inherently safe, for both keyboard and player, and the mic input, console or interface.
While I certainly have connected keyboards directly to line‑level inputs, it has only ever been when I've been 100 percent certain of their safety condition. Personally, I would never connect anyone else's (untested) keyboards to a line input without a line‑isolating transformer in the way, and 99.5 percent of the time I would use a DI box (active or passive, depending on the situation) and go via a mic input.
Published October 2009
Tuesday, January 8, 2019
Monday, January 7, 2019
Q. Is Windows 7 good for musicians?
Could SOS write an article on the latest Windows 7
as soon as possible, and say whether in your view it's worthwhile to try
it instead of Vista, or even XP?

Windows 7 has been available as a public Beta for up to 2.5 million members of the public, but is not expected to be officially released until late this year at the soonest.
SOS contributor Martin Walker replies: I've already discussed Windows 7 in my January 2009 PC Notes column, but as I said there, it's not been released yet. At the time I mentioned a likely release date of January 2010, but a few industry experts have since predicted that this may be moved forward to November 2009 to take advantage of the Christmas market, or even July 2009.
The general public have been able to download a full‑featured Beta version since January 9th 2009 (from www.microsoft.com/windows7), but this is only apparently available to the first 2.5 million people, and it expires on August 1st 2009. However, in my opinion no musicians should be running Beta versions of any software anyway, unless they are prepared to accept crashes and unexpected behaviour. Many users now seem to regard Beta software simply as a 'free download', but it's actually part of the development cycle before a new product is released to the public. First the developers release an Alpha version (normally only available to internal staff) to test that all serious bugs have been eradicated, and then a Beta version is typically released to a limited number of testers outside the company to root out any further incompatibility problems.
A new operating system like Windows 7 faces installation on an almost infinite variety of PC hardware combinations, so it makes sense for Microsoft to let the public at large aid in Beta compatibility testing prior to its release. In direct response to your question, I'd say it's worth trying the Windows 7 Beta if you are desperate to see what's coming next from Microsoft, like taking a gamble, and are prepared to install it on a fresh partition alongside any existing Windows install, so that you don't have to rely on it for day‑to‑day use. Even on Microsoft's own web site they admit that the Windows 7 Beta "can be glitchy — so don't use a PC you need every day”. Possible problems include software that runs perfectly on Windows XP or Vista but won't run at all on Windows 7, hardware drivers that don't install for devices such as printers and audio interfaces, such that you can't use them at all, random BSOD (Blue Screen Of Death) problems, and possibly file corruption. Remember also that on 1st August 2009 the Beta will cease to run, and then you'll have to wipe your partition, buy the official release version (which may involve a wait of several more months), and install it from scratch, along with all your hardware drivers, software applications, and so on.
On the positive side, the feedback so far is that Windows 7 is more efficient than Vista, and smoother in operation. On the other hand, it's an incremental version of Vista rather than a completely new OS, and there are still audio software developers who have yet to release Vista‑compatible versions of their products. Moreover, some musicians have had problems running their audio interfaces with Windows 7, and it's unlikely that audio manufacturers will devote time to updating drivers until we can actually buy it. Rest assured that once Windows 7 is available to the public, we'll give it the coverage it deserves.
Published April 2009
Saturday, January 5, 2019
Friday, January 4, 2019
Q. What should I buy to equip my studio?
I'm planning to start some writing and recording in
my basement home studio — only there's no equipment in it! I have an
Ensoniq ESQ1 from back in 1987 (when I used to play in a band) and
I know virtually nothing about current music technology. My basic plan
is to get a Macbook or Macbook Pro and possibly Logic Express 8, and use
my ESQ1, via a USB/MIDI link, to play into it.
I'm lucky enough to have a 'proper', soundproofed studio, complete with separate vocal booth, as (I'm told) my house used to belong to Simon Gallup, bass player with The Cure.
Andrew Ward

Laptops are deservedly popular, but if you're equipping a fixed studio installation, think twice: it's possible that a desktop machine, with its generally better price/performance ratio, is a better bet.
SOS Features Editor Sam Inglis replies: You are in a relatively lucky position, as most of the hard work and expense involved in setting up a home studio often goes into the building of the rooms themselves! The idea of buying a computer and a DAW program such as Logic is a sound one, and should enable you to take care of all your synth and sampling needs without buying any other hardware instruments. Any modern computer will also let you burn CDs. Is there a specific reason why you're looking to buy a laptop computer? In general, desktop machines have better price/performance ratio and expandability, so unless you need the portability it might be worth looking at a Mac Pro or iMac rather than a Macbook.
Assuming you're happy to use your ESQ1 as a controller keyboard, you'll need some way of getting MIDI and audio in and out of the computer. There are many, many combined audio and MIDI interfaces on the market, and choosing one is a matter of deciding which features you are likely to need. It sounds as though you are likely to want to record vocals, so you will need one or more inputs with mic preamps, unless you plan to buy a separate mixer or preamp, and make sure these preamps can supply phantom power for condenser mics.
If there's any chance you'll want to record drums, or other sources that will require more than two audio signals to be recorded at once, you'll need a multi‑channel interface. Focusrite's new Saffire Pro 40, Presonus' Firestudio and M‑Audio's ProFire 2626 all give you eight inputs with mic preamps at an affordable price (under £500 on the street). If you're only ever likely to record, say, vocals and guitars, you may well get away with a smaller interface, such as the basic Focusrite Saffire, M‑Audio Firewire 410 or Edirol FA66. The interfaces I've listed above connect via Firewire, but there are also many interface options that connect via USB if that suits your computer better.
On top of that you should budget for some monitor speakers, a decent pair of headphones, one or more microphones, and those sundries like cables and mic stands that always cost more than you think! It's worth spending as much as you can afford in each of these areas, and especially getting the best monitors you can. You can buy either active or passive monitors: the latter require a separate power amp, the former are complete within themselves. In both cases, there's a huge range on the market: names to look out for include Genelec, ADAM, Dynaudio, Yamaha and KRK.
For vocals, a decent large‑diaphragm condenser probably makes the best first microphone. There are lots on the market at the moment from the likes of Audio‑Technica, Rode, SE Electronics, Audix, Sennheiser, AKG, Sontronics and many others. With both monitors and microphones it's helpful to try before you buy, and worth making a special trip to a music shop that will let you do so (Digital Village, for instance, have listening rooms set up so that you can run music you know through different sets of monitors). For other sources, you'll probably want to add to your mic collection. A pair of 'pencil' small‑diaphragm condenser mics can be handy as drum overheads or for recording acoustic guitars, while dynamic mics such as the classic Shure SM57 are widely used for close‑miking loud sources such as guitar amps and snare drums.
Published April 2009
Thursday, January 3, 2019
Wednesday, January 2, 2019
Q. If speakers have to be 'anchored', why don't mics?
As I understand it, loudspeakers create sound and momentum, which
needs to be absorbed in order for the sound quality to be accurate, so
we ensure they are braced or fixed to their stands and not wobbling
about too much. So surely a mic diaphragm, which is moved by incoming
sound, will less accurately represent the sound if the mic casing is not
sufficiently anchored. Given that we hang these things from cables, or
put them in elastic shockmounts, can you explain to me why this
principle doesn't apply?
Is it just to do with acceptable tolerances or is it a trade‑off between picking up vibrations from the stand and capturing the intended sound?
Paul Hammond, via email
SOS Technical Editor Hugh Robjohns replies: In a perfect world, both the loudspeaker and the microphone would be held rigidly in space to deliver optimal performance. However, we don't live in a perfect world. Sometimes a shelf is the most appropriate position for a speaker, but the inevitable down side, then, is that the vibrations inherently generated by the speaker's drive units wobbling back and forth will set up sympathetic resonances and rattles in the shelf, adding unwanted acoustic contributions to the direct sound from the speaker, and thus messing up the sound.

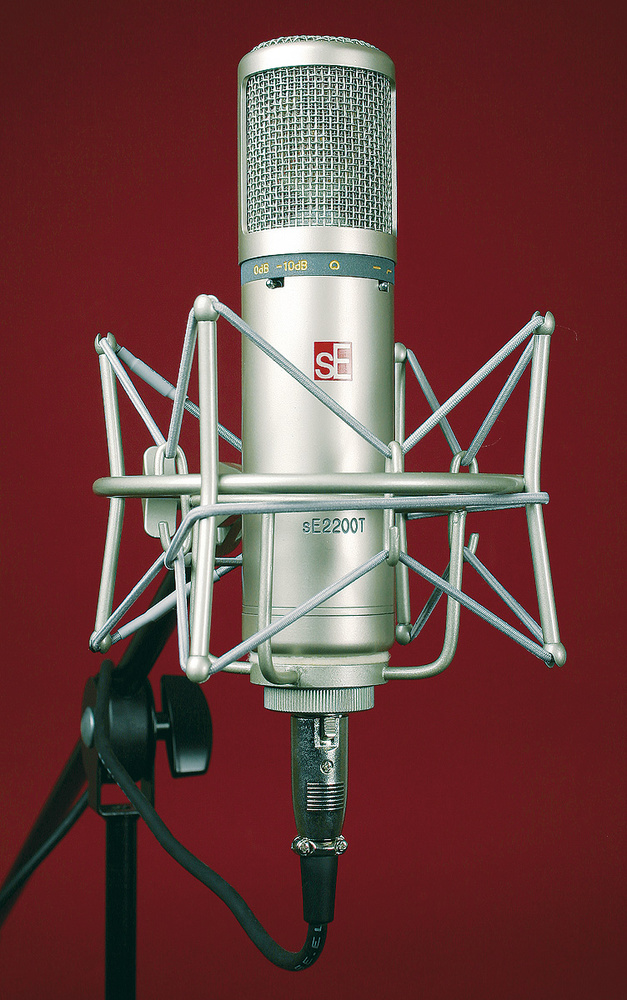
We 'decouple' speakers with foam to prevent annoying low‑end frequencies leaving the speakers from reaching the surface they sit on. In the case of mics, we want to stop problem frequencies from reaching them, so we support them in shockmounts.

The obvious solution is, therefore, to 'decouple' the speaker from the shelf with some kind of damped mass‑spring arrangement optimised to prevent the most troubling and annoying frequencies (generally the bottom end) from reaching the shelf. This is often achieved, in practice, using a foam pad or similar.
With microphones, we are trying to control energy going the other way. We want to stop mechanical vibrations from reaching the mic, whereas we were trying to stop mechanical vibrations leaving the speaker.
Again, in a perfect world the mic would be held rigidly in space, using some kind of tripod, much like the ones photographers use for their cameras. However, in practice, we tend to place mics at the ends of long, undamped boom arms on relatively floppy mic stands which are, themselves, placed on objects that pick up mechanical vibrations (foot tapping, perhaps) and then pass them along the metalwork straight to the mic.
The obvious result is that the mic body moves in space, and in so doing forces the diaphragm back and forth through the air. This results in a varying air pressure impinging on the diaphragm that the mic can't differentiate from the wanted sound waves coming through the air, and so the mic indirectly captures the 'sound' of its physical movement as well as the wanted music.
The solution is to support the mic in a well‑designed shockmount so that the troublesome (low end, again) vibrations that travel up through the mic stand are trapped by another damped mass‑spring arrangement and thus are prevented from reaching the mic. If the shockmount works well, the mic stays still while the stand wobbles about around it, much like the interior of a car moving smoothly while the wheels below are crashing in and out of potholes!
The only potential problem with the microphone shockmount is that it can easily be bypassed by the microphone cable. If the cable is relatively stiff and is wrapped around the mic stand, the vibrations can travel along the mic cable and reach the mic that way, neatly circumventing the shockmount. The solution is to use a very lightweight cable from the mic to the stand, properly secured at the stand to trap unwanted vibrations.
Is it just to do with acceptable tolerances or is it a trade‑off between picking up vibrations from the stand and capturing the intended sound?
Paul Hammond, via email
SOS Technical Editor Hugh Robjohns replies: In a perfect world, both the loudspeaker and the microphone would be held rigidly in space to deliver optimal performance. However, we don't live in a perfect world. Sometimes a shelf is the most appropriate position for a speaker, but the inevitable down side, then, is that the vibrations inherently generated by the speaker's drive units wobbling back and forth will set up sympathetic resonances and rattles in the shelf, adding unwanted acoustic contributions to the direct sound from the speaker, and thus messing up the sound.

We 'decouple' speakers with foam to prevent annoying low‑end frequencies leaving the speakers from reaching the surface they sit on. In the case of mics, we want to stop problem frequencies from reaching them, so we support them in shockmounts.
The obvious solution is, therefore, to 'decouple' the speaker from the shelf with some kind of damped mass‑spring arrangement optimised to prevent the most troubling and annoying frequencies (generally the bottom end) from reaching the shelf. This is often achieved, in practice, using a foam pad or similar.
With microphones, we are trying to control energy going the other way. We want to stop mechanical vibrations from reaching the mic, whereas we were trying to stop mechanical vibrations leaving the speaker.
Again, in a perfect world the mic would be held rigidly in space, using some kind of tripod, much like the ones photographers use for their cameras. However, in practice, we tend to place mics at the ends of long, undamped boom arms on relatively floppy mic stands which are, themselves, placed on objects that pick up mechanical vibrations (foot tapping, perhaps) and then pass them along the metalwork straight to the mic.
The obvious result is that the mic body moves in space, and in so doing forces the diaphragm back and forth through the air. This results in a varying air pressure impinging on the diaphragm that the mic can't differentiate from the wanted sound waves coming through the air, and so the mic indirectly captures the 'sound' of its physical movement as well as the wanted music.
The solution is to support the mic in a well‑designed shockmount so that the troublesome (low end, again) vibrations that travel up through the mic stand are trapped by another damped mass‑spring arrangement and thus are prevented from reaching the mic. If the shockmount works well, the mic stays still while the stand wobbles about around it, much like the interior of a car moving smoothly while the wheels below are crashing in and out of potholes!
The only potential problem with the microphone shockmount is that it can easily be bypassed by the microphone cable. If the cable is relatively stiff and is wrapped around the mic stand, the vibrations can travel along the mic cable and reach the mic that way, neatly circumventing the shockmount. The solution is to use a very lightweight cable from the mic to the stand, properly secured at the stand to trap unwanted vibrations.
Published February 2011
Tuesday, January 1, 2019
Subscribe to:
Posts (Atom)