Thursday, July 31, 2014
Q. Why shouldn’t I use mastering limiting during mixing?
I often read recommendations to mix with compressors/limiters in the main bus so we can adjust to the effects of mastering during our mixing, and then to bypass those dynamics plug-ins when we export for mastering. Why not put in the full mastering chain and mix and master your track in one pass? I mixed my latest track with the following chain in the master bus: Cubase's full-band compressor with a 1.2:1 ratio for 4-5dB of reduction; Powercore EQsat plug-in with a broad four-octave dip of 1dB at 850Hz; Powercore Master 3X multi-band compressor plug-in operating at a 3.2:1 ratio with 2dB of gain reduction; and ToneBoosters' Barricade limiter set to a -1dBFS ceiling and showing 3-4dB gain reduction.
Damien McEwan, via email
Although full-band compression and EQ inserted on the master channel can often be helpful during mixing, multi-band dynamics and mastering-style limiting are more likely to hinder your progress.

SOS contributor Mike Senior replies: Using a compressor on the main mix bus during mixdown is indeed very common (although by no means universal) in order to 'glue' the mix together or create extra excitement via gain-pumping effects. Given that this bus-processing can impact quite heavily on the way you balance the track, it makes sense to have it working while you mix, particularly so that you can judge your effects levels and fader automation sensibly within context.
However, limiting the main output bus during mixdown is a whole different kettle of fish, because the main purpose of full-mix limiting is simply to boost the subjective loudness within the digital headroom. As such it's usually much faster-acting, and the goal is usually to make as little difference to the mix balance as possible. Furthermore, setting up a limiter for the best results is usually a delicate process, where small shifts of the input level and plug-in controls can make big differences to the sound. So on the basis that mastering limiting shouldn't normally affect mix balance, and that it adds to the already considerable complication of creating a decent mix, I usually recommend that this process be left until after mixdown.
Clearly there are some chart-oriented producers for whom the loudness of the master is an important primary concern. In that context having a preview of what the side-effects of heavy-handed loudness processing (including limiting) will do to the mix tone and balance can allow some pre-emptive compensatory steps to be taken by the mix engineer. However, even in that case, I'd favour bouncing your mix out to a separate project to experiment with this processing, even if that means that you then have to hop between the mix and a pseudo-mastering project. One reason I prefer working this way is that it puts fewer limitations on the mastering-style plug-ins I can use within my PC's available CPU resources, and usually makes it a lot simpler to switch between my own pseudo-mastered mix and a selection of commercial reference tracks — an essential process when judging the results of your own mastering. Also, from a psychological perspective, being unable to immediately enact changes on the mix during the comparison process encourages me to clarify my own thoughts on the deficiencies of my own production across my available monitoring systems, and I find that this means I go round the houses less often while finalising my mix settings.
Equalising your main output bus at mixdown is pretty common. It's very easy while you're working on a mix for your ears to get used to a skewed tonality (they're very good at adapting), and if this shows up during comparisons with commercial tracks then it's much easier to deal with using a decent-quality master-bus plug-in than by tweaking the individual EQ settings across dozens of individual tracks.
Multi-band compression, on the other hand, is another thing that I suggest leaving to a separate mastering stage. Again, this is because it's so fiddly to set up properly, and you're not normally looking for it to impact hugely on the mix tone or balance; the heavy multi-band compression of the late '90s hasn't aged well, and isn't very fashionable these days. Also, in my experience, it's very easy to take your eye off the ball as regards getting the mix balance right when there's a multi-band compressor in the master bus, because the compression can often counteract your mix settings and disguise subtler balance problems that need addressing. Or, to put it another way, it tempts to you think that the mix is easier than it is somehow, so you work less hard.
Damien McEwan, via email
Although full-band compression and EQ inserted on the master channel can often be helpful during mixing, multi-band dynamics and mastering-style limiting are more likely to hinder your progress.
SOS contributor Mike Senior replies: Using a compressor on the main mix bus during mixdown is indeed very common (although by no means universal) in order to 'glue' the mix together or create extra excitement via gain-pumping effects. Given that this bus-processing can impact quite heavily on the way you balance the track, it makes sense to have it working while you mix, particularly so that you can judge your effects levels and fader automation sensibly within context.
However, limiting the main output bus during mixdown is a whole different kettle of fish, because the main purpose of full-mix limiting is simply to boost the subjective loudness within the digital headroom. As such it's usually much faster-acting, and the goal is usually to make as little difference to the mix balance as possible. Furthermore, setting up a limiter for the best results is usually a delicate process, where small shifts of the input level and plug-in controls can make big differences to the sound. So on the basis that mastering limiting shouldn't normally affect mix balance, and that it adds to the already considerable complication of creating a decent mix, I usually recommend that this process be left until after mixdown.
Clearly there are some chart-oriented producers for whom the loudness of the master is an important primary concern. In that context having a preview of what the side-effects of heavy-handed loudness processing (including limiting) will do to the mix tone and balance can allow some pre-emptive compensatory steps to be taken by the mix engineer. However, even in that case, I'd favour bouncing your mix out to a separate project to experiment with this processing, even if that means that you then have to hop between the mix and a pseudo-mastering project. One reason I prefer working this way is that it puts fewer limitations on the mastering-style plug-ins I can use within my PC's available CPU resources, and usually makes it a lot simpler to switch between my own pseudo-mastered mix and a selection of commercial reference tracks — an essential process when judging the results of your own mastering. Also, from a psychological perspective, being unable to immediately enact changes on the mix during the comparison process encourages me to clarify my own thoughts on the deficiencies of my own production across my available monitoring systems, and I find that this means I go round the houses less often while finalising my mix settings.
Equalising your main output bus at mixdown is pretty common. It's very easy while you're working on a mix for your ears to get used to a skewed tonality (they're very good at adapting), and if this shows up during comparisons with commercial tracks then it's much easier to deal with using a decent-quality master-bus plug-in than by tweaking the individual EQ settings across dozens of individual tracks.
Multi-band compression, on the other hand, is another thing that I suggest leaving to a separate mastering stage. Again, this is because it's so fiddly to set up properly, and you're not normally looking for it to impact hugely on the mix tone or balance; the heavy multi-band compression of the late '90s hasn't aged well, and isn't very fashionable these days. Also, in my experience, it's very easy to take your eye off the ball as regards getting the mix balance right when there's a multi-band compressor in the master bus, because the compression can often counteract your mix settings and disguise subtler balance problems that need addressing. Or, to put it another way, it tempts to you think that the mix is easier than it is somehow, so you work less hard.
Wednesday, July 30, 2014
Tuesday, July 29, 2014
Q. How can I easily match levels on MP3s?
When I listen to MP3s on a PC or Apple Mac, they are all at different levels, with the louder ones seeming twice as loud as the quietest ones.
Back in the days of tape and vinyl, you set your own recording level on the tape deck. So if you recorded three different tracks to tape you could get the levels similar; listening to a 'mix tape' was way more consistent than ripping CDs to MP3, where different tracks have different volumes.Has anyone made a piece of software that adjusts the volume level of tracks so they all match? Surely this can't be that hard? And surely I am not the only guy on earth that finds this annoying? (Please note, however, I do not mean I want a compressor or limiter that zaps the dynamic range!)
, you can easily level out your MP3s with iTunes' surprisingly effective Sound Check feature. That's assuming you don't have the patience to adjust the levels of your favourite tracks manually using a DAW, of course!")
Via SOS web site
SOS Technical Editor Hugh Robjohns replies: The 'mix tape' solution is still available of course: you can transfer tracks manually, perhaps using a DAW, adjusting levels as you go. But few of us are probably prepared to invest that kind of time and care these days!
The issue of varying loudness is a serious one, and something that afflicts many different media outlets. The film industry tried to address this issue a while ago with some success, for example, and the broadcast TV industry has recently introduced a new standard that is currently being adopted worldwide and which involves a reliable and standardised way of assessing and quantifying loudness. The broadcast radio industry will follow in a year or two's time, and these initiatives will finally end the 'loudness wars'. The standard in question here is the ITU-R BS.1770, and the various local adaptations such as EBU R-128, ATSC-A/85 and the CALM Act in the USA.
The metering system that underpins these standards is already widely available and I would urge anyone involved in mixing music or involved in audio production to familiarise themselves with this system as soon as they can. There is no doubt that this is the future. While the 'loudness wars' still rage on (for the time being, at least), you can easily level out your MP3s with iTunes' surprisingly effective Sound Check feature. That's assuming you don't have the patience to adjust the levels of your favourite tracks manually using a DAW, of course!While the 'loudness wars' still rage on (for the time being, at least), you can easily level out your MP3s with iTunes' surprisingly effective Sound Check feature. That's assuming you don't have the patience to adjust the levels of your favourite tracks manually using a DAW, of course!
Returning to your question of software solutions, the easiest option, if you are using iTunes and/or iOS-based players, is to switch on the 'Sound Check' function. This doesn't quite conform to the BS.1770 standard, but it is very close and works extremely well. Essentially, it analyses the loudness of each track in the library and writes metadata into the file header which documents the playback level needed to achieve a perceived loudness equivalent to -16dBFS; this level being chosen to accommodate wide dynamic range material without clipping. Since the Sound Check function is only storing a 'level offset' instruction, the actual stored audio data isn't altered in any way, and the replay process is directly equivalent to you manually adjusting the playback level, so it is entirely non-destructive. The result is that every track ends up with a similar perceived loudness, which is exactly what you want. An alternative that I've not tried, but which I've seen recommended, is a program called Mp3Gain Pro (www.mp3gain-pro.com). This is capable of batch-processing MP3 files to establish a common loudness across all files, but I believe it does so via a destructive manipulation of the original file data.
Back in the days of tape and vinyl, you set your own recording level on the tape deck. So if you recorded three different tracks to tape you could get the levels similar; listening to a 'mix tape' was way more consistent than ripping CDs to MP3, where different tracks have different volumes.Has anyone made a piece of software that adjusts the volume level of tracks so they all match? Surely this can't be that hard? And surely I am not the only guy on earth that finds this annoying? (Please note, however, I do not mean I want a compressor or limiter that zaps the dynamic range!)
Via SOS web site
SOS Technical Editor Hugh Robjohns replies: The 'mix tape' solution is still available of course: you can transfer tracks manually, perhaps using a DAW, adjusting levels as you go. But few of us are probably prepared to invest that kind of time and care these days!
The issue of varying loudness is a serious one, and something that afflicts many different media outlets. The film industry tried to address this issue a while ago with some success, for example, and the broadcast TV industry has recently introduced a new standard that is currently being adopted worldwide and which involves a reliable and standardised way of assessing and quantifying loudness. The broadcast radio industry will follow in a year or two's time, and these initiatives will finally end the 'loudness wars'. The standard in question here is the ITU-R BS.1770, and the various local adaptations such as EBU R-128, ATSC-A/85 and the CALM Act in the USA.
The metering system that underpins these standards is already widely available and I would urge anyone involved in mixing music or involved in audio production to familiarise themselves with this system as soon as they can. There is no doubt that this is the future. While the 'loudness wars' still rage on (for the time being, at least), you can easily level out your MP3s with iTunes' surprisingly effective Sound Check feature. That's assuming you don't have the patience to adjust the levels of your favourite tracks manually using a DAW, of course!While the 'loudness wars' still rage on (for the time being, at least), you can easily level out your MP3s with iTunes' surprisingly effective Sound Check feature. That's assuming you don't have the patience to adjust the levels of your favourite tracks manually using a DAW, of course!
Returning to your question of software solutions, the easiest option, if you are using iTunes and/or iOS-based players, is to switch on the 'Sound Check' function. This doesn't quite conform to the BS.1770 standard, but it is very close and works extremely well. Essentially, it analyses the loudness of each track in the library and writes metadata into the file header which documents the playback level needed to achieve a perceived loudness equivalent to -16dBFS; this level being chosen to accommodate wide dynamic range material without clipping. Since the Sound Check function is only storing a 'level offset' instruction, the actual stored audio data isn't altered in any way, and the replay process is directly equivalent to you manually adjusting the playback level, so it is entirely non-destructive. The result is that every track ends up with a similar perceived loudness, which is exactly what you want. An alternative that I've not tried, but which I've seen recommended, is a program called Mp3Gain Pro (www.mp3gain-pro.com). This is capable of batch-processing MP3 files to establish a common loudness across all files, but I believe it does so via a destructive manipulation of the original file data.
Monday, July 28, 2014
Saturday, July 26, 2014
Friday, July 25, 2014
Epic Heroes Academy Interviews Jordan on his anniversaary album "No Limit to the Skies"
An interview with Jordan on his release
of the 20 year Anniversary Special Edition of album single “No
Limit to the Skies”.
interviews Jordan about his 20 year anniversary music album
release of “No Limit to the Skies”.
Epic Heroes Academy interviews Jordan on his latest album single release: the 20 year Anniversary Special Edition of album single “No Limit to the Skies”, video game music shorts.
Epic Heroes Academy interviews Jordan on his latest album single release: the 20 year Anniversary Special Edition of album single “No Limit to the Skies”, video game music shorts.

Interview with Jordan
So 20 year anniversary, I thought the “Solace” album was your first release?
The “Solace” album was my first official release. I have done a couple of album singles in the past that were not released to the public. “No Limit to the Skies” was officially my first single. At the time I was a teenager working for a video game company that needed some music pieces composed for an air combat simulation game. The music I composed for that game was not used for that project. They became a collection of music that ended up being shelved. I later added them as an album single that I thought I could use on other projects and never seemed to get there with them. I had other projects that demanded more of my time.
Why did it take you so long in releasing the album?
I worked in “live” sound for a number of years and did some post production work on a number of other projects and assignments over the years and didn't make time for it.
What was it like to working on the game project at the time as a teenager?
It was a bit overwhelming at the time. I was still young as a composer working on quite a big project. I guess you would call it my big break which I was grateful for. I was still learning concepts and theories and now working with deadlines and wondering how to apply and incorporate concepts into some of the animation sequences. This was an air combat simulator experience on a new type of game system console. Still learning things as I went along. I wasn't sure if I was going to get the ideas I needed to make the headway that was intended. It took some work and then the music came. Even with today's technology, music inspiration still comes the old fashioned way.
I know I already asked this previously, what brought you back to composing music?
I don't think I really left; I was just delayed for a while. I have always enjoyed composing music. Music is my passion, it has been a number of years composing when I could between projects and making tunes at times, but it was never far from my thoughts even with all the distractions between now and then. I love composing, I always have... sometimes I wondered how I was even going to create some of these themes, but they came.
What was it like to work on a project that was animated or had a picture to music?
Some of the gaming concepts were new at the time with 3D rendering and not your normal 2D games. I actually enjoy doing music for picture or film. At the time it was a new experience, I had melodies that I would imagine, but would leave it for the listener to put to the music. I think that still applies even now. I hope even though the music was intended for one thing, does not mean it can't have another meaning or be interpreted differently. I enjoy putting timelessness in my music. It may have been said before by those who compose music in the film industry, that half the work is done when there is a picture to reference by, all it needed was some music to bring out the picture. I would feel the same way.
“No Limit to the Skies” is more like an album single. Why is shorter than the others?
I originally wrote these tunes for the game at the time and they were not intended to be a full album. I really wanted to release this album for those who couldn't afford to pay for the full album price. These are original concepts. Some of the music concepts went on the “Solace” and “In Motion” albums and were started from here. I have had fans ask when more music was coming, I guess this is a way of tiding them over until the next album.
I understand you have another album scheduled in 2016. Why so far out?
Well, it is still kind of hush-hush... Of course, the reason for the longer time period is that composing takes a lot of time. This is going to be a big project. It is scheduled for 2016; I just hope that is going to be enough time to meet the deadline. There will be more to come on that project at another time.
Links:
Thursday, July 24, 2014
Wednesday, July 23, 2014
Q. How should I record a marimba?
I have a question about recording percussion — in particular, tuned percussion. Why is it that some sound engineers can record without a massive impact when a mallet strikes a bar, and others can't? Miking marimbas seems to be the hardest job, I guess because of its size, and some use two mics, while others one. What is the best approach?
, but will not be too harsh. Alternatively, placing a stereo pair above the head of the player will capture the sound from his or her perspective, though the results could lack resonance.")
As sound comes from such a large area, it is often a good idea to use a couple of different miking techniques to record a marimba. Placing mics at either end, but still fairly far from the instrument, and below the level of the bars will pick up the resonators (the metal tubes), but will not be too harsh. Alternatively, placing a stereo pair above the head of the player will capture the sound from his or her perspective, though the results could lack resonance.
Chris, via email
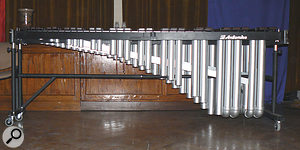
SOS contributor Jon Burton replies: The general consensus seems to be that marimbas, in particular, are one of the hardest percussion instruments to mic up. For anyone who hasn't seen a full-sized marimba up close, they are very large, at about 2.5 metres long! They also produce sound from several points. Beneath each bar is a resonator, and it is the combined sound of these that makes up the wonderfully rich tones. The range of notes produced can also be anywhere between 3.5 and 5.5 octaves.
Choice of mallets can also greatly affect the tones produced, with soft mallets producing warmer tones and harder mallets producing far more attack. When recording it is very easy to over-emphasise the sound of the mallet striking the bar, which produces a harsh sound. It is therefore important to try to capture the instrument as a whole, including the resonators.
Engineers have different views on what to use, with suggestions varying from single to multiple microphones. As for placement, there is less variation, with engineers generally plumping for one of two options. The first would be to have a microphone either end of the marimba between four and eight feet away, depending on the room you are recording in and how much room you want to capture. Placement below the level of the bars will increase the amount of sound from the resonators. Raising the mics up will increase the sound from the bars. At this point you can decide what balance suits the track best.
The other method is one I have always preferred, which is to put a stereo pair above the head of the player and capture the sound from his perspective. This can sometimes lack resonance but, if combined with the first technique, can give you lots of options.
As for microphone choice, I would go for dynamics for the resonator mics: a pair of Electro-Voice RE20s works well but, equally, you can use Shure SM57s. And for the overhead mics I'd use the best capacitor microphones you have!
In these days of almost unlimited track counts, recording these as two stereo pairs will give you the chance both to balance both the stereo image and the relative contributions of the bars and the resonators.
As sound comes from such a large area, it is often a good idea to use a couple of different miking techniques to record a marimba. Placing mics at either end, but still fairly far from the instrument, and below the level of the bars will pick up the resonators (the metal tubes), but will not be too harsh. Alternatively, placing a stereo pair above the head of the player will capture the sound from his or her perspective, though the results could lack resonance.
Chris, via email
SOS contributor Jon Burton replies: The general consensus seems to be that marimbas, in particular, are one of the hardest percussion instruments to mic up. For anyone who hasn't seen a full-sized marimba up close, they are very large, at about 2.5 metres long! They also produce sound from several points. Beneath each bar is a resonator, and it is the combined sound of these that makes up the wonderfully rich tones. The range of notes produced can also be anywhere between 3.5 and 5.5 octaves.
Choice of mallets can also greatly affect the tones produced, with soft mallets producing warmer tones and harder mallets producing far more attack. When recording it is very easy to over-emphasise the sound of the mallet striking the bar, which produces a harsh sound. It is therefore important to try to capture the instrument as a whole, including the resonators.
Engineers have different views on what to use, with suggestions varying from single to multiple microphones. As for placement, there is less variation, with engineers generally plumping for one of two options. The first would be to have a microphone either end of the marimba between four and eight feet away, depending on the room you are recording in and how much room you want to capture. Placement below the level of the bars will increase the amount of sound from the resonators. Raising the mics up will increase the sound from the bars. At this point you can decide what balance suits the track best.
The other method is one I have always preferred, which is to put a stereo pair above the head of the player and capture the sound from his perspective. This can sometimes lack resonance but, if combined with the first technique, can give you lots of options.
As for microphone choice, I would go for dynamics for the resonator mics: a pair of Electro-Voice RE20s works well but, equally, you can use Shure SM57s. And for the overhead mics I'd use the best capacitor microphones you have!
In these days of almost unlimited track counts, recording these as two stereo pairs will give you the chance both to balance both the stereo image and the relative contributions of the bars and the resonators.
Tuesday, July 22, 2014
Q. What insurance do I need?
I've had a home studio for a few years now that I use mainly for my own projects and some commissioned work. I'm occasionally asked to record people and am usually paid a small fee for doing so, though it doesn't form a large part of my business. My equipment is insured in the usual way, but do I need to worry about any other factors, such as public liability, when insuring my studio?
If you earn any money at all from your home studio, it's important to read the small print of your insurance policy, and inform your provider if necessary. Business activities on any scale could invalidate your insurance, whether or not a claim is related to your studio work. It may be that taking out specialist cover is the most sensible option, particularly when you consider the potential costs of public liability claims.If you earn any money at all from your home studio, it's important to read the small print of your insurance policy, and inform your provider if necessary. Business activities on any scale could invalidate your insurance, whether or not a claim is related to your studio work. It may be that taking out specialist cover is the most sensible option, particularly when you consider the potential costs of public liability claims.

Owen Morrison, via email
SOS contributor Mike Senior replies: If your gear is already insured, the main question when recording other people in your home is one of public liability. In other words, if the artist trips over their stompbox and impales themselves messily on your lava lamp, will you be covered when their relatives sue for compensation? If you were recording entirely as a hobby, then you'd probably be covered in such situations under your normal household insurance policy, although (as with anything relating to insurance) this is something that you need to check in the policy particulars to be absolutely sure of. However, the fact that you're making some money from your recording, albeit small, may disqualify your studio activities from this domestic public liability cover, in which case you might feel you need an additional professional public liability policy. It may be that you can negotiate a certain degree of wiggle room with your domestic insurance provider, though, so it might be worth giving them a ring to confirm exactly what is and isn't covered in this respect, and how much you are able to earn from your studio work while still qualifying for cover under a domestic policy.
If you've insured your gear with a specialist music technology insurer, you may find that you already have professional public liability cover built into this insurance, and that's all well and good, if so. If not, then you have to make a judgement call as to whether the risk of a compensation claim is high enough to warrant the yearly cost of dedicated public liability cover. It's not illegal to do studio work without public liability insurance, but unless you know your clients very well, it's probably a bit of a foolhardy economy given the litigious times in which we live.
Adrian Scott, head of Musicguard, adds: If you use your home for business purposes, however infrequently, you'll almost certainly need to let your home insurer know to ensure your cover isn't affected. Most standard home insurance policy wordings specifically exclude business equipment (other than for clerical purposes) from their contents cover, which would include your music equipment. Worryingly, you may find other aspects of your insurance are invalidated simply by running a business from home unless you get their acceptance regardless of how you choose to insure your equipment. An extreme example may be that if the equipment you were using causes a fire due to some form of electrical failure. In this example your insurer may refuse to pay out a claim as the incident occurred due to business activities that they had not been made aware of. Insurers usually state quite clearly that you must inform them if your home is used for business purposes, and may reduce, or even turn down, a claim payout if they feel you haven't been open with them.
As Mike stated, a specialist music insurance policy will cover your gear whether you're using it for business or pleasure, giving you the breadth of cover you'd expect, such as theft, accidental damage, loss or mechanical/electrical breakdown, and will almost certainly come with public liability included, or at least be an option. Just make sure that the money you're already spending on insurance to protect your home and other possessions isn't wasted because you've fallen foul of their small print.
If you earn any money at all from your home studio, it's important to read the small print of your insurance policy, and inform your provider if necessary. Business activities on any scale could invalidate your insurance, whether or not a claim is related to your studio work. It may be that taking out specialist cover is the most sensible option, particularly when you consider the potential costs of public liability claims.If you earn any money at all from your home studio, it's important to read the small print of your insurance policy, and inform your provider if necessary. Business activities on any scale could invalidate your insurance, whether or not a claim is related to your studio work. It may be that taking out specialist cover is the most sensible option, particularly when you consider the potential costs of public liability claims.
Owen Morrison, via email
SOS contributor Mike Senior replies: If your gear is already insured, the main question when recording other people in your home is one of public liability. In other words, if the artist trips over their stompbox and impales themselves messily on your lava lamp, will you be covered when their relatives sue for compensation? If you were recording entirely as a hobby, then you'd probably be covered in such situations under your normal household insurance policy, although (as with anything relating to insurance) this is something that you need to check in the policy particulars to be absolutely sure of. However, the fact that you're making some money from your recording, albeit small, may disqualify your studio activities from this domestic public liability cover, in which case you might feel you need an additional professional public liability policy. It may be that you can negotiate a certain degree of wiggle room with your domestic insurance provider, though, so it might be worth giving them a ring to confirm exactly what is and isn't covered in this respect, and how much you are able to earn from your studio work while still qualifying for cover under a domestic policy.
If you've insured your gear with a specialist music technology insurer, you may find that you already have professional public liability cover built into this insurance, and that's all well and good, if so. If not, then you have to make a judgement call as to whether the risk of a compensation claim is high enough to warrant the yearly cost of dedicated public liability cover. It's not illegal to do studio work without public liability insurance, but unless you know your clients very well, it's probably a bit of a foolhardy economy given the litigious times in which we live.
Adrian Scott, head of Musicguard, adds: If you use your home for business purposes, however infrequently, you'll almost certainly need to let your home insurer know to ensure your cover isn't affected. Most standard home insurance policy wordings specifically exclude business equipment (other than for clerical purposes) from their contents cover, which would include your music equipment. Worryingly, you may find other aspects of your insurance are invalidated simply by running a business from home unless you get their acceptance regardless of how you choose to insure your equipment. An extreme example may be that if the equipment you were using causes a fire due to some form of electrical failure. In this example your insurer may refuse to pay out a claim as the incident occurred due to business activities that they had not been made aware of. Insurers usually state quite clearly that you must inform them if your home is used for business purposes, and may reduce, or even turn down, a claim payout if they feel you haven't been open with them.
As Mike stated, a specialist music insurance policy will cover your gear whether you're using it for business or pleasure, giving you the breadth of cover you'd expect, such as theft, accidental damage, loss or mechanical/electrical breakdown, and will almost certainly come with public liability included, or at least be an option. Just make sure that the money you're already spending on insurance to protect your home and other possessions isn't wasted because you've fallen foul of their small print.
Monday, July 21, 2014
Saturday, July 19, 2014
Friday, July 18, 2014
Thursday, July 17, 2014
Wednesday, July 16, 2014
Tuesday, July 15, 2014
Monday, July 14, 2014
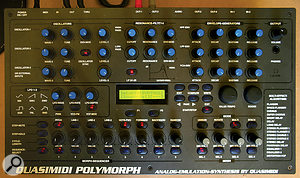
Q What’s a modern equivalent to the Quasimidi Polymorph?
I'm an ambient musician looking for an addition to my synth collection. I'm interested in the Quasimidi Polymorph, yet they are getting very old and hard to find. I was wondering what the modern-day multi-voice alternatives might be (preferably with a step sequencer), as it seems that many instruments are somewhat limiting. Would the Dave Smith Poly Evolver Keyboard be a good alternative?Also, I've never had a modern synth before — are they as repairable as old ones?
 was a popular synth, but one that is now becoming increasingly difficult to find on the second-hand market. Our contributor's choice for a modern alternative — if money were not an object! — would be the Sequentix Cirklon (top) paired with a synth module.")
The Quasimidi Polymorph (above) was a popular synth, but one that is now becoming increasingly difficult to find on the second-hand market. Our contributor's choice for a modern alternative — if money were not an object! — would be the Sequentix Cirklon (top) paired with a synth module.The Quasimidi Polymorph (above) was a popular synth, but one that is now becoming increasingly difficult to find on the second-hand market. Our contributor's choice for a modern alternative — if money were not an object! — would be the Sequentix Cirklon (top) paired with a synth module.Q What’s a modern equivalent to the Quasimidi Polymorph?
David Robinson, via email
SOS contributor Paul Nagle replies: The Polymorph was the centerpiece of my live set for a few years, and it has a wonderfully direct interface and a simple but powerful step sequencer. It didn't sound anything special, though! As for the Dave Smith PEK, it's an alternative in the same way a nuclear missile is an alternative for a bow and arrow! Something closer would be a Tetra, although it hardly matches the Polymorph for hands-on, nor does it match the Polymorph's eight-/16-note polyphony. If polyphony doesn't matter, my recommendation would be to look at the Elektron Analog Four, which has four monophonic synthesizer tracks, effects and the capacity to drive a couple of external analogue synths too. It comes with Elektron's three-year parts and labour guarantee, which may ease your worries about repairs. Other synths to investigate include the Korg Radias and Radikal Technologies Spectralis 2.
There are many options: so many it can be bewildering. I'm quite a fan of Korg's Electribes, though maybe not so much for ambient music. However, if money were no object, I'd be looking at a Sequentix Cirklon combined with a multitimbral synth module or two. I'm not entirely unbiased (its developer is a friend of mine) but I know of no sequencer that screams 'creativity' quite so emphatically.
As to whether old or new synths are more repairable past their warranty date, there's no hard and fast rule. Some older gear is packed with rare chips (ICs), hard-to-source DACs and other obscure parts, while other gear of a similar age may use very common components, or ones with obvious off-the-shelf modern equivalents. As an example, I recently found it easy to get my EMS Synthi repaired, but my much newer Emu Proteus 2000's dying power supply proved a failure too far. Just because a synth is more modern, there's no guarantee its parts will be available in 10 or 20 years. If you know a good tech, treasure him (or her) — these people are worth their weight in gold.
Q Is there a difference between clipping and limiting?
What, if any, difference is there between clipping and limiting? Is a soft clipper just a limiter with very fast attack and release times? Where would you typically choose one over the other?

Joe Bates, via email
Although clipping and limiting are similar processes, they are not the same thing. As can be seen from the picture, clipping abruptly stops the signal from going over a maximum voltage limit, causing distortion. Limiting is a far more controlled process in which the signal is attenuated specifically to avoid clipping.Although clipping and limiting are similar processes, they are not the same thing. As can be seen from the picture, clipping abruptly stops the signal from going over a maximum voltage limit, causing distortion. Limiting is a far more controlled process in which the signal is attenuated specifically to avoid clipping.
SOS Technical Editor Hugh Robjohns: On a purely technical level, clipping occurs when gain structure has gone horribly wrong, and limiting is the controlled application of gain reduction to avoid clipping! Both are non-linear processes, albeit in different ways, and both introduce distortion products. Soft clipping is still clipping, but with a slightly less aggressive onset of clipping: essentially a combination of limiting prior to clipping.
Clipping occurs when the audio signal amplitude exceeds the maximum voltage (or quantising) capability of the system. As a result, the output signal stops abruptly at the voltage (or quantising) limit, and so the tops and bottoms of the audio wave form are, in effect, 'sawn off'. This is something that inevitably produces strong harmonic distortion. The system is entirely linear up to the clipping level, and then horribly non-linear, so signals slightly lower than the clipping level are passed unaffected, while those at, or higher than, the clipping level are mangled, resulting in the addition of complex additional harmonics that were not present in the original.
In analogue systems, if the clipping is very brief, we don't normally perceive the resulting distortion at all. However, in digital systems, we can often recognise it because digital clipping produces unnatural anharmonic distortion through aliasing. This is especially obvious for signals with a well-defined harmonic structure, such as pianos, voices, and so on. Noise-like sources, such as cymbals and snare drums, when aliased, produce more noise-like distortions, so although the timbre might change slightly it won't usually be recognised as distortion.
Limiting is an altogether much more controlled business, where a loud signal is briefly attenuated, specifically to avoid clipping. The short-term dynamic changes involved do introduce a form of distortion, but it is a far more benign form and, again, it is rarely recognised as such. The system is linear up to the limiting level, above which the waveform is reduced in amplitude but more or less retains its original shape, and thus remains harmonically intact. The distortion that results is usually negligible.
As a technical engineer, I'd suggest that clipping is a fault condition that should always be avoided, and that peak control should always be achieved with a fast-acting limiter. However, as a mixing engineer, I know that the harmonic distortion produced through analogue clipping can sometimes be an artistically and musically useful tool in the right context. It produces a very different kind of sound, and at the end of the day, the intended sound is what would determine whether clipping, soft clipping, or limiting is the appropriate form of processing. Personally, I shun digital clipping at all times because I just don't like the resulting sound... but I know of people that do like it. .
Published in SOS August 2013
Saturday, July 12, 2014
Q Should I go for a Clavia Nord or a V-Piano?
I'm undecided about whether to choose a Roland V-Piano or a Clavia Nord, because Roland use physical modelling technology in their V-Piano that breaks the limitations of sample-based digital pianos like the latest Nord. Can you advise?

Colin Burrell, via email
A large instrument such as the Roland V-Piano wouldn't be the easiest option for gigging, but in a permanent installation its size and weight would be much less of an issue.A large instrument such as the Roland V-Piano wouldn't be the easiest option for gigging, but in a permanent installation its size and weight would be much less of an issue.
SOS contributor Gordon Reid replies: Piano sounds and keyboard responses are very personal. Some people like Steinways, some (such as me) like Bösendorfers. Likewise, in the digital world, some people like the sound and response of the Nords, whereas some prefer the Roland, and some wouldn't wish to use either.
For what it's worth, I must admit that I'm a fan of the Extra Large Bösendorfer samples in the Clavia piano library. In contrast, I found the V-Piano to be considerably less satisfying 'out of the box', although it offers extraordinarily detailed editing potential and sounded considerably more engaging after I had spent a few hours making it imitate the less-than-perfect tuning and response of my Broadwood.
Which would I use? That's simple to answer. I'm a gigging musician, and the V-Piano is a large and heavy beast. Once in its flightcase, it's at least a two-man (preferable four-man) lift, whereas I can do pirouettes with a Nord Stage 2 HA88 under one arm. Since I like the sound and the feel of the Nord, the decision would be easy. Of course, size and weight wouldn't be an issue if I were considering a permanent installation, and the choice would then become much more difficult.
Regarding the technologies involved, I wouldn't worry about the use of samples, physical modelling, or anything that lies between. The sound and response are what matters, not the manner in which the electrons are inconvenienced.
Does this answer your question? Probably not. I'm afraid that there's no substitute for playing both instruments and seeing which you prefer. But don't try the acoustic piano patches in the Korg M3 or Kronos X, or even those in the latest Kurzweil PC3K8 — that would really complicate matters! .
Published in SOS August 2013
Friday, July 11, 2014
Q Is there a simple way to play a VST instrument without a DAW?
I recently bought a digital piano. It was mainly to learn piano, but also as a controller to use with Omnisphere. I really did think it would be as simple as installing the discs, connecting the keyboard by USB to my PC and then synthesizing away.I thought I didn't need anything else and that I could get to grips with DAWs at a later date, but clearly I was wrong! So my question is: what is the simplest — ie. most idiot-proof — way of getting sound from Omnisphere on my PC that won't require too much technical ability and know-how?

This is Spectrasonic's Omnisphere running as a stand-alone soft synth inside Herman Seib's excellent Savihost utility. Savihost is one of the simplest VST hosts, as well as being a valuable test tool.This is Spectrasonic's Omnisphere running as a stand-alone soft synth inside Herman Seib's excellent Savihost utility. Savihost is one of the simplest VST hosts, as well as being a valuable test tool.
Via SOS web site
SOS contributor Martin Walker replies: To use a plug-in like Omnisphere without a DAW, you require a host application capable of loading VST instruments. Examples of suitable 'full-featured' hosts include Ableton Live, Cubase, GarageBand, Logic and Reaper. Developers do get occasional complaints from users if they don't provide a standalone version of their software instruments as well as the plug-in version, but there's really no need for them to take the time, trouble and expense of creating their own stand-alone application when so many simple host utilities are also already available to let you run any VST instrument in stand-alone mode.
Mac users can download VST Lord (http://arne.knup.de/?page_id=32) for OS X use, while PC users have several choices, including the free Cantabile Lite (www.cantabilesoftware.com), Tobybear's donationware Minihost (www.tobybear.de/p_minihost.html), and Herman Seib's Savihost (www.hermannseib.com/english/Savihost.htm).
Savihost is probably the simplest to use of all of those listed above. It was created for the sole purpose of automatically loading only one VSTi, is extremely quick to load, is light on system resources, is available in both 32-bit and 64-bit versions to suit whichever format of soft synth you're using, and also supports ASIO drivers for low latency during performance. You just unzip the Savihost file into the same folder as the DLL file for your VST instrument (in this case Omnisphere.dll), then rename the file Savihost.exe to the name of your instrument (so, in this case, Omnisphere.exe).
Finally, double-click on this renamed file and your instrument will appear in all its glory. Just use Savihost's Devices menu to choose your MIDI input device and audio output device and you can start playing it. Even if you don't have a keyboard controller on hand, you can download a different version of Savihost including its own software version that you can play with your mouse.
I've used Savihost myself on quite a few occasions over the years, and not only for playing soft synths as stand-alone applications. It's also a very useful tool if you have any problems running a particular soft synth in a DAW, since you can use it to check that the synth is installed and running correctly without all the extra paraphernalia associated with sequencers, editors and so on. As before, just drop the Savihost file into the same folder as the problem synth DLL, rename it and then double-click on it. If the synth works properly in Savihost, any problem is most likely to be with your DAW. The other advantage of the renaming process is that you can have several instances of Savihost in one 'vstplugins' folder, each launching a different stand-alone synth.
Thursday, July 10, 2014
Q What's the best setup for processing while recording?
I have a question about setting up a channel strip in a home recording environment. I have an SSL XLogic Superanalogue channel running into an M-Audio Project Mix interface via the S/PDIF input and, although I realise that I should record clean and process after, I want to use this relatively high-end device for EQ, gating and compression at source.My question is what is the best way to set the EQ? Recording through a microphone, I obviously can't monitor the result through the main monitor speakers because of feedback, and using headphones will give a coloured result. I have thought about running a clean recording of, say, an acoustic guitar through the input and adjusting the unit to hear the result — is this workable?

If you feel confident about the processing you need, there's no reason not to apply it directly to the source signal.If you feel confident about the processing you need, there's no reason not to apply it directly to the source signal.
Tim Chandler, via email
SOS Technical Editor Hugh Robjohns replies: First, there are no hard and fast rules about processing (or not) on the way in. Back in the days when we had to record to tape, it was often beneficial to process the signal before recording, compressing the dynamic range to get the quieter performance elements well above the relatively high noise floor, and boosting the HF to compensate for inherent tape losses.
With modern 24-bit converters, we no longer have to compensate for the deficiencies in the recording chain, and recording 'flat' means that the raw performance is captured on the hard disk, leaving all your options open for processing as you build the mix.
However, if you are confident about what processing is needed, there's no reason not to apply it directly to the source signal: just remember that you can't undo it afterwards! A lot of engineers still do 'pre-process', in fact, simply because it's a faster way of working, they have the experience and confidence to know what will be needed, and they aren't afraid to make critical decisions early.
Your main concern seems to be hearing what you're doing when performing and adjusting the SSL channel strip. Decent headphones should let you hear the processing without the sound being coloured, but few people could give a decent performance at the same time as analysing and tweaking the channel strip!
Ideally, a trusted friend with good ears would set up the processing while you performed, but then you would have to live with their EQ and compression decisions rather than yours! The only way I can see this working in a self-operating capacity is if you record a test vocal track 'flat', then route that recording back out to the SSL channel strip's line input, and process the raw mic signal as you want. Effectively, you would be 're-amping' the vocal track, but using the channel strip's analogue processes to shape the sound, rather than a guitar amp!
You could then simply re-record that processed vocal and use it in your mix, but that means additional conversion stages and probably some time-shifting because of the converter latency. However, it may be that once you've alighted on optimal settings for EQ and compression that suit your voice, you could then record a new performance directly through the SSL, avoiding the additional conversion stages. And, if all your vocal performances are similar, once you've found the optimum SSL settings you could record all future vocals through the channel strip, without worrying about further fine-tuning. The only critical setting would be the input gain!
Q Which types of pickup are available for guitar?
I play acoustic guitar and sing. It's mainly covers that I do, and this has started getting me regular gigs. They're fairly small pub gigs, for the most part, and for amplification purposes I've just had the sound guy point a couple of mics at me, so far. I do find this pretty restrictive, though. I know there's not much I can do about it for the vocals (barring some kind of Madonna-style head mic, which seems a little extreme), but I would like to explore the possibility of an alternative for the guitar. Despite having been a guitarist for some years now, I've never actually used any kind of pickup, and I was expecting there to be a smaller choice than there seems to be. Could you outline the differences for me and perhaps recommend a solution? Also, if I'm serious about this, should I be getting a pickup professionally installed into the body of the guitar?

If you'd like to try a pickup on your acoustic guitar, a magnetic soundhole type, as pictured here, won't require physical modification of your guitar. Models are available at all price points, and the higher-end ones, from companies such as Fishman and LR Baggs, can sound excellent.If you'd like to try a pickup on your acoustic guitar, a magnetic soundhole type, as pictured here, won't require physical modification of your guitar. Models are available at all price points, and the higher-end ones, from companies such as Fishman and LR Baggs, can sound excellent.
Craig Allison, via email
SOS Editor In Chief Paul White replies: The simplest type of acoustic guitar pickup to fit is the so-called 'magnetic soundhole' pickup, as these clip across the soundhole, requiring no modification to your instrument. For a more permanent solution, the output socket can be fitted in place of the end strap-pin (you can still hang a strap on it), although this is best done by a professional luthier. Soundhole pickups come in many types and at many prices, the cheaper ones having a slightly 'electric guitar' quality to them, but the better ones, such as those made by Fishman or LR Baggs, can sound excellent. Prices range from around $15 to around $450, so there's something there for every budget. Some are entirely passive, whereas others require a small battery. LR Baggs also make a miking system for guitar in which a microphone is fitted into the guitar body.
The other popular type of pickup system uses under-bridge 'piezo' pickups, but this type has to be fitted by a competent luthier. Other systems combine under-bridge pickups with internal microphones, but these also require expert fitting. Piezo pickups have a very high impedance and so require either an external preamp or a built-in preamp, the latter often requiring a hole to be cut into the side of the guitar. So if you have a guitar that you want to keep 'as is', your best solution is either to go for a soundhole pickup, or buy a second guitar with a piezo pickup system already built in.
Fitting a pickup of any type will allow you a lot more level before feedback than an external microphone, but the resulting sound may not be quite as natural, so your sound guy may have to apply some EQ. Various external preamps and processors are available to make the output of a pickup sound more 'acoustic', but these add complication and expense to the equation. Pickups don't cure the feedback problem altogether, as sound energy fed back to the guitar body will cause the strings to vibrate, feeding energy back into the pickup, and when you reach a certain level, feedback will reassert itself. In most cases, though, the level at which you can work is acceptably high. .
Published in SOS September 2013
Wednesday, July 9, 2014
Q Baffled By Session Notes
I'm a bit behind on my reading; I just finished Mike Senior's article on recording the band 'Impossible Colours' in the April issue's Session Notes (/sos/apr13/articles/session-notes-0413.htm) and I'm confused about a couple of things. I couldn't find the reason why the author went through the convoluted process of placing hanging baffles on the drums, as well as using the overhead miking approach, when the only thing that was needed was to DI the bass and re-amp later, or even just place the bass amp outside in the hallway and close-mic it there. Instead, he had to contend with drum spill on the bass track and bass spill on the drums, and the weirdness of the cymbals not picking up early reflections from the room, as well as the lack of room ambience mics that could have gelled it all better.

As there wasn't a particularly great 'sound' to the room that was being used to record, it was decided to use baffles to eliminate room sound from the drum recording altogether.As there wasn't a particularly great 'sound' to the room that was being used to record, it was decided to use baffles to eliminate room sound from the drum recording altogether.He also placed the guitarist in the control room with headphones and an amp modeller, so the rest of the guys were listening to the foldback mix too, and could just have used that for cues. Maybe I'm missing something, but wouldn't reserving the tracking room only for the kit make more sense?
Via SOS web site
SOS contributor Mike Senior replies: If my main reason for the drum baffling had been to stop crosstalk between the bass and the drums, I agree that my setup would have been a bit odd! However, in this case the drum baffling was primarily designed to eliminate the room sound from the drums. Normally, I'm a big fan of room ambience on drums for exactly the reasons you mention (ie. gelling the ensemble), and I do try to use it wherever possible — for example, in the Dunning Kruger session I wrote about in Session Notes October 2012 (/sos/oct12/articles/session-notes-1012.htm). In this instance, though, the room frankly didn't sound good; it was small and sounded boxy. Also, I knew that the band had referenced some super-dry records, and I wanted to give us the option of achieving that dryness without having to bring in samples, if possible. Samples are alright if you're just replacing a backbeat, but can be really fiddly where the playing is more nuanced and jazz-influenced, as Miko's (the drummer) was.
The issue of whether to have a bass cab in the room with the drums was actually an independent consideration, and mostly a question of creating a situation where the musicians could perform and communicate more naturally. Ideally, with new bands I like to use a setup very much like their rehearsal or performance layout: all the musicians in the same room with their instruments and amps, hearing each other naturally without any headphones. On this occasion, a couple of practicalities tempered this preference. Firstly, the drummer wanted a click track, so there had to be some headphones for him; and secondly, we wanted the flexibility to overdub and replace the guitar parts without losing a great rhythm take, which meant that the guitar sound couldn't be live in the room. There was, however, no practical necessity to remove the bass cab from the room, so I preferred to leave it in there. This meant that Chacha (the bassist) and, indeed, the other band members, were able to 'feel' the low end of his cab in a way that's impossible when monitoring bass over headphones. Had I removed the amp from the room to the corridor, I think we'd have lost some of the vibe from the whole tracking session, and I suspect the performances might not have been as good. Besides, as it happened, recording out in the corridor wasn't really an option, for Neighbourhood Watch reasons, otherwise I'd have already taken advantage of it to mic up the guitar parts!
With regard to your comment about the placement of the guitarist and having the guitar sound through headphones only, I think there's a little confusion here. Firstly, the guitarist was actually in with the rest of the band, despite his sound appearing only in the headphones. That meant he could perform to the real sound of his colleagues, rather than a headphone mix of them; that the visual interaction between the players was improved (guitarist David is also something of a band leader); and that they could all discuss things between takes without any need for talkback complications. Secondly, the rest of the players were only hearing the guitar in their headphones, not bass and drums. The cans were just supplementing what everyone was already hearing in the room. If I'd cleared the drum room exclusively for the drummer and drum kit, everyone would have had to have a full headphone foldback mix, and in my experience bands don't tend to find it as natural or inspiring to play together in this way.
You also ask if it wouldn't have made sense to reserve the tracking room only for the drum kit. For the engineer, yes it would, but not for the performers, in my experience. While I'm a pragmatist in terms of trying to create a recording setup with enough production and mixdown flexibility to fulfil the band's musical goals in the most efficient manner, for me it's still the performances that provide the real magic when tracking. This is why I was happy to put up with a bit of bass spill and, indeed, why we decided to keep some of the tracking session's more inspired 'scratch' guitar solos at mixdown.
Tuesday, July 8, 2014
Q How is impedance balancing audio different from normal balancing?
Various
Would impedance balanced and electronic balanced audio provide exactly the same noise reduction as regular symmetrical balanced audio? And how can I tell if a product has symmetrical balanced outputs or asymmetrical balanced outputs from a published block diagram?
. The wanted signal (green) is applied and received differentially between the two signal wires. The unwanted interference (red) is the same on both signal wires (common-mode signal), and is thus ignored by the differential receiver.")
Differential Receiver: A balanced line has equal impedances to ground from both the hot and cold wires (yellow and blue resistors in this diagram). The wanted signal (green) is applied and received differentially between the two signal wires. The unwanted interference (red) is the same on both signal wires (common-mode signal), and is thus ignored by the differential receiver.Differential Receiver: A balanced line has equal impedances to ground from both the hot and cold wires (yellow and blue resistors in this diagram). The wanted signal (green) is applied and received differentially between the two signal wires. The unwanted interference (red) is the same on both signal wires (common-mode signal), and is thus ignored by the differential receiver.Transformer Both Ends:
The traditional arrangement using transformers to create and receive the balanced signal. The two signal wires carry signals which are in opposite polarity, but are identical and equal in amplitude, both being half (-6dB) the total signal level.Transformer Both Ends: The traditional arrangement using transformers to create and receive the balanced signal. The two signal wires carry signals which are in opposite polarity, but are identical and equal in amplitude, both being half (-6dB) the total signal level.Active Both Ends: Most modern equipment uses active electronics to create and receive the balanced signal. Again, the two signal wires carry signals which are in opposite polarity, but are identical and equal in amplitude, both being half (-6dB) the total signal level.Active Both Ends: Most modern equipment uses active electronics to create and receive the balanced signal. Again, the two signal wires carry signals which are in opposite polarity, but are identical and equal in amplitude, both being half (-6dB) the total signal level.Impedance-balanced Send: the total signal level.") Increasingly, manufacturers are using impedance-balanced outputs. The signal is still being transmitted differentially, but only the hot wire carries the (full level) signal. The cold wire is arranged to have the same impedance to ground to ensure proper common-mode rejection. This approach has fewer components and so is cheaper to implement, but it also ensures the correct signal levels are maintained regardless of whether the destination is balanced or unbalanced.Impedance-balanced Send: Increasingly, manufacturers are using impedance-balanced outputs. The signal is still being transmitted differentially, but only the hot wire carries the (full level) signal. The cold wire is arranged to have the same impedance to ground to ensure proper common-mode rejection. This approach has fewer components and so is cheaper to implement, but it also ensures the correct signal levels are maintained regardless of whether the destination is balanced or unbalanced.
Increasingly, manufacturers are using impedance-balanced outputs. The signal is still being transmitted differentially, but only the hot wire carries the (full level) signal. The cold wire is arranged to have the same impedance to ground to ensure proper common-mode rejection. This approach has fewer components and so is cheaper to implement, but it also ensures the correct signal levels are maintained regardless of whether the destination is balanced or unbalanced.Impedance-balanced Send: Increasingly, manufacturers are using impedance-balanced outputs. The signal is still being transmitted differentially, but only the hot wire carries the (full level) signal. The cold wire is arranged to have the same impedance to ground to ensure proper common-mode rejection. This approach has fewer components and so is cheaper to implement, but it also ensures the correct signal levels are maintained regardless of whether the destination is balanced or unbalanced.
Via SOS web site
SOS Technical Editor Hugh Robjohns replies: The very short answer to the first part of your question is "yes”. The longer answer is, I'm afraid, a lot longer... There's a lot of misunderstanding on this topic, and the key point to comprehend is that the 'balanced' aspect of a balanced interface has nothing whatsoever to do with the shape of the waveforms present (or not) on each signal wire! The critical element of a balanced interface is the 'differential receiver' — the balanced input circuitry. This can be active (as most are, these days) or passive (as in a transformer), but the important point is that it works differentially. That means that it only responds to the difference between the signals presented at its two input terminals; it ignores anything that appears identically on both terminals (otherwise known as a 'common mode' signal). the total signal level.")
In order to reject unwanted interference that might find its way onto the two signal wire connections, it's essential that the interfering source induces identical interference voltages on both lines (to make it a common mode signal). That can only happen if both signal wires have identical impedances to ground, because voltages develop across impedances. Hence the 'balanced' part of the balanced interface refers exclusively to the balanced (ie. matched) impedances to ground on both signal lines, and all balanced inputs, whether active or passive, only work correctly if the impedances to ground from each signal wire are matched or balanced. Without that, they wouldn't be able to reject unwanted interference at all. So matched impedances mean matched interference signal voltages on both signal lines, and thus the unwanted interference is presented as a common mode signal, which is ignored or rejected by the differential receiver.
That's the receiving or balanced input end of the system defined, so we can now consider how the wanted audio signal is dispatched from the 'balanced' source. Clearly, the wanted audio signal has to be presented as a differential signal for it to be recognised and passed on by the differential receiver. The old-school way of achieving that was with a transformer, in which case the signal on the 'cold' signal line has the same amplitude but opposite polarity to that on the 'hot' signal line. This is a 'symmetrical' balanced signal; both wires carry the same thing, but one is inverted with respect to the other. Moreover, because it is the difference between these two signals that is passed on as the wanted signal, the output will have twice the amplitude than either one individually, and so typically the signal on each line is half the required amount, or -6dB.
A lot of electronically balanced outputs emulate the transformer's symmetrical format, and thus work in exactly the same way. Typically there will be two active output drivers, one connected to the 'hot' signal wire, and the other to the 'cold' signal wire, the later typically providing an inverted version of the signal from the former. Both signals will normally be 6dB lower than the actual wanted signal, too, providing a useful headroom margin benefit!
However, this isn't always the most practical solution. For a start, this active electronic symmetrical format requires at least two output drivers and associated circuitry, making it relatively expensive. More importantly, if this electronically balanced output is likely to be connected to an unbalanced destination, typically only the signal on the 'hot' wire will be passed. This is inherently 6dB lower than it should be, and that can be inconvenient.
The 'impedance balanced' alternative is badly named, since all balanced interfaces are inherently impedance balanced! But what most manufacturers mean by this phrase is that the balanced output uses only a single output driver for the 'hot' signal line. A resistor of equivalent value to the output driver's impedance to ground is connected between the 'cold' signal output and ground, thus ensuring the correct impedance balance. With this configuration, the differential receiver at the balanced input sees lots of signal on one line and nothing at all on the other, but the difference between these is still the wanted signal, just as with the symmetrical approach, so it works in exactly the same way as any other balanced interface. The advantages are that it requires only one active output driver, not two (so it's cheaper to implement), and the hot signal is at the correct level to work as expected with unbalanced destinations. Consequently, you tend to find 'impedance balanced' outputs used for mixer aux sends and control room monitor outputs (and suchlike), where it is quite likely that an unbalanced destination might be found.
 signal. The cold wire is arranged to have the same impedance to ground to ensure proper common-mode rejection. This approach has fewer components and so is cheaper to implement, but it also ensures the correct signal levels are maintained regardless of whether the destination is balanced or unbalanced.")
As for identifying from a block diagram which kind of output is employed, in many cases you can't. Hopefully the manufacturer will state in the manual somewhere whether the balanced outputs are configured as symmetrical or asymmetrical, and transformer or actively coupled. Sometimes the block diagram will show a transformer at the output, or a pair of output drivers (symmetrical), or a single driver with the cold side tied to ground via a resistor (asymmetrical)... but often they don't bother with that level of detail. In reality it really doesn't matter in practice much, because they all work in the same way and there's no significant quality difference between the two implementations. By the way, a lot of microphones with electronic outputs are actually 'impedance balanced', and few people, if any, ever notice — or care! .
Published in SOS October 2013
Would impedance balanced and electronic balanced audio provide exactly the same noise reduction as regular symmetrical balanced audio? And how can I tell if a product has symmetrical balanced outputs or asymmetrical balanced outputs from a published block diagram?
Differential Receiver: A balanced line has equal impedances to ground from both the hot and cold wires (yellow and blue resistors in this diagram). The wanted signal (green) is applied and received differentially between the two signal wires. The unwanted interference (red) is the same on both signal wires (common-mode signal), and is thus ignored by the differential receiver.Differential Receiver: A balanced line has equal impedances to ground from both the hot and cold wires (yellow and blue resistors in this diagram). The wanted signal (green) is applied and received differentially between the two signal wires. The unwanted interference (red) is the same on both signal wires (common-mode signal), and is thus ignored by the differential receiver.Transformer Both Ends:
The traditional arrangement using transformers to create and receive the balanced signal. The two signal wires carry signals which are in opposite polarity, but are identical and equal in amplitude, both being half (-6dB) the total signal level.Transformer Both Ends: The traditional arrangement using transformers to create and receive the balanced signal. The two signal wires carry signals which are in opposite polarity, but are identical and equal in amplitude, both being half (-6dB) the total signal level.Active Both Ends: Most modern equipment uses active electronics to create and receive the balanced signal. Again, the two signal wires carry signals which are in opposite polarity, but are identical and equal in amplitude, both being half (-6dB) the total signal level.Active Both Ends: Most modern equipment uses active electronics to create and receive the balanced signal. Again, the two signal wires carry signals which are in opposite polarity, but are identical and equal in amplitude, both being half (-6dB) the total signal level.Impedance-balanced Send:
Increasingly, manufacturers are using impedance-balanced outputs. The signal is still being transmitted differentially, but only the hot wire carries the (full level) signal. The cold wire is arranged to have the same impedance to ground to ensure proper common-mode rejection. This approach has fewer components and so is cheaper to implement, but it also ensures the correct signal levels are maintained regardless of whether the destination is balanced or unbalanced.Impedance-balanced Send: Increasingly, manufacturers are using impedance-balanced outputs. The signal is still being transmitted differentially, but only the hot wire carries the (full level) signal. The cold wire is arranged to have the same impedance to ground to ensure proper common-mode rejection. This approach has fewer components and so is cheaper to implement, but it also ensures the correct signal levels are maintained regardless of whether the destination is balanced or unbalanced.Via SOS web site
SOS Technical Editor Hugh Robjohns replies: The very short answer to the first part of your question is "yes”. The longer answer is, I'm afraid, a lot longer... There's a lot of misunderstanding on this topic, and the key point to comprehend is that the 'balanced' aspect of a balanced interface has nothing whatsoever to do with the shape of the waveforms present (or not) on each signal wire! The critical element of a balanced interface is the 'differential receiver' — the balanced input circuitry. This can be active (as most are, these days) or passive (as in a transformer), but the important point is that it works differentially. That means that it only responds to the difference between the signals presented at its two input terminals; it ignores anything that appears identically on both terminals (otherwise known as a 'common mode' signal).
In order to reject unwanted interference that might find its way onto the two signal wire connections, it's essential that the interfering source induces identical interference voltages on both lines (to make it a common mode signal). That can only happen if both signal wires have identical impedances to ground, because voltages develop across impedances. Hence the 'balanced' part of the balanced interface refers exclusively to the balanced (ie. matched) impedances to ground on both signal lines, and all balanced inputs, whether active or passive, only work correctly if the impedances to ground from each signal wire are matched or balanced. Without that, they wouldn't be able to reject unwanted interference at all. So matched impedances mean matched interference signal voltages on both signal lines, and thus the unwanted interference is presented as a common mode signal, which is ignored or rejected by the differential receiver.
That's the receiving or balanced input end of the system defined, so we can now consider how the wanted audio signal is dispatched from the 'balanced' source. Clearly, the wanted audio signal has to be presented as a differential signal for it to be recognised and passed on by the differential receiver. The old-school way of achieving that was with a transformer, in which case the signal on the 'cold' signal line has the same amplitude but opposite polarity to that on the 'hot' signal line. This is a 'symmetrical' balanced signal; both wires carry the same thing, but one is inverted with respect to the other. Moreover, because it is the difference between these two signals that is passed on as the wanted signal, the output will have twice the amplitude than either one individually, and so typically the signal on each line is half the required amount, or -6dB.
A lot of electronically balanced outputs emulate the transformer's symmetrical format, and thus work in exactly the same way. Typically there will be two active output drivers, one connected to the 'hot' signal wire, and the other to the 'cold' signal wire, the later typically providing an inverted version of the signal from the former. Both signals will normally be 6dB lower than the actual wanted signal, too, providing a useful headroom margin benefit!
However, this isn't always the most practical solution. For a start, this active electronic symmetrical format requires at least two output drivers and associated circuitry, making it relatively expensive. More importantly, if this electronically balanced output is likely to be connected to an unbalanced destination, typically only the signal on the 'hot' wire will be passed. This is inherently 6dB lower than it should be, and that can be inconvenient.
The 'impedance balanced' alternative is badly named, since all balanced interfaces are inherently impedance balanced! But what most manufacturers mean by this phrase is that the balanced output uses only a single output driver for the 'hot' signal line. A resistor of equivalent value to the output driver's impedance to ground is connected between the 'cold' signal output and ground, thus ensuring the correct impedance balance. With this configuration, the differential receiver at the balanced input sees lots of signal on one line and nothing at all on the other, but the difference between these is still the wanted signal, just as with the symmetrical approach, so it works in exactly the same way as any other balanced interface. The advantages are that it requires only one active output driver, not two (so it's cheaper to implement), and the hot signal is at the correct level to work as expected with unbalanced destinations. Consequently, you tend to find 'impedance balanced' outputs used for mixer aux sends and control room monitor outputs (and suchlike), where it is quite likely that an unbalanced destination might be found.
As for identifying from a block diagram which kind of output is employed, in many cases you can't. Hopefully the manufacturer will state in the manual somewhere whether the balanced outputs are configured as symmetrical or asymmetrical, and transformer or actively coupled. Sometimes the block diagram will show a transformer at the output, or a pair of output drivers (symmetrical), or a single driver with the cold side tied to ground via a resistor (asymmetrical)... but often they don't bother with that level of detail. In reality it really doesn't matter in practice much, because they all work in the same way and there's no significant quality difference between the two implementations. By the way, a lot of microphones with electronic outputs are actually 'impedance balanced', and few people, if any, ever notice — or care! .
Published in SOS October 2013
Q Why are some DI boxes expensive?
Various
Why are some DI boxes so damned expensive? Aren't they all just pretty much a transformer in a box? And what if any advantage is there when tracking in using a dedicated DI over the instrument input on a decent-ish mic preamp?
Preston Fleming via email
Not all good DI boxes are expensive. This Orchid range is particularly affordable, but many of the more expensive boxes do justify their price.Not all good DI boxes are expensive. This Orchid range is particularly affordable, but many of the more expensive boxes do justify their price.
SOS Technical Editor Hugh Robjohns replies: As with everything, the cost of a product is partly down to its construction, partly its complexity and R&D investment, and partly its reputation and marketing. As you've found, there's a very wide range of DI boxes on the market, from the amazingly cheap — but usually not very good — up to the scarily expensive and (hopefully, but not always) sonically transparent devices.
In general terms, the more expensive units tend to be better built, mechanically, and better designed electronically. Consequently they're more robust, are often more flexible (with more features and options), they usually sound better — with lower distortion, more headroom, less noise and wider bandwidth — and more transparent.
In my own experience, the better designed and usually more expensive products will last for decades and will never become the weak link in your recording chain, so the high initial investment is amortised over a very long period, making them good value for money in the long term. Bargain basement products are more likely to fail or become damaged, and sound quality issues may well become apparent as your own abilities, awareness and expectations rise.
As for the 'transformer in a box' comment, passive DI boxes do involve little more than a transformer, a case, a few passive components and some switches and connectors. However, the cost of switches and connectors can vary wildly depending on their quality and reliability. The same is true of the case: some will easily survive being dropped and even driven over, while others will break if you look at them funny. Some designs afford far greater protection for the switches and connectors than others, too.
The most significant cost of a passive DI box is usually the transformer, though. The cheapest far-eastern units can cost as
little as $1 in bulk, while the likes of a specialist Jensen or Lundahl tranformer may cost upwards of $80. While they all do the same basic job, the more expensive models are better screened, introduce negligible distortion, enjoy a wider, flatter frequency response, can cope with high signal levels without saturation, and provide excellent electrical safety isolation. Cheaper transformers won't perform as well, and the results are often audible.
Active DI boxes obviously involve active amplifier circuitry, and again there are quality differences due to the circuitry involved: discrete FETs in class-A circuits, op-amps, or even valves, for example. Most active DI boxes still use transformers to provide the output balancing and isolation, but certainly not all, and some involve more sophisticated power-supply schemes than others to maximise headroom and minimise noise, as well as to maintain electrical isolation.
The other aspect to consider is that while most DI boxes are designed to be as transparent as possible, some deliberately impart certain desirable sonic characteristics to enhance the sound of a bass or electric guitar, for example. Some are also designed to accept piezo pickup inputs instead of or as well as normal magnetic pickups. Again, these tend to be more expensive than their vanilla cousins.

Everyone has their own personal favourite DI boxes, and many of mine are well over 20 years old now and still going strong. In the active line my favourite remains the Canford Audio Active DI (originally produced by Technical Projects). This has a very useful transformer-isolated balanced link output mode for signal splitting duties. I also have an original BSS AR116 (no longer available, and replaced with the AR113), but more often these days I use the ever-popular Radial J48 (with its handy input-merge facility and clever power-supply technology). Challenging the trend for costly DI Boxes, I have several extraordinarily cost-effective — but very high quality indeed — Orchid Electronics transformerless active DIs. However, there are many other great-sounding active DI boxes around with a wide variety of features, facilities and quality.
Of the passive DIs, I like the EMO and Radial boxes, the latter being better engineered mechanically, but also more expensive. Radial's J range employs high-quality Jensen transformers while the Pro range uses less costly alternatives. The bandwidth and frequency response suffers slightly in comparison, but not to any serious extent and only the most demanding situations would reveal any weaknesses.
One advantage of a DI box is that it can be placed close to the instrument itself, minimising cable losses, which is obviously important for on-stage and some studio live-room applications. However, a lot of microphone preamps and computer interfaces now include instrument inputs, which are essentially transformerless active DI boxes integrated into the preamp itself. The majority employ a fairly simple FET input buffer to provide the high-impedance unbalanced input. They generally work very well, sound good and avoid the additional expense of a separate DI box.
Why are some DI boxes so damned expensive? Aren't they all just pretty much a transformer in a box? And what if any advantage is there when tracking in using a dedicated DI over the instrument input on a decent-ish mic preamp?
Preston Fleming via email
Not all good DI boxes are expensive. This Orchid range is particularly affordable, but many of the more expensive boxes do justify their price.Not all good DI boxes are expensive. This Orchid range is particularly affordable, but many of the more expensive boxes do justify their price.
SOS Technical Editor Hugh Robjohns replies: As with everything, the cost of a product is partly down to its construction, partly its complexity and R&D investment, and partly its reputation and marketing. As you've found, there's a very wide range of DI boxes on the market, from the amazingly cheap — but usually not very good — up to the scarily expensive and (hopefully, but not always) sonically transparent devices.
In general terms, the more expensive units tend to be better built, mechanically, and better designed electronically. Consequently they're more robust, are often more flexible (with more features and options), they usually sound better — with lower distortion, more headroom, less noise and wider bandwidth — and more transparent.
In my own experience, the better designed and usually more expensive products will last for decades and will never become the weak link in your recording chain, so the high initial investment is amortised over a very long period, making them good value for money in the long term. Bargain basement products are more likely to fail or become damaged, and sound quality issues may well become apparent as your own abilities, awareness and expectations rise.
As for the 'transformer in a box' comment, passive DI boxes do involve little more than a transformer, a case, a few passive components and some switches and connectors. However, the cost of switches and connectors can vary wildly depending on their quality and reliability. The same is true of the case: some will easily survive being dropped and even driven over, while others will break if you look at them funny. Some designs afford far greater protection for the switches and connectors than others, too.
The most significant cost of a passive DI box is usually the transformer, though. The cheapest far-eastern units can cost as
little as $1 in bulk, while the likes of a specialist Jensen or Lundahl tranformer may cost upwards of $80. While they all do the same basic job, the more expensive models are better screened, introduce negligible distortion, enjoy a wider, flatter frequency response, can cope with high signal levels without saturation, and provide excellent electrical safety isolation. Cheaper transformers won't perform as well, and the results are often audible.
Active DI boxes obviously involve active amplifier circuitry, and again there are quality differences due to the circuitry involved: discrete FETs in class-A circuits, op-amps, or even valves, for example. Most active DI boxes still use transformers to provide the output balancing and isolation, but certainly not all, and some involve more sophisticated power-supply schemes than others to maximise headroom and minimise noise, as well as to maintain electrical isolation.
The other aspect to consider is that while most DI boxes are designed to be as transparent as possible, some deliberately impart certain desirable sonic characteristics to enhance the sound of a bass or electric guitar, for example. Some are also designed to accept piezo pickup inputs instead of or as well as normal magnetic pickups. Again, these tend to be more expensive than their vanilla cousins.
Everyone has their own personal favourite DI boxes, and many of mine are well over 20 years old now and still going strong. In the active line my favourite remains the Canford Audio Active DI (originally produced by Technical Projects). This has a very useful transformer-isolated balanced link output mode for signal splitting duties. I also have an original BSS AR116 (no longer available, and replaced with the AR113), but more often these days I use the ever-popular Radial J48 (with its handy input-merge facility and clever power-supply technology). Challenging the trend for costly DI Boxes, I have several extraordinarily cost-effective — but very high quality indeed — Orchid Electronics transformerless active DIs. However, there are many other great-sounding active DI boxes around with a wide variety of features, facilities and quality.
Of the passive DIs, I like the EMO and Radial boxes, the latter being better engineered mechanically, but also more expensive. Radial's J range employs high-quality Jensen transformers while the Pro range uses less costly alternatives. The bandwidth and frequency response suffers slightly in comparison, but not to any serious extent and only the most demanding situations would reveal any weaknesses.
One advantage of a DI box is that it can be placed close to the instrument itself, minimising cable losses, which is obviously important for on-stage and some studio live-room applications. However, a lot of microphone preamps and computer interfaces now include instrument inputs, which are essentially transformerless active DI boxes integrated into the preamp itself. The majority employ a fairly simple FET input buffer to provide the high-impedance unbalanced input. They generally work very well, sound good and avoid the additional expense of a separate DI box.
Monday, July 7, 2014
Q How best can I capture room tone with home-recorded drums?
Various
I'm trying to get a nice spacious rock drum sound. But while my live room — or 'dining room' as my wife calls it! — sounds nice and lively, it doesn't seem big enough to do much useful with room mics, and I'm having to close-mic everything and do what I can with reverb after recording. Are there any tools or techniques you can recommend for getting a bit more of a spacious sound while I'm actually tracking? I read somewhere that tube traps might help, but I'm not sure how!
If you can't afford to hire a studio, close-miking and reverb is probably the best option for a roomy drum sound, but you could always try finding a local facility with a larger space — as here, when we used a local school hall!If you can't afford to hire a studio, close-miking and reverb is probably the best option for a roomy drum sound, but you could always try finding a local facility with a larger space — as here, when we used a local school hall!
Reece Law via email
SOS Editor In Chief Paul White replies:
When recording drums in a less-than-ideal acoustic space, I find that the best option is usually to remove the influence of the space as much as is possible and then add a good convolution, drum room-style, reverb when you mix — as you're doing now! The close mics aren't usually too much of a problem, as the amount of room ambience leaking into them is generally quite small. The overheads, though, are a different story. Using acoustic foam screens or Reflexion Filters between the mics and the ceiling can help reduce the ceiling reflections (at least for the mids and highs), which are a big contributing factor to poor sound in a low room. You could even go to the extent of fixing a pair of boundary mics to the ceiling to use as overheads, which would avoid the ceiling reflections altogether. Ensuring both overheads are the same distance from the snare drum also helps keep the snare sound clean and focussed.

Mid- and high-frequency reflections from walls can be dealt with by the usual deployment of acoustic foam, duvets, furniture removal blankets and so on, but none of these treatments will do much for the low end. So if the overheads sound wrong at the bass end, try cutting out the lows and rely on the close mics to provide the punch. The main thing in this instance is for the overheads to capture the cymbals and the transient impact of the stick hits. Finally, clean up the tom mic tracks by muting everything between tom hits as that also makes a huge difference in cleaning up your drum tracks. Toms have a habit of resonating along with every other drum you hit, so that's pretty important.
With care, and providing you have a well-tuned kit to start with, you can get a very credible drum sound in a smallish room by following these guidelines, and there's no shortage of excellent reverb treatments for putting the life back into the sound. You may also want to advance the overhead mic signals by a few milliseconds to get them into precise alignment with the close mic signals, though let your ears decide what sounds best, not your eyes. If the final sound still lacks weight, consider using drum replacement software to add a deep sampled kick to the one you've recorded — there's no shame in doing that!
SOS Reviews Editor Matt Houghton adds: On the whole, I'm a great believer in finding a nice space in which to track your drums, and if you have any recording budget available, hiring a decent studio in which to track your drums can make a huge difference to your productions — usually a greater one than, say, adding another mic or preamp to your personal collection. If you can't afford that then why not try to beg or borrow the use of a bigger room in a local hall? You can still achieve decent results in smaller spaces, though. As Paul says, in most domestic rooms there's little to be gained by capturing the ambience of the recording room itself, and most of your efforts are probably best spent in capturing a decent dry close-miked sound and adding in 'room' sound later courtesy of a convolution reverb plug-in.
But there are ways and means if you're willing to experiment (and unwilling to shell out for a studio space!). The tube-trap trick you're thinking of is, I suspect, one where you place these vertical traps around the drum kit and then place your room mic on the other side of one trap from the kit, facing the wall. That way, the 'direct' sound that comes to the mic is travelling that bit further, bouncing off the wall, and this can sometimes successfully mimic a larger room. But you could alternatively try deploying boundary mics on the rear wall (ie. the one the drum kit is facing). These will give you the most distant sound achievable in your room without resorting to that tube-trap trickery.
Depending on the sound you're aiming for, your quest for 'real' ambience needn't end there. My suggestion would be to try putting up a random mic or two — an SM57 or 58 pointing at the wall can add a useful grittiness that suits some styles and takes aggressive compression nicely. Also, I assume your dining room has a door or two? In that case, you could try putting a mono ambience mic in one or more of the adjacent rooms. That should pretty much only pick up reflections, with very little direct sound. Experiment with compression on that and you might just have a workable 'room-ish' sound that works quite well in some rock/indie/grungey styles, though probably not in more 'natural-sounding' genres.
I'm trying to get a nice spacious rock drum sound. But while my live room — or 'dining room' as my wife calls it! — sounds nice and lively, it doesn't seem big enough to do much useful with room mics, and I'm having to close-mic everything and do what I can with reverb after recording. Are there any tools or techniques you can recommend for getting a bit more of a spacious sound while I'm actually tracking? I read somewhere that tube traps might help, but I'm not sure how!
If you can't afford to hire a studio, close-miking and reverb is probably the best option for a roomy drum sound, but you could always try finding a local facility with a larger space — as here, when we used a local school hall!If you can't afford to hire a studio, close-miking and reverb is probably the best option for a roomy drum sound, but you could always try finding a local facility with a larger space — as here, when we used a local school hall!
Reece Law via email
SOS Editor In Chief Paul White replies:
When recording drums in a less-than-ideal acoustic space, I find that the best option is usually to remove the influence of the space as much as is possible and then add a good convolution, drum room-style, reverb when you mix — as you're doing now! The close mics aren't usually too much of a problem, as the amount of room ambience leaking into them is generally quite small. The overheads, though, are a different story. Using acoustic foam screens or Reflexion Filters between the mics and the ceiling can help reduce the ceiling reflections (at least for the mids and highs), which are a big contributing factor to poor sound in a low room. You could even go to the extent of fixing a pair of boundary mics to the ceiling to use as overheads, which would avoid the ceiling reflections altogether. Ensuring both overheads are the same distance from the snare drum also helps keep the snare sound clean and focussed.
Mid- and high-frequency reflections from walls can be dealt with by the usual deployment of acoustic foam, duvets, furniture removal blankets and so on, but none of these treatments will do much for the low end. So if the overheads sound wrong at the bass end, try cutting out the lows and rely on the close mics to provide the punch. The main thing in this instance is for the overheads to capture the cymbals and the transient impact of the stick hits. Finally, clean up the tom mic tracks by muting everything between tom hits as that also makes a huge difference in cleaning up your drum tracks. Toms have a habit of resonating along with every other drum you hit, so that's pretty important.
With care, and providing you have a well-tuned kit to start with, you can get a very credible drum sound in a smallish room by following these guidelines, and there's no shortage of excellent reverb treatments for putting the life back into the sound. You may also want to advance the overhead mic signals by a few milliseconds to get them into precise alignment with the close mic signals, though let your ears decide what sounds best, not your eyes. If the final sound still lacks weight, consider using drum replacement software to add a deep sampled kick to the one you've recorded — there's no shame in doing that!
SOS Reviews Editor Matt Houghton adds: On the whole, I'm a great believer in finding a nice space in which to track your drums, and if you have any recording budget available, hiring a decent studio in which to track your drums can make a huge difference to your productions — usually a greater one than, say, adding another mic or preamp to your personal collection. If you can't afford that then why not try to beg or borrow the use of a bigger room in a local hall? You can still achieve decent results in smaller spaces, though. As Paul says, in most domestic rooms there's little to be gained by capturing the ambience of the recording room itself, and most of your efforts are probably best spent in capturing a decent dry close-miked sound and adding in 'room' sound later courtesy of a convolution reverb plug-in.
But there are ways and means if you're willing to experiment (and unwilling to shell out for a studio space!). The tube-trap trick you're thinking of is, I suspect, one where you place these vertical traps around the drum kit and then place your room mic on the other side of one trap from the kit, facing the wall. That way, the 'direct' sound that comes to the mic is travelling that bit further, bouncing off the wall, and this can sometimes successfully mimic a larger room. But you could alternatively try deploying boundary mics on the rear wall (ie. the one the drum kit is facing). These will give you the most distant sound achievable in your room without resorting to that tube-trap trickery.
Depending on the sound you're aiming for, your quest for 'real' ambience needn't end there. My suggestion would be to try putting up a random mic or two — an SM57 or 58 pointing at the wall can add a useful grittiness that suits some styles and takes aggressive compression nicely. Also, I assume your dining room has a door or two? In that case, you could try putting a mono ambience mic in one or more of the adjacent rooms. That should pretty much only pick up reflections, with very little direct sound. Experiment with compression on that and you might just have a workable 'room-ish' sound that works quite well in some rock/indie/grungey styles, though probably not in more 'natural-sounding' genres.
Saturday, July 5, 2014
Q How much latency is acceptable for virtual piano?
Various
I'm a classically trained pianist who, on occasion, plays keyboard on stage. Though I am told that the latency in a given system is negligible by the tech, I often think I can feel the difference between the immediacy of a piano with that of a keyboard running through a program like Mainstage. Please can you shed some light on how many milliseconds of latency is acceptable and how much is just people like me thinking we can feel a difference when we can't.
If latency on your sampled piano sounds makes playing uncomfortable, you could always try Pianoteq when playing live.If latency on your sampled piano sounds makes playing uncomfortable, you could always try Pianoteq when playing live.
Jonathan Ingham via email
SOS contributor Dave Stewart replies: If you're used to playing Hammond organ, electric piano or acoustic piano, the difference between their near-instant physical response and that of a virtual instrument can feel quite dramatic. In order to buy the time to process incoming MIDI data, computers use an 'In/Out Buffer' to temporarily store data, and this can introduce considerable timing delays. At a sample rate of 44.1kHz, setting the I/O buffer to 512 samples gives a delay of around 12 milliseconds (= 0.012 seconds), which though it sounds tiny on paper, many people can feel. I find that a setting of 256 samples (6ms) is acceptable for most situations, but with instruments that use thousands of samples (sampled pianos being the worst offenders), a setting of 256 samples will sometimes create pops and clicks.

As a rule of thumb, a 5 or 6 ms latency feels OK, but anything above 10ms may cause problems when using samples with hard attacks (drums, percussion, piano or clavinet for example). For live playing, you may find that an instrument such as Pianoteq (a modelled piano which uses no samples) may be more up your street than an intensively sampled, multi-gigabyte piano library.
Ultimately, the best judge of whether system latency is 'neglible' or not is the musician, not the technician. If you can feel the latency when you play, it almost certainly exists!
I'm a classically trained pianist who, on occasion, plays keyboard on stage. Though I am told that the latency in a given system is negligible by the tech, I often think I can feel the difference between the immediacy of a piano with that of a keyboard running through a program like Mainstage. Please can you shed some light on how many milliseconds of latency is acceptable and how much is just people like me thinking we can feel a difference when we can't.
If latency on your sampled piano sounds makes playing uncomfortable, you could always try Pianoteq when playing live.If latency on your sampled piano sounds makes playing uncomfortable, you could always try Pianoteq when playing live.
Jonathan Ingham via email
SOS contributor Dave Stewart replies: If you're used to playing Hammond organ, electric piano or acoustic piano, the difference between their near-instant physical response and that of a virtual instrument can feel quite dramatic. In order to buy the time to process incoming MIDI data, computers use an 'In/Out Buffer' to temporarily store data, and this can introduce considerable timing delays. At a sample rate of 44.1kHz, setting the I/O buffer to 512 samples gives a delay of around 12 milliseconds (= 0.012 seconds), which though it sounds tiny on paper, many people can feel. I find that a setting of 256 samples (6ms) is acceptable for most situations, but with instruments that use thousands of samples (sampled pianos being the worst offenders), a setting of 256 samples will sometimes create pops and clicks.
As a rule of thumb, a 5 or 6 ms latency feels OK, but anything above 10ms may cause problems when using samples with hard attacks (drums, percussion, piano or clavinet for example). For live playing, you may find that an instrument such as Pianoteq (a modelled piano which uses no samples) may be more up your street than an intensively sampled, multi-gigabyte piano library.
Ultimately, the best judge of whether system latency is 'neglible' or not is the musician, not the technician. If you can feel the latency when you play, it almost certainly exists!
Friday, July 4, 2014
Q Why are analogue tape emulation plug-ins so expensive?
Q Why are analogue tape emulation plug-ins so expensive?
The effects of recording to tape seem to be very subtle, with the so-called 'warmth' appearing to be largely due to the soft-saturation characteristics of the tape itself and other non-linear components in the signal chain. This being the case, won't a simpler valve emulation or mild overdrive plug-in achieve pretty much the same result as both really just 'squash' the signal peaks? If so, why do tape emulation plug-ins cost so much more than overdrive plug-ins?David Astley via email
SOS Editor In Chief Paul White replies: You're right in pointing out that the effects of recording to tape can be pretty subtle, but they do become more obvious if you drive the tape harder, deliberately causing saturation. That saturation is a big part of what makes tape sound the way it does, of course, but the signal is also equalised (usually NAB or IEC) before going to tape and then additional EQ is applied on playback to linearise the performance of what's otherwise a somewhat imperfect medium (tape has a natural high-end loss that must be compensated for). In other words, the tape saturation is effectively applied to an equalised signal with all its attendant phase-shift implications rather than to the flat signal. The outcome is that the spectrum of added 'saturation' harmonics will be a little different from those produced when a flat signal is fed via a simple non-linear saturation device. Tape machines will, for example, distort at far lower levels for high-frequency sounds such as hi-hats than for lower-frequency sounds. Other factors also come into play, such as the bass-boost 'head bump', which is a function of tape speed and head-gap design, as well as subtle pitch modulation that we term 'wow and flutter'. Even the best analogue tape transports are far less stable than a digital clock. All these elements add up to produce the analogue tape sound, but even that changes depending on the tape recorder model, the tape speed and the formulation of the tape being used.
 What is it about decent analogue-tape emulations that means they can command a higher price than, say, a tube distortion plug-in?What is it about decent analogue-tape emulations that means they can command a higher price than, say, a tube distortion plug-in?There are also other effects that may be considered more or less important such as modulation noise (a sine wave recorded to an analogue tape machine can sound alarmingly crunchy!) and the position of other non-linear devices such as transformers and valves in the signal path. Tape machines also introduce significant phase shifts, as you'd see if you recorded a square wave and then checked the output on an oscilloscope. You might expect to see some integration or smoothing of the sharp rising and falling edges of the waveform because of the frequency response limits of the tape machine, but the reality is that the square wave often appears bent almost beyond recognition, due to different frequencies being shifted in phase relative to each other during the recording and playback process.
A simple valve emulation plug-in may deliver the desired warmth — and if that's all you want then I guess you're in luck! — but designing a plug-in that takes into account all the variables of specific tape machines including tape width, speed, hiss and formulation, and recording levels is a very complex task, which is why the best of these tape emulations don't come cheap. However, bear in mind that most still cost rather less than an album's worth of two-inch tape, and that if you just want a general approximation of the effect, but without the accuracy of modelling, there are some pleasant-sounding freebies and low-cost plug-ins available.
The effects of recording to tape seem to be very subtle, with the so-called 'warmth' appearing to be largely due to the soft-saturation characteristics of the tape itself and other non-linear components in the signal chain. This being the case, won't a simpler valve emulation or mild overdrive plug-in achieve pretty much the same result as both really just 'squash' the signal peaks? If so, why do tape emulation plug-ins cost so much more than overdrive plug-ins?David Astley via email
SOS Editor In Chief Paul White replies: You're right in pointing out that the effects of recording to tape can be pretty subtle, but they do become more obvious if you drive the tape harder, deliberately causing saturation. That saturation is a big part of what makes tape sound the way it does, of course, but the signal is also equalised (usually NAB or IEC) before going to tape and then additional EQ is applied on playback to linearise the performance of what's otherwise a somewhat imperfect medium (tape has a natural high-end loss that must be compensated for). In other words, the tape saturation is effectively applied to an equalised signal with all its attendant phase-shift implications rather than to the flat signal. The outcome is that the spectrum of added 'saturation' harmonics will be a little different from those produced when a flat signal is fed via a simple non-linear saturation device. Tape machines will, for example, distort at far lower levels for high-frequency sounds such as hi-hats than for lower-frequency sounds. Other factors also come into play, such as the bass-boost 'head bump', which is a function of tape speed and head-gap design, as well as subtle pitch modulation that we term 'wow and flutter'. Even the best analogue tape transports are far less stable than a digital clock. All these elements add up to produce the analogue tape sound, but even that changes depending on the tape recorder model, the tape speed and the formulation of the tape being used.
What is it about decent analogue-tape emulations that means they can command a higher price than, say, a tube distortion plug-in?What is it about decent analogue-tape emulations that means they can command a higher price than, say, a tube distortion plug-in?There are also other effects that may be considered more or less important such as modulation noise (a sine wave recorded to an analogue tape machine can sound alarmingly crunchy!) and the position of other non-linear devices such as transformers and valves in the signal path. Tape machines also introduce significant phase shifts, as you'd see if you recorded a square wave and then checked the output on an oscilloscope. You might expect to see some integration or smoothing of the sharp rising and falling edges of the waveform because of the frequency response limits of the tape machine, but the reality is that the square wave often appears bent almost beyond recognition, due to different frequencies being shifted in phase relative to each other during the recording and playback process.A simple valve emulation plug-in may deliver the desired warmth — and if that's all you want then I guess you're in luck! — but designing a plug-in that takes into account all the variables of specific tape machines including tape width, speed, hiss and formulation, and recording levels is a very complex task, which is why the best of these tape emulations don't come cheap. However, bear in mind that most still cost rather less than an album's worth of two-inch tape, and that if you just want a general approximation of the effect, but without the accuracy of modelling, there are some pleasant-sounding freebies and low-cost plug-ins available.
Subscribe to:
Posts (Atom)