Thursday, October 31, 2019
Wednesday, October 30, 2019
Q. What's the best way to fix a pushed-in tweeter cone?
The dome of the tweeter on one of my M-Audio Studiophile BX5 monitors has somehow got pushed inwards. Does this cause permanent damage? If it's advisable, how should I go about pulling it back out? Someone told me to use some sticky tape, but I'm concerned that this could do further damage.
Alex Dean
Technical Editor Hugh Robjohns replies: I'm afraid to say that if a soft-dome tweeter has been pushed in, it will already be creased, and that will result in increased distortion compared with an original unit. This structural damage cannot be repaired, although you can improve the looks of the thing by drawing the tweeter dome back out.
 While it may be possible to draw this pushed-in tweeter dome back out, its performance will be permanently compromised.
If you can't replace the tweeter, then you might be able to restore its shape and some of its original performance. Bear in mind, though, that the coating on the tweeter dome is delicate, and trying to pull it out by sticking tape or Blu-Tac to it is a daft idea in my opinion. Such techniques will either pull off parts of the coating (making the situation even worse) or leave residues behind (ditto).
A better way of restoring the shape of the dome is to use a vacuum cleaner, because it is a non-contact approach. This is what we did to provide a temporary fix for a damaged tweeter in a Studio SOS visit in the October 2002 issue. By carefully reducing the air pressure in front of the tweeter using the hose from the vacuum, the pressure of air behind the tweeter forces its shape back out in a fairly gentle way. Obviously, it involves a strong and steady hand to avoid the vacuum cleaner nozzle coming into contact with the tweeter in any way, but, provided that you are careful, this technique can be effective.
Published December 2003
Tuesday, October 29, 2019
Monday, October 28, 2019
Q. How can I set up my Korg Kaoss Pad to act as a pitch-bender?
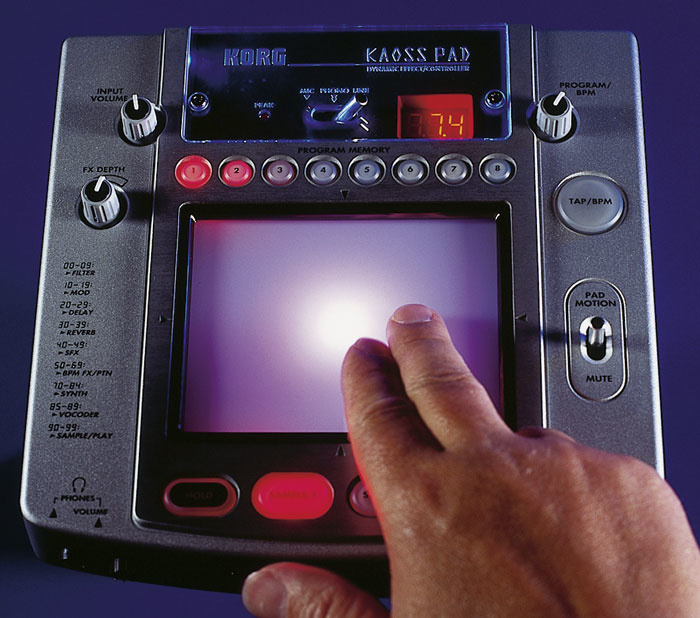
Can you please tell me how to set up the Korg Kaoss Pad KP2 as an ordinary pitch-bender?
SOS Forum Post
Reviews Editor Mike Senior replies: Hold down the Tap/BPM and Rec/Stop buttons at the same time, and after a second or so you'll enter the MIDI editing mode — various buttons will light up and the MIDI channel will be shown in the display. You can at this point change the MIDI channel as necessary using the Program/BPM dial. If you're only wanting to transmit MIDI pitch-bend messages from the Y axis of the pad, then make sure that only the Program Memory 5 button is lit. If you want something transmitted from the X axis as well, then the Program Memory 4 button should also be lit. Pressing any button briefly will toggle its lit/unlit status.
Now to get Y axis movements sending MIDI Pitch-bend messages. Still in MIDI Edit mode, hold down Program Memory 5 until the currently assigned Y-axis controller (by default MIDI Continuous Controller number 13) is displayed in place of the MIDI channel number. Use the Program/BPM dial to bring up 'Pb' on the display. If you're also wanting to set the X axis, press and hold Program Memory 4 until its controller number (by default MIDI Continuous Controller number 12) is shown, and adjust as necessary. Finally, to exit MIDI Edit mode, hold Rec/Stop until you're back in the normal operating state.
A quick bit of general advice too — the unit will automatically leave MIDI Edit mode if you leave it alone for more than 10 seconds, so don't hang around too long when making settings, or you'll be dumped back into the normal operational mode. I find that it's worth toggling a random one of the Program Memory keys on and off occasionally, as the activity keeps the unit in MIDI Edit mode and gives me time to think and consult the manual!
There is another thing to think about when setting the KP2 to transmit pitch-bend information: a normal pitch-bend wheel is sprung so that it resets the pitch whenever you let go of it. Unfortunately, the Hold button doesn't affect MIDI transmission in the same way as it does the response of the internal effects, so the degree of pitch-bend will always stay where it is when you remove your finger from the pad. (Apparently the KP1 doesn't suffer from this problem.) This isn't necessarily a problem, however, because you can effectively do a rough-and-ready pitch-bend 'spring-back' manually, especially if you're able to use both hands: one to pitch-bend and the other to tap the centre of the pad, resetting pitch-bend to zero. If you only have one hand free, you could keep one finger in the centre of the pad while pitch-bending with other fingers. However, the finger that you leave in the centre of the pad will decrease the range over which the rest of the pad operates, so you won't get the same maximum bend range.
If you really need to be able to zero the pitch-bend exactly without sacrificing pitch-bend range, I'd suggest putting a controller button in-line to do this (I'd use one of the ones on my Peavey PC1600X for this) and setting it to generate a 'centred' pitch-bend message. But, to be honest, if you're using the KP2 for subtle pitch changes, it should be adequately accurate to zero the pitch-bend manually. If you're doing mad sweeps the whole time, then it may not even matter if you're not able to zero it perfectly.
However, if you simply have to have mad pitch sweeps along with perfect pitch-bend zeroing, then consider restricting yourself to pitch-bends in only one direction, with the zero point at the top or bottom edge of the pad, so that you can accurately reset the controller manually (finding the middle of the pad accurately is tricky, but finding the edge is easy). To do this for upwards-only bending, set your synth to play an octave higher than you want it (assuming that the bend range will be an octave). This will give you two octaves' shift above whatever note you're playing, with the low edge of the pad representing the former zero-bend position. Reverse the idea for downwards-only shift. If you really want to shift both ways, then you could assign a normal MIDI Continuous Controller (CC) message to the other axis and then use that to control the other pitch-bend direction, assuming that the synth you're triggering allows ordinary controllers also to modulate the pitch — my Korg Prophecy does. You won't get the same controller resolution out of a MIDI CC, so large shifts may sound stepped, but this will at least give you both directions of bend from the pad, and with exact pitch-bend reset.
Having said all of this, there is one other workaround to this problem, which provides all the functionality of a 'sprung' pitch-bend wheel, but it requires that you use a synth with fairly flexible modulation routing. Two of the KP2's transmission types do actually exhibit a 'sprung' action: Modulation Depth One (Y=5-1) and Modulation Depth Two (Y=5-9), activated in MIDI edit mode by Program Memory buttons one and two respectively. Both of these will automatically send their minimum values when you let go of the pad, as if you had moved your finger to the centre of the pad. If you switch both of these types of transmission on in the MIDI edit mode, then the top half of the Y axis will transmit MIDI Continuous Controller number one, and the bottom half will transmit MIDI Continuous Controller number two. The problem is that you can't change the controller assignments for this transmission type, so you'll need to assign the two controllers to upwards and downwards pitch modulation respectively to make it all work. The same caveat concerning controller resolution applies as before, but you do get a true pitch-bend wheel-style action. If your synth won't allow this modulation routing, you may be able to use your sequencer or MIDI controller to convert the MIDI CC messages to MIDI Pitch-bend or Aftertouch messages to achieve the same result.
Published December 2003
Saturday, October 26, 2019
Friday, October 25, 2019
Q & A April 2002
Q. Why is phase important?
I'm an experienced musician who's just beginning to understand recording techniques and acoustic treatment. On page 160 of your December 2001 issue there was a box called "Absolute Phase Is Important", and this has prompted a few questions.
How does one reverse the phase of a microphone as suggested in the article? Is this done by resoldering connections, or are there any quality mics you can suggest that come with a phase-reverse switch? Phase testers were also mentioned. What are they? How do they work? Where can they be purchased?
Many of us use a phaser effect, and I assume that phasers basically alter the phase of a sound source over a given time period. Perhaps you could elaborate on how they work?
Finally, I use a PC to store all my recorded audio information as WAV files. Is it possible to uniformly alter the phase of a piece of digitally recorded audio so it stays static at the same place? I have been trying in Sound Forge, but haven't found a way to successfully do it yet.
Jonathan Sammeroff
Paul White and Sam Inglis respond: As you probably know, sound consists of pressure waves in the atmosphere. The function of a microphone is to translate these pressure waves into changes in the voltage of an electrical signal. Absolute phase usually refers to instrument miking where a positive increase in air pressure translates to a positive increase in voltage at the microphone output. If the mic is wired out of phase, or some other phase inversion is introduced, the output voltage will go negative as the air pressure becomes positive, and in the context of some percussive sounds, such as kick drums, there can be an audible difference. Also, if you have two very similar signals (such as are obtained by close-miking the same source with two different microphones) which happen to be out of phase, a lot of cancellation will occur, and this is usually undesirable. The classic case is when you close-mic both the top and bottom of a snare drum: here, you will get two very similar signals, but one will effectively be phase-reversed with respect to the other, so it's standard practice to reverse the phase on the bottom microphone.
Any balanced mic can be reversed in phase by making up a cable with the hot and cold conductors (the two inner wires) swapped over at one end of the lead. Most mixers, and some mic preamps, also have mic phase invert buttons that will switch the phase without requiring any special cables. Most cable testers will check that your leads are wired correctly (without crossed over hot and cold wires that would cause a phase reversal), but devices that can check acoustic phase from microphone to loudspeaker tend to be more complex and rather more expensive. Check with Canford Audio (www.canford.co.uk), as they carry this type of test equipment.
A phaser effect combines a signal with a delayed version of itself, using a low-frequency oscillator to modulate the delay time. As the length of the delay time is varied, cancellation occurs at different frequencies, and the result is a type of notch filter where the notch frequency is constantly moving, introducing a sense of movement into the sound.
You can't uniformly alter the phase of a whole piece of music, as phase relates to frequency, so unless your music comprises a single tone, adding delay (which is how some phaser effects work) will cause some frequencies to add and others to cancel. However, I suspect this is the effect you want, in which case you can get it by copying the audio to be treated, then moving it slightly ahead or behind the original audio, usually by just a few milliseconds. The two parts summed together will exhibit the static phase effect you describe.
Q. What orchestral sample libraries are available for
HALion?
I recently bought Steinberg's software sampler HALion to replace Cubase's good (but limited) Universal Sound Module for orchestral work. However, I'm having difficulty sourcing suitable samples for this, and wondered if you could recommend some alternatives in the price region of £100 to £300, and how I might be able to hear them before I buy?
Bill Taylor


If you want something more professional, both Peter Siedlaczek and Miroslav Vitous offer junior versions of their larger (and more expensive) orchestral libraries as Akai CD-ROMs. At £99, Peter Siedlaczek's Advanced Orchestra Compact might be a bargain, though many people regard it as being a little too compact. But at the upper limit of your budget, Miroslav Vitous' Mini Library offers a good selection of high-quality bread-and-butter sounds for £299, which is around a tenth of the price of the full library. Both are available from Time & Space (www.timespace.com).
Hearing libraries before you buy can be tricky, but all of those mentioned here have MP3 demo songs on their respective web sites.
Q. Where can I get Windows-based ASIO drivers for
an Audiomedia III card?
 Digidesign Audiomedia III card.
I recently bought a Digidesign Audiomedia III card second-hand from your magazine's Readers' Ads, and it didn't come with any ASIO drivers for my Windows-based PC. The card was highly recommended by a friend of mine (combined with Pro Tools), and the sound quality is very good. However, I've got a problem with latency and can't find any ASIO drivers to bring this down to acceptable levels. With Cubase 3.7 I can only use the default settings of 750mS (ASIO DirectX/ASIO Multimedia), which is far too high for any serious recording. How can I reduce the latency (apparently the AMIII is capable of latencies less than 5mS), and what ASIO driver should I install to use the card's full potential?
Another problem I'm experiencing is that when recording electric guitar through the soundcard into Pro Tools, I get nasty digital clicks at the beginning of every recording. Is there any way I can eliminate these? I'm not very experienced in setting up studios, and everything I read regarding Pro Tools and the Audiomedia III card seems to be written for the Mac platform, and not for PCs.
Bernd Krueper
PC Music specialist Martin Walker replies: The Audiomedia III is now quite elderly as soundcards go, having been introduced by Digidesign in 1996, and features 18-bit converters, although internally it has a 24-bit data path. I've only mentioned it once in the pages of SOS, in my first ever (May 1997) PC Notes column, where I published details of a way to cure inexplicable clicks by disabling PCI Burst Mode in your motherboard BIOS, should this setting be available. At the time, Digidesign were finalising a chip upgrade addressing the problem, so hopefully you have one of the later cards with this modification. Digidesign mention various other known incompatibilities on their web site, including AMD processors, VIA chipsets, and various Hewlett Packard PCs, which isn't encouraging.
I eventually found the latest Wave (MME) drivers on Digidesign's web site including version 1.7 for Windows 98/ME, dated January 2001, which supports 16 and 24-bit recording and playback at sample rates of up to 48kHz, in addition to other drivers for Windows NT, 2000, and even the announcement of an XP beta test program to support the AMIII cards. Various cures for crackling during playback were implemented in driver development, so make sure you have the latest versions. These will still give high latency, although you may be able to tweak the ASIO Multimedia settings inside Cubase 3.7 to bring the default 750mS down a little.
However, there was absolutely no mention of ASIO drivers, and Digidesign UK subsequently confirmed that none were ever written by them, or are now likely to be. Because the AMIII was released pre-ASIO, Digidesign developed the DAE (Digidesign Audio Engine) and relied on the sequencer developers to add support for it. Apparently, Steinberg did originally write an ASIO driver that supported this, and Emagic supported the DAE in Logic Audio up to version 3.5 on the PC, but since the DAE apparently wasn't updated by Digidesign to support Windows 98, support was dropped in Logic version 4.
So, sadly, although the card might be capable of latencies down to 5mS, you won't find any modern audio application that can use anything other than the high-latency MME drivers. This is a cautionary tale for any musician buying a soundcard, and particularly a second-hand one, so make your decision based on what drivers you can confirm are available to save yourself regrets later on.
Q. Are there really reverb and synth plug-ins supplied
with Mac OS X?
I'm running Mac OS 10.1.2 and use SparkME, but there's no sign of the reverb and synth plug-ins anywhere. What's going on?
Arum Devereux
Assistant Editor Mark Wherry replies: The short answer is yes, there's a reverb and a synthesizer supplied with Mac OS X. The slightly longer answer is that developers have to provide support in their applications to take advantage of these features. And, since the MIDI and audio APIs (Application Programming Interfaces), collectively known as the Core Audio services, are some of the newest elements of Mac OS X, it's going to take a while for developers to fully support them.
The Core Audio services provide a plug-in architecture known as Audio Units, which isn't a million miles away from DirectX plug-ins on Windows. Audio Units can be used for a variety of applications, including software effects and instruments, and indeed, the reverb and DLS/SoundFont player instrument Apple supply with Mac OS X are both Audio Units.
The advantage of Audio Units, like DirectX plug-ins, is that any musical application running on Mac OS X can use the same pool of global plug-ins if it was developed to support Audio Units. This saves developers having to develop their plug-ins to support multiple architectures like VST, MAS, RTAS, and so on.
Q. How can I isolate the vocals from a stereo mix?
Do you know of any software or hardware that can remove a vocal from a track but allow you to save the vocal? There are numerous software packages that remove vocals from a track, but those are the parts I want.
Simon Astbury
Senior Assistant Editor Matt Bell replies: This question and variants on it come up time and time again here at SOS, and also on music technology discussion forums all over the Internet, presumably because budding remixers are forever coming to the conclusion that it would be great if there were a way of treating the finished stereo mixes of songs on CD and coming up with the isolated constituents of the original multitrack, thus making remixing a doddle. The situation is further complicated by the ready availability of various hardware and software 'vocal removers' or 'vocal cancellers', which leads people to assume that if you can remove the vocal from a track, there must be some easy way of doing the opposite, ie. removing the backing track and keeping the vocals.
Sadly, the truth is that there's no easy way to do this. To understand why not, it's helpful to learn how vocal cancellation — itself a very hit-and-miss technology — works. Believe it or not (given that so much of this month's Q&A is already given over to the topic) it's all to do with signal phase!
A stereo signal consists of two channels, left and right, and most finished stereo mixes contain various signals, mixed so they are present in different proportions in both channels. A percussion part panned hard left in the final mix, for example, will be present 100 percent in the left channel and not at all in the right. A guitar overdub panned right (but not hard right) will be present in both channels, but at a higher level in the right channel than it is in the left. And a lead vocal, which most producers these days pan dead centre, will be equally present in both channels. When we listen to the left and right signals together from CD, the spread of signal proportions in both channels produces a result which sounds to us as though the different instruments are playing from different places in the stereo sound stage.
If you place one of the channels in a stereo mix out of phase (ie. reverse the polarity of the signal) and add it to the other channel, anything present equally in both channels (ie. panned centrally) will cancel out — a technique sometimes known as phase cancellation. You can try this for yourself if you have a mixer anywhere which offers a phase-reversal function on each channel (many large analogue mixers have this facility, as do some modern software sequencers and most recent stand-alone digital multitrackers such as Roland's popular VS-series, although the software phase switch on the Roland VS1680 and 1880 doesn't exactly advertise its presence — see pic, right). Simply pan both the left and right signals to dead centre (thus adding them on top of one another), and reverse the phase of one of them — it doesn't matter which. The resulting mono signal will lack all the items that were panned centrally in the original mix. Sometimes, the results can be dramatic. Old recordings from the early days of stereo sometimes featured the rhythm section panned dead centre and overdubs (vocals, say, or guitar or keyboard) panned off-centre. In these cases the vocals or guitar will remain following phase cancellation, and the drums and bass will disappear completely, allowing you to appreciate details you never knew were there in the parts that remain. In recent recordings, the tendency has usually been for lead vocals to be panned centrally, so with these recordings, it's the lead that will cancel from the mix, leaving (in theory) the backing. This is how most vocal-cancellation techniques work.
So, doesn't this mean that the success (or failure) of vocal cancelling depends on whether or not the original vocal was panned centrally? Well, yes — which is why vocal cancelling is such a hit-and-miss technique! What's more, although most vocals are panned centrally in today's stereo productions, backing vocals are often panned off-centre, and will therefore not cancel with the lead vocal.
Furthermore, nearly all lead vocals in modern productions have some effects applied to them. If these are stereo effects and therefore present unequally in both channels (as is the case in a stereo reverb), the dry signal may cancel, but the processed signal will not, leaving a 'reverb shadow' of the lead vocal in the phase-cancelled signal. No matter how much you pay for vocal-cancelling software or hardware, there's nothing that can be done if the original vocal was not mixed in such a way as to allow complete cancellation.
In addition, although you can cancel anything panned centrally in this way, you can't isolate what you've cancelled to the exclusion of everything else. Many people, when learning of phase-cancelling techniques, assume that if you can cancel, say, a vocal from a mix, then if you take the resulting vocal-less signal and reverse the phase of that and add it back to the original stereo mix, the backing will cancel and leave you with the vocal. This is hardly ever workable in practice, however, because a phase-cancelled signal is always mono, and if the original backing mix is in stereo (as it nearly always is), you can never get the phase-cancelled mono backing on top of the stereo mix in the right proportions to completely cancel it out.
Another suggestion that is often made when encountering phase-cancelling techniques is that of dividing a stereo mix into its component sum and diference signals, which you can do with a Mid and Side matrix. However, isolating the 'Mid' component of any given stereo mix won't merely give you anything that was panned centrally in the original mix to the exclusion of everything else — it's simply the mono signal obtained by panning Left and Right signals to centre and reducing the overall level by 3dB. So, if an original mix consists of a centre-panned lead vocal and an off-centre guitar overdub, the Mid signal constituent of the mix is not the isolated lead vocal, but a mono signal with the vocal at one level, and the guitar at a slightly lower level. You may be able to emphasise the vocal at the expense of the guitar with EQ, but you'll never remove the guitar altogether. In a busy mix with several instruments playing at once, deriving the Mid component of a stereo mix won't get you very much nearer to an isolated vocal than you are with the source stereo mix!
Despite this, it's worth pointing out that phase-cancellation techniques can be fascinating for listening to the component parts of mixes, and useful for analysing tracks you admire or are trying to learn to play. If you pan left and right channels to centre, reverse the phase of one of the channels and play around with the level of the phase-reversed channel, different parts of the mix will drop out as differently panned instruments cancel at different settings. Sometimes the relative volume of one component can shift very slightly, but enough to lend a whole new sound to a mix, enabling you to hear parts that have never seemed distinct before. An example might be if a song contains a blistering, overdriven mono guitar sound panned off-centre, which normally swamps much of the rest of the track when you play it back in ordinary stereo. With the faders set unequally, and one channel phase-reversed such that the guitar cancels out, you will hear most of the other constituents of the mix, but minus the guitar, which could make the track sound very different!
However, as a technique for isolating parts from a stereo mix, phase cancellation remains very imprecise, its success or failure dependent entirely on how the original track was mixed. This doesn't mean that it's not worth a try, but it also means that the only sure-fire way to obtain the isolated vocals from a track is to obtain a copy of the original multitrack from the artist or record company — which is, of course, what professional remixers do. Sadly, this is not an option for most of us!
Published April 2002
Thursday, October 24, 2019
Wednesday, October 23, 2019
Q. What's the difference between saturation and distortion?
 Voxengo Tube Amp plug-in.
How do you differentiate between the following terms: saturation, harmonics, distortion, overdrive? Are all of these just similar terms with different names? When should we use one of these versus the other? Is there a way to quantify or measure the addition of these signal enhancements other than just by their sound — perhaps with something like DDMF's Plugindoctor? Do you have any good references to recommend of songs to strive to emulate? How can you tell if you've over-baked your track and gone too far?
Pat Autrey
SOS contributor Mike Senior replies: Well, as regards the terminology, although some of those terms have agreed scientific definitions, in the real world of project-studio work all of them are actually used quite loosely. In the most general sense, distortion is the result of any process that alters a sound's waveform and therefore adds new frequency components. If these added frequencies are generated in harmonic relation to the source sound (as is the case when applying most analogue-style distortion effects), they're usually called harmonics. Saturation, overdrive and fuzz are all words used to describe 'flavours' of distortion — from saturation at the subtle end to fuzz at the extreme. In this context, you may also find the word 'distortion' used to imply a certain severity of distortion effect, usually somewhere between overdrive and fuzz. However, it's important to realise that many analogue-style saturation effects don't just add extra frequency components, but also affect the dynamic qualities of the sound, so in a sense saturation is only partly a distortion effect.
If all of this sounds a bit vague, that's because it is! And while there are indeed ways to measure and quantify the distortion and dynamics characteristics of different plug-ins technically, such measurements aren't of much practical use when it comes to learning how to get the best out of each effect in practice.
So what should the game-plan be with these effects at mixdown? Well, the crux of the matter is that distortion is seldom applied for technical reasons — it's usually a means of adjusting the subjective timbre of the sound — so it stands to reason that everyone will have their own opinion on what sounds good, depending on the kinds of productions they admire. I can't dictate what a 'good' reference track is as far as you're concerned, because different people like music with different types and amounts of distortion in it, and different artists and genres also differ widely in this respect. You have to choose reference tracks that suit you and the music you're working on. Once you've done that, it's comparing your mix against those references that'll let you know whether you're 'over-baking' them with distortion.
The problem with a totally 'suck it and see' approach to choosing distortion effects is that trial and error can be very time-consuming. This is where some understanding of the nature of different distortion effects can be useful. For instance, once you've used a couple of different tube saturators or tape emulators, you'll begin to get a feel for the kinds of sounds they produce, so whenever you're faced with a new plug-in based on tubes or tape you'll already have a rough idea of what it's likely to do even before you try it out. In a similar vein, if you're looking to expand the range of distortion flavours available to you, it makes sense to seek out distortion devices with unfamiliar designs. After a while, you'll build up a small library of plug-ins that will provide you with a wide variety of distortion timbres, and you'll have developed an idea of which plug-ins are most likely to help you in which situations.
For example, for mixing purposes I've come to regularly use Voxengo's Tube Amp, Klanghelm's IVGI, GVST's GClip & GRect, Mokafix's NoAmp, ToneBoosters' ReelBus, Sonimus' Britson & Satson, and various stompbox and guitar-amp simulators in IK Multimedia's Amplitube. Over time I've developed a mental image of the kinds of sounds each of those plug-ins can create, and what those sounds have been useful for, so I can usually make a decent educated guess about which to use for any given mix scenario — which speeds up my workflow. Mind you, on occasion none of these plug-ins end up being suitable, in which case it's back to the trial and error to find some new options! It's never wasted time, though, because every new processor you experiment with increases your experience and listening skills.
Published August 2019
Tuesday, October 22, 2019
Monday, October 21, 2019
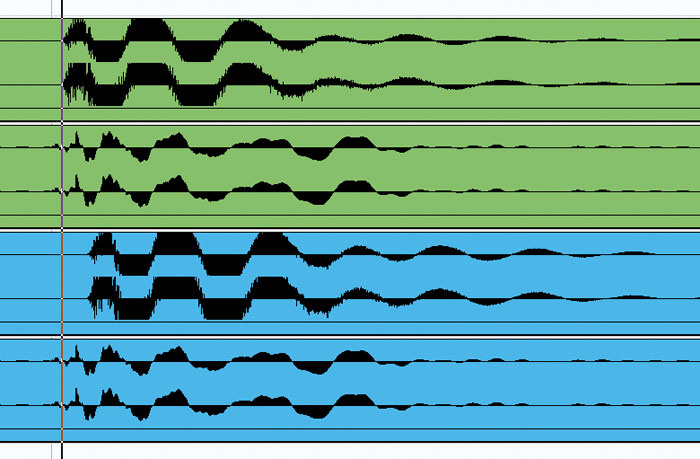
Q. Should I use linear or constant-power crossfades?
 DAWs offer a range of different crossfade types, and which is the right choice is depends on the material you're editing.
For years I've noticed crossfades between two audio files don't behave predictably. Some have an audible 'swell' in volume while others have an audible 'dip'. When there's a bump, changing from the default curved 'constant-power' crossfade mode to the linear option in my DAW will often cure the problem, and vice versa when there's a dip. I always thought the logarithmic shape was fool-proof, but is it programme-dependent?
I should perhaps clarify that one recurring example is when I introduce crossfades into a continuous recorded track to isolate a section for repair. In these examples, the constant-power fade nearly always sounds like a bump, and yet surely this is the one time where it should sound seamless, because the two 'takes' are actually the same continuous take?
SOS Forum post
SOS Technical Editor Hugh Robjohns replies: This condition — isolating a section of a continuous track — is the one guaranteed situation where you should use the linear crossfade option, which is exactly analogous to the angled razor-blade cut when editing analogue tape! In this situation you have identical and time-aligned (ie. fully coherent) material on both sides of the cut, so at the middle of the crossfade the level of each half has to be -6dB to ensure that the summation of the two identical halves is the same level as the original, increasing/decreasing linearly pro rata either side of the centre of the crossfade. And this is exactly what the linear crossfade is designed to do.
In contrast, the curved 'constant-power' crossfade option only attenuates the incoming and outgoing audio by 3dB at the centre of the crossfade. This arrangement ensures a constant-level summation for similar but non-coherent material — such as when you are editing together different takes of the same musical piece.
Most DAWs also provide a variety of other curve shapes (some symmetrical and some not), as well as the ability to adjust the level of the incoming or outgoing material to make more complex edits work seamlessly. So there is no 'fool-proof' crossfade option that will work in every circumstance... with the one exception of the situation where you are isolating a section of a continuous track; here a linear crossfade is guaranteed to work seamlessly.
Published August 2019
Saturday, October 19, 2019
Friday, October 18, 2019
Q. Can you recommend an all-pass filter plug-in?
 is identifying phase problems between the left and right channels of a stereo file — a situation which could be ameliorated using the setting shown on Melda's freeware MFreeformPhase plug-in (right).") Here, Voxengo's freeware Correlometer (left) is identifying phase problems between the left and right channels of a stereo file — a situation which could be ameliorated using the setting shown on Melda's freeware MFreeformPhase plug-in (right).
Here, Voxengo's freeware Correlometer (left) is identifying phase problems between the left and right channels of a stereo file — a situation which could be ameliorated using the setting shown on Melda's freeware MFreeformPhase plug-in (right).
I was reading Mike Senior's Mix Rescue article in SOS November 2011, about Arise's 'Run Run Run', and he used an all-pass filter within Cockos Reaper's ReaEQ plug-in to improve the mono compatibility of the drum overhead mics. I can't find a plug-in that does this in Logic, or an obvious freeware — can you recommend anything?
James B
SOS contributor Mike Senior replies: Well, the first thing to say is that there's nothing particularly 'voodoo' about all-pass filters. The normal filters you get in your EQ (things like peaks and shelves) affect not only the processed sound's frequency response, but also its phase response (ie. the phase relationships between its different frequency components). The only difference with an all-pass filter is that it only affects the phase response, while leaving the frequency response unchanged. By sweeping an all-pass filter around and adjusting its bandwidth, you can change a sound's phase response in a more complex, frequency-dependent manner than is usually possible using things like simple phase rotators or micro-duration delays.
As far as I can remember, Logic doesn't have any built-in variable phase-rotation tools or all-pass filtering facilities at all. Fortunately, there are actually a number of freeware phase-manipulation tools that'll run in Logic. For simple phase rotation, Airwindows' PhaseNudge (www.airwindows.com/phasenudge) and Audiocation's Phase AP1 (www.audiocation.de/plugin) work well. But if you're after something more controllable in the frequency domain, there's nothing to beat Melda's freeware MFreeformPhase (www.meldaproduction.com/MFreeformPhase), which gives you precise control over the phase response via an editable graph of phase against frequency.
Incidentally, if you're suspicious of frequency-specific phase problems in stereo files, check out Voxengo's freeware Correlometer plug-in (voxengo.com/product/correlometer), which provides a spectral phase-correllation display — any dips showing on that display indicate frequency regions where phase mismatch may be impacting on your mono compatibility.
Published September 2019
Thursday, October 17, 2019
Wednesday, October 16, 2019
Q. Will the ToneDexter work with an on–board mic?
 Audio Sprockets' clever ToneDexter processor aims to let you enjoy your favourite miked acoustic guitar sound without the inconvenience of actually miking it!
Bob Thomas wrote a review of the Audio Sprockets ToneDexter, and I wanted to know if he thought I could get good results on a Dobro that has a Shertler Basik on‑board mic, or if he thinks I'd need to get a piezo pickup. Thank you for any advice.
Gary Pierce
SOS contributor Bob Thomas replies: In my experience, the ToneDexter [reviewed in SOS September 2019: https://sosm.ag/audio-sprockets-tonedexter] seems to work best with undersaddle and bridgeplate‑mounted soundboard piezo transducers (UST and SBT are the usual designations). That's not to say that the ToneDexter can't produce usable results from other types of contact pickups — it samples (simultaneously) the output of the pickup and the output of the microphone, compares them, and then creates an 'image' of the difference between the two that (in simple terms) it can overlay on the pickup signal to make that pickup sound like the microphone, and in theory you could try using it with any two signals.
The Schertler Basik is a high-quality electrostatic SBT and does have quite a bright character, in my experience. Personally I think that, with a bit of experimentation with the positioning of the microphone, you could well get a decent result with your Basik and the ToneDexter. It's would certainly be worth trying it before you splash out on a piezo pickup.
I've got a 1920's Dobro tenor guitar with a McIntyre Feather Resonator pickup mounted on the cone and that works well with my ToneDexter. However, I've just come across a recording of a Beard Dobro using a Fishman Nashville pickup running into a ToneDexter and that was pretty impressive, so I may well end up changing over to that pickup some time soon!
Published September 2019
Tuesday, October 15, 2019
Monday, October 14, 2019
Q. What's the smallest audible change in level?

A few days ago I read something about 1dB being the minimum difference in volume that can be noticed — or something along these lines. I know that when I am approaching the final balance for a track, I often end up doing much smaller changes (especially on vocals, or parts which I want to stand out without 'ungluing' them), easily of 0.1 or 0.2 dBFS. It does seem to make a difference to me — in the sense that I end up with a defined and repeatable preference between two options which are a 10th of a dB apart. Obviously in these situations my brain is highly attuned to the details of the mix in question (something that happens after listening to it some 20 times in a row!), so I can perceive and appreciate a lot of details that I normally wouldn't. I will keep on doing it regardless, but I wonder if I am fooling myself into believing there are differences or actually other people experience that too?
Facebook post
SOS Technical Editor Hugh Robjohns replies: I don't know the context of that, but I believe the 1dB thing comes from testing people's ability to detect absolute level changes. So you play a tone or a track or something, and then play it again with a small level change, and see whether the listener can identify whether the level is the same or not. A skilled listener is supposed to be able to hear changes of 1dB or more. Less skilled listeners need more like 2 or 3 dB before they are sure there is a difference. (This is measuring source signal amplitude, by the way, not acoustic power.)
But listening to sound levels in isolation is a very different thing to listening to the relative internal balance of two or more sounds. As you say, a skilled listener can easily tell the difference in relative mix levels to a much finer degree — 0.25dB being a figure I've come across often.
Published September 2019
Subscribe to:
Posts (Atom)