Thursday, December 31, 2015
Wednesday, December 30, 2015
Tuesday, December 29, 2015
Re-chord Industry | Media
Cubase Tips & Techniques
Technique : Cubase NotesJohn Walden
The following audio examples accompany the Cubase workshop in SOS June 2013 (/sos/jun13/articles/cubase-0613.htm), in which John Walden explores some of the more creative uses of the new Chord Track that was introduced in Cubase 7.
Download
3.8 Mb
Re-Chord Me JW Audio Example 1
A drums/piano mix of the original chord sequence — not the most original three-chord sequence ever recorded, but useful for this workshop example.
Re-Chord Me JW Audio Example 2
The same short song section, but with the bass, guitar and vocal melody added to the mix.
Re-Chord Me JW Audio Example 3
A drums/piano mix of the chord sequence, after some experimentation with the Chord Editor and Chord Assistant, as described in the main article. It's still not going to rip up the charts but is more interesting than the original. The piano was re-pitched by following the Chord Track changes.
Re-Chord Me JW Audio Example 4
The same short song section with the revised chord sequence, but with the bass, guitar and vocal melody added to the mix. The piano, bass and vocal tracks have been re-pitched by following the Chord Track. The guitar track had to be re-recorded.
Re-Chord Me JW Audio Example 5
As an additional example, here is the same song section, but this time the Chord Track has been used to substitute minor chords for the major chords in the original progression. The piano was re-pitched by following changes made to the Chord Track.
Re-Chord Me JW Audio Example 6
The same short song section with the chord sequence adjusted to minor from major, but with the bass, guitar and vocal melody added to the mix. The piano, bass and vocal tracks have been re-pitched by following the Chord Track. The guitar track had to be re-recorded.
Monday, December 28, 2015
Saturday, December 26, 2015
Sweet Harmony
Cubase Tips & Techniques
Technique : Cubase NotesWant to fake some vocal harmony parts? Cubase 7 has a range of tools that can help you...
John Walden
The Generate Harmony Voices dialogue box.The Generate Harmony Voices dialogue box.
If you're blessed with access to talented and technically knowledgeable vocalists, recording and mixing vocal harmonies can a real pleasure, but some of us don't have this luxury, and find ourselves needing to fake realistic harmony parts. Cubase 7 has a number of tools that can be used to do this pretty convincingly. In this article, I'll work through two scenarios, each starting with a single vocal take: creating multiple harmonies for vowel-based ('ooh', 'ahh', etc) backing vocals; and creating lead-vocal harmonies that follow the actual lyrics!

The Generation Game
If you have a monophonic audio event selected, the Generate Harmony Voices option (found in the Audio menu) can be used to create up to four harmony parts from this original, each of which will be placed on a new audio track. If you've not defined a Chord Track for the project, these harmonies are created at a set number of semitone intervals from the original: the first harmony is +3 semitones; and subsequent voices are placed at -3, -6 and -9 semitones.
The original vocal (active) and the rather unmusical default four-part harmony generated in the absence of a Chord Track, all displayed in a single Sample Editor window. Note the drop-down menu at top-left that allows you to select which track is active for editing.The original vocal (active) and the rather unmusical default four-part harmony generated in the absence of a Chord Track, all displayed in a single Sample Editor window. Note the drop-down menu at top-left that allows you to select which track is active for editing.In the absence of a Chord Track, although these default intervals are unlikely to result in anything that fits the harmonic structure of your song, they often serve as a useful starting point, particularly if you want to create a single harmony voice for a lead vocal. However, when you generate a four-part harmony, audio artifacts will become quickly apparent, particularly in the -6 and -9 semitone pitch-shifts. If your harmony parts are low in the mix, or you're deliberately going for a synthetic sound, this might be acceptable, but more realistic results are going to require fairly careful work.
 and the rather unmusical default four-part harmony generated in the absence of a Chord Track, all displayed in a single Sample Editor window. Note the drop-down menu at top-left that allows you to select which track is active for editing.")
As well as choosing the number of voices to be generated, you can control the vibrato strength. Higher values apply greater pitch straightening, and for some backing-vocal styles this can be quite effective. However, once the harmony is generated, you can't restore the pitch straightening without also losing any larger-scale pitch changes — so unless you're aiming for a deliberately synthetic texture, it's best to opt for a low value and perform any further pitch straightening that's required manually, using the Sample Editor.
A further option in the Generate Harmony Voices dialogue box enables you to open the harmony parts in the Sample Editor, but note that you can do this at any time by simply selecting the audio events and hitting the Enter/Return key. This allows you to see — and edit — multiple VariAudio 2.0 parts in a single instance of the Sample Editor, with one track 'active' for editing and the 'non-active' tracks appearing more faintly in the background. This is ideal for creating harmony parts. You can select which track is active for editing via the drop-down menu on the left side of the Sample Editor toolbar, or by clicking on a VariAudio segment belonging to a particular track.
Tied By A Chord

A three-part harmony that follows the Chord Track; more musical but still fairly static.A three-part harmony that follows the Chord Track; more musical but still fairly static.
Configuring a Chord Track prior to using the Generate Harmony Voices function should — in theory, at least — mean that somewhat more musical harmonies are created, and this is a good place to start our first worked example, with block 'oooh'-style backing vocals.
Assuming you have one sung backing-vocal line, you can start by using the Generate Harmony Voices function to create four additional parts. These will automatically follow the Chord Track and, by default, you will end up with soprano, alto, tenor and bass parts (check the Inspector's Chord Track settings for each of the new tracks). The default output can be somewhat static and mechanical and, even in the context of a mix, a little further editing is generally required.
When doing such editing, use the Sample Editor and engage the Chord Track display option, so that the note segments appear colour coded (green for a note within the current chord, blue for a note within the current scale and red for anything else). This colour coding is a useful visual cue when you're manually editing the harmony-part pitches: unless you are feeling particularly experimental, avoid the red and aim for green or blue!
If the more extreme pitch-shifting makes some of the harmonies unusable, try resetting the pitch changes using VariAudio, and you can also try changing the Inspector's Chord Track settings to produce a second soprano or alto part, which might work better. Manually editing the VariAudio settings for this second version, perhaps adding some further pitch quantisation or applying a little audio quantisation, will help create the illusion of two different performances, even when both are 'faked' from the same original source.
You can also experiment with the way each harmony part follows the Chord Track. The Inspector's Chord Track tab provides plenty of possibilities, but it's going to be a case of trial and (lots of!) error; while I suspect that there are a few folks at Steinberg who understand fully how the various options interact, I found the Operation Manual a little lacking in its coverage of this feature. The Voicings setting is a good place to start: I recommend you set it to Basic, open the Settings dialogue box, and start experimenting with the Start Voicing setting. This changes the chord inversion used for the currently selected harmony. For the soprano, alto and tenor voices (the bass voice sticks to the root note of each chord), it allows you to quickly audition different possibilities.

Lead The Harmony
The Voicing Range control allows you to quickly audition different harmonies when a part is following the Chord Track.The Voicing Range control allows you to quickly audition different harmonies when a part is following the Chord Track.
Our second example is the creation of a single harmony that follows the lead vocal. The same techniques apply if you want to generate a couple of harmonies to add emphasis to selected words or phrases of the lead vocal. Generally, this requires a little more 'hands on' work than the preceding example. Let's take a typical scenario, in which we add a harmony part that's pitched a third above the main lead vocal (that is, based on the scale used for the melody, two notes above the lead vocal note).

The initial harmony track can be created via the Generate Harmony Voice function, or by simply duplicating the lead part. Either way, manual editing of the harmony part's pitch segments will be required to ensure that they all lie two scale-notes above the pitch of the corresponding segment in the original vocal. You might think it would be nice if Cubase had a 'scale snap' function, so that you could select all the notes, drag upwards from the original pitch and have them all jump to an appropriate note on the scale — but while there's a logic to the pitches required for this kind of harmony part, it's always best to let your ears be the final judge. If one or two notes simply don't sound 'right' a third above, feel free to experiment. Even working manually in this way, the process takes only a few minutes for each segment.
Creating a harmony lead vocal at an interval a third above the original lead vocal requires manual editing of pitch segments — and ear-based decision-making as to what interval works best for each note.Creating a harmony lead vocal at an interval a third above the original lead vocal requires manual editing of pitch segments — and ear-based decision-making as to what interval works best for each note.If you want to add harmony parts to the occasional word or phrase of a lead vocal, rather than the whole part, make a duplicate of your lead vocal track and manually edit it to isolate just the words or phrases that you want to harmonise. This allows you to make sure the editing of the starts and ends of each word are as clean as possible. Once this is done, select all these separate audio events and use the Bounce Selection function (in the Audio menu) to recombine them into a single audio event. You can then apply the Generate Harmony Voices function to just the required phrases and follow up with any manual pitch editing. as for our 'third above' example.
Once you're happy with your harmonies, whether backing vocals or lead harmonies, it can be useful to apply the Flatten function (in the Process section of the Sample Editor) to each track, just to lock the VariAudio changes in place. Mix the 'fake' parts a few dB beneath the original vocals, apply a little panning, and the job is done.
Keep It Real

If you just want harmonies for certain words, edit a copy of your original to isolate just those words prior to generating the harmony parts.If you just want harmonies for certain words, edit a copy of your original to isolate just those words prior to generating the harmony parts.
The technology behind the Generate Harmony Voice function, VariAudio and the Chord Track is very clever, but it's not without limitations. The human voice reveals the artifacts of pitch shifting like no other sound can, and the harder you push the technology in your quest to create the perfect fake harmony, the more obvious the 'fake' becomes. Equally, while one or two auto-generated voices can often be made to sound very effective, their artificial nature becomes more obvious as you add more voices that have been generated from a single source. If you limit yourself to one or two voices with pitch-shifting of a few semitones, though, you can create something quite convincing, particularly if you're willing to perform a little manual editing on the result. That said, in some musical styles, the rather synthetic nature of extreme pitch-shifting is not a problem — indeed, it is an intentional part of the sound — in which case, feel free to push the VariAudio envelope as far as you like!
Friday, December 25, 2015
Thursday, December 24, 2015
Sweet Harmony | Media
Cubase Tips & Techniques
Technique : Cubase Notes
John Walden
The following audio examples accompany John Walden's Cubase workshop 'Sweet Harmony'.
Download
2.7 Mb
Cubase-Example1
This example uses a vowel-based vocal sample as its starting point. The vocals have been left deliberately exposed with no other instrumentation so that the harmony parts can be heard more clearly, although in a full mix these 'fake' harmonies would obviously be less exposed. The example is split into four parts: (a) the original backing vocal line; (b) the original vocal plus a four-part harmony generated automatically but without using a Chord Track to guide the harmonies (not very musical!); (c) the original vocal plus a four part harmony that follows chord changes within the Chord Track but with no further editing; d) as with (c) but with some additional editing within the Sample Editor. This included replacing the bass harmony with a second soprano harmony and applying a small amount of audio quantize to the various harmony parts.
Cubase-Example2
This example is based short vocal sample that uses a sung lyric. The vocals have been left deliberately exposed with, in this case, just a simple acoustic guitar accompaniment, so that the harmony parts can be heard more clearly although, in a full mix, these 'fake' harmonies would obviously be less exposed. The example is split into three parts; a) the original lead vocal; (b) the lead vocal plus a single harmony voice pitched above the lead but slightly lower in the mix. The intervals used are mainly a third above the lead but a few notes used different intervals where this seemed to work better than sticking rigidly to fixed interval; (c) similar to (c) but with two different harmony parts and only generating harmonies for certain words to add emphasis.
Wednesday, December 23, 2015
Match & Mix
Cubase Tips & Techniques
Technique : Cubase NotesCubase 7 includes the Voxengo CurveEQ plug-in, which matches the frequency responses of different sounds.
John Walden
.")
An equaliser can help with all sorts of mix problems. You can use it to 'correct' individual instruments or final mixes that just don't sound like your favourite commercial tracks, or to make instrument parts that were tracked at different times or in different studios sound more similar. Perhaps you want to give a series of final mixes for a CD/album project a more consistent sound. In each of these cases, EQ might help you get closer to that 'ideal' sound you are aiming for.
The main spectrum display of CurveEQ. As described in the main text, frequency spectrums for two different audio examples are shown here, as well as the EQ curve that the plug-in has generated to make the 'My Rock Mix' frequency response sound closer to that of 'Punk Pop Mix' (in this case, Green Day's 'American Idiot').The main spectrum display of CurveEQ. As described in the main text, frequency spectrums for two different audio examples are shown here, as well as the EQ curve that the plug-in has generated to make the 'My Rock Mix' frequency response sound closer to that of 'Punk Pop Mix' (in this case, Green Day's 'American Idiot').Cubase includes a powerful suite of equalisers, but none of them can tell you which EQ settings are required! If that question bamboozles you, Voxengo's excellent CurveEQ plug-in might help. Installed as part of Cubase 7, one of its key features is the ability to 'EQ match': you capture the frequency response of two recordings, one of which becomes your 'reference' (with the frequency characteristics that you think are ideal) and the other your 'target' (the audio with the frequency response you wish to change). CurveEQ calculates an EQ curve that will, when applied to the target audio, make its overall frequency response match that of the reference audio. In short, the plug-in is automatically generating the EQ boosts and cuts required to achieve the desired sound. I'll use three examples to demonstrate this EQ matching process in greater detail.
Kick Me
A very simple example can illustrate the basics. Imagine you have a drum-kit recording where the kick-drum track lacks a little something. A little bit of EQ matching might allow you to shape the tone of this track to ape a much better-sounding kick from another recording.
The first step is to place an instance of CurveEQ as an insert effect on your imperfect kick-drum track. When you first open the plug-in, its main display is blank, and a flat EQ curve is displayed as a straight horizontal line with a control point at each end. You can add, move and delete control points to create an EQ curve manually, but for EQ matching you need to open CurveEQ's Edit dialogue box, using the button located at the top right, and select AVG from the Type drop-down menu. This setting means that the plug-in builds a frequency distribution based upon the average frequency content of the audio playback, rather than continuously displaying instantaneous snapshots.
Then, import or paste a section of audio containing your 'ideal' kick drum to the same audio track — perhaps at some point beyond the end of the project — and play back a few seconds of that. A stable frequency-spectrum curve will build up in the display. You can then open the Static & Match dialogue box and temporarily store the captured frequency spectrum in one of the four main slots by pressing the appropriate Take button. These slots can be named and colour-coded for ease of reference. The frequency spectrums for my two kick drums and the EQ curve created to 'match' my kick recording to an 'ideal' target. The frequency spectrums for my two kick drums and the EQ curve created to 'match' my kick recording to an 'ideal' target.
 Now return to the Project window, play back a short section of your deficient kick-drum track, and capture its spectrum in the same way, placing it in a second slot within the Static & Match dialogue. While this is happening, you should see a second frequency response build up, and this gives you an immediate visual cue as to any obvious frequency differences. As shown in the screenshot, my 'ideal' kick has more energy in the 300-400Hz and 2kHz areas than the unsatisfactory kick recording, and the latter also has more energy above 5kHz.
To create the matching EQ curve, engage the Reference button for the 'ideal' kick-drum spectrum in the Static & Match dialogue, and press the Apply To button for the kick sound to be EQ'ed. If you then press the Match Spectrums button, the required EQ curve will be calculated and displayed in the main plug-in window. Then all you need to do is audition your kick with and without this EQ, and decide whether the curve-matching process has delivered a significant improvement.
Acoustic Alignment

The second example is very similar, in that it involves curve-matching an individual instrument, but it provides a means of exploring more of CurveEQ's features. Here, I have an acoustic guitar that I'm not quite happy with, and a reference audio sample that contains my desired acoustic guitar sound (bear in mind that what's ideal in one context may not be so in another). There's one problem, though: the reference has been taken from a commercial track and never appears in total isolation, but only in combination with a kick drum.The Static & Match dialogue where the EQ matching can be configured.The Static & Match dialogue where the EQ matching can be configured.The automatic EQ curve created by the matching process can be tweaked manually if required, as I've done here for my acoustic guitar example described in the main text. The upper curve is that produced automatically but contains low-end frequencies from the included kick drum. The lower curve shows the result of my manual edits, where I've reduced the kick drum's influence below 400Hz.The automatic EQ curve created by the matching process can be tweaked manually if required, as I've done here for my acoustic guitar example described in the main text. The upper curve is that produced automatically but contains low-end frequencies from the included kick drum. The lower curve shows the result of my manual edits, where I've reduced the kick drum's influence below 400Hz. I could apply the curve-matching process described earlier, but the reference frequency spectrum contains information from the kick drum, which won't be ideal. Thankfully, CurveEQ provides comprehensive curve editing options, and as the majority of the kick energy will be in the sub-250Hz range, I can simply edit the appropriate EQ points by hand to try to remove the influence of the kick. In this example, the most obvious approach is simply to flatten this portion of the EQ curve — meaning that no EQ matching is applied in that region — and to fine-tune from there. Note that as well as individual control points, you can also select multiple points and drag these up or down together, retaining their relative positions while changing their gain by the same amount. In other cases where the reference isn't a 'pure' example of the instrument that you want, this type of hands-on editing may require a little more work, but at least the matched curve provides a reasonable starting point.
Fixing It After The Mix

Another obvious application of EQ matching is at the mixing or mastering stage, when you're either trying to get your mix closer to the tonality of a commercial track you like in the same musical style, or trying to get all your tracks on a CD project to have a more consistent frequency balance.
The principles here are identical to EQ-matching an individual instrument and, as illustrated by the first screenshot, simply looking at the frequency content of commercial tracks can be an education in itself. In this third example, I'm trying to get the mix of a rock project to sound more like a specific commercial mix (in this case, Green Day's 'American Idiot'); as you can see, my mix lacks energy in the sub-100Hz area and top-end sparkle above 7kHz, and perhaps has too much going on in the 200-400Hz range. Whatever your own musical genre, this kind of EQ comparison between tracks can really encourage you to think about how to construct your mix in the first place.
Moreover, CurveEQ doesn't have to stop with an A/B track comparison. The final screenshotHere is the result of applying (a) multiple 'reference' tracks (three different commercial rock mixes) and (b) limiting the curve to 15 control points to generate a smoother EQ matching curve for my own rock track.Here is the result of applying (a) multiple 'reference' tracks (three different commercial rock mixes) and (b) limiting the curve to 15 control points to generate a smoother EQ matching curve for my own rock track. shows three 'reference' tracks, with a 'classic rock' and a 'heavy rock' spectrum added to the Green Day track. If you engage the Reference button for all three and then execute the Match Spectrums function, CurveEQ evenly blends the frequency responses of the three references, before creating the EQ curve required to match your mix to that blend. Using a 'blended' reference spectrum in this way means that the end result is much less dependent upon the idiosyncrasies of an individual mix.
In the example shown in the screenshot, there are, broad trends aside, some adjacent bands where the corrective EQ curve jumps about a bit. The smoothness (or otherwise) of the curve can be controlled via the Points setting in the Static & Match dialogue. I've used the default setting of 30 control points, but using a lower number will produce a smoother curve. While this might make the match less tight, it's also less likely to generate audible oddities caused by narrow peaks or troughs in the spectrum of either the reference mix or your own. Note that if you change the number of control points, you'll need to reapply the Match Spectrums function to generate the new curve.
Of course, CurveEQ has many more applications, but I hope these examples demonstrate what a powerful corrective EQ tool it is, and the educational possibilities it presents to anyone who finds the whole process of EQ'ing a challenge.
Save Me
As
you can see from the various screenshots provided here, the Static
& Match dialogue includes save/load options for each of the
frequency spectrum slots. This means that you can easily build up
a collection of graphs from individual instruments or full mixes and
recall them at any time for a little matching EQ work without having to
re-analyse these audio references each time. Inside a single Project, it
also means that you can easily copy a frequency response saved in one
instance of the plug-in to another instance on a different track.
Audio Examples
The
following audio examples demonstrate the results of using Cubase 7's
bundled Voxengo CurveEQ to match the spectrum of one sound to that of
another.
Download | 4.1 Mb
Cubase 7 Beautiful Curves JW Audio Example 1.mp3
Example
1: EQ-matching a kick drum. This audio example contains four sections,
each separated by a short silence; (1) a short example of the 'ideal'
kick sound that I wished to emulate (my reference audio); (2) a short
example from my actual kick drum track and which I'd like to EQ so it
sounds closer to the 'ideal' kick in (1); (3) my recorded kick with the
matched EQ curve applied as described in the text of the workshop; (4)
my recorded kick with matched EQ curve off to start with and then being
toggled on/off so you can more easily hear the difference. Do bear in
mind with all these examples that the ideal that something sounds better
with or without EQ changes is a subjective (artistic) call. All the
examples are trying to do is illustrate what the EQ curve matching
process can achieve.
Cubase 7 Beautiful Curves JW Audio Example 2.mp3
Example
2: EQ matching an acoustic guitar, but where the 'ideal' audio includes
another sound (in this case, a kick drum). This audio example contains
five sections, each separated by a short silence; (1) a short example of
the 'ideal' acoustic guitar sounds that I wished to emulate but which
I could only extract from the commercial source track with a kick drum
playing simultaneously as it never appears in isolation; (2) a short
example of my actual acoustic guitar recording (which, for the mix
context I wished to use it in, had too much top-end); (3) my acoustic
guitar track with the unedited matched EQ curve generated by CurveEQ
and, therefore, heavily influenced by the bass frequencies of the kick
drum in (1); (4) my acoustic guitar track after manual editing of
CurveEQ's matched EQ curve (lowering the control points in the sub-400Hz
range) as described within the main article; (5) my recorded acoustic
with edited matched EQ curve off to start with and then being toggled
on/off so you can more easily hear the difference.
Cubase 7 Beautiful Curves JW Audio Example 3.mp3
Example
3: EQ matching a full rock mix to Green Day's 'American Idiot' track.
This audio example contains three sections, each separated by a short
silence; (1) my original rock mix prior to EQ matching; (2) my rock mix
after applying the matching EQ curve produced by CurveEQ using American
Idiot as the reference audio; (3) my rock mix with the matched EQ curve
off to start with and then being toggled on/off so you can more easily
hear the difference. Obviously, we have not included an extract of
'American Idiot' here for copyright reasons so you will need to audition
that for yourself (via iTunes, for example). In comparison to the Green
Day track, my mix lacked both bottom end and top end. However, perhaps
the most noticeable difference is the presence of too much low-mid range
(200-400Hz), which the matched EQ curve has attempted to scoop out.
While the matched EQ version is a significant improvement over the
original, in this case what the exercise has really revealed is that the
original mix needs revisiting. As with any mix comparisons you make
with your favourite commercial tracks, this is a very useful lesson in
itself but, with CurveEQ, you also get very useful visual data from the
EQ curve as a starting point for your mix revisions.
Published in SOS August 2013
Tuesday, December 22, 2015
Monday, December 21, 2015
Freq Out!
Cubase Tips & Techniques
Technique : Cubase NotesCarsten Kaiser

To receive multiple channel signals, your analysis Group track needs to be configured as a 5.1 surround channel.
Let's assume you've recorded and edited your next hit single in Cubase, and now you'd like to construct a mix whose instruments go hand in hand, complementing each other tonally but not treading on each other's toes. When frequency clashes between different parts are occurring, EQ is the traditional starting point, but modern DAW projects, which can comprise a huge number of tracks, group channels, send effects and so on, complicate the job of equalisation considerably. This is where frequency analysis tools come into play, and there's a perfectly good one built into Cubase 7's Studio EQ plug-in.
If you want to compare even just five or six main tracks (or groups) in your project, though, your screen will soon become unworkably crowded using this sort of analyser. A better option for such comparative analysis jobs is a tool that can monitor frequency activity on several channels at once, within a single plug-in instance. There are various such third-party plug-ins, including Melda's MultiAnalyzer, Blue Cat's FreqAnalystMulti, Vertex DSP's MultiInspector and Voxengo's SPAN Plus. In this workshop, I'll explain how to use SPAN Plus for the job, but while the setup might change for some of those other plug-ins, the same principles will still apply.
SPAN Plus is very reasonably priced ($49.95), but I appreciate that not everyone wants to open their wallet every time they read an SOS Cubase column! Fortunately, Voxengo also offer a freeware version of SPAN. Despite its stripped-down range of functions, this freebie plug-in provides enough analytical capabilities in many cases. Even if it just helps you to get the kick and bass out of each other's way by suggesting where to apply EQ cuts, it could help you take your mixes to the next level.
Project Prep

Naming the SPAN Plus input channels and choosing appropriate group names makes this process much more intuitive.
First, you'll need a Cubase Project containing multitrack audio. The examples use multitrack drums and bass guitar, and it will be easier to follow my instructions if your Project uses similar audio.
To use SPAN Plus, you'll need a dedicated 'analysis channel' in Cubase. SPAN Plus can be fed with up to eight channels using, for example a 7.1 source, but the maximum number of input buses for a single channel in Cubase is six. Start by creating a group channel, and in the configuration dialogue, choose 5.1. Name this group channel SPAN. Now configure the group channel to provide your six distinct input buses, as follows:
1. Create buses: Choose Devices/VST Connections and select the Group/FX tab. Then right-click on the bus named SPAN and choose Add Child Bus to SPAN/Add All Mono Child Buses to SPAN. You've just created six new input buses for your frequency-analysis group channel.
2. Rename buses: Rename these buses according to your own analysis needs. I've used shorthand for various instruments (KK for kick, BS for bass, and so on).
3. Assign outputs: In the 'output routing' column, set the group channel's output bus routing to 'no channel'. This ensures that the analysis channel's audio stream won't screw things up by reaching your master bus!
Setting Up SPAN Plus

Adding child buses to your Group channels will make each channel in the group available as an individual send destination.
Now you're ready to load SPAN Plus into one of the SPAN group channel's insert slots. Before the fun part starts, we just need to organise this plug-in's routing — because otherwise it's easy to lose your way while doing the multi-channel analysis. Here's how:
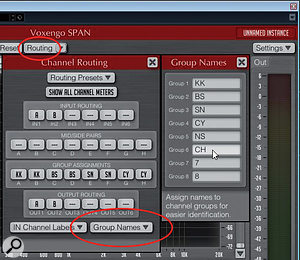
1. Set up inputs: Click on the 'routing' label (not the arrow on the right-hand side of the label, but the label itself). Then click on the IN Channel Labels button and rename the first two channels In1 and In2.
2. Set up groups: Open the Group Names dialogue box and rename the groups to match the input-channel names on your SPAN group channel.
3. Route inputs to groups: Inside the Channel Routing dialogue, route SPAN's inputs to different groups (A to F).
4. Assign channels to groups: still inside the Channel Routing dialogue, set the group assignment for channel A to group KK, channel B to group BS, and so on. You can now see these separate groups at the bottom of the plug-in.
On With The Show!

To feed the plug-in with the corresponding channels, route send signals from those tracks you wish to compare into the dedicated inputs you've created for SPAN Plus. Do not forget to activate these send routings on the instrument channels! In my example, I've routed sends from several drum instruments (kick drum, snare drum, and so on) to their respective input buses.
As you let your song play, activate the KK group button at the bottom of the SPAN Plus GUI. You'll instantly get a visual representation of the frequencies present in your kick-drum signal. From the Underlay menu above the spectrum window, you can choose another signal with which to compare your kick. In the example, I've chosen BS, which is the bass guitar, so I can check whether the bass and kick might be interfering with each other. Armed with this information, I can then use EQ on either or both tracks, knowing precisely where I'm most likely to be able to cut frequencies to make the tracks sit rather better together and avoid undesirable masking.
It doesn't take a great leap of imagination to see that you can do similar analyses to see if your bass notes and guitar chords are struggling in the mid-range and upper octaves, or if the cymbal sound and any special effects are occupying the same parts of the frequency spectrum. Using this method, you have countless possibilities for really digging deep into the frequency analysis of your productions. Yes, you still need to use your ears and your EQ tools as normal, but it should become much easier to zoom in on problem areas in your mix.
More Power

SPAN Plus Enables you to underlay the frequency plot from one channel beneath another, and to colour code the plots. Here, you can see three channels being analysed.
If you find this a useful tool, you might find yourself wanting yet more analytical power. Despite the six-input limitation of Cubase's buses, it's possible to use SPAN Plus for more extensive analysis, because it provides up to 48 virtual import/export slots — and these can be used across different instances of SPAN Plus. Start by opening an instance of SPAN Plus in the insert slots of each of the channels that you'd like to analyse. Then:
1. Rename: Open the plug-ins' GUIs and rename each new instance of SPAN Plus in its top-right corner to reflect the track in question (Kick, Bass, Snare, and so on). Don't forget to give the analysis graph of each instance a different colour!
2. Export Graphs. Open the GUI of your first SPAN Plus instance (Kick, for example). Press the Import/Export button and click on 'Export to'. Choose entry 1. Your kick-channel analysis is now ready to be imported into other instances of SPAN Plus. Repeat this procedure for each Cubase channel you'd like to analyse.
3. Import Graphs: Open a plug-in instance of your choice and click on the Import/Export button. Then choose Import From > Bass (stereo) in the first import slot. Choose the Snare (stereo) entry in the second slot and Cymbal (stereo) in the third slot. You will now see the analysis graphs of the kick, bass, snare and cymbal tracks.
Even More Fun
Need even more graphs? No problem. Go back to the multi-channel instance of SPAN Plus you set up earlier.
1. Rename main instance: In your SPAN Plus group channel, open the SPAN Plus GUI and, in the top-right corner, rename it Analyser Group.
2. Export graphs: Click the Import/Export button and, at the bottom, choose the third group (SN, for example). You will now see the analysis graph for the snare signal as well as the underlying graph of the cymbal signal. Click on 'Export to' and choose a free slot. Choose the fifth group and export it to another free slot.
3. Import Graphs: At the bottom of the Import/Export settings, click on the first group and import the graphs of both groups you've just exported to the available import slots. You will now see all six of the different analysis graphs at once.
If you really want to, you could choose to combine both techniques: setting up several multi-channel analysis instances, you could compare a maximum of eight different signals at once. These would include your chosen analysis group, its underlying graph and up to three imported stereo groups, along with their accompanying underlying graphs.
0
Saturday, December 19, 2015
Friday, December 18, 2015
Step Up!
Cubase Tips & Techniques
Technique : Cubase NotesCubase's StepDesigner offers a surprising amount of creative potential.
 in the lower one.") John Walden
John WaldenThe StepDesigner interface with note data in the upper section and controller data (in this case velocity) in the lower one.The StepDesigner interface with note data in the upper section and controller data (in this case velocity) in the lower one.
, you can also pick two other continuous controller numbers to build into your patterns.")
Recently, I had the pleasure of working with Sugar Bytes' excellent Thesys MIDI step sequencer plug-in. Thesys provides multiple lanes for each sequence, holding note data, velocity, pan and other MIDI controller data that can be used to control various synth parameters, and one of the really interesting features of Thesys is that you can change the step length of each of these lanes independently, allowing you to develop all sorts of evolving sounds. In short, there's a lot of fun to be had here and, as a Cubase user, it got me thinking: could the humble StepDesigner MIDI plug-in that comes bundled with Cubase be pressed into service to do something similar?
Quick Step

Aside from velocity and gate (note length), you can also pick two other continuous controller numbers to build into your patterns.Aside from velocity and gate (note length), you can also pick two other continuous controller numbers to build into your patterns.
StepDesigner might not win prizes for elegance, but it is straightforward to use. It's placed as a MIDI Insert on the MIDI track that drives your target synth and, once opened, provides two main panes for editing: the upper note area and the lower controller lane. Patterns can be up to 32 steps in length and you can adjust this and the timebase of the steps (1/16th, 1/8th, for example) via the narrow control panel that runs along the top of the window. Other useful options include a swing control and buttons to shift the pattern left and right or reverse it and shift the notes up and down an octave.

Each instance of StepDesigner can contain up to 200 patterns. The current pattern number is indicated in the control strip at the base of the window and, during playback, MIDI notes can be used to automate pattern changes. Sets of patterns can be saved as presets for later recall.
Notes can be added to the pattern grid via the mouse. You can also click and drag to enter multiple notes, while the range of pitches displayed can be scrolled up and down if you want to enter higher or lower pitches. Notes longer than an individual step can be added via the Tie lane (between the Note and Controller lanes) and, for notes shorter than a step, you can add controller data to the Gate lane. Simply select Gate from the drop-down menu and draw in controller data to define note lengths. This menu allows you to toggle the controller lane between four sets of controller data: velocity and gate, and two, user-defined, continuous controllers. Note that velocity and continuous controller (CC) data is added here in the same way.
Your choice of which two CCs you use is configured via the Setup button. This selection box simply lists the CC numbers, so you'll need to check your target synth's MIDI specifications to work out exactly which CC numbers you require. In my example project I used Halion Sonic SE.
Out Of Time
As described in the main text, pairing two StepDesigner patterns of different step lengths allows you to create some interesting evolving sequences.As described in the main text, pairing two StepDesigner patterns of different step lengths allows you to create some interesting evolving sequences.
Used as described above, StepDesigner is a perfectly respectable pattern sequencer, but as all elements of the pattern (notes, velocity, gate and CCs) operate to the same number of steps, you can't create the 'different step length' effects possible in Thesys. So, I thought, how about using two (or more) instances of StepDesigner, all targeting the same synth, but set to different step lengths? Well, perhaps this wasn't what Steinberg had in mind (for reasons that will become obvious in a minute) when creating StepDesigner plug-in, but it can be made to work. There are, however, a couple of limitations... You're limited as to where you can insert your additional StepDesigner plug-ins. You might think that the obvious location would be the MIDI Insert slot beneath your first instance of the plug-in, but this doesn't work because the MIDI note output from the first StepDesigner instance is interpreted as program change data by the second instance, and CC data just doesn't seem to be passed at all. So you need to create a second MIDI track, with its own StepDesigner inserted, that targets exactly the same synth. In this way, the two instances of the plug-in do not interfere with each other (well, they do, but I'll come back to that issue in a minute) so both sets of StepDesigner data get to the synth.
The screenshot shows an example setup, with a 16-step pattern of notes playing in one instance of StepDesigner (top) while a second instance (bottom) is sending CC data to Halion Sonic SE's filter resonance in a 15-step pattern. Both patterns play back continuously and in sync with the project but, on each cycle through, the shorter filter cutoff pattern is offset by a single step relative to the note pattern. As a result, instead of the relationship between the notes and filter sweep staying constant, they change over each cycle and, in this case, only start to repeat after 15 cycles.
Changing the Step Length setting — in this case set to 1/2 — provides further variation.Changing the Step Length setting — in this case set to 1/2 — provides further variation.
You can, of course, add a third MIDI track and a third instance of StepDesigner, and then use this to set another synth parameter in motion over a different pattern length. The next screenshot shows a 28-step pattern set to vary Halion Sonic SE's filter cutoff. However, there's an extra trick employed here: the step size setting has been set to a half rather than a sixteenth. Each step in this instance of StepDesigner, therefore, lasts for half a bar and the whole 28-step pattern for 14 bars. Combine this with your two other levels of variation from the first two tracks and, well, it makes my head hurt trying to calculate, so let's just say the variation in the synth tone cycles over a long period! If you target a suitable combination of synth parameters and step lengths in this way, the sequence can take on a real ebb and flow, and the effect can be very cool indeed; it certainly avoids some of the 'rigidity' that's often associated with poor electronic music.
Hit The Buffers
StepDesigner's velocity and gate lanes can only be used when that instance of the plug-in is also sending note data (the velocity and note length data are part of the MIDI data passed with each note) but, as mentioned earlier, StepDesigner allows you to select two CCs of your choice to use in the other two lanes. You might think, therefore, that using two instances of the plug-in would give you four possible synth parameters to tweak and three instances would provide six. That's what I expected when I started experimenting, but found that it's here you're confronted by a second limitation.
I'm not sure if this is a 'feature' or simply a bug (I'll let you decide!) but, regardless of how many StepDesigner plug-ins you have active in your project — even if they are targeting different MIDI synths — they all seem to share the same two CC numbers. If you select a CC combination in one instance of the plug-in, the changes you make are applied to all instances (at least, that's my experience using Cubase 7 running on Mac OS X). It's almost as if the two CC numbers are stored at a Project level (they apply globally for that Project) rather than at a plug-in-level (applying just to that instance of the plug-in). I've not found a way around this, so it means that two CC numbers per project are all you can control via StepDesigner.
Making Notes
Combining two StepDesigner instances where both contain note data can create a 'moving melody' effect.Combining two StepDesigner instances where both contain note data can create a 'moving melody' effect.
That may be disappointing, but there is one extra trick the plug-in can perform that Thesys (at least a single instance of Thesys) can't, which is to combine note sequences with different step lengths. This might sound like an odd thing to do but it can create some really interesting rhythmic and melodic results, with an effect that's not unlike singing in the round. The final screenshot shows an example. Both instances of StepDesigner are targeting the same synth, but use different MIDI tracks. The lower one is playing a very simple 16-step pattern of four notes, and provides a solid bass that syncs, without fail, to the project tempo. The upper pattern contains a more melodic phrase at a higher pitch and uses a 15-step pattern. As the patterns are repeated, the melody phrase gradually shifts one step at a time relative to the bass notes. The effect can be almost hypnotic — a solid bass and a repeating, but somehow 'moving', melody — with the synth tone itself also shifting if you apply some CC control as described above.
Step On It

With modern music technology, the user is often spoilt for creative choice and it's refreshing to take a simple tool and see just how far you can push it. StepDesigner might not be one of the more whizz-bang elements of the Cubase feature set but, despite the occasional quirk, with a little lateral thinking it's capable of great things.
Thursday, December 17, 2015
Wednesday, December 16, 2015
Tuesday, December 15, 2015
Keyboard Fraud
Cubase Tips & Techiques
Technique : Cubase NotesWith the Chord Track, even the most keyboard-phobic and ham-fisted of composers can play in their piano parts!
Like many people, I can write half-decent chord sequences on a guitar, but if I want to perform those parts on a keyboard... well, let's just say my keyboard skills are somewhat limited, and I'm therefore grateful for all the help technology can now offer. There are commercial products that can help you create a convincing performance, of course, but Cubase 7's wonderful, albeit occasionally baffling, Chord Track already includes a keyboard-playing assistant. So, if your keyboard skills are as, ahem, 'good' as mine, let me show you how the Chord Track can help you fake it...
Chords can be added to the Chord Track with the pencil tool and edited using the Chord Editor.Chords can be added to the Chord Track with the pencil tool and edited using the Chord Editor.
Chord Track Basics

We've already covered a couple of applications of the Cubase Chord Track in previous workshops: using it to re-pitch MIDI and monophonic audio when you want to adjust a chord sequence but don't want to re-record existing parts (June 2013) and in creating harmony parts from audio tracks (July 2013). As a brief reminder, the Chord Track allows you to specify a chord sequence along your project timeline. Once this is done you can select a MIDI or audio track (as long as the audio contains a monophonic performance such as a vocal or instrumental melody part) and, via the track's Chord Track panel in the Inspector window, configure this to follow the Chord Track; Cubase will magically re-pitch notes to fit the chords and scale specified by the Chord Track.
Much of the time this works well, but for audio tracks in particular it's not fool-proof, and a little manual editing may be required. It's worth noting that the Chord Track's documentation is not the easiest to follow, particularly with regard to the interaction between the Chord Track settings and the Inspector settings for each individual track. Thankfully, for this month's trick the settings are very straightforward.
Write It Yourself

In this example, I used an audio guide track to help me position the chord changes.In this example, I used an audio guide track to help me position the chord changes.
The first step is the creation of the song's chord progression. Thankfully, that still requires a modicum of musical skill (it would be a boring world if we took everything human out of the music-making process — although the Chord Assistant can even help with this if you want it to!). Once the muse has struck, you need to add a Chord Track (Project/Add Track/Chord), and populate it with your chosen chord sequence. As I've usually developed my chord sequences on my guitar, I'll often record this to a click track as an audio guide, but you can just go straight to the Chord Track if you prefer. Creating the Chord Track events is most efficiently done in two passes. First, using the pencil tool, add blank chord events (they appear with a big X in them) for each chord change. Then, using the Chord Editor (click on a chord event to open the Chord Editor), you can enter the appropriate chord.
The key thing (other than picking the right chords!) here is the timing of your chord changes, which is particularly important if you've written and performed the chord sequence on another instrument and the natural groove plays slightly off the beat. Using an audio guide track and zooming in will allow you to position your Chord Track events to hit those chord changes more accurately — you can turn off snap to grid, or select finer quantise values if you need to.
Get Rhythm

With your Chord Track sorted, the fun can commence. First, create a MIDI track and link it to a suitable virtual instrument (I used an acoustic piano patch in Halion Sonic SE in my example project, as shown in the screenshots). Then, in the Chord Track panel of the MIDI track's Inspector, change the Live Transform setting to Chords. This will result in real-time transformation of any MIDI-note data routed to the track's input. Whatever notes you play, Cubase will re-pitch them so that they're transformed into notes that fit the current chord on the Chord Track.
To fake some piano chords, the MIDI track's Live Transform setting needs to be set to 'Chords'.To fake some piano chords, the MIDI track's Live Transform setting needs to be set to 'Chords'.
If you set your locators around your chord progression and loop playback, you can apply almost as much keyboard incompetence as you wish! Cubase will make some sensible chords out of it and, if you record your performance, what you're left with are harmonically correct chords. The one thing to ensure is that whatever notes you play span a reasonable spread of keys: if, for example, you want the end result to be a simple three-note (triad) chord, don't just bash out three adjacent notes as Cubase might transform two of these to the same MIDI note, leaving you with a two-note chord. Instead, span your three fingers a little wider over the keys or, crass as it might sound, use the flat of your palm and play five or six adjacent notes. Amazingly, out will pop the right chords! The good thing about this approach is that it allows you to focus on the rhythmic elements of your performance, which can suffer if you're worrying too hard about fingering the chords correctly.
If you change your hand position as you play, you'll find that the transformation process will produce different inversions of the required chords, which adds some useful variety to the performance. You can even play with two hands, perhaps playing a single bass note with your left hand and full chords with your right; again, the transformation process will give you a harmonically correct end result that follows the Chord Track.
Scale New Heights
If you want to create a melodic part, the 'Scale' Live Transform setting can be used.If you want to create a melodic part, the 'Scale' Live Transform setting can be used.

Perhaps it isn't just the chords that you want help with, though… If you need some melodic parts — even if that's only a few incidental notes — the Chord Track can again be pressed into service. When you add chords to the Chord Track, Cubase will automatically add scale events based on the chords used. If you want more control (or wish to avoid some of the more esoteric scale selections), unchecking the Automatic Scales options in the Chord Track's Inspector allows you to set the scale events manually. You can set the key and choose from a range of different For full-on left-hand/right-hand faking, creating two MIDI tracks and a keyboard split within Halion Sonic SE will get the job done.For full-on left-hand/right-hand faking, creating two MIDI tracks and a keyboard split within Halion Sonic SE will get the job done.scale types to suit the musical style of your track.
Providing that you've specified the correct scale(s) in the Chord Track, simply switch the MIDI track's Live Transform setting to the 'Scale' option, and any notes that you play will be transformed to fit the scale.
Having It All

It's also possible to fake simultaneous left-hand chord and right-hand melody performances, and this can be done a number of ways. If, for example, your master MIDI keyboard includes a 'split' option that allows you to transmit notes above/below the split on different MIDI channel then simply configure two MIDI tracks with two instances of the same VST instrument and set each to receive the appropriate MIDI channel. If you configure the Live Transform settings of one MIDI track to 'Chords' and the other to 'Scale', you can (rather too easily) create some two-handed 'faking'
 Alternatively, some VST instruments allow you to limit the range ofIf you switch off the Automatic Scales options in the Chord Track, you can then manually configure the scales used.If you switch off the Automatic Scales options in the Chord Track, you can then manually configure the scales used. MIDI notes a patch will respond to. As shown in the screenshot, Halion Sonic SE allows you to do this, and I've set up two instances of a piano sound where each responds to one half of the MIDI note range. Providing you record-enable both MIDI tracks connected to these Halion Sonic SE channels, and configure the Live Transform settings as described in the previous paragraph, you can achieve the same effect.
Guilty Pleasure
While I'm all for improving my own musical skills, I have to admit that since discovering how absurdly easy the Cubase 7 Chord Track makes it to bypass my less-than-stellar keyboard chops, the incentive for me to improve said chops has decreased dramatically — and faking keyboard performances in this fashion has become a bit of a guilty pleasure! Is this wrong? I'll leave you to discuss that with your own musical conscience; I'm too busy laying down piano parts that get the job done to worry about it!
Monday, December 14, 2015
Saturday, December 12, 2015
On Your Marks
Cubase Tips & Techniques
Technique : Cubase NotesGet more done in less time, with these workflow tips for Cubase 7.
John Walden
One of the main frustrations with DAW software is how long everything seems to take — often just long enough for you to lose the creative inspiration you were seeking to nurture! Wouldn't it be nice, then, if your Cubase projects benefitted from a little more flow and a lot less work? Follow this tutorial and hopefully you'll achieve that, because this month I'll offer several tips that should result in a more efficient use of your favourite DAW software.
The Curse Of The GUI
.")
Our interaction with almost all modern computer software is through a graphical user interface (GUI). While the GUI makes it easier to access the multitude of features in today's 'bloatware', it doesn't necessarily make it faster. Certainly, when you use a feature frequently — perhaps dozens of times during a working day — being tied to a mouse and a menu is not the best way forward; you really do need to use key commands. If the keyboard shortcut takes a tenth of the time itWe all spend a lot of time in the project window so it's worth learning the most efficient way to work within it (and that doesn't include those pesky zoom sliders at the bottom-right).We all spend a lot of time in the project window so it's worth learning the most efficient way to work within it (and that doesn't include those pesky zoom sliders at the bottom-right). takes to execute the same command with a mouse, and this saving is totted up over the 20 or so commands you execute perhaps hundreds of times every working day... well, you do the maths. You'l certainly save a hell of a lot of time and frustration.
Every Cubase user spends a lot of time in the Project window, so for our 'workflow efficiency 101' that's a good place to start. Our main mouse-free, workflow enhancements may seem unglamorous and perhaps a little obvious, but get to grips with them fully and they'll speed up your work more than anything else: let's hear it for Markers, Zooming options and Key Commands...
Marking Time

In all but the simplest of projects, if you know you're going to spend some time working on it, it's well worth creating a Marker track. Cubase provides two kinds of markers — position and cycle — and both have their uses. Position markers simply identify a single point on the timeline. You might use these to identify important locations when, for example, composing to picture, where position markers can identify 'hit' points where the music has to synchronise with the on-screen action. For song-based work, where you have the usual array of defined song sections, cycle markers are often more useful. As the name suggests, these are paired markers that can be used to identify the start and end points of a particular song section.
You can add both types of markers via the Marker track or the dedicated Marker window. Position markers will be added at the project cursor position while cycle markers will be added at the current left/right locator positions. Initial positioning of markers is a one-off task so we can forgive ourselves some mouse work there. However, once positioned, key commands exist to either move the cursor to a marker (position or cycle) and to recall a cycle marker. The beauty of the latter function is that it A project can contain both position and cycle markers but, for clarity, you can choose to filter their display within the Marker window if required.A project can contain both position and cycle markers but, for clarity, you can choose to filter their display within the Marker window if required.instantly moves the left and right locators to cycle marker positions ready for cycle playback. For moving quickly back and forth to work on different song sections, this is a huge time saver. The 'Recall Cycle Marker' key commands are not defined by default so a visit to the Key Commands window is required to configure these.
The only other issue to consider with cycle markers is whether you position them exactly on the song section boundaries, or whether you set them a bar or two pre and post those boundaries. The latter approach obviously means you get a couple of bars of pre-roll and post-roll around the song section which can be useful when doing multiple takes via cycle-based recording.
Zooming About
Aside from moving between different song sections, the other oft-repeated navigation task is zooming in or out — both vertically and horizontally — on the Project window contents. This can be done in various ways but (unless you're a glutton for self-abuse!) avoid using the horizontal and vertical zone sliders that lurk bottom-right of the Project window; they're too small and fiddly to give you sufficiently precise control (in fairness to Steinberg, similar controls in other DAWs are equally irritating).
Instead, learn just a few of the zoom-related key commands. The most obvious of these are pre-defined by default; horizontal zoom in and out uses the H and G keys respectively, Alt/Option+H or G zooms in and out in a vertical sense, while Shift+F automatically zooms horizontally to show the full length of the project.
However, there are a few other very useful ones that are not pre-defined and you ought to define for yourself. For example, Zoom To Selection Horizontally (rather than just the Zoom To Selection key command) and Zoom To Locators are both very useful. The latter is great when used in combination with the Recall Cycle Marker; two quick key combinations and you have both your song section selected and are zoomed in horizontally to view it. If you then add the To Left Locator key command (by default, 1 on the number pad), then your cursor is all ready to start playback (via the SpacebarBeing able to recall preset cycle markers using key commands means you can get working on the required song section in an instant.Being able to recall preset cycle markers using key commands means you can get working on the required song section in an instant. key command, of course) of that song section.
In addition, if you need to flip back and forth between two zoom settings, it is worth defining key commands for the Redo Zoom and Undo Zoom options.
Unlock Your Potential

Even just adding these cycle-section selection and zoom key commands to your keyboard repertoire will bring significant workflow improvements, but these commands hold the key to plenty of other possibilities for further time saving. Obvious examples are the key commands for moving between tracks and selecting events on tracks. For example, in the absence of having any events selected within the Project window, the up/down cursor keys will move you through the track list, selecting each track in turn. If you hold the Shift key at the same time, you can select multiple tracks in the same fashion, adding tracks either beneath the current selection or above it.
If you then try the left/right cursor keys, these allow you to select an individual event on the currently selected track (or on the topmost track if you have several tracks selected). Again, adding in the Shift key allows you to select multiple events along an individual track while holding Shift and pressing the up/down cursor keys expands the selection of events onto tracks above/below the current one.
Used in this way, it is very easy to select a horizontal/vertical range in your project manually (perhaps a range that doesn't coincide with one of your song sections already defined by cycle markers). And once you've done that, the default Alt/Option+S key command executes the Zoom To Selection command to perfectly zoom horizontally and vertically into your selection.
Finally, if you use Folder Tracks to organise projects containing lots of tracks, there are various key commands available for folding/unfolding these, although you do have to define them for yourself within the Key Commands window.
Pretty Fly For A GUI Guy

There is nothing dramatic about any of the examples provided above except, of course, the fact that when repeated over and over again in the course of a working day, they will save you a significant chunk of time. However, nothing comes for free and, if you want to benefit from these efficiencies, you have to train yourself to use them — which often means working hard to break your existing habit of reaching for the mouse.
Creating a printout of these Project window navigation shortcuts (most easily done by making some screen grabs of the Navigate, Transport and Zoom sections of theThe Zoom section of the Key Commands window has lots of options for improving your Project window navigation.The Zoom section of the Key Commands window has lots of options for improving your Project window navigation. Key Commands list) will help enormously. For a short while, this might feel like one step back rather than two steps forward but, if you persevere, I promise the rewards will come. It will be one less thing to get between you and the realisation of your musical/production ideas, so it should lead to quicker and more satisfying results. And if not, well, at least you'll have saved enough time destroy a few more brain cells by getting to the pub significantly earlier!
Published in SOS December 2013
Friday, December 11, 2015
Thursday, December 10, 2015
Dubstep Drums | Media
Technique : Cubase Notes
Rob Talbott
The following examples accompany Cubase Technique article for January 2014.
Package icon cubase-technique-0114.zip
250 KB.
Rob Talbott
The following examples accompany Cubase Technique article for January 2014.
Package icon cubase-technique-0114.zip
250 KB.
Saturday, December 5, 2015
Friday, December 4, 2015
Control Freak
Cubase Tips & Techniques
Technique : Cubase NotesCubase offers several different ways to take advantage of your master keyboard's knobs, buttons and faders.
John Walden

In Mark Wherry's recent review of Cubase 7.5 (http://sosm.ag/feb14-cubase75) he commented on the potential confusion created by multiple features that perform similar functions, and the remote control options are a case in point. A typical modern MIDI master keyboard/controller will include something like eight assignable faders and eight rotary knobs, and to make full use of them, you have to get your head around Cubase's Generic Remote, Track Quick Controls (formerly 'Quick Controls'), VST Quick Controls (VSTQC, new in v7.5) and the Remote Control Editor (RCE). Being blunt, Steinberg'sThe Generic Remote pane of the Device Setup panel allows you to configure your hardware controls and link them to parameters within Cubase. documentation of these related and overlapping components leaves a little to be desired — but don't worry because this month I'll explain how to decide on the best way to take advantage of your control surface or controller keyboard in Cubase. (If you don't yet have a suitable hardware controller and want to acquire one, I'd recommend that you opt for a model with continuous rotary controls rather than fixed pots, as these tend to be much less restrictive in use.)
Do Your Homework
 panel does a similar job for the two Quick Control systems.")
I've previously discussed the Device Setup options for the Generic Remote (SOS December 2010) and the original Quick Controls system (SOS July 2009) in detail, and as these articles are free to access on the SOS web site I won't retread too much of that ground here. Essentially, the Generic Remote is a system that allows any MIDI controller device to be configured to control your choice of parameters in Cubase. Via the Device Setup options, you can define the number of hardware faders and knobs available and link each of those controls to a specific 'target' parameter in Cubase. You could include parameters of a VSTi, but given that the Quick Controls system is better for that the most appropriate targets for the Generic Remote will be found in the VST Mixer — things such as fader level and pan setting. As the Generic Remote provides multiple banks of assignments, you can actually cover a lot of ground this way, even if you have only a few hardware controls.
 Inspector panel allows you to see and (for tracks not linked to a specific VSTi) define the parameters assigned to each of the eight TQCs. Note the preset button now in this pane, introduced in Cubase 7.5.") The Track Quick Controls (TQC)The Track Quick Controls (and very similar VST Quick Controls) panel does a similar job for the two Quick Control systems. system is used to control parameters at the individual track level, whether it's an audio or MIDI track. Back in the Device Setup pane you establish a link between a maximum of eight of your hardware controls and the eight software 'quick controls'. If you then select, for example, an audio track and open the TQC section in the Inspector, you can specify up to eight parameters to be governed by your hardware controller at the track level, including insert effects parameters, EQ settings and send levels.
The Track Quick Controls (TQC)The Track Quick Controls (and very similar VST Quick Controls) panel does a similar job for the two Quick Control systems. system is used to control parameters at the individual track level, whether it's an audio or MIDI track. Back in the Device Setup pane you establish a link between a maximum of eight of your hardware controls and the eight software 'quick controls'. If you then select, for example, an audio track and open the TQC section in the Inspector, you can specify up to eight parameters to be governed by your hardware controller at the track level, including insert effects parameters, EQ settings and send levels.You can define the same hardware controls for your eight TQCs within the Device Setup pane as you already used within the Generic Remote pane — but you must take care not to have both systems 'active' at the same time, as you'll otherwise inadvertently send data to two different destinations at once, which can cause mayhem! The TQC system can simply be switched off in the Inspector of the selected track. For the Generic Remote, the simplest option is to return to the Device Setup pane and disconnect the Generic Remote's MIDI input. That this is a bit clunky is unfortunate, but it works — and you can easily re-enable it when the time comes to mix.
All New
The v7.5 update added the new VST Quick Controls (VSTQC) system to this already complex mix. VSTQC works in a similar fashion to TQC, in that you can assign hardware controls to the eight VSTQCs via the Device Setup pane. Note that if you only have eight physical controls, you can also assign them to the VSTQC system that you've already assigned in both the Generic Remote and TQC systems. When you then create an Instrument track, or add an instrument to the VST Instrument Rack and then select the associated MIDI track, the TQC assignments are already defined for you in the Inspector Panel, and are based on the VSTQC assignments.
These assignments come from the final piece of the remote-control jigsaw: the Remote Control Editor (RCE). Right-clickingThe Track Quick Controls (TQC) Inspector panel allows you to see and (for tracks not linked to a specific VSTi) define the parameters assigned to each of the eight TQCs. Note the preset button now in this pane, introduced in Cubase 7.5. on the VST device within the VST Instrument Rack allows you to open its RCE. The panel allows you to create multiple banks of eight virtual rotary controls and link them to specific parameters in the VSTi.
For many VSTis, the RCE will contain a number of predefined parameter links. The first eight will form the default selections that appear in the Inspector TQC panel for the associated track. You can edit these default RCE selections (and labels) if required. These are 'global' settings and, once defined in the RCE, they'll appear for any instance of that plug-in in any project.
Linking a physical hardware control to a specific software parameter via the RCE is a two-stage process. First, you need to have completed the steps mentioned above and configured your hardware controls via the VSTQC section in the Device Setup pane. Second, in the RCE, activate the 'MIDI Learn' option (the 'L' button in the control strip located top-right), select one of the RCE virtual knobs and then, in the editor window of the VSTi, use your mouse to move the required parameter. This links the VSTi parameter to that RCE control knob (one software control is linked to another). Once you've finished editing, press the RCE's Apply button to enact the changes.
If you do change any of these first eight RCE default assignments, make sure you press the 'Get default QCs from plug-in' button (the one with the curved arrow icon) in the associated track's TQC Inspector panel so that it updates to reflects the new RCE assignments.
Pieces Of Eight
So far, so good. Indeed, if you only need to control a maximum of eight parameters in your VSTi, you can look away now. If you need yet more control, though, read on, because it's possible to use the VSTQC system to access more than eight parameters in each VSTi. To do this, you need to add additional strips of eight virtual knobs to the VSTi's RCE panel. Link them to VSTi parameters via the 'learn' process described above and then press the RCE's Apply button to make those assignments active.
The track Inspector TQC panel will only ever show the first bank of eight of the RCE assignments. However,The Remote Control Editor (RCE) panel allows you to link RCE virtual controls to VSTi virtual controls. for a VSTi in the VST Instruments Rack, you can use the 'Page' drop-down menu to switch between the banks of eight RCE controls. If, for example, you select page two for a particular VSTi, your eight hardware controls assigned to the VSTQC system will automatically switch to controlling that bank of eight parameters. In this instance, VSTQC assignments take precedence of the TQC assignments.
 panel allows you to link RCE virtual controls to VSTi virtual controls.")
This is very neat but not without a rather odd catch. This page system works for third-party VSTis and the bulk of Steinberg's own, but it doesn't work with Steinberg's Halion Sonic (SE or full versions), in which the 'page' option is replaced by a 'channel' drop down. While you can view the RCE panel and use the eight default assignments, you can't actually edit the RCE panel contents in any way (at least none that I've found). I suspect that there are elements of the Halion Sonic QC system and the overall QC system that, at present, are rather uncomfortable bedfellows. Indeed, the QC system within Halion Sonic could probably fill its own article — although I suspect my head might explode if I tried to write it!
Save Me

This whole subject of hardware control in Cubase will inevitably leave you scratching your head on occasion, but I promise that things will fall into place without requiring too much in the way of mental gymnastics. Thankfully, then, once you get things working as required you can save your settings for later recall in case things go pear-shaped. To do this, go to the Device Setup panel, where you can export your Generic Remote, TQC and VSTQC assignments as XML files, which can be imported again when you wish to recall your settings.
A new feature in v7.5 is that you can now save TQC assignmentsIn the instrument rack, most virtual instruments provide a 'page' option allowing you to select which bank of eight RCE parameters you want to control via the VSTQC system. as presets from the track Inspector panel. This is only really useful for tracks not linked to a VSTi (eg. audio tracks) as, for VSTis, whatever changes you make to the TQC assignments within the Inspector the RCE assignments will always take precedence.
Despite some obvious quirks that I suspect result from the progressive implementation of the various hardware control systems described above (including the direct 'MIDI learn' facilities built into many VSTi, which I've left out of the discussion here simply because the QC system is more efficient), using a generic MIDI keyboard/controller with Cubase can bring some genuine workflow improvements over endless fader sliding and knob twiddling with a mouse. If you do experience problems (for example, the TQC or the VSTQC suddenly stop working), a quick visit to the Device Setup pane to import your saved settings, followed by hitting the Apply button, will often wake things up again.
Subscribe to:
Posts (Atom)