Cubase Tips and Technique
Technique : Cubase NotesGot a drum loop with a great groove but a less-than-great kick sound? Let's beef it up...
John Walden
In reviewing Digital Performer 8 recently, I was impressed by the new Subkick kick-drum enhancer plug-in. This sits on your kick-drum track and makes it easy to beef up the sound by adding sub-bass frequencies, and during the course of the review I began to wonder if I could replicate the same result within Cubase, using the built-in plug-ins. In addition, while Subkick is designed for use on an individual kick-drum track, I wanted to see if I could replicate the process when the starting point was a pre-mixed drum loop in which the kick lacks a little oomph.
This workshop describes two routes to adding an additional layer of sound to beef up the kick. First, we can use an audio trigger to add an additional synth sound (like Subkick does in DP8) or, second, we can use a MIDI trigger to add either an additional synth sound or a sample sound. However, if starting with a pre-mixed drum loop, there's an additional step required, so let's start with that first.
Gate The kick

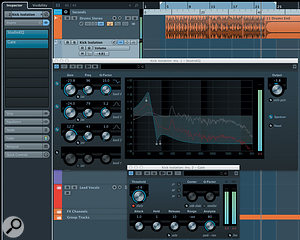
Our starting point is that we've assembled a complete drum track from a series of stereo drum loops — but in the context of your full mix, the kick sound doesn't quite cut it. Before applying either of the kick-drum enhancement approaches mentioned above,Here's the Studio EQ and Gate plug-in settings used on the 'kick isolation' effects channel in my example project. you need to isolate the kick-drum part from the pre-mixed stereo drum performance.
There are a couple of ways we might do this but, for this example, let's start by creating a Cubase effects channel. Initially, don't insert any effects on this channel but do give it a suitable name, such as 'Kick Isolation'. Once this is done, add two Insert plug-ins to this channel — Studio EQ and Gate — and adjust the parameters as shown in the screenshots. Configure a send in your original stereo drum track to pass audio to this Kick Isolation effects channel.

The aim is to isolate just the kick with the EQ in the Kick Isolation channel. It doesn't have to sound great because, eventually, we won't actually hear this audio at all; it will be a trigger source. Therefore, it has to be absolutely dominated by the kick. Once the EQ is configured (I've massively emphasised the 50Hz region in this example), adjust the Gate Threshold so that the gate only opens on kick hits.
This process complete, we can choose between our two methods of triggering the extra element to the sound of our kick drum; an audio trigger or a MIDI trigger. I'll deal with each of these in turn.
Pull The Trigger

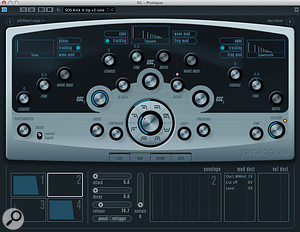
For the audio trigger approach, we're going to enhance our kick with a synth sound. Start by creating an Instrument track with Prologue as the VSTi (although any single oscillator synth that can use a sine waveform would suffice) and configure Prologue as shown in the screenshot, with just one oscillator active using a sine waveform. I actually started with the Pulse Width Mod Bass presetPrologue configured to use a single oscillator based on a sine waveform. to get things in the right ballpark and then adjusted to the settings shown.
On the MIDI track associated with Prologue, we then need to add a MIDI part with a single note (C1 is a good choice) that spans the full length of the project starting just before, and finishing just after, your drum track. If you were to play back the project now, you would hear this single synth note play constantly throughout the length of the project.

We then need to place a further Gate plug-in as an Insert on the audio channel associated with Prologue and activate the side-chain input. Next, go back to the Kick Isolation channel and change its routing so that its output is directed to the side-chain input of the Gate on the Prologue track. Then adjust the Gate on the Prologue track so that it is triggered by the kick from the Isolated Kick channel. Pay particular attention to the Attack and Hold settings; between them, these will dictate how quickly the synth is added to each kick hit and how long the synth plays. On playback, you should now only hear the Prologue synth when the kick plays. All that's required now is to blend the actual drum track and the Prologue kick sound, adding just enough to beef up the overall result. Of course, a further option is to get more experimental with the Prologue sound; try a few different Prologue presets and see (hear) The gate plug-in on the Prologue channel has its side-chain input activated (orange) while the Kick Isolation output routing is being set to feed that side-chain input.where it might take you.
MIDI Triggering

The second approach to trigger our kick enhancement is based on MIDI. In order to do this, the first step requires us to create an audio track that just contains (or at least is dominated by) the kick-drum performance from our stereo drum track. To do this, set the loop region around the entire project and then use the File / Export / Audio Mixdown option. In the Export Audio Mixdown dialogue box, select just the Kick Isolation track to be rendered. In the 'Import Into Project' section of the dialogue box, tick the boxes to add to the Pool as an Audio Track. On clicking Export, a new audio track will appear that, hopefully, just contains the rather weird-sounding kick from your Kick Isolation track.
On opening this new audio event in the Sample Editor, via the Hitpoints tab, we can set the threshold for the hitpoints so they only occur for the kick hits. This should be fairly easy if we were able to EQ/gate the kick appropriately when setting up the Kick Isolation channel. Once done, we can select the 'Create MIDI notes' option (at the base of the Hitpoints tab) and, in the dialogue that appears, choose a new MIDI track as a destination. Don't worry about the Dynamic Velocity conversion; setting the note length to something short (1/16th) is the best starting point. The result should be a MIDI track with 1/16th notes that coincide with the original kick-drum hits.
We can now mute the Kick Isolation track and the audio track from which you have just created the MIDI notes. These have served their purpose butOnly the Kick Isolation channel is selected for export in the Export Audio Mixdown dialogue. it's best not to delete them in case you want to come back and repeat some of the steps.
We now have a choice: we can create an instrument track with either a synth sound (for example, use the Prologue sound from the audio trigger approach above) or a sample-based drum instrument such as Groove Agent SE4. Either way, set the MIDI destination of the MIDI track we have just created to point at this VSTi. We then need to pick a suitable synth sound or kick-drum sample to layer with your original drum loop's kick.
On the MIDI track, we might then need to adjust the pitch of the MIDI notes. If using a synth sound, the MIDI note will be influenced by how low you want the synth sound to play in order to support the original kick. If using a drum sample in Groove Agent, the MIDI note will depend upon which drum pad contains the kick-drum sample you want to layer with your original drum loop's kick.
We can then let our original drum loop and our new MIDI track play alongside each other and the MIDI track will trigger either the synth sound or the additional kick sample to enhance the overall kick sound. If required, use can use theHaving set the hitpoint threshold correctly, the hitpoints can be used to create MIDI notes on a new MIDI track. Track Delay setting in the MIDI Track's Inspector panel to move the MIDI note timing forwards/backwards to tighten up the timing with the actual kick. This can be useful as it allows you to experiment with which of the two elements of the kick sound — original or 'enhanced' — dominate the initial attack of the sound. As before, you then simply blend as required. However, unless you are after more of a 'drum replacement' effect, a relatively minor amount of 'enhancement' is required to beef up the original loop.
If you do go down the synth route, you might also need to pay attention to the synth's volume envelope settings than when using the audio trigger approach (where the gate's settings control the attack, sustain, decay and release of the synth sound for each kick hit). For example, adding a short attack (but not zero) can prevent any 'click' from the synth, while adding some sustain, decay and release can change how long the synth kick plays for on each hit.
Oh, and if you need some serious oomph, then you could combine both the audio trigger and MIDI trigger routes, or duplicate the MIDI track and use two (or more) sources of kick-drum enhancement.
No comments:
Post a Comment