If you've ever wanted a cheap and easy way to do drum
replacement with Cubase, there are some good solutions
out there...
While it is, of course, best to capture the right sound at source while recording, everyone comes across times when they'd like to have captured a different drum sound, or a more consistent performance. Whether the purpose is remixing or emergency surgery on sub-standard recordings, drum replacement seems to have become an increasingly common technique in much modern music production.
For years, though, this is an area in which I've found Cubase to be rather lacking. Even the old PC version of Logic has a simpler method than the latest versions of Cubase, and in the past I've often turned to Logic or Pro Tools for this task.
One obvious option for Cubase users is to use a commercial drum replacement plug-in. If you've ever looked into these, you'll have heard of Drumagog (www.drumagog.com), which, alongside Digidesign's Soundreplacer (for Pro Tools), has long been an industry-standard tool. Though Drumagog offers great results, it isn't a modest purchase for the home studio musician, and it offers arguably more functionality than you need for simple jobs. With this in mind, I decided it was about time I discovered ways of going about drum replacement inside Cubase without having to splash the cash.
Hitpoints
My first thought was to try to find a way to use the hitpoint function to detect the beat and to use that to generate MIDI information to trigger a sampler. However, I soon discovered that Sam Inglis had beaten me to it, back in SOS August 2005 (www.soundonsound.com/sos/aug05/articles/cubasetech.htm). He devised a way of using hitpoints generated from multitrack drum recordings to line up replacement drum beats. I take my hat off to Sam for his patience in finding that particular solution because, although it remains the only way I know to do this using Cubase 's in-built functionality, and although constructing the macros he suggested makes things a little easier, it is still not (at least for me) an intuitive approach. Of course, it may work for you, and it's well worth checking out that article.
Cubase 4.0.2 Update
Steinberg have issued an update to Cubase 4 and Cubase Studio 4 that fixes 51 minor bugs in these programmes. Version 4.0.2 was released on 2nd March and is available as a free download from the Steinberg website (www.steinberg.net). For details of what has been fixed you can download a PDF document of the version history, which also lists the remaining known issues and suggested workarounds.
Third Party
With the options inside Cubase apparently so limited, my next thought was to see what cheap or freeware third-party solutions existed.
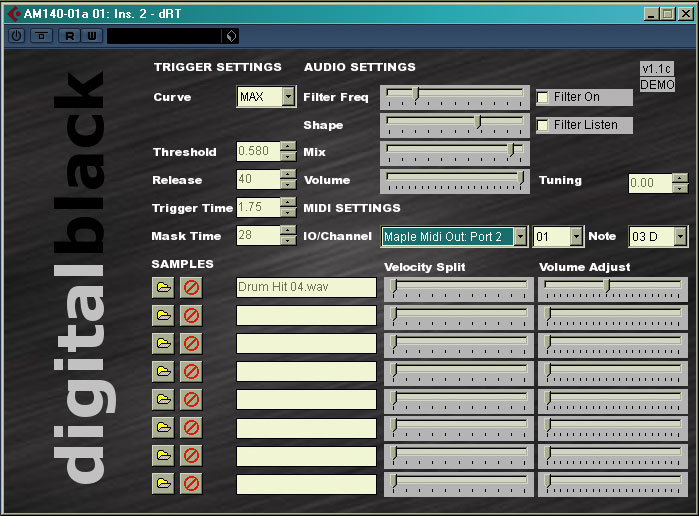
The first product that cropped up on a web search was Digital Black's Raven DRT for Windows (see screenshot below left), and I promptly downloaded the demo from their web site (www.digital-black.net). This plug-in offers functionality that is not a million miles away from Drumagog and, though it is not as feature-packed, at $35 it is much more affordable. You define the threshold, set a filter to determine the trigger frequencies, and either load samples (up to eight different samples, triggered by different velocities — which is great if you have something like the free multi-layer NS7 Kit) or set it to output a MIDI note. While I initally had some difficulty getting it to trigger the samples I loaded in (this may be a plug-in compatibility issue with Cubase 4, as I've had similar issues now with a few plug-ins!), it eventually worked pretty well, with good, tight timing. The biggest issue I have with Raven DRT versus Drumagog (other than it being Windows-only) is that there's no visual representation of the incoming audio, and you must set everything by ear. Apart from this, for Windows users at least, it provides a neat and pretty reliable MIDI trigger at a decent price.
 Boxsounds freeware Replacer provides a nice, basic drum-trigger solution for PC users.Another popular product is Apulsoft's Aptrigga 2, which provides a similar solution to Raven and is available for both Mac and PC. Downloadable for 35 Euros from www.apulsoft.ch, it is slightly more costly, but it includes some simple metering to help you set thresholds and filters, and it comes with a well-written manual, so it is still pretty good value. Unlike Raven, though, there is no MIDI output, so you are limited to triggering the samples that you load in to Aptrigga.
Moving on, I discovered that there are a few good freeware/donationware solutions. Like Aptrigga, Boxsounds' PC-only Replacer (www.boxsounds.com) has no MIDI output but allows you to load in samples. These must be in WAV format, though — which is a little frustrating if you happen to have a vast drum-sample library in a different format! Again, there is no graphical representation of the audio to aid you in setting the trigger. Also, you are limited to triggering up to four separate sounds and, while this may be enough for some styles, it isn't ideal. On the other hand, what it does, it does pretty well, and as it's free you can't really complain!
 With 24 channels, plenty of control and a visual display of the trigger points, KT Drum Trigger from Smart Electronix is arguably the best freeware drum trigger.If you prefer to trigger MIDI, and don't need the sample functionality, you could try the very unfussy JTRIG (www.jens.org/stuff/jtrig/readme.htm). It doesn't have its own GUI, so all you get are the default slider controls in Cubase to set the trigger level, attack and release times, the MIDI note and channel, and a couple more basic functions. A similar, but more aesthetically pleasing alternative is Fretted Synth Audio's Drum Direction (www.frettedsynth.asseca.com).
A more comprehensive option — and the best freeware solution I came across by quite a distance — is KT Drum Trigger, by Koen, of Smart Electronix (www.smartelectronix.com). Like J Trigga, KT Drum Trigger only outputs MIDI, so you need to use it in conjunction with a sampler, synth or drum module. However, it offers much more extensive functionality — so much so that it can at first appear a little daunting. You are confronted by 63 separate slider controls and six graphs, spread across three separate trigger channels. Further investigation reveals that the plug-in offers up to 24 separate channels (more than you could possibly need for drums, though I'm sure there must be some more creative uses this could be put to!). Each channel includes a filter that is settable to low pass, band pass or high pass, and allows full control over cutoff frequency, Q and gain. Not only do you get a graphical representation of the audio passing through each channel but, as with Drumagog, markers appear to show visually which parts of the waveform are triggering the notes. Though it takes a little effort setting up the filters, I found that it wasn't too difficult to generate pretty accurate MIDI information relating to kick, snare and hi-hats (which, let's face it, is the essence of most drum patterns) from a single stereo drum loop. KT Drum Trigger also offers an audio thru mode, which means you can still listen to and process the original drum recording as usual, and merge the sound with those triggered by the plug-in. You also have much greater control over the MIDI information that this plug-in generates than you do with the others mentioned above. Not only can you select the note and MIDI channel, but you can also have the plug-in derive MIDI velocity from the level of the incoming audio (which works brilliantly where the performance is good, but you wish to change the sound), or it can be set to a fixed velocity (great for an erratic performance, where you want to achieve a more consistent level).
MIDI Routing
Having found a plug-in capable of doing the job, I encountered complications with the MIDI routing in Cubase. For example, if you place separate instances of your drum trigger plug-in on different elements of your multitrack drums (for example, one on the kick channel, one on the hi-hat and one on the snare), the MIDI output of each will be treated by Cubase as a separate MIDI source — one for each instance.
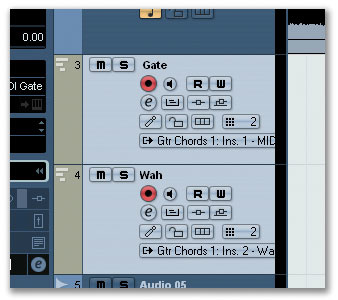
 To route multiple drum-trigger signals to your drum module, you may want to set up an empy MIDI track for each instance of your plug-in. Select the relevant drum trigger output as the MIDI In source and your drum module channel as the destination. Also note that the orange 'monitor' button is on for BFD here: if this, or the record button, isn't enabled, your drum module won't play the incoming data.No surprises so far, but this can present problems, because the MIDI track for your drum module can only be set to receive either a single MIDI input or all MIDI inputs — you cannot define two or three specific inputs, while at the same time excluding others. This may be fine if you are replacing only one drum part but for multiple parts, especially if you have other MIDI information flowing around your project, it can be something of a pain.
To get around this issue, there are two possible approaches. The most simple is to create a separate, empty MIDI channel for each instance of the trigger plug-in. Set the MIDI input source to the plug-in's output, set the channel's output to the drum module, and ensure the orange monitor button on both MIDI tracks is on. The MIDI data will then be routed through each channel to your drum module.
Of course, you might sometimes want to try the trigger signals on more than one drum module, or experiment with sounds from different modules. In this case, it might prove easier to use a virtual MIDI cable, and there is one built into OS X on the Mac (if you've not discovered this yet, you can find it at Applications / Utilities / Audio MIDI Setup), and on the PC you can install a freeware one such as MIDI Yoke (www.midiox.com/myoke) or Maple (www.hurchalla.com/Maple_driver.html). A virtual MIDI cable allows you to group and route MIDI tracks, and it works across all the MIDI applications open on your computer. As before, you'll need to create separate MIDI channels, but this time, instead of routing the output direct to your drum module's MIDI channel, assign it to one of the virtual MIDI channels. Then, on each drum module's MIDI channel, select the corresponding virtual cable from the drop-down as the channel's MIDI input source. This technique proves particularly useful if you want to create layered sounds, using multiple modules.
Getting Creative
One pleasant discovery I made while researching this article was that you don't have to limit yourself to using drum triggers with recorded drums or drum samples. I can't play drums and, though I'd like to, I don't have the resolve to spend years learning to play them as well as I'd insist they should be played on my tracks. I don't get on very well with the MPC-style drum pads either but, like many people, I often find myself absent-mindedly 'beatboxing,' or tapping out rhythms on the desk, steering wheel, or whatever comes to hand.
 A virtual MIDI cable — in this case Marblesounds' Maple — can be useful to route the MIDI data from multiple drum triggers to multiple drum modules.If you often find yourself doing the same, it might be worth experimenting with drum-trigger plug-ins as a means of inputting your drum parts. All you need do is set up a microphone and record yourself tapping or beatboxing away. Provided you make sufficiently percussive sounds (so there is plenty of attack — otherwise the timing will be a bit late) you can use this signal to trigger your drum sounds. As when working with recorded drum loops, if you make sure that you create sounds at sufficiently different frequencies that can be isolated by filters, you can trigger more than one part at once. For example, I found that tapping with my thumb gave a lower sound than tapping with the fingernail of my index finger. An alternative would be to set up a junk kit using, for example, stationery or kitchen utensils in place of a drum kit. As we've seen, by setting the filters on KT Drum Trigger it is pretty easy to trigger three separate parts from a single audio source. Thereafter, though, isolating the sounds so that the filters can separate them becomes more tricky. If you can do better, let me know how you get on!
Using this approach, it is easy to trigger new parts to add percussion to existing drum tracks, playing along in time to the track. To do this in real time, though, you will of course need a sufficiently low latency audio interface: latencies that seem acceptable when you're singing or playing guitar soon become irritating when working with shorter, percussive sounds.
If you haven't tried this before, you really should. It is a bit of a surreal experience beatboxing into an SM58, or hitting an invisible kit, and hearing 'real' drums playing back, but when you get used to it, it provides a genuinely useful way of getting down your rhythmic ideas.
Realism
If you are remixing, for some styles it may be fine to trigger the same hit every time a beat is detected. However, it is often desirable to have a little variation, so things sound a little more human. As I mentioned earlier, one way to do this is to ensure that you trigger hits at different velocities. This works better if you have a multi-layered sampler or drum module patch, so you get slightly different hits at different velocities.
 If you have a drum module such as BFD, that has a dynamic control, you can use automation to breathe life into your triggerd drums. This is particularly useful for hi-hats.If you have one of the more advanced modules, such as BFD, which I was using for my testing while I was writing this article, then you can also vary the dynamic of the played drum parts. Though you can only extract the basic groove from the original drums, you can vary what gets played by automating the module's 'dynamic' control, either for the whole kit or for individual kit pieces. I found that this worked particularly well with BFD when I was triggering hi-hat parts. The sound can otherwise tend to get a bit repetitive, as your drum trigger isn't really capable of detecting whether the hi-hat is open, closed, or somewhere in between. Automating the dynamic control of the hi-hat or of the whole kit will vary how the part is played back and make the resulting part feel more natural.
This prompted another thought, although I didn't have time to try experiment (if anyone does, please let me know what happens): it should be possible, using audio-to-MIDI controller plug-ins (such as Venusian Snails' Gatefish) to use the level of the incoming audio as an automation source for the dynamic control (or anything else, such as send level, for example), so that parts get slightly busier as the source track gets louder.
Some of the uses I've described above go rather further than drum 'replacement', but it is perfectly possible to use these tools more subtly. The better results I achieved were where I took 'good' samples of the kick from the original kick-drum track, loaded these into a sampler and used a drum trigger plug-in to play them back. As the 'replacement' sounds are from the original recording, this can give very credible results when played alongside the other drum parts.
Anyway, there we have it: drum replacement in Cubase on a budget. Happy triggering!
Published May 2007