Saturday, April 29, 2017
Friday, April 28, 2017
Q. What equipment is suitable for my 'sound installation'?
I'm
planning to write a piece of music for a sound installation using Logic
Pro. There would be 10 tracks, which I'm hoping to route from an audio
interface such as a MOTU 828 to 10 different active speakers, so that
there would be one speaker for each track of the piece. I'm quite new to
music technology, so I'd appreciate it if you could explain some things
to me. Firstly, would this setup actually work? Secondly, is a MOTU 828
a good device to use or would something else be better? Also, what
leads do I need, what active speakers would you recommend for use
outdoors, and how should I protect the speakers and other equipment from
getting wet, without compromising the sound?
I have around £1500 to spend on speakers, audio interface and leads, and I would really appreciate your help.
Anya Ustaszewski

This system diagram shows the plan of an eight-channel sound installation in a fairly large church. Each of the four CD players was sending a split-mono signal to dedicated amplifiers, which were connected via two-core mains cable to speakers around the building. The result was, well, spacious!
News Editor Chris Mayes-Wright replies: In response to your first question, the answer is yes, it will work; in fact, I've done a number of similar projects myself. The MOTU 828 that you mention would indeed be a suitable device, but it only has eight analogue outputs. Analogue outputs are the kind that you can connect directly to the line inputs on the back of an active speaker. So, basically, if you used the MOTU 828 on its own (without additional equipment), you would only be able to feed eight different signals to eight different speakers. If doing this, you should use quarter-inch balanced jacks to connect between the back of the MOTU 828 and the inputs to your active speakers.
If you really need 10 channels, you can use the MOTU 828's stereo S/PDIF output: this is a digital audio connection that needs converting to analogue before it can be plugged into the back of a speaker. You can buy digital-to-analogue (D-A) converters from most music technology equipment retailers, such as the ones that advertise in these pages, but they can be quite expensive. With your budget, I'd suggest aiming at the lower end of the market. Behringer manufacture a product called the Ultramatch Pro SRC2496, which has D-A functionality, as well as some other features. It costs £109 including VAT, so it shouldn't take up too much of your budget, but if you can make do with just eight speakers, I would suggest using the MOTU interface on its own.
You mentioned that you'd like to use active speakers. When I've done installations in the past, I've found that using passive speakers with separate power amplifiers was far easier (and safer). I'm a big fan of the JBL Control 1 speakers (they cost under £100 for a pair and are really rugged), which seem to work well with Samson Servo 170 amplifiers, although these seem to have been superseded by the Servo 200 model, which costs around £100.
The reason I suggest passive speakers coupled with amps is that if you are using active speakers and they're spread out over a wide space, you will need to distribute power to each of them, which is not a good idea over distance, especially outdoors. I would only suggest active speakers if you can guarantee that there will be a power socket next to each one.
If you use passive speakers powered with amplifiers, you can keep all the amplifiers (and therefore power) in one place, then run long lengths of speaker cable to each one. Mains electricity cable works well to carry the signal between the amplifier and speaker, as its per-metre cost is cheaper than 'proper' speaker cable, and it's tough enough to withstand a bit of trampling in grass or on concrete.
Remember that you only need one stereo amplifier for every two speakers, because a stereo amplifier has two separate inputs and outputs. As long as you feed a dual mono signal into the amp, you will get the necessary separation at the speakers.
You also mention that you are planning on running all of this from a laptop. If so, bear in mind the security aspect; it's probably not wise to leave a laptop unattended at a public event. Also, the fact that the audio would be running from a hard drive (which is not the most stable of media) may be a concern.
If these things worry you, and you're not too bothered about the sync of the material being ultra-tight, I would suggest using a bank of CD players; these can be located near the amplifiers to help keep the power supply in one place. I have used CD players for exactly this purpose in the past, and it is by far the easiest and most reliable way to play out sound for a long period of time.
Again, as with the amplifiers, you only need one stereo CD player for each two channels of your sound installation. But you'll need to bounce five stereo mixes (or four, if you're only using eight speakers) from Logic, then burn them onto CD. Previously, I've used the Tascam CD160, but any CD player with line outputs (usually red and white phono sockets) would be fine. The cabling for connecting the CD players to the amplifiers can be done using phono-to-jack connectors.
I found the Tascam player to be particularly good at this job: it can be rackmounted, it's pretty robust, and if you have a stack of them the infra-red remote control can be used to start them off simultaneously, to achieve a reasonably good sync between them! Of course, you could get a few of your friends to press the play buttons at the same time, but this approach is a little rudimentary.
As for your concerns about the weather, the most important thing is to run everything through a safety breaker circuit, so if you get a problem the power instantly cuts and everything is made safe.
To prevent the rain getting to your speakers, you can cover them with plastic refuse sacks. Also, make sure all electrical contacts are insulated with electrical tape, and if you are using a stack of power amps, ensure that these are well covered, while keeping vents, which require a constant airflow around them, clear. Make sure you lift the equipment off the ground, too (perhaps on a table or wooden pallet), and erect some kind of cover, such as a garden gazebo or large patio umbrella, over it all. Good luck!
Published December 2007
Thursday, April 27, 2017
Wednesday, April 26, 2017
Tuesday, April 25, 2017
Q: How do you connect a mixer to a PC?
Referring to your article in Q&A from SOS
January 2007, regarding a basic home recording setup, can you connect
the Yamaha MG102C, which you suggest, to a PC directly? If so, how?
, so you'll need to have the correct cable to interface with the PC input.")
The output section of a mixer may have a number of different connectors (this Yamaha MG102 only uses jack sockets), so you'll need to have the correct cable to interface with the PC input. Via email
News Editor Chris Mayes–Wright replies: To get the audio from a mixer (or any source) directly into a computer, you'll need some kind of audio interface — also known as a soundcard. It's likely that your computer has an 'on–board' soundcard, and yours may have line and/or microphone inputs on mini-jack connections. If this is the case, you can simply plug the outputs of the mixer (in this case either the Stereo Out, Monitor, Rec Out or Aux Send) into the input of your on–board soundcard. You'll obviously need a cable with the relevant terminations. If connecting from the quarter–inch jacks of the MG102C to a mini–jack line input of your PC soundcard, you'll need two mono quarter–inch jacks on one end of the cable and a stereo mini–jack on the other. From here, almost any audio recording package should be able to 'see' the incoming audio.
An alternative would be to purchase an external audio interface, and you can get these from around £50. Not knowing your specific requirements, I can't really recommend one that will best suit your needs, so I suggest visiting our on–line Forum, www.soundonsound.com/forum, where you can post questions.
Published April 2008
Monday, April 24, 2017
Saturday, April 22, 2017
Q: Should I mix on high-end headphones or low-end monitors?
I don't really want to get into a discussion about
whether or not you should mix on headphones, but I'm wondering whether
I'd be better off with a pair of Sennheiser HD600 (or similar)
headphones instead of some low–end monitors? At the moment my 'studio'
is just the corner of my bedroom and there's a huge peak around 150Hz,
so it's not ideal for mixing. My current monitors are Blueroom Minipods,
which are not the best thing for monitoring. So most of the time I mix
on Sennheiser HD497s and check later on the monitors.

Sennheiser HD600s are well respected, and are often used for critical listening. They'll yield better results on a mix than a pair of poorly placed or indifferent–sounding speakers, particularly if your listening environment is compromised. There are certain considerations to bear in mind when mixing on headphones, however.
The problem is that my mixes are not really as good as I would like them to be, so I'm just wondering what the next step should be. (I don't think the missus wants bass traps on top of her bed, by the way...) So, basically, the question is: what monitors should I be looking for in order to have something better than mixing on, say, a pair of HD600s and checking on the Minipods?
SOS Forum Post
SOS contributor Mike Senior replies: I'd rather mix on a good pair of headphones than a similar–priced pair of (especially ported) speakers any day of the week, especially in a dodgy–sounding room. The Sennheiser HD600s are a very well–respected choice in this regard, and should seriously outclass your HD497s, in my opinion. However, the way that headphones place phantom central images 'inside' your head, and the lack of crosstalk between left and right channels (as in loudspeaker listening), can make it a bit tricky to judge panning and balance between the instruments. Gauging the low–end response will also be tough, as headphones simply can't generate the same physical sensation as the low frequencies emerging from loudspeakers.
A little temporary acoustic treatment should allow you to use your existing monitors to judge panning and stereo imaging, so working around that aspect of headphone mixing shouldn't be too much of a concern. However, in your position I'd probably invest in an additional mono 'grotbox' (such as the Avantone Mixcube or Pyramid Triple P, perhaps), which should give a more reliable impression of the balance of the instruments than either the headphones or Minipods are likely to provide — it won't sound nice, but that's not the point of it — and will also confirm mono compatibility.

A single 'grotbox', such as this Avantone Mixcube, will give a better idea of musical balance than headphones or unsuitable monitors. 'Grotboxes' are useful in all studios, large and small.
The bass problems are more difficult to work around, however. The HD600s are very good in this respect (especially if you make sure to reference your mix against commercial tracks), and could be supplemented with a software spectrum analyser (such as Roger Nichols' Inspector), but I'd still advise checking the low–end response somewhere else if possible. Even spending lots of money on new monitors won't help you here, if your room sounds rubbish at the low end. If you can't check mixes elsewhere, sources with mainly high–frequency and mid-range content, such as guitars, vocals and drum overheads, can be high–pass filtered. Try, also, to keep a tight grip on the dynamics of remaining low frequencies. For more headphone mixing tips, see the 'Mixing On Headphones' feature in SOS January 2007, which includes links to plug–ins that simulate loudspeaker listening on headphones.
Published April 2008
Friday, April 21, 2017
Thursday, April 20, 2017
Multi-core Processors For Musicians
Some
music applications will completely fail to take advantage of the
multiple cores of a modern CPU - but which ones, and why? We find out,
and advise on how you can make best use of however many cores your PC
has.

Over the last couple of years, the PC musician has been offered first dual-core processors, then quad-core models, and octo-core machines (currently featuring two quad-core processors) are now available for those with deep enough pockets. Competitive pricing has already ensured a healthy take-up of DAWs based around a quad-core CPU, yet many users haven't cottoned onto the fact that not all software benefits from all these cores. Some existing software may only be able to use two of them, reducing potential performance by a huge 50 percent, while older software may only be able to utilise a single core, reducing potential performance to just 25 percent of the total available. This month PC Musician investigates which audio software works with dual-core, quad-core PCs and beyond, what benefits you're likely to get in practice over a single-core machine, and which software may for ever languish in the doldrums.
A Brief History
In the days when most musicians ran Windows 95, 98 or ME, the question of running multiple processors didn't arise, because none of these operating systems supported more than a single CPU. It was Windows NT and then Windows 2000 that introduced us to the benefits of being able to share the processing load between multiple CPUs: Windows 2000 Professional supported one or two processor chips, while the more expensive Server version supported up to four, and the Advanced Server up to eight. However, at this early stage each processor was a physically separate device, so to be able to (for instance) use twin processors, you needed a specially designed motherboard with two CPU sockets. Many audio developers and interface manufacturers didn't actively support Windows 2000, so most musicians stuck with Windows 98.In 2001, Microsoft released Windows XP in Home and Professional versions, and once again most consumers who opted for the Home version were limited to a single physical processor, although the Professional version supported two. By this stage many musicians were straining at the leash, wanting to run more and more plug-ins and software instruments, and this Professional version let them do exactly that, using dual-processor motherboards and twin Xeon or Pentium 4 processors.
 and stand-alone soft synths or samplers, and even in most multitrack sequencers when you're only running a single track, only one core of a multi-core CPU will be heavily used, although any others available may help with disk access, the user interface and other applications that are running simultaneously.")
When you're running stereo audio editors (such as Wavelab 6, shown here) and stand-alone soft synths or samplers, and even in most multitrack sequencers when you're only running a single track, only one core of a multi-core CPU will be heavily used, although any others available may help with disk access, the user interface and other applications that are running simultaneously.Multi-processing options really opened up the following year, when Intel introduced first Xeon and then Pentium 4C processor ranges with Hyperthreading technology, which let these CPUs appear to both Windows XP Home and Professional (or Linux 2.4x) as two 'virtual' processors instead of one physical one. They each shared the various internal 'sub-units', including the all-important FPU (Floating Point Unit), but could run two separate processing 'threads' simultaneously.
Intel claimed up to a 30 percent improvement with specially written applications over a standard processor, but as many musicians soon found, having a Hyperthreaded processor didn't necessarily benefit them at all unless they were running several applications simultaneously, since applications like MIDI + Audio sequencers had to be rewritten to take advantage of Hyperthreading. Steinberg's Nuendo 2 was one of the few music apps to support it, but although various others followed, a few (such as Tascam's Gigastudio) needed a major rewrite before they would even run with HT enabled. Nevertheless, my own tests (published in PC Notes June 2004) showed that with optimised audio applications such as Cubase SX2 you could expect a significant drop in CPU overheads where it really mattered, at low latencies of 3ms or under.
The biggest change came in late 2004, when both AMD and Intel seemed to agree that processor clock speeds had reached a ceiling. Intel abandoned plans to release a 4GHz model in their Prescott CPU range, and in 2005 both companies largely switched to releasing dual-core models. Unlike the twin virtual processors of Intel's Hyperthreading range, these featured two separate processing chips mounted inside one physical package. By placing two processor cores into a single piece of silicon, manufacturers could provide significantly faster performance than a single processor, even when under-clocking them and running them at lower voltages, so that they didn't run hotter than the single-core variety.
By late 2006 we had been introduced to quad-core processors, which have now dropped in price and can even be run with Windows XP Home (which is licensed to run a single physical processor, however many cores it has inside). However, if running XP Professional (and the x64 64-bit version), Vista Home Premium, Business, Enterprise or Vista Ultimate you also gain the option of installing two quad-core processors on a suitable motherboard, to provide a total of eight processing cores. Unfortunately, as with so many new hardware advancements, much software has had a long way to catch up before it could take advantage of so many cores.
Checking Your Tasks
Determining how much extra performance you'll get from a particular software application with four or more cores will require some benchmark testing, but fortunately it's far easier to determine whether or not a particular application is utilising all the available cores. Windows Task Manager (launch it using the Ctrl-Alt-Delete keyboards shortcut, aka the 'three-fingered salute') has a Performance page that offers a CPU Usage History, and as long as you select the 'One Graph Per CPU' option in the View menu you'll get as many individual graphic windows displaying CPU activity as you have cores.
This is what you're hoping to see in Task Manager's CPU usage history when running a multitrack sequencer: the four cores in this PC are all being equally stressed to their maximum capability.
Multiple-threaded Applications
When you're using a PC with multiple processors of whatever type, to gain any significant performance benefit the software you run has to be specially written or adapted with multiple processors in mind. The way multi-processing works is that applications are divided into 'threads' (semi-independent processes that can be run in parallel). Even with a single processor there are huge advantages in this programming approach. Many applications use multiple threads to enable multi-tasking, so that one task can carry on while another is started; and when multiple processors are available, different threads can be allocated to each CPU. simply indicates that one or more cores is approaching its limit. However, since Cubase 4 is optimised for multi-processing, if you create another track and connect its output to another instance of the same soft synth, you'll still be able to run a further 28 voices on the other core.")
Here's some classic multi-processing confusion, illustrated by Cubase 4 running 28 voices of a heavy-duty physically modelled soft synth that together consume almost 100 percent of a single core of this dual-core PC. The high Cubase 'VST Performance' meter reading (bottom left) simply indicates that one or more cores is approaching its limit. However, since Cubase 4 is optimised for multi-processing, if you create another track and connect its output to another instance of the same soft synth, you'll still be able to run a further 28 voices on the other core.
With some processor-intensive programs, such as 3D graphics and CAD software, it's comparatively easy to split off different functions to each processor. However, the situation becomes somewhat more complicated with an application such as a MIDI + Audio sequencer, since all the different tracks are generally being streamed in real time and must remain in sync.
Early schemes used by audio software for sharing tasks between multiple processors were fairly crude; they tended to devote each CPU to a specific duty, so that (for instance) audio mixing and effects were handled in one thread, MIDI processing in another, and user interface responses in yet another. When a MIDI + Audio sequencer is run with several identical processors under such a scheme, the entire audio-processing workload is normally handled by one processor, with any remaining tasks left to the others. Since audio processing is by far the most significant overhead for any music application, this approach resulted in a typical overall performance improvement of just 20 to 30 percent for a dual-core processor over a single-core processor running at the same clock speed.
To gain further improvement, you need to split the audio processing in some way between the various CPUs, so that it can be processed in parallel. This means added code and complexity, and rather explains why some audio software really benefits from four or more cores, while some doesn't. Steinberg introduced their 'Advanced Multiple Processing Support' on Cubase VST version 5, splitting the audio processing between the processors and giving much larger performance boosts of 50 to 60 percent. Many other audio developers (although not all) followed with similar improvements, and although there are no guarantees, most applications optimised in this way should also subsequently benefit from quad-core and octo-core PCs.
Mainstream Applications
Despite the possibilities, even today many mainstream office applications and games have not really been optimised for multiple processors, and some developers have been resistant to rewriting their applications to support more than two cores, since debugging an application that can run several threads in parallel is far harder than one in which everything happens in a single queue of tasks. Of those applications that have been optimised for multiple processors, most can still only take advantage of two processors, so you'll only get the best performance from them on a dual-core or twin single-core computer. If, for instance, you run a game that can only take advantage of two cores on a quad-core machine, it will only be able to access up to 50 percent of the available processing power.With quad-core processors and beyond, applications that may benefit include 3D graphics modelling, ray-tracing, and rendering, plus video-encoding tasks, image processing and some scientific tasks. You're always likely to achieve good performance when running several different applications simultaneously, since each will get a good share of the pie, but with MIDI + Audio applications you want a single application to have all its tasks shared out as fairly as possible between the available cores.
Hang On, I'm Busy
While it's possible to specifically assign each Windows programming task to a separate processor, you can also let Windows handle its CPU resources dynamically across a single processor by giving each task a specific priority. The lowest priority is nearly always given to the user interface, which is why screen updates can get sluggish on a single-core machine when you run lots of real-time software plug-ins.Conversely, any PC with multiple cores is always likely to remain more responsive even when most of the cores are stressed, because the user interface is still happily ticking away on another one. Even if you're running elderly applications that are not multi-threaded, you can still benefit from a dual-, quad- or octo-core machine if you're running several such applications simultaneously, as Windows will allocate each one to a different core.
Audio Applications
Developers told me that although most instruments and plug-ins run as several threads, they have no control over how these are distributed among the available cores. This is totally managed by the host application, and according to all the tests I carried out while researching this feature, most audio applications treat each mono/stereo audio track (or soft-synth/sampler track), plus associated plug-in effects, as a single task, and allocate it to a single processor core. You can easily confirm this for your own applications using Task Manager (see the 'Checking Your Tasks' box) and systematically adding a series of demanding plug-ins to the same audio track. I suggest a convolution reverb with the longest Impulse Response you can find.
The older Thonex benchmark masks the true performance of systems with four cores and beyond, here displaying a very modest performance increase of no more than 30 percent between identically-clocked dual-core and quad-core systems.
 it nevertheless shows that the small extra cost of a quad-core CPU over a dual-core model can give you almost double the performance — as long as the load is shared well between the cores.")
These DAWbench Blofelds DSP40 results illustrate a much healthier scaling from two cores to four, and although the number of Magneto plug-ins isn't the whole story (there are a smaller number of Dynamic and EQ plug-ins also being run) it nevertheless shows that the small extra cost of a quad-core CPU over a dual-core model can give you almost double the performance — as long as the load is shared well between the cores.
If you're running multiple cores (whether in the same chip or spread across multiple processors in discrete packages) the above has certain implications. Let's say you have a physically-modelled synth that consumes a lot of CPU resources. Since our synth track is a single task, on a quad-core processor it can only consume a maximum of 25 percent of the overall processing power available — ie. the maximum available from a single core. So, even though your sequencer's 'CPU meter' may indicate 100 percent loading in this situation, and it's possible for your audio application to glitch and stop playback because one of the four cores has run out of steam, you still have 75 percent of your CPU resources available to run other synths and plug-ins, which should automatically get allocated to the remaining cores. Confusing, isn't it? So if you find yourself 'maxing out' a single core by, for instance, running lots of instruments on different tracks, all linked to a single multitimbral software sampler, launch another instance of it and run some of your instruments from that one instead.
When measuring multi-core performance of audio applications, it's therefore important to choose a suitable benchmark test that will allow the applications the best chance of spreading the processor load as evenly as possible. I carefully tested single-, dual- and quad-core PCs, all having identical clock speeds, with Cubase SX running the Thonex and Blofelds DSP40 tests. As you can see from the graphs, while the older Thonex test only displays a 20 to 30 percent improvement between the dual-core and quad-core results, Blofelds showed much better scaling. A quorum of DAW builders seem to have agreed that Vin Curiglianio's DAWbench suite is currently the best test available to measure differences in multi-core system performance, since it starts with a real-world song and then ignores the application's CPU meter in favour of adding more and more plug-ins and/or soft synths across 40 tracks until you hear audio glitching, which largely mirrors what many musicians do in the real world.
The original DAWbench Blofelds DSP40 test is for those Cubase/Nuendo users who mainly record audio tracks and use lots of plug-ins (there's now also a new SONARbench DSP test that uses the same techniques), while the L-Factor II test is for Cubase/Nuendo owners who instead run lots of software synths. Such 'on the edge' tests are also useful in comparing audio driver performance, as well as spotting operating system issues such as jerky graphic scrolling under stress, and the extra overheads imposed by the Windows XP and Vista Aero graphics over the Windows 'classic' look.
What tasks you're going to perform with your audio application may also affect the ideal number of cores, and thus which is the 'best' PC for the job. For drummers and vocalists monitoring their own live performances on headphones, the Holy Grail is to run a system that runs with barely discernible latency. Many would be happy using a buffer size of 64 samples, which would mean a total real-world latency for audio monitoring with plug-ins of just under 5ms (at a sample rate of 44.1kHz), or around 3.5ms for playing soft synths. If you still find this unacceptably high and prefer not to rely on 'zero latency' monitoring solutions (which bypass any plug-in effects), 32-sample buffers would offer total audio monitoring latency of around 3.5ms (around 2.7ms for soft synths), again at a 44.1kHz sample rate.
Blofelds DSP40 tests by a range of DAW builders who have access to lots of PCs based around different processors have shown that at really low buffer sizes, such as 32 samples, a single quad-core processor will always outperform a single dual-core processor or (more interestingly) a system featuring two dual-core processors, and sometimes even a dual quad-core system. In some tests at these really low latencies, when stressed with lots of plug-ins and instruments, the single quad-core machine was the only one to complete them successfully, making it the current king for low-latency performance.
If you're happy to run use a higher buffer size, of 128 samples or above (audio monitoring latency of around 8ms), you'll probably be able to run significantly more plug-ins and soft synths using two quad-core processors than one. Those involved in lots of recording work who want 'real time' monitoring may thus prefer a single quad-core, while others who rely mainly on samples and soft synths may get even more mileage from a twin quad-core system.
Which Audio Apps Benefit?
This is the biggie: it's all very well having a hugely powerful quad-core or octo-core PC, but not a lot of use if your software only uses two or four cores from those available, or makes a poor job of sharing resources between them. The secret is for the application to balance requirements across the available cores, so that you don't get any audio glitches as a result of one or more cores running out of juice while there's some still available from the others.For the reasons mentioned above, stereo audio editors may not take full advantage of a multi-core PC — something I soon confirmed with Steinberg's Wavelab 6, which only used one core for DSP processing during playback or audio rendering. Its author Philippe Goutier says that a second core will be used for disk access and the user interface, which does at least mean that the application will always remain responsive to new commands, but he hopes to improve core-sharing now that so many musicians have multi-core PCs.
The vast majority of stand-alone soft synths also seem to mostly use a single core, but as soon as you load the VSTi or DXi version into a host VSTi or DXi application, this host should distribute the various plug-ins and soft synths across the available cores to make best use of resources. Fortunately, most multitrack audio applications can distribute the combined load from all your tracks between as many cores as they find, although it's perhaps inevitable that since many of the latest versions were released long before quad-core and octo-core PCs were in regular use, some don't manage it quite as efficiently as others. Even now some developers don't have octo-core test systems.
Special Settings
Before coming to any conclusions about the multi-core performance of your particular sequencing package, make sure you have any appropriate parameters set correctly. For instance, in the case of Cubase/Nuendo you'll need to tick the 'Multi Processing' box in the Advanced Options area of the Device Setup dialogue, while for Sonar the tick-box labelled 'Use Multiprocessing engine' is the one to check. With these settings deactivated you'll only be using one of your cores, and performance will plummet. In Reaper, most multi-core users will need to tick the the 'FX render-ahead' option in the Audio Buffering dialogue to enable the full benefits of native plug-in multi-processing. Universal Audio UAD1 owners should leave this option un-ticked, however, because of current UA driver issues.
 tend to have specific tick-boxes to allow you to enable multi-processing support, so make sure these are activated if you want to achieve the best performance.")
Audio applications (such as Cubase 4 and Reaper, shown here) tend to have specific tick-boxes to allow you to enable multi-processing support, so make sure these are activated if you want to achieve the best performance.
The DAWs
Reaper's Justin Frankel told me that he routinely does a lot of his development on a dual quad-core Xeon PC, so it's hardly surprising that the default Reaper settings work well with up to eight-core machines, typically offering over 95 percent utilisation of all eight cores. Reaper mostly uses 'Anticipatory FX processing' that runs at irregular intervals, often out of order, and slightly ahead of time. Apparently, there are very few times when the cores need to synchronise with each other, and using this scheme he can let them all crank away using nearly all of the available CPU power. Exceptions include record input monitoring, and apparently when running UAD1 DSP cards, which both prefer a more classic 'Synchronous FX multi-processing' scheme.Steinberg's Cubase SX, Cubase 4 and Nuendo all work decently on quad-core systems, scaling up well from single to dual-core and quad-core PCs. However, Cubase 4 and Nuendo 4 don't currently provide all the benefits they could at low latency with a dual quad-core system. Compared with the potential doubling of plug-in numbers from dual to quad, when you move to 'octo' you may only be able to run about 40 percent more plug-ins down to buffer sizes of 128 samples, while below this you may even get worse performance than a quad-core system.
Steinberg developers have already acknowledged the problem, which is apparently due to "a serialisation of the ASIO driver, which eats up to 40 percent of the processing time. Together with the other synchronisation delays, only 25 to 30 percent of the 1.5-millisecond time-slice can be used for processing. This is not very efficient." Steinberg have promised to address the issue in a Nuendo 4 maintenance update, and have hinted that it may also result in changes to the ASIO specification.
Cakewalk's Sonar does seem to scale well, sometimes giving a better percentage improvement when moving from a quad-core to an octo-core PC than the current version of Nuendo/Cubase 4, but the jury still seems to be out on whether choosing ASIO or WDM/KS drivers gives better results; with some systems ASIO is a clear winner, while in others WDM/KS drivers move significantly ahead.
Digidesign have a reputation for being slow but thorough when testing out new hardware to add to their 'approved list', and as I write this in early November 2007 their web site states that Intel Core 2 Quad processors and Intel Xeon quad-core have not been tested by Digidesign on Windows for any Pro Tools system.
Nevertheless, Pro Tools HD/TDM users started posting recommendations for rock-solid systems featuring twin dual-core Opteron processors (four CPU cores in all) in mid-2006, and there are now loads of Pro Tools LE users successfully running both quad-core and even a few octo-core PCs in advance of any official pronouncements (there's lots of specific recommendations on both quad-core and octo-core PC components in a vast 126-page thread on the Digi User Conference at http://duc.digidesign.com/showflat.php?Cat=&Number=988224). Despite the lack of official 'qualification', all Pro Tools systems seem to scale well on quad-cores, happily running all four cores up to 100 percent utilisation, and many users are very pleased with their quad-core 'native' CPU performance.
Like various other audio applications, even the latest Mac version of Logic Audio doesn't yet fully benefit from having eight processor cores at its disposal, but for die-hard PC users of Logic the situation is rather more serious: Apple discontinued development and support for those using Logic on the PC back in 2002, so most recent version (5.5.1) is now some five years old. Although it's a multi-threaded application, Logic 5.5.1 for Windows is not really optimised for multiple processors, so only one of the cores is likely to get much of a workout. However, there's a partial workaround, using the I/O Helper plug-in available from Logic version 5.2 onwards, which can force any plug-ins on a track with it inserted to run on a second core, so that you can use lots more plug-ins/instruments overall (there's a more detailed description on Universal Audio's web site at www.uaudio.com/webzine/2003/may/index5.html). Logic Audio 5.5.1 also has a problem if more than 1GB of system RAM is installed (see http://community.sonikmatter.com/forums/lofiversion/index.php/t8032.html for some suggestions on this one), and also has problems running some VST plug-ins. It's unlikely to benefit from a quad-core processor at all, and I wouldn't recommend running it on a new quad-core PC, so its shelf-life is looking increasingly limited.
Overall, getting the best out of a multi-core PC generally means a little detective work from the user. You need to make sure you have the most appropriate audio application settings (which might be different if you run DSP cards), and you also need to be cautious when running heavy-duty synths or plug-ins that might consume one of your cores in a single gulp. Keeping an occasional eye on the Windows Task Manager may also help, since the CPU meters provided by most sequencers are becoming rather less useful now that they are monitoring so many individual cores.
Published January 2008
Wednesday, April 19, 2017
Q. How should I compress a classical recording?
I recorded a performance of Handel's Messiah
recently, and I was wondering what the common practice is when
compressing the whole mix in classical recordings. During the session, I
put a compressor over the master outputs, just to catch any stray
peaks, and when fiddling around with the settings I found that a low
threshold and a low ratio helped to blend the mix as a whole and
fattened it up. Is this acceptable?
SOS Forum Post

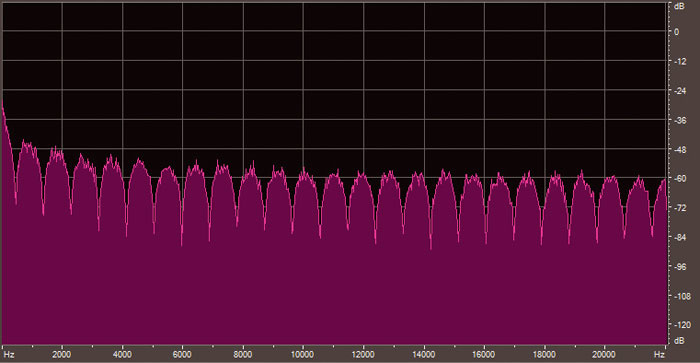
, for instance, the audio level is generally very low, except for the explosive section about three-quarters of the way through. Sometimes the best way to reduce this dynamic range is to manually ride the fader on mixdown, or draw in volume automation to drop the level of the loudest parts by a few decibels. Once you've done this, you can make up lost gain by turning the signal up at the output stage.") Recordings
of classical music typically have an incredibly wide dynamic range. In
this example waveform (above), for instance, the audio level is
generally very low, except for the explosive section about
three-quarters of the way through. Sometimes the best way to reduce this
dynamic range is to manually ride the fader on mixdown, or draw in
volume automation to drop the level of the loudest parts by a few
decibels. Once you've done this, you can make up lost gain by turning
the signal up at the output stage.
Recordings
of classical music typically have an incredibly wide dynamic range. In
this example waveform (above), for instance, the audio level is
generally very low, except for the explosive section about
three-quarters of the way through. Sometimes the best way to reduce this
dynamic range is to manually ride the fader on mixdown, or draw in
volume automation to drop the level of the loudest parts by a few
decibels. Once you've done this, you can make up lost gain by turning
the signal up at the output stage. SOS contributor Mike Senior replies: The question is what you're trying to achieve. With a piece like this, which has a wide dynamic range (between the quieter Recitatives and the full-scale Hallelujah chorus), I'd certainly recommend reducing the dynamic range a little to make the CD more suitable for home listening. The most transparent way of doing this would be to use simple fader automation, riding up the quieter sections to make them more audible. I wouldn't go for much more than about a 6dB increase to the quietest sections if you're unsure how far to go. The advantage with this approach is that a human engineer can intelligently anticipate changes in the signal in a way that no compressor can.
Another thing you can also deal with using fader automation (or even audio editing) is ducking any brief signal peaks which are unduly loud, which allows you to achieve a louder final CD. Some might suggest limiting or even soft-clipping to achieve a similar effect, but neither will sound as transparent, so I'd stick with fader automation myself.
If you're wanting a little more detail and ambience to the sound, by all means try the low-ratio, low-threshold compression you mentioned, as this will usually work fine on most types of music. Don't stray over a ratio of around 1.1:1 for classical recordings, though, if you want to play things safe, and if you're getting gain-reduction of more than about 4-5dB, you've probably got the threshold set too low. I'd personally set the attack time fairly fast to track the signal levels pretty closely, and then go for faster release times for more detail/ambience and longer release times for less detail/ambience, but this will inevitably be a matter of taste. Any isolated accented chords will be particularly revealing of potentially unpleasant compression artefacts, so listen out for how those sound.
You might be tempted to use multi-band compression with similar settings, as many people do when working with more modern music styles, but I'd steer clear of this, to be honest. The fluctuating tonal changes that arise from this kind of processing are likely to upset the delicate balance of the performance.
A more transparent approach to compression is to use a compressor as a send effect, mixing the compressed signal in with the unprocessed one — this is often referred to as parallel compression. For this to work, you need to make sure that the compression processing doesn't also introduce any delay, otherwise you'll get a nasty kind of static phasing sound. That said, most software DAWs now have comprehensive plug-in delay compensation, so this is becoming less of a problem for people these days.
When working like this, you can usually get away with slightly heavier compression, but I'd stay below a ratio of 1.3:1 to be on the safe side. What some engineers do is automate the compressed channel's fader, rather than the main channel's, adding in more of the compressed signal during quieter sections. This can work really well, as it's often when the music is quietest that it benefits most from added detail.
Published January 2008
Tuesday, April 18, 2017
Monday, April 17, 2017
Q. Why so many digital audio formats, and what are they for?
There are so many ways of connecting equipment
these days, such as S/PDIF, ADAT, AES-EBU and MADI, not forgetting good
old analogue. What are all the digital connections for?
SOS Forum post
Technical Editor Hugh Robjohns replies: Back in the '80s and '90s, there were dozens of manufacturer-specific digital interfaces, such as Yamaha Y1 and Y2, Melco, TDIF, ADAT, SDIF2, R-Bus and many more, and none of them could be connected together. It was a complete nightmare!
In order to make 'going digital' a practical option, the Audio Engineering Society (AES) and the European Broadcast Union (EBU) put their collective heads together and came up with two generic, open-source digital interfaces: one for stereo and one for multi-channel audio, the latter of which was originally intended to link multitrack recorders to large consoles. These were called AES-EBU (now more commonly referred to by the AES standards document number, AES3), and MADI (Multi-channel Audio Digital Interface).

A comparison chart showing different types of digital audio protocols.
AES3 was a bodge in the engineering sense, but the use of apparently standard mic cables and connectors made it a familiar-looking interface that reduced the fear and cost of 'going digital'.
The original MADI specification essentially carried 56 channels, made up of 28 AES3 stereo pairs transmitted serially. A later revision called MADI-X catered for 64 channels and is in widespread use today in applications such as connecting stage boxes to digital desks, linking Outside Broadcast trucks, and connecting the infrastructure in digital studio complexes.
Today, AES3 is the preferred interface format for professional stereo applications, although there is a noticeable trend towards the AES3-id format which uses unbalanced BNC connectors and 75Ω video cables rather than balanced XLR connectors and 110Ω cables. AES3-id is a much better-engineered interface, and is far more space-efficient. AES3 digits run with a fundamental frequency of 1.5MHz, with strong harmonics all the way up to 10MHz and more. Video cable and connectors are far better suited to handling those kinds of frequencies than manky old mic cables, and AES3-id works more reliably over greater distances, with less jitter as a result.
Having designed a very versatile and effective digital interface, and all the hardware chips to drive and receive it, Sony and Philips took the opportunity to use the same thing for domestic applications and called it S/PDIF, with coaxial (phono) and Toslink (optical) interfaces. The nitty gritty of the auxiliary information and metadata carried by AES3 and S/PDIF are slightly different, but the basic structure and audio formatting are identical, and you can normally interconnect AES3 and S/PDIF with little problem. S/PDIF is electrically almost identical to AES3-id.
In terms of the actual interface properties, AES3 runs balanced signals with a nominal 7V peak-to-peak swing, feeding a receiver with a minimum sensitivity of 200mV. Because the signal starts so big, it tends to go a long way (more than 100 metres) even on nasty mic cables. Put it into decent low-capacitance 110Ω cable and it will easily travel 300 metres. AES3-id is unbalanced and starts at 1V. The receiver sensitivity is the same 200mV, while S/PDIF is also unbalanced and starts at about 0.5V. The receiver sensitivity is also 200mV. The lower starting voltage is why S/PDIF doesn't travel very far.
There are several eight-channel AES3 interfaces, most using 25-pin D-Sub connectors. Sadly, there are lots of different incompatible pin-outs: Yamaha, Tascam, Genex and Euphonix, to name a few. But the Yamaha and Tascam formats are the most prevalent.
Yet another variant of AES3 is called AES42. This still uses XLRs and balanced cable, and the data is encoded in exactly the same way as AES3, but it is intended for carrying the output of digital microphones. The critical difference is that an AES42 input socket provides 10 Volts of phantom power, and that power is modulated in a specific way to allow remote control and digital clocking of the microphone. It is an agreed format that has been adopted by Neumann, Sennheiser, Schoeps and others, and will start becoming a common feature on digital consoles and professional recording interfaces.
In terms of other digital interfaces, Tascam's TDIF is virtually dead, but ADAT is alive and well and in widespread use. ADAT uses the same Toslink fibres and connectors as S/PDIF, but with a different data-stream structure to carry eight channels.
In addition to MADI for high numbers of channels, we also now have the new AES50 SuperMAC and HyperMAC audio networking interfaces (originally developed by Sony Oxford in the UK and now owned by Telex Communications under the Klark Teknik brand).
SuperMAC provides 48 channels bi-directionally over Cat 5 cable, while HyperMAC provides up to 384 channels bi-directionally over Cat 5 or Cat 6 or fibre. The signal format includes embedded clocks in the same way that AES3 does.
Published February 2008
Saturday, April 15, 2017
Friday, April 14, 2017
Q. How do I prevent comb-filtering when close-miking?
The crack team of Paul White and Hugh Robjohns have
travelled the world solving readers' problems. Here, they down the Hob
Nobs and answer some of your recording queries in our Q&A
mini-series, Sound Advice.
Hugh: What we're talking about here is sound arriving at different mics at different times due to the different physical distances between the sound source and the mics. Sound travels relatively slowly at around 340m/s (roughly one foot per millisecond or one metre in three milliseconds). So if you place one microphone a foot behind the other, the more distant mic will capture that sound roughly 1ms after the closer one.
Paul: In these situations, complex filtering occurs whereby some frequencies are enhanced and others attenuated, depending on the exact time difference between the two signals. A graph of such an affected waveform shows lots of sharp peaks and troughs that look not unlike the teeth of a comb (as shown below). Hence the term comb filtering is commonly applied to the phenomenon. The filter notches and peaks are strongest when the two signals are exactly the same level, and once you're familiar with the rather coloured sound that comb filtering creates, you'll always recognise it when you hear it again.

Hugh: So how can you prevent this from happening? Well, the simple answer is not to use multiple mics on the same source in the first place, and to minimise any spill from a loud sources that could reach several mics in the room. If that is not physically possible, or if you deliberately want to combine the outputs of two or more mics, then you need to be prepared to spend some time optimising the combined sound. As Paul mentioned, the comb filter effect is at its worst when the signal level from the two (or more) mics is the same. So it helps if you make one mic's contribution much less than the other's. That way you'll get some of the tonal flavour, without nasty 'phasiness'. Something more than 10dB of level difference is typically needed, although you may get away with less in some situations.
Paul: Minimising spill between microphones is also key to keeping unwanted phase effects at bay, so cardioid mics can sometimes be used in place of omnis where their directional characteristics may be exploited to reduce the amount of unwanted sound getting into the mic. Acoustic screening between microphones, where practical, will also help and, in some situations, such as with tom mics on drums, you can use gating to mute the mics' signals, so they don't contribute the mix when not being hit.
Hugh: You can also often improve the situation by time-slipping one of the microphone signals inside your DAW to re-establish time alignment. If you anticipate having to do this, it is helpful if you have a timing reference to work with on the recording. The simplest way is to record a sharp click at the start of the take — a bit like the classic sync clapper board used in old film shoots. Simply tap the instrument once with something to generate a simple, clear click, wait a few seconds to make sure the reflections from that sound have died down, and start the performance. When everything is finished, it will then be easy to find that click at the start of the appropriate tracks and use it as a reference marker when time aligning the relevant tracks. Whether you slide the more distant mic track forward, or the closer one back depends on how the overall source timing works with the other tracks.
Paul: Sometimes, the precision of time slipping tracks isn't necessary or required, and a simpler approach will suffice. If you fade up two or more channels, flipping the signal polarity of one with the preamps's 'phase' button will be sufficient to confirm whether that mic's contribution is constructive to the mix or not. You will usually find that there is obviously more bass in one signal polarity than the other you would normally select the position that provides the most bass.
Hugh: Most larger consoles incorporate a 'Phase Meter' to try to provide warning of this situation, and most DAWs will have a similar facility somewhere. Phase meters are scaled from +1, through zero and on to -1. If the two channels are perfectly time-aligned and carrying identical levels, the meter will show +1. Perfect mono! In general terms, when listening to a normal stereo mix, anything on the positive side of zero will produce acceptable mono without audible phasing problems. If the needle (or LED marker) dips below zero and stays there, you have some kind of timing/phasing problem, and listening in mono will reveal that. It's not uncommon to find the phase meter dip briefly under the zero mark — especially when there are complex reverbs involved — and as long as it is only a brief dip towards -1, there is probably nothing to worry about.
Published February 2008
Thursday, April 13, 2017
Wednesday, April 12, 2017
Tuesday, April 11, 2017
Q. Can I combine stereo mic techniques?
Is there any reason not to combine, say, an M/S
stereo mic pair with an additional spaced mic pair when recording things
like acoustic guitar? I've tried it and thought it sounded pretty
sweet. I'm pretty sure other people use this method on acoustic guitar,
even if it's not strictly by the rule book, but am I at risk of
confusing the stereo image?
SOS Forum post

There's no reason why you can't use a spaced pair of mics alongside a coincident pair, such as the Mid/Side arrangement shown here. But when recording a single instrument it can have little effect, unless you are specifically trying to capture a lot of ambience from a reverberant room. Using the Mid/Side approach has advantages over a crossed pair, as you can get a full, on-axis sound from the centre mic, with the sides of the figure-of-eight adding some 'space' to the sound.
SOS contributor Mike Senior replies: The bottom line with this is that your ears should be the guide. As far as stereo imaging is concerned, I'm not sure there's enough width in an acoustic guitar to give away what you're doing unless you get really close with the microphones, and I find that extreme close-mic positions often don't work very well with acoustic guitar.
I certainly don't think you're transgressing against any real rules. For example, the well-known Decca Tree method is quite similar to what you describe, with the exception that you're using an M/S array rather than a single omni mic in the centre. In fact, I understand that the original Decca engineers also experimented with replacing their central mic with a coincident stereo pair, and I can think of a good reason for doing so: although the straight Decca Tree makes a lovely spacious sound with good mono compatibility, its stereo imaging isn't as sharp as you'll get from a coincident pair. Putting a coincident pair at the centre of a Decca Tree adds sharper stereo imaging without impacting mono compatibility.
Your choice of an M&S rig for this purpose has a number of potential advantages over a crossed pair. With a single instrument, a crossed-pair setup is likely to have the instrument off-axis to both mics, and this will compromise the frequency response at the centre of your stereo image, especially if you're using budget mics. With an M&S setup, you can take advantage of the clearer on-axis response of your Middle mic. Another potential advantage of using M&S is that you can experiment with using an omni polar pattern for the middle mic, which will give you a better low-end response and more resistance to proximity effect if you're close-miking. Summing to mono in this case would leave you with the same situation as with a traditional three-mic Decca Tree, because the Sides signal from the figure-of-eight mic completely cancels itself out.
Published February 2008
Monday, April 10, 2017
Saturday, April 8, 2017
Q. Should I buy a Headphone Amp?
I recently purchased some Sennheiser HD600 headphones and have been told that I'll need a good headphone amplifier to make the most of them. Currently, I use the headphones output of my audio interface (a Digidesign M Box 2) to power my cans, but it seems to distort at high levels. Do you think it would be advisable to get myself a headphone amp? If so, how would I get the signal to the headphone amp from my audio interface? I'm thinking of getting either the Presonus HP4, Samson's C Que 8, the CME Matrix Y, or the Behringer AMP800, mainly because the configuration of the inputs and outputs are suitable for my system. It's probably worth mentioning that I use a small Yamaha desktop mixer as a front-end to my DAW.
Michael Fearn
PC music specialist Martin Walker replies: Most audio interfaces provide fairly clean-sounding headphone outputs, although it can be tricky to predict how loud a particular set of phones can go through a particular headphone amp without sounding strained. According to the Digidesign web site, the M Box 2's headphone output can provide six milliwatts into 50Ω, and since most such amps provide less power into higher impedances such as the 300Ω of the Sennheiser HD600s, a dedicated headphone amp might help you gain increased level while helping your new headphones to sound as clean as possible.

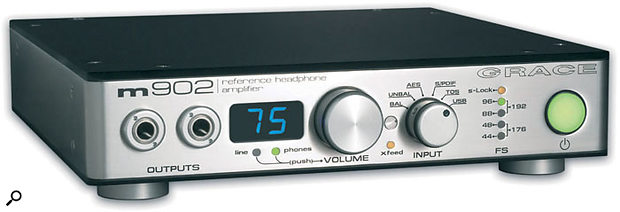
Sennheiser's HD600 (right: reviewed in SOS June 2002) are open-backed, reference-quality headphones. They are renowned for their wide and spacious sound, but are at their best when used with a good headphone amplifier, such as the Grace M902 pictured below.
However, the models you propose all have four headphone outputs, which is fine if you need to plug in four pairs of headphones (so that an entire band can monitor simultaneously, for example), but is not so suitable if you simply want to get higher audio quality for your single pair of Sennheisers. It sounds as though the latter is the case, so you simply need to get hold of a single stereo headphone amp and connect it between the stereo outputs of your audio interface and the inputs of your Yamaha mixing desk. By spending your money on this one headphone output you should be able to get better audio quality than spreading it across four.
I say 'should', but, unfortunately, while there are lots of handy multiple-output headphone amps at budget prices, once you start looking for high-quality, single-output headphone amps the prices tend to shoot up alarmingly. The Sennheiser HD600s are superb headphones, and some people are prepared to spend over £1000 on a headphone amp to get the very best out of them. Take the Grace M902 (www.gracedesign.com), which I mentioned in my January 2007 feature on headphone mixing (www.soundonsound.com/sos/jan07/articles/mixingheadphones.htm). It costs £1400, but is far more than a rudimentary volume control. Another widely recommended amp is Graham Slee's Monitor Class model, which costs £475 (www.gspaudio.co.uk). Of course, you may still consider this 'silly money'.
I've scoured the Internet trying to find a reasonably priced headphone amp to use with my Sennheiser HD650's, since it seems bizarre to end up paying several times more than the cost of your audio interface just to improve slightly on its integral headphone output. But while there are plenty of audiophile products with prices to match, there currently seem to be few products available to suit more modest budgets.
One possibility is Creek's OBH21 (www.creekaudio.co.uk), which retails at £190. I haven't auditioned it myself, but I know of happy HD600/650 owners using this model. Another is the Rega Ear at around £150 (www.rega.co.uk/html/ear_2001.htm), which, again, is used by many HD600/650 owners, while the Pro-Ject Head Box Mk 2 (www.sumikoaudio.net/project/products/headbox2.htm) seems a bargain at £75 (yet still wins awards for its audio quality compared to the average headphone socket found on a hi-fi amp), and will deliver 60 milliwatts into 300Ω phones, or 330 milliwatts into 30Ω models, which is a lot more than the M Box 2! What's more, it has additional line-level outputs that you could connect to your mixer.
The Pro-Ject Head Box Mk 2 is available from local hi-fi shops or can be bought on-line (in the UK) from various retailers, including Noteworthy Audio (www.noteworthyaudio.co.uk), Stone Audio (www.stoneaudio.co.uk), or Superfi (www.superfi.co.uk). Readers in the USA seem to benefit from a much wider selection of indigenous products. Visit Head Room (www.headphone.com), and you'll find a huge range of headphone amps.
Published August 2007
Friday, April 7, 2017
Thursday, April 6, 2017
Q. How do you mic up a Djembe?
The crack team of Paul White and Hugh Robjohns have traveled the world solving readers' problems. Here, they down the Hob
Nobs and answer some of your recording queries in our Q and A
mini-series, Sound Advice.


Hugh: The djembe is a type of African drum, shaped like a goblet, and made from a single piece of wood. Its head, traditionally goatskin, is stretched over the top and tensioned with string. Like the conga, the djembe is played by hand, and has an opening at the bottom of its hollow, tubular shell which acts as a Helmholtz Resonator. Most of the tone and volume of the bass resonance emerges from the bottom of the tube when the drum is struck in the centre of the skin, while the higher-pitched percussive sounds come from the drum skin when played closer to the edge.
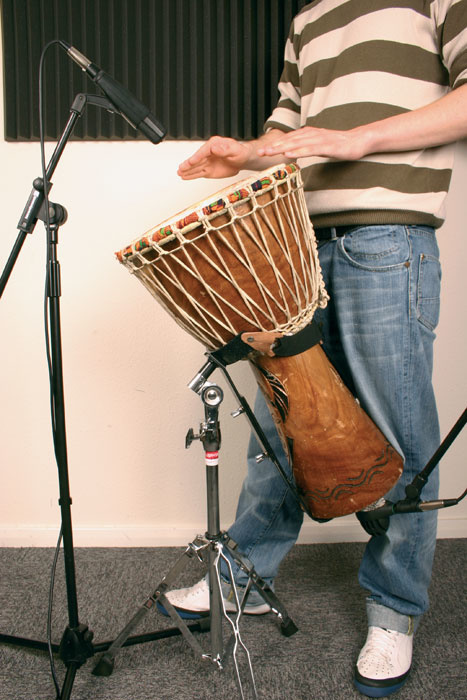
Paul: Because of that large bass tube, the djembe needs to be lifted off the floor to to allow sound to escape from the bottom of the drum. For recording, many players use a metal floor stand or cradle, rather than holding it between their knees, as it keeps the drum still. The pictures, right, show a traditionally made djembe in such a stand.
Hugh: When it comes to miking the drum, I'll always listen carefully to the sound that the drum is making in the room. Only then will I make an informed decision on where to place the mics.
If you have a nice-sounding room, and can afford to mic the drum from a distance, then a single (mono or stereo) mic, positioned in a place where there's optimum balance between bass and percussive sounds, should give good results. However, in any kind of performance situation where there are other instruments playing in the vicinity, or where you specifically want a closer, more intimate sound, or where the room has no worthwhile sound character, you are almost certainly going to have to use two close mics. This is because the traditional approach of a single mic above the drum head simply won't capture the bass energy in the right proportion.
Paul: When tackling the top of the drum, I'd usually start around 12 inches from the drum skin, using a small-diaphragm, cardioid capacitor microphone. If you don't have one of these, a good dynamic will yield good results, but you'll have to get closer to the drum head, maybe within four to six inches.
Hugh: Whatever you use and wherever you place it, try to aim it roughly halfway between the edge and the centre to capture the percussive sound of the hand hitting the head. You can experiment with the exact angle and aiming point of the mic to change and control the tone slightly. The second mic is used to capture the weight and tone of the bass resonance from below, and would usually be placed somewhere close to (or maybe even an inch or two inside) the mouth of the base, as shown in the pictures. Alternatively, you could place a pressure zone (boundary layer) mic on the floor below the mouth of the djembe, or use an omnidirectional mic on a thin sheet of foam directly on the floor. This approach gives a more natural bass sound, to my ears, and is well worth a try if you have suitable mics. Just beware of foot-tapping or other floor vibrations. Of course, experimentation is the key, because the best djembes are hand-made, and every one will be different.
Paul: As is regularly mentioned in the hallowed pages of SOS, if the room is adding unpleasant tonality to the sound of the drum, hanging the ubiquitous duvet around and to the sides of the drum will help damp down the sound. It is possible to over-dampen, so try sticking a tea tray under the drum if you think it's a little dull.
Hugh: Mic selection is much the same as for any percussion or drum kit, hence the use of the AKG D112 inside the base. (Alternatives include Shure's Beta 52, the EV RE20, or Sennheiser's E902 — basically anything suitable for miking bass drums). When miking the skin, good-quality dynamic mics such as the venerable Shure SM57 or Sennheiser MD421 will tend to give a slightly fatter, more flattering sound. A condenser mic such as a Rode NT5 or AKG C451, by contrast, will tend to give more detail and percussive edge, but watch out for overloads if you're close-miking. A mic with a 10dB pad is often a good idea.
Paul: Once you've got your djembe recorded, you may find that the levels vary too much on playback, as the instrument is very dynamic. Compression will help, and using an attack time of around 10ms will allow the drum hits to come through cleanly, while taking around four to five decibels off the very loudest peaks should help to even them out. You may have to be more severe on recordings with excessive dynamic range.
Published August 2007
Wednesday, April 5, 2017
Q. How do I maximise loudness on tracks?
I have been recording music for quite a few years
now, but I always get the same problem when I listen back to my mixes:
mine are far quieter than any commercial releases. Can you give me any
tips on how to get the sound louder without the track distorting? Or are
there any effects I can put on a track to boost the volume?
James Atkins
SOS contributor Mike Senior replies: Maximising the loudness of final mixes is something of a contentious issue, with different professional engineers holding widely divergent views on the matter. Assuming that your mix is already peaking at 0dBFS, increasing loudness beyond this is always a compromise, because you inevitably have to change the recorded waveforms in some way. Whether the compromises of any particular audio process are sufficiently offset by the increase in loudness is a decision you have to make for yourself.

The multi-band tube-compression processor in Drawmer's DC2476 Masterflow unit is simple but very effective.
The best tactic is simply to line up your mix in your DAW alongside a couple of commercial mixes you rate, and process your mix to try to bring it into line. The higher the quality of your monitoring facilities, the better you'll be able to judge what you're doing. (With mediocre monitoring, you'll tend to overdo the loudness because you won't be sufficiently aware of the associated decreases in signal quality.)
So what processing might you try? Well, the least deleterious change I can think of making to increase loudness is to high-pass filter the mix at a very low cut-off frequency (for an example, see the screenshot on page 20). If you have any DC (0Hz) signal on your recorded tracks, this can offset the whole audio waveform such that it clips earlier than it should; high-pass filtering will remove this. You can also use the high-pass filter to cut any low-frequency rumble you don't want, which will give you more headroom to fade up the overall track level.
While we're on the subject of EQ, it's worth mentioning that the human ear isn't as sensitive to high and low frequencies as it is to the mid-range, and people tend to interpret brighter sounds in particular as being louder. If you can detect a tonal difference between your track and your references, I'd recommend trying gentle shelving EQ cuts to match the sounds more closely in the first instance.
You might also want to have a look at plug-ins like Logic 's Match EQ and the TC Works Assimilator, or the stand-alone utility Harbal. These all compare the frequency content of a reference track with that of your own mix, and will suggest an EQ curve to match the two automatically. Just be sure to take the suggested EQ curve with a pinch of salt, as the automatic process is unlikely to be foolproof.
Subtle tape, valve, or transformer distortion processes can be a very nifty way of increasing the subjective loudness with very little increase in metered signal level. There are masses of software options here, such as Silverspike's freeware Rubytube or the Magneto plug-in built into Cubase SX2. Some nice hardware possibilities include the DRG process built into a number of TC Electronic's rack processors, or the lovely multi-band tube processing (shown on the left) in Drawmer's DC2476 Masterflow unit.
Compression can give comparatively transparent increases in loudness, especially with low-ratio (below around 1.3:1) and low-threshold (between maybe -30dBFS and -50dBFS) settings. Full-band compressors will be more tonally transparent in this role, but multi-band models can usually add more loudness without pumping artifacts, albeit with the side-effect of dynamically tampering with the tonality of the mix.
For rock and dance styles, full-band compression can be used with higher threshold and ratio settings to create an illusion of extra loudness through pumping compression effects. If you want to experiment with this, try starting with a 2:1 ratio, a 1ms attack time and about 100ms of release time. If you then set the threshold level so that the compressor reduces the gain mainly on drum hits, you should hear a pumping effect, and you can adjust the ratio and release time to regulate the strength of it.

The zoomed-in waveform of a kick-drum hit from Dr Dre's 'The Watcher', from the album 2001, showing that the track has been clipped to increase its loudness. The highlighted region in this screenshot clips around 140 consecutive samples.
If you find that compression pumping is knocking the bass frequencies out of your kick drums, you may want to increase the compressor's attack time to let more of the sound through before the compressor clamps down. Alternatively, you could high-pass filter the compressor's side-chain to decrease the gain-reduction element's sensitivity to low frequencies.
Limiters are often used to give a loudness increase, and can manage a comparatively loss-free increase of several decibels in the right circumstances. There are now lots of full-band and multi-band models available, but one side-effect I'm not fond of with any of them is that they tend to cause any heavy drum sounds in your track to lose punch and to sink back into the mix. For less percussive material, the trade-offs of processing depend on how you the limiter's release time is set, but the main things to listen for are unwanted pumping effects and bass distortion.
If you've tried all of the above and you're still short, then maybe it's time to zoom in on the waveforms of your reference tracks to see whether they've been clipped. Although clipping is frowned on by many engineers, the practical reality is that clipping is all over commercial releases in many styles, so you need to give the issue of clipping serious consideration in order to decide where you stand. The main sonic disadvantage of clipping is a type of distortion which in itself is pretty unmusical. However, many engineers take the view that a degree of clipping can be well enough disguised under certain circumstances that it becomes a reasonable price to pay for a considerable loudness hike.
The first main situation where it's often used is when the track has a lot of fuzzy sounds, such as distorted electric guitars, into which the clipping artifacts can fairly easily blend. Some stark examples of this are The Darkness' 'Growing On Me', Chemical Brothers 'Block Rockin Beats', and Pink's 'Feel Good Time', to name a few.
The other common use of clipping is in music styles that are very drum-heavy, such as rock and hip-hop, and here the technique is to clip mainly just the drum beats. Unless you drive things too far, the burst of distortion on each hit tends to be perceived mostly as an alteration in the tonality of the drum hits, rather than as distortion per se, so many producers are happy to take advantage of that. To take one example, Dr Dre's 2001 album frequently clips in excess of 100 consecutive samples on its kick-drum hits (see the screenshot on page 22), and that kind of clipping is by no means out of the ordinary in a lot of modern commercial music styles.
The only thing I would say is that no matter what you do, you should always make a habit of retaining a completely unprocessed version of your mix file for safety's sake. Not only will this mean that you don't burn any bridges if you decide at a later date that you mucked up your settings, but it also means that you can always still take your material to a professional mastering house if you want. Their specialist equipment and engineers will be able to get much better (and louder) results from an unprocessed file than from a processed one.
Published May 2007
Subscribe to:
Posts (Atom)