Friday, March 30, 2012
Wednesday, March 28, 2012
New piano piece by W.A. Mozart - Allegro Molto in C Major

02। 03. 12. - 16:24-Austian Independent
Previously unknown Mozart piece discovered
A previously unknown piano piece from Wolfgang Amadeus Mozart has been discovered in Tyrol in Austria. The Mozart Foundation in Salzburg has reported that the piece was recently found in a music book from 1780.
According to the "Stiftung Mozarteum", the music book, which dates back to the 18th century, was found by university lecturer Hildegard Herrmann-Schneider from the institute for Tyrolean music research at Innsbruck University. The lecturer encountered the music when gathering handwritten pieces for the "Répertoire International des Sources Musicales", an international organisation which catalogues music sources preserved around the world.
The handwritten piece was handed over to a professional music copyist in Tyrol who identified the writing. The piano piece, he and the foundation in Salzburg have claimed, "is clearly written by the young Wolfgang Mozart". Experts have now confirmed that the work was produced by the young Austrian born composer.
The piece will be presented in the "Tanzmeistersaal" in the house of Mozart in Salzburg on 23 March at 11am। Prior to this, the most recent discoveries were in 2006 and 2010 of the so-called "Nannerl-music books". Leopold Mozart, the father of Wolfgang is thought to have written pieces in the books for his daughter Maria Ann known as Nannerl and later put in the compositions of his young son. The Mozart Foundation in Salzburg identified these as containing several piano pieces from the musician.
During his short lifetime, Mozart completed more than 600 works and began an additional 150 works which were never completed, a fact which is often overlooked.
Monday, March 26, 2012
Managing noise at the end of a mix

Any noise that is present in your multitrack recording will probably be unnoticeable until the end of the song. But when the instruments fade away, noise might become embarrassingly audible.
Where does noise come from?
In the olden days of analog tape recording, tape hiss was like a lush carpet upon which every instrument and singer stood. But with digital recording, unwanted noise should be a thing of the past. Sometimes it isn't...
Perhaps your microphone is a little noisier than the best a mic can be. For example, the Beyerdynamic MCE 72 is a nice-sounding stereo mic. But it has a certain noise background that must be considered.
Perhaps your preamp isn't up to scratch in respect of noise level. There is no reason why it shouldn't be within a decibel or two of theoretical perfection. But that doesn't always happen, particularly with designs that tend towards a 'warm' sound.
Guitar amplifiers are commonly noisy. So are effects pedals. Compression always increases the noise level of a signal. And some plug-ins even emulate the noise component of the physical hardware they model!
And of course there's the computer. It shouldn't really be in the studio but in a separate machine room, connected by long cables or a KVM extender.
Since noise present in any individual track of a multitrack recording will almost always be masked by the instrument or vocal on that track, noise should not be a problem during the verses and choruses of the song.
But at the end when the instruments play their final notes or chords, the sound will die away leaving the noise clearly audible. This sounds ugly and amateurish, and must be corrected.
One solution to the problem is firstly to fade each individual track in such a way that any noise on the track isn't noticeable. If each track is fixed individually, then the whole mix will fade into absolute silence.
Another is to allow a prominent and noise-free track to dominate at the end, masking the noise on other tracks that should be faded out a little earlier.
One could of course just fade everything out before any noise becomes audible, but this is a rather cheap-sounding solution, as though the mix engineer doesn't really care about their craft.
Sometimes however, one important instrument might pose a real problem and there is no way to fade it out with elegance while at the same time eliminating the noise.
In a case such as this one option worth trying is to insert a low-pass filter into the track, setting the cut-off frequency to 20 kHz, then using automation to bring down the cut-off frequency as the last note fades away. Since noise is more noticeable at high frequencies than at mid and low frequencies, then this, combined with a fade, can lower the perceived level of noise to an extent that few listeners would notice.
One last point - sometimes modern-day digital recordings are just too quiet. Recording a track consisting of nothing but the hiss and hum of a guitar amplifier can provide a useful 'glue' that holds all of the instruments and vocals together. Just be sure to fade it out nicely before the end.
Friday, March 23, 2012
Thursday, March 22, 2012
Wednesday, March 21, 2012
More than a Decade of Sound for Live Theater Performaces
 Our company has provided more than 10 years experience in Live Theater sound engineering.
Theater in the round and proscenium thrust stages.
More than 80 productions of sound engineered and performed Including: © Disney's "Beauty and the Beast", "Thoroughly Modern Millie", "Jekyll and Hyde", "A Christmas Carol" and so forth.

With use of our own LavBridge® for wireless microphone preservation, these kits saved us numerous times extending the life of the wireless microphone systems. Not only have they preserved the lavalier, but also saved us time on quick lavalier fixes during a performance.
Pleasant Grove Community Production

Pleasant Grove local production of "The King and I". We were asked to do some system adjustments and tweaking console setups for their performances.
The LavBridge® Kit is great for single or multiple wireless microphone applications for system use with stage performances.

 The other crew with us were running lights and music tracks, while we were engineering sound and mixing.
Monday, March 19, 2012
Achieving the 'mastered sound' while keeping a wide dynamic range

The mastered sound is very popular these days. But does it always have to come at the expense of dynamic range?
I have been reading some interesting material on dynamic range recently. Well, it was 'Dynamic Range Day' on March 16, so it seems appropriate.
My point of view is that I hate the over-mastered sound as much as anyone else... Except for the people in record label A&R departments who decide what we are allowed to hear. They all seem to think that louder equals better. It does up to a certain point. But many people in the industry feel that current releases go far beyond the limits of acceptability.
But when I say that I hate the over-mastered sound, it doesn't mean that I hate the mastered sound. No, in fact I love to hear mastering tastefully done. It can turn a good mix into a powerful one, improving both frequency balance and the overall impact of the sound.
Does mastering always have to reduce dynamic range though? We are often led to believe that it does, but in fact it doesn't have to.
Dynamic range defined
One common definition of dynamic range is the difference between the peak and the RMS level of a signal. Since the peak level in a commercial release is always at full-scale, then the mastering process will level out the peaks then bring up the RMS level, thus reducing the dynamic range.
If the difference is less than 12 decibels, then the music will start to suffer. Less than 8 dB and the sound will be aggressive and harsh. 14 dB (or DR14) is thought to be a reasonable difference to aim for, to preserve dynamic range.
But...
You could look at dynamic range from a more musical point of view. Suppose for example that the RMS level of a song was -8 dB during a loud section. The peaks would be at 0 dBFS so this would represent DR8 and probably sound rather harsh.
But maybe it's meant to sound harsh - it's a loud section of the song. Maybe the song has a quieter section where the RMS level is around -20 dB (the peaks in this section would probably be lower than 0 dBFS).
Musically speaking, it would be reasonable to say that this song has a dynamic range of 12 dB when comparing the loud section and the quiet section.
Split mastering
So here's a thought...
What about mastering the loud sections and quiet sections of this song separately?
The loud sections would be mastered in the conventional way. The quiet sections could be mastered in a similar way, but the peak levels held down to -12 dBFS and the RMS levels possibly 10 or 12 dB below that.
Both the loud and quiet sections can now have a similar mastered sound, but in musical terms there is indeed dynamic range... 12 or more decibels of it in fact, comparing either the peaks of the loud sections to the peaks of the quiets, or the RMS levels of the loud sections to the RMS levels of the quiets.
Food for thought
There is a little bit of food for thought here. Normally an entire mix is mastered with the same parameters. But if a song varies in level as performed, then there is a case for varying the mastering parameters as the song progresses. It could combine the best features of mastering done well, with the louds and quiets that modern music often so desperately lacks.
Wednesday, March 14, 2012
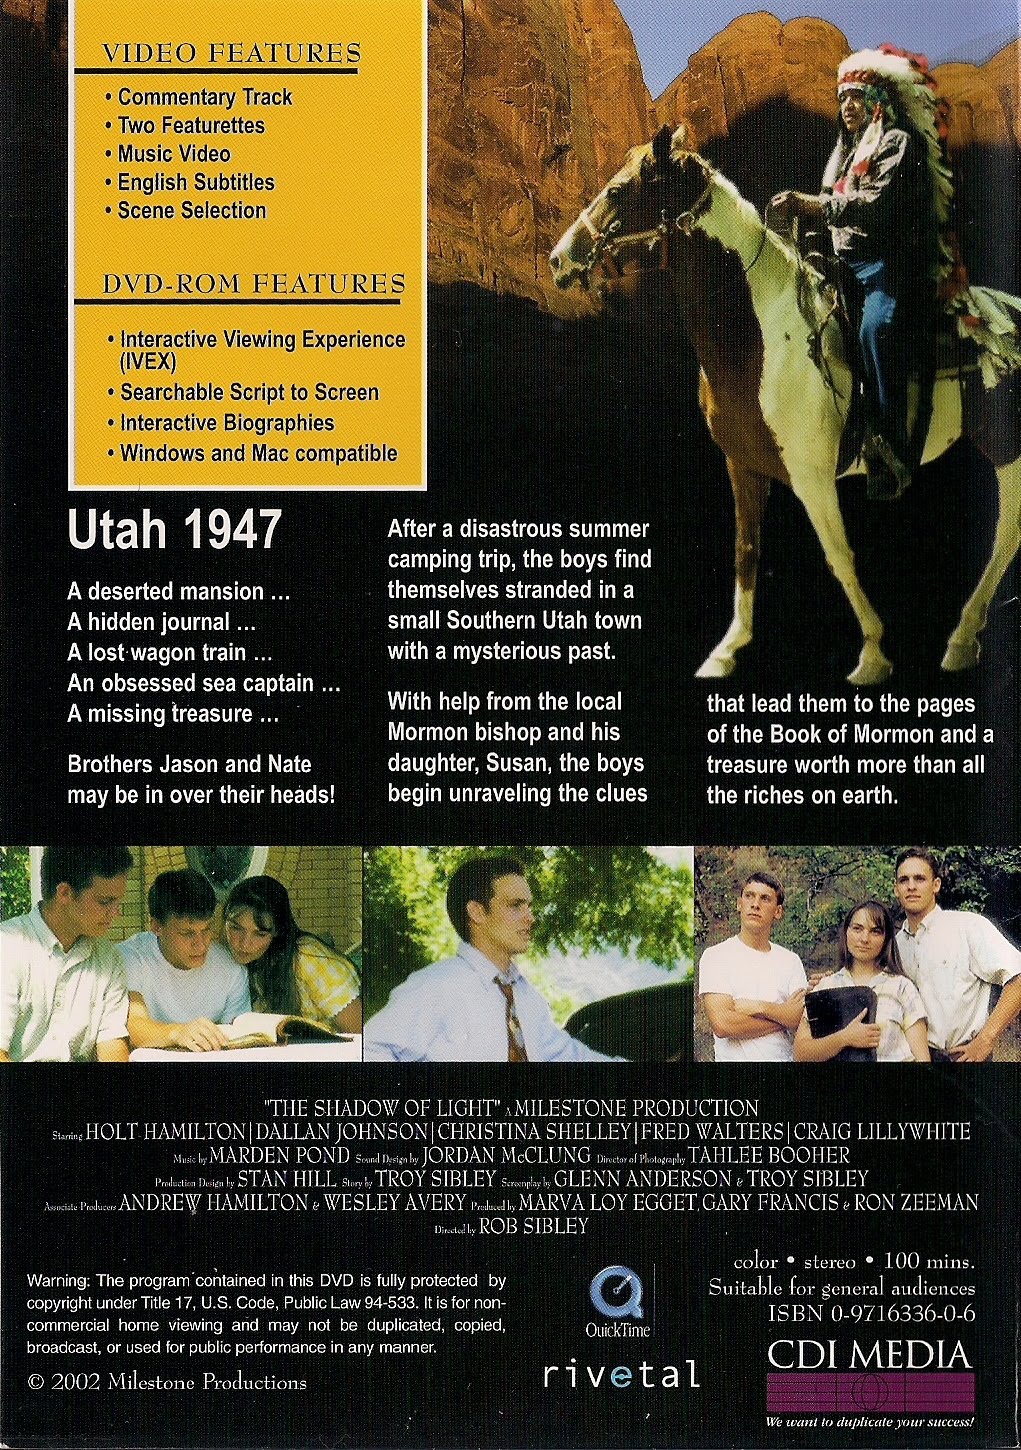
The Shadow Light 2002-2012 10th Anniversary

The Story
Utah, 1947A deserted mansion... a hidden journal... a lost wagon train... an insane sea captain... a missing treasure, brothers Jason and Nate Simms may be in over their heads! After a disastrous summer camping trip, the boys find themselves stranded in a small southern Utah town with a mysterious past.
With help from the local family, the boys begin unraveling the clues of a 60 year-old mystery that lead them to an ancient treasure worth more than all the riches on earth.
The Production
Producer Rob Sibley has always been fascinated with the history of the Rocky Mountain West. He wanted to make an adventure story that would spark the imagination of the audience about the pioneers. The Shadow of Light is targeted for every member of the family. Although the majority of the story is fictional, there are many elements of fact sprinkled throughout. "The whole purpose of this film is to entertain the family and yet at the same time tell a compelling story," said Sibley.
The Shadow of Light covers two time periods, the late 1800's (when the pioneers were still settling many areas of the west) and the late 1940's. Wanting to tie the two time periods together, Sibley knew that in the late 40's there were people still alive who would have known some of the original pioneers. He also wanted to show how much has changed from the late 40's through the present.
Jordan McClung was the Sound Designer/Sound Engineer making the movie to work with limited resources and budget. Here are some of his thoughts and quotes when starting this audio post-production project.
"I wasn't sure what the outcome was going to be with this film at the beginning of the this post-production project. I just remember Rob saying along the lines of "I don't know what to do with this film, the [onsite production] sound is all messed up for some reason and I am about to just throw it out, tell me what you can do with it".
"At the time I figured it was it was already viewable, now to see what could be done to make it worth listening to on a reasonable sound level". I told him "let's have a look" It was quite the challenge, but our team made it happen. The sound isn't stunning, but a great improvement from where it started. It is half of what makes the story".
No Limit Sound Productions 2002-2012
View the Trailer
We were working with Milestone Productions doing the Audio Post-Production work, at the time our company was DBA SIMPLE Sound Productions.
Credits
IMDB
Still available for purchase at: Amazon.com
Tuesday, March 13, 2012
Monday, March 12, 2012
Parallel compression: Finding excitement in the lower levels

The ear and brain pay much more attention to high-level sounds than low. So if you can bring up the low levels you might find a new source of excitement in your audio.
If you have ever heard drums played live, purely acoustically from a close listening position, then you will know how exciting they can sound. But when those drums are recorded and played back through loudspeakers, a lot of the excitement can be lost.
The plain fact is that drums are LOUD, even when the drummer tries to play quietly. If you want to attempt to reproduce the level of a drum kit through speakers, then you had better have a big amplifier. A really big one. And big speakers too.
For most practical purposes, recorded drums are normally played back at a volume that is a lot lower than real life. So although the 'hit' component of the various drum and cymbal sounds comes through fine, the lower levels, such as the shell resonances, are somewhat lost in comparison.
One solution to this is to use parallel compression. Here is one way to do it...
Mix the drums as normal, the way you like to hear them. Then create a new stereo aux track. Use post-fade auxiliary sends in all of the drum tracks with the send fader set to 0 dB so that an identical copy of the drum mix is sent to this aux track.
Insert a compressor into the aux track and compress the drums heavily - much more than you would do for normal compression.
Mix this compressed version with your normal mix of the drums. You have now achieved parallel compression, and the result should already sound more exciting. You can experiment with the compression settings, and the level at which you mix in the aux track.
One thing to watch out for however is whether the compressor plug-in adds any delay to the aux track. With a modern DAW that compensates for latency in plug-ins, this should not be a problem, but it is best to check. You can do this by setting a very high threshold on the compressor, so that there is no compression going on, even though the compressor is inserted and not bypassed. When you mix this in with the unprocessed signal, you should hear the volume change, but not the character of the sound.
Happy parallel compressing!
Sunday, March 11, 2012
Saturday, March 10, 2012
Friday, March 9, 2012
Mixing: Where to start? - Set all of your tracks to the same level

If you don't know where to start mixing a multitrack recording, then often having some plan, even a crazy one, is better than having no plan at all.
A common question I am asked is, "With which instrument should I start mixing?"
I can think of at least four good answers to this, and possibly a fifth. I have already covered the vocal, drums, the most important instrument, and starting with random levels. In the last day of this working week, which just happens to be Audio Masterclass's Enrollment Week, I will cover one more option that may seem just a little crazy.
Clearly, some of the tracks in your multitrack recording will be more important than others. The vocal, for instance, must be more important than the floor tom (unless you're mixing Sing, Sing, Sing!).
But setting levels according to the relative importance of each track doesn't work. You can try it and see for yourself - list each track in order of importance, then set the most important at 0 dB, then all the others in descending 1 dB intervals. You'll get an interesting mix that might tell you something about the song you're working on, but it will demonstrate that there is only a mild correlation between importance and level for any track.
What you can do however is start from an assumption that there was a reason why every track was recorded, so each track deserves equal consideration. Most mixing engineers will audition tracks individually, to get a feel for the components of a song, and to look for any problems that may need correction. So why not go one stage further and mix all of the tracks at the same level? This of course is just a starting point. You will raise some tracks in level and lower others until your mix is perfect (adding processors and effects to taste along the way).
So you might think that setting all the faders to the same level will achieve this. But it won't. The tracks are probably recorded to different levels, and in any case the recording level will have been judged according to the peaks, not to the subjectively-heard loudness of each instrument or vocal.
What you need is... a VU meter!
VU (Volume Unit) meters were developed way back in the history of audio. I mean way, way back. They were superseded by meters that display peaks more accurately, which is essential for successful clip-free digital recording.
However, a VU meter does show the subjective loudness of a signal quite well. The level you see on the meter corresponds closely to the level you feel that you are hearing.
So, armed with a VU meter plug-in, you can indeed set all of your tracks to the same level. -10 dB on the faders would probably be a good starting point. You will quickly realize which tracks need to recede into the background, and which need to become more prominent.
Of course, this is far from being the only way to start out on a mix. But it is a plan. And having a plan - whatever plan - is, in most aspects of life, far more productive than having no plan at all. Try it!
Thursday, March 8, 2012
Mixing: Where to start? - Just throw the faders up at random!

You may be an expert mix engineer, but even the best mix engineers can't imagine all of the possibilities contained within a multitrack recording. Random chance may offer better solutions than ever could be planned.
A common question I am asked is, "With which instrument should I start mixing?"
I can think of at least four good answers to this, and possibly a fifth. I have already covered the vocal, drums and the most important instrument. In the final two days of this working week, which just happens to be Audio Masterclass's Enrollment Week, I will cover options that may surprise you just a little.
The process of becoming a really good mix engineer is a long one, involving learning one's craft and making a lot of mixes. Over time, you will develop techniques and solutions that can achieve the perfect mix of any multitrack recording sent your way.
But what is 'perfect'? A mix can be described as perfect it it satisfies all of the criteria by which a mix can be judged. It 'ticks all of the boxes' in other words.
But remember the old cliche of 'think outside the box' - just because a mix is perfect doesn't mean that it is good enough, or as good as it possibly ever could be.
Music is a developing art form. The people who listen to and buy music like to hear their favorite tracks, and new songs that sound similar to songs they know already.
But most of all, people like novelty. Humans beings always have, and always will - up to the point just before our species becomes extinct (think about that!).
So a mix that satisfies all currently-known criteria might be a perfect mix. But if it doesn't contain the all-important element of novelty, it might not be as good as it could be.
Novelty might come in the form of unusual processing techniques, or simply new ways of combining sounds. Think about how you always pan the kick drum, bass instrument and lead vocal center. There are good reasons to do this, but you're thinking well inside the box.
So although you may audition a multitrack recording and form in your 'mind's ear' a sound that you might aim to achieve, that sound might be the sound of yesterday rather than the sound of tomorrow.
One quick method of finding new ways to introduce novel sound combinations into your mix is to harness the power of random chance. So instead of carefully constructing the mix from the ground up, you just throw up the faders to random positions and start from there.
On old-style analog mixing consoles this was easy - just a few flicks of the fingers and the faders were effectively randomized. On a DAW, your 'randomness' is bound to have a degree of intent. Or you could use a random number generator to select fader levels.
Of course, you will not view random fader levels, or other random settings, as the end point of your work. What you will do is listen for sound combinations that are interesting; that you might not have arrived at through a conscious thought process. How the bass guitar interacts with the floor tom just before the chorus - that kind of thing.
Or you might choose to listen out for what sounds good in your random mix, then construct your finished mix around that.
All of this relates very closely to Quincy Jones's comment of allowing God to walk through the room. Worshiping at the altar of the god of random chance can often be a good way to start a mix.
Wednesday, March 7, 2012
Mixing: Where to start? - The most important instrument

Although the vocal is often the most important component of a song, sometimes it is another instrument that provides the 'hook' that compels people to buy. Perhaps that is where you should start mixing?
A common question I am asked is, "With which instrument should I start mixing?"
I can think of at least four good answers to this, and possibly a fifth. Yesterday, I covered the vocal and previously drums. I will cover the other options over the course of this week, which just happens to be Audio Masterclass's Enrollment Week.
Every hit song needs a 'hook'. It is the feature that compels people to buy. The hook may be a beautifully written vocal line, beautifully sung. But take a listen to tracks from the current Hot 100 chart and you will find that this is not always so. Many times the hook is an instrumental phrase or harmonic progression that occurs on several occasions during the song. It might be a real instrument, or a synthesized sound. It might be a percussive element. Whatever it is, it attracts the ear, and attracts sales.
Occasionally also, a song might have a certain instrument that is of major importance in the arrangement and production. This may be to such an extent that it is vital that this instrument is shown off to its best in the mix, while the vocal may need only a standard professional treatment.
So although this will not apply to every song, on many occasions there is a certain instrument that gives a song its magic. And this instrument must be presented to the listener as well as the mix engineer is capable of.
If this is so, then it makes sense to start mixing with this instrument being the only one in the monitors, even if it doesn't play all the way through the song. You need to work hard to make the instrument sound amazing, or amazingly interesting (notice the subtle difference there).
By 'work hard', I mean use all of the processes you have available to get the best from the instrument - fader, pan, EQ, compression, reverb and any other effects you feel that you need. You may also need to do some editing - for example a beautifully-played acoustic guitar part might have a few finger squeaks.
If a particular instrument really is important in a mix, then it makes sense to spend time on it. As much time as necessary to get the absolute best from it. Some of that time will be spent in experimentation, some in consideration and detailed listening. Once you have achieved the best you can from the instrument, the other instruments and vocals might only require a standard, professional treatment, which can be done more quickly as you are applying techniques and achieving sounds that are already comfortably within your range of experience.
My comments on drums and vocals still apply, but sometimes you may need to decide to put the bulk of your time, energy and effort into a particular single instrument.
Tuesday, March 6, 2012
Mixing: Where to start? - The vocal

Since the vocal is usually the most important part of a recording, it makes a lot of sense to start mixing with that. What? How can you mix just one track?
A common question I am asked is, "With which instrument should I start mixing?"
Well I can think of at least four good answers to this, and possibly a fifth. Yesterday, I covered the drums and I will cover the other options over the course of this week, which just happens to be Audio Masterclass's Enrollment Week.
The vocal
The argument for starting to mix with the vocal is that since the vocal is the most important component of the song, everything else should fit around it and support it. It's a logic that is difficult to flaw.
But before any mixing can begin, you have to decide what you want from the vocal. For instance, do you want it to sound like a real human being, singing a couple of meters (six feet) in front of you?
Well you might, but since very few recordings attempt to achieve this, you might be trying to sell into a market that doesn't exist. It's a shame that the natural sound isn't popular, but that's the way things are, and probably will be for some time to come. (Classical music is different of course - so different that I will consider it separately at a later time.)
Clean vocal
Taking the above into account, what you might want from a vocal is a clean sound. A sound that doesn't obviously appear to be 'messed about with'. The best option for capturing this is to use a small-diaphragm capacitor microphone at a distance of 30 - 60 cm (one to two feet), with a pop shield.
Once recorded, then there shouldn't be any necessity to do anything other than add a little reverb to put the vocal into a believable acoustic space. Unless you have used a poor quality microphone then there should be no need for EQ. If the vocal varies in level, then the cleanest way of handling this is to use fader automation, or clip-based gain, rather than a compressor.
So if you start mixing from this point, you should be trying to achieve a clean, not-messed-about-with sound, consistent in level with a little reverb. Everything else needs to fit in with that.
Fat vocal
A clean sound can be good. However a 'fat' sound is often preferred in modern production technique. Fattening starts by using a microphone with a large diaphragm. A tube microphone will be fatter still. A large-diaphragm, tube microphone through a tube preamp should be positively obese. A close microphone position will help even further.
If the sound is still not fat enough (or you are trying to fatten up a vocal that was originally recorded cleanly), then you can use a tube compression plug-in and perhaps some EQ. A short but rich reverb can take fatness to the outer limits of possibility, and panning the reverb center so that it is not spatially separated from the vocal will help too.
When you have achieved the desired degree of fatness, you can start mixing in the instruments to complement your by-now full, thick vocal sound.
Processed vocal
Occasionally a vocal seems to call for a processed sound, taking it far away from the natural sound of the human voice. A distorted telephone effect would be one example.
Since the possibilities of processing the vocal are limitless, once you have decided to go this route there will be a lot of things to try out. This is a time for not being in a hurry. The vocal is all-important and has to be just the way you want it before adding any instruments.
Summary
Starting with the vocal is a great way to work, and because you will fit the instruments around the vocal, there is no point of difficulty later in the mix when the vocal and instruments don't seem to gel together, as can often happen otherwise.
My comments on drums are still relevant, as treating them as a single instrument makes mixing much more straightforward. Once you have achieved a great vocal sound and a great drum sound, you might make blending them the second stage of your mix.
Publication date: Tuesday March 06, 2012Author: David Mellor
Monday, March 5, 2012
Mixing: Where to start? - The drum kit

When a multitrack session might contain twenty or thirty audio tracks or more, it might be difficult to know where to begin mixing. But over the course of the next few days, Audio Masterclass and RecordProducer.com will provide several 'get you started' options.
A common question I am asked is, "With which instrument should I start mixing?"
Well I can think of at least four good answers to this, and possibly a fifth. I'll start with the drums and cover the other options over the course of this week, which just happens to be Audio Masterclass's Enrollment Week.
Real Drums
If your song is intended to have real-sounding drums, perhaps real drums even, then they should sound like real drums being played in a real room, with a genuine-sounding room acoustic. The levels of all of the individual drum mics should therefore be in proportion. Since they will probably all be the same distance from their respective drum heads, then if the mics are identical it would be a good starting point to set them all at the same level (assuming that the preamp gains were all the same during the recording session). Balance the hihat mic against the snare, then bring up the overheads to balance the cymbals.
The kick drum however will need special attention. Since it is further from the overheads than anything else in the kit, it may sound a little dry. This might be acceptable to you, or you might add a little appropriate digital reverb.
It is often possible to get a realistic drum sound without EQ. If you do choose to EQ any particular drum however, make sure not to make it sound like it is from a different drum kit. Also, if you choose to compress any particular drum, consider whether you are making it too 'foreign' to the kit.
Work hard with the faders and pans to achieve a mix of the drums that genuinely does sound real. You can add reverb if you want to make the kit sound as though it is in a bigger room, but choose your reverb settings wisely.
Once you have this in place, buss the whole of the kit to a single stereo aux track. Now you can control the level of the whole kit with a single fader.
Electronic or sampled drums
If you have used electronic or sampled drums to create your rhythm track then the situation is a little bit different. If you don't want your drums to sound like real drums, or perhaps your samples are such that there is no possibility of that, then there is nothing 'real' to imitate.
In this case your task is to build up a convincing rhythm track before you start mixing in any other instruments or voices. Indeed, I would go further and say that you probably need to do this before you record any other instruments or voices.
When you are overdubbing instruments or voices to real drums, then even if your monitor mix isn't 100% realistic, then at least people know what the drums are supposed to sound like. But if you are constructing your rhythm track virtually from scratch, it needs to be a really good foundation for the music before you start adding to it.
In summary so far, if you start mixing with the drums or rhythm track, you should be able to achieve a solid foundation for your mix. This is an excellent point from which to start.
J. Peter Robinson Makes His Greatest “Catch” with Genelec 5.1 Active Monitoring
March 2012
J. Peter Robinson Makes His Greatest “Catch” with Genelec 5.1 Active Monitoring

— Composer chooses a surround monitoring system consisting of three Genelec 8250A Bi-Amplified DSP Monitors for the L-C-R array, a pair of 8240A Bi-Amplified DSP Monitors for the left and right rear surrounds, and a 7260A Active DSP Subwoofer for projects including feature films, reality television, video games and more—
NATICK, MA, February 23, 2012 — You could say J. Peter Robinson has been around the block a few times. In fact, you could say he’s been around the world more than once, too, both the real world and the world of entertainment media. Classically trained at the Royal Academy of music in his native London, Robinson moved easily between the worlds of theater, where he was the pianist for Andrew Lloyd Weber and Tim Rice on the original production of “Jesus Christ Superstar,” and rock, as a member of bands fronted by artists including Eric Clapton, David Bowie and Phil Collins. He was equally adept at the transition to media composing, creating music for television series including Charmed and five-time EMMY Award® winner Deadliest Catch, and feature films including Wayne’s World, Encino Man, Highlander: The Final Dimension and the soon-to-be-released Nicolas Cage film Seeking Justice. In fact, it was exactly that wide-ranging eclecticism that led Robinson to choose Genelec Active Monitors for the first 5.1 surround monitoring system in his personal recording and mix studio in Los Angeles.
After carefully vetting a wide range of speakers, Robinson decided upon three Genelec 8250A Bi-Amplified DSP Monitors for the L-C-R array, a pair of Genelec 8240A Bi-Amplified DSP Monitors for the left and right rear surrounds, and a Genelec 7260A Active DSP Subwoofer. The system was purchased from West L.A. Music and installed late last year.
“I had been spending a lot of time and money in other facilities to do my 5.1 surround monitoring and mixing, and it was time that I got my own set up, but it had to be able to handle all of the kinds of media that I work in,” says Robinson, who, in addition to his TV and film credits, has just finished work on his first video game, scoring a title based on the popular Highlander franchise. “It had to be a system that could cover all of these types of media.”
Robinson auditioned numerous monitors but kept coming back to the Genelecs as his favorites. “I listened to a lot of great-sounding speakers, but the Genelecs were the only ones where I heard only the music, not the speaker,” he explains. “All I heard from them was the material, and that’s critical.”
Also important was the fact that Genelec’s AutoCal™ automatic calibration system allowed Robinson to plug the monitors in and let them optimize themselves to his environment. “The Genelecs basically made friends with the room,” he says. “What they give me is the confidence that I’m always hearing what I recorded, as I recorded it. That’s invaluable.”
photo:
Composer J. Peter Robinson, in his control room featuring a Genelec 5.1 Active Monitoring system that includes three Genelec 8250A Bi-Amplified DSP Monitors for the L-C-R array (pictured). Not pictured: a pair of Genelec 8240A Bi-Amplified DSP Monitors for the left and right rear surrounds, and a Genelec 7260A Active DSP Subwoofer.
Friday, March 2, 2012
Thursday, March 1, 2012
Dead for 171 years, but still in copyright!

How can it be that music by a composer who died in 1840 is still in copyright? Does his immortal soul get the royalties?
I was browsing through the sheet music section of a local charity shop. Actually I was groveling on the floor, because that's where they put slow-selling lines. But there is often interesting stuff there that you wouldn't normally find out about.
Since one of my hobbies is making an awful scratching noise on my violin, I was intrigued by a copy of Niccolo Paganini's Introduction, Theme and Variations on Nel Cor Piu Non Mi Sento by Giovanni Paisiello. These classical music titles can sometimes be long and complex can't they?
The reason I bought it is that it is one of the most difficult pieces in the violin repertory. So difficult in fact that parts of it are written out on two staves like piano music! I don't expect I'll ever be able to play it, but that doesn't mean I can't enjoy looking at it and dreaming.
Copyright issue
After untying the knot in my left-hand fingers caused by trying to scratch out the first page, I noticed a panel at the bottom...
"Copyright 1973 by International Music Company"
Hmm... Paganini died in 1840 and copyright only lasts for 70 years after death (to give a publisher chance to recoup their investment if a composer or songwriter is on their last legs), so how can this company have claimed copyright in 1973? Presumably this will be classed as corporate copyright in the USA and therefore last until 2068.
A little bit of maths will reveal that 2068 is 228 years after Paganini's death and 252 years after the death Paisiello, the original writer of the tune!
So how can copyright last 252 years?
252-year copyright
The answer to this is firstly that the publisher is, as we say in the UK, 'trying it on'. They are claiming that they own copyright in the music and hoping that users of the music will pay up without considering whether that claim is valid. This piece must be broadcast at least dozens of times every year and although royalties wouldn't amount to a lot of money, as the proverb says, every penny counts. There will be recordings too.
I feel confident in saying that there is no valid copyright in Paganini's music and it has fallen into the public domain, so no royalties are payable for any kind of use.
But the publisher has a trick up its sleeve, actually two tricks...
Publisher's tricks
Firstly, the publisher has not printed a straight copy of Paganini's manuscript, nor an edition that was published long enough ago to be public domain. It has typeset the music and is entitled to claim a copyright in that. That should mean that is is OK to broadcast or record Paganini's notes, but unauthorized duplication in print would not be allowed.
I feel that is fair because there is investment and labor involved that deserves recompense.
But there is another trick...
This isn't a verbatim copy of the notes that Paganini wrote, it is an edition. The editor is violinist Zino Francescatti who died in 1991. Francescatti has added indications on how the piece should be played, with respect to bowing, fingering and performance style. He may also have corrected notes that he felt had been wrongly placed in Paganini's manuscript.
This process is considered to be an original creative work and is therefore subject to copyright.
Moral question
Now here comes the moral question...
Some of Francescatti's additions are obvious, such as the indication to use the second left-hand finger on the first G in Bar 1. Only a lunatic would do otherwise. And wherever a violinist would have a choice in fingering, in any music, the choices are always obvious. Picking one choice out of two or three doesn't seem to me like much of a creative work.
Also there are the bowing indications. Well a violin bow can go one way or the other. Is it a creative act to say that a certain note should be played on an upbow? I think not.
Taken as a whole however, one could say that there is enough work that the editing amounts to being creative and therefore subject to copyright.
However a violinist might choose to ignore the editor's additions entirely. How then could any claim for royalties be justified?
Also, suppose the violinist memorizes the piece, then records or broadcasts it? Who could possibly know which edition he or she had originally learnt it from?
It still happens
Although the publication date of 1973 in this instance may seem like the distant past, this kind of practice still goes on.
For example I have in front of me a sheet music copy of Lord Cutt's March by that well-known composer A. Nonymous. It is published by the Associated Board of the Royal Schools of Music (in the UK) and is used in their current violin exam syllabus. And apparently, according to the panel at the bottom of the page, it is in copyright!
Once again I would contend that it is merely the edition (by Philip Ledger, who is still alive) that is in copyright and not the actual music.
In summary, copyright is a thorny, knotted, twisted and tangled issue. Copyright helps composers and songwriters earn a living. To disrespect the concept by claiming copyright where none exists doesn't help anyone but those who make false claims. This practice should stop.
Publication date: Friday July 15, 2011Author: David Mellor
Subscribe to:
Posts (Atom)