Welcome to No Limit Sound Productions

Company Founded
2005
Overview

Our services include Sound Engineering, Audio Post-Production, System Upgrades and Equipment Consulting.
Mission
Our mission is to provide excellent quality and service to our customers. We do customized service.

Friday, November 29, 2019

Magix ACID Pro Next

By Robin Vincent
Magix ACID Pro Next
ACID Pro is the original loop-based remixing program, and the Next version opens up new possibilities thanks to the intriguing Stem Maker.
When it first appeared in the late '90s, ACID's extraordinary ability to manipulate the pitch and tempo of looped audio created a whole genre of computer-based loop sequencing that had previously been the realm of scratch DJs and hardware samplers. Loops in ACID contained tempo and key information that allowed them to be matched automatically when used in the same project. Armed with a sample CD of 'Acidized' loops, you could paint them onto a timeline and pull together arrangements at great speed.

This looping technique has been adopted by pretty much every audio production program since. The ability to pitch-shift audio and time-stretch loops to fit a given tempo is a standard feature and one for which Ableton Live was invented. ACID, meanwhile, slowly acquired the vital bits and pieces it needed to call itself a DAW, and by version 4 in 2003 had MIDI sequencing, automation, VST plug-ins, surround–sound mixing and video support. It was around this time that the original makers Sonic Foundry sold everything to Sony, and for the next decade or so, Sony seemed to put most of their effort into developing the Vegas Pro video editing software that had emerged from ACID in 1999. ACID crawled to a couple of new versions, but development had largely stalled. When German software developers Magix picked it all up from Sony in 2016, they had a lot to do to breathe life back into this loop–making workstation.

Last year saw the release of ACID Pro 8, the first update to the program in many years, with a slightly updated look, 64-bit coding and support for VST3 plug-ins. It was what they needed to do to get ACID back on track, but was very much a statement of intent rather than anything new or innovative. Now, however, Magix are opening a new chapter in the history of time-stretching with ACID Pro 9 and ACID Pro Next. Quite why these need separate names is unclear, but perhaps Magix have diverging plans for the brand. At the moment ACID Pro Next has all the features of ACID Pro 9 plus a small number of extras. Each update usually brings with it large barrels of loop content, too, and this update certainly doesn't disappoint.

Installation

For this review, I'll focus on the new features found in ACID Pro Next, but first, a word or two about installation. I'd usually skip past this part in a software review, but I found the process so infuriating that I thought it deserved mention, in the hope that Magix will sort it out for future installers. The problem is that installer doesn't let you specify where the 24GB or so of library content should go, and so it fills up your C drive, first with the downloaded files and then with the installed content. ACID doesn't tell you where it lives or how to find it, and the manual and tutorial videos came up empty. I scoured the forums and came across a helpful post which directed me to a folder called...


Published August 2019

Wednesday, November 27, 2019

Nektar Panorama T4

By Bob Thomas
Nektar Panorama T4
Nektar's Panorama T4 takes their already impressive DAW integration to a higher level.
Nektar have built up a strong name for themselves through their Panorama and Impact series of USB MIDI controller keyboards, both of which feature Nektar's DAW integration software that allows control of DAW parameters directly from the keyboards' faders, encoders and pads. Enhancing the DAW integration of the latest members of the Panorama line — the 49-note T4 reviewed here and its larger 61-note T6 sibling — is Nektarine, a VST, VST3 and AU plug-in that can host VST, VST3 and AU instrument plug-ins. This setup allows you to control these plug-ins directly from the new controllers, either through the pre-configured mapping that Nektar have created for many popular instruments, or through your own custom maps.

T4

Somewhat petite, rather than small, the T4 is USB class-compliant with Windows XP and higher, Mac OS 10.5 and greater and Linux (Ubuntu). For someone like me who still runs XP because of some crucial legacy hardware whose support got 'sidelined' in Vista, this is an important consideration. Unsurprisingly, the Nektar DAW integration software requires Windows 7 or higher, and Mac OS 10.7 or greater, and this again helps to support users of legacy operating systems.
With its control topology laid out on its black fascia in the familiar Nektar fashion above the keyboard — faders and switches to the left of centre; LCD screen and mode and performance control switches in the centre; encoders and transport controls centre right; and pads to the far right — the T4 packs a significant level of functionality into a relatively small space.

Keys & Pads

The T4 is equipped with a 49-note version of Nektar's second–generation synth-action keyboard, which features aftertouch, five velocity curves and one fixed velocity (127) that can be programmed to be varied in real time by a fader or encoder. The octave shift buttons above the pitch-bend and modulation wheels can shift the T4's keyboard up four octaves and down three. The eight velocity– and pressure-sensitive pads have tri-colour LED illumination (green/red/orange) and can be programmed to transmit either MIDI Note On, Switch or CC messages with four curved velocity options and one fixed. These settings can be saved in 16 (two banks of eight) preset Pad Maps that are recalled by a combination of the Pad Bank switch, the Shift display button and the appropriately numbered pad.

Both keys and pads can be set to repeat using the independent Key and Pad Repeat buttons that sit to the left of the keyboard above the pitch-bend and modulation wheels. This intriguing feature can give some great results as its tempo can be set either from the T4 or driven by an external MIDI Clock and, using the encoders, the note length, repeat rate (quarter to 1/96th notes), swing, accent velocity and the interval between accents can all be continuously varied. Diving deeper into its setup, you can pick a velocity source (aftertouch/pad pressure, expression pedal or mod wheel), make the repeat buttons either momentary or latching (you can also change this on the fly), and set the sync point — either...


Published September 2019

Monday, November 25, 2019

Light, fantastic: ROLI's colourful new controller

24-key modular controller keyboard appeals to both keyboard beginners and pros
LUMI, by ROLI.LUMI, by ROLI.
ROLI have been impressing us with innovative controller designs since the launch of their otherworldly Seaboard Grand four years ago (see the review in SOS September 2015). Their latest product offers all the depth and innovation of their previous products, but channelled in a very different direction. As its name suggests, it's all about light.

Like ROLI's earliest products, LUMI is a controller based around a keyboard-like interface, but the loose resemblence ends as soon as you power it up, because in stark contrast to the monochromatic Seaboards, LUMI comes alive in a riot of colour. Each of its 24 keys is lit evenly along its entire length from underneath by super-bright variable LEDs — so each one can be a completely different colour.
This simple idea is used to excellent effect to assist a major part of LUMI's target market: those of any age who are learning to play the keyboard. Thus it ships with a proprietary iOS or Android music training app with a library of songs, and if you select one, the keys will light up brightly in sequence, allowing keyboard learners to follow and play the melody (and accompanying chords, if you wish) for the selected song by following the lights. While there have been educational keyboards with 'followable' LED strips or lights above the keys before, we can't call to mind any on which the entire key can light up so brightly and in such a wide range of colours before — and the intuitive impact of being able to follow the lights as an aid to playing is not to be understated. For songs already in the LUMI app's library, there is a wealth of extra content to help you master playing, from videos showing you optimum fingering to performance training routines, where you accompany a scrolling score on the app, a piano-roll display, or simply follow LUMI's lights, and the app rates your accuracy and speed.

The library will cover music from classical to cutting-edge; at the demo we attended, it was still under development, but already contained works from Bach to the Beatles, Sia and Calvin Harris. However, the app will not be limited to audio material already loaded in its library — in time, the plan is that it will be able to analyse the music in any audio file presented to it and swiftly provide a light-up key sequence for the melody, and a best guess at the key and chords too. We saw an early demo of this aspect of the app in action: we were asked to freely pick a well-known track completely at random. Slightly mischievously, we chose one not in the LUMI library — The Beatles' 'Lucy In The Sky With Diamonds', well known for its various key changes — and watched as the app not only identified the keyboard and vocal melodies from a quick playback on Spotify, but also tracked the key changes through the verse into the chorus and back again. Once this feature is fully working, it could in theory allow fledgeling keyboard players to learn whatever songs they like quickly and easily.

If your initial impression is that you have no need for this kind of educational aspect to a controller, and the 24-note span and light-up keys call to mind countless cheap plastic kids' keyboards or even the atonal early 80s warblings of Hasbro's circular toy Simon, think again. LUMI is a fully specified, modular and highly portable self-powered MIDI controller, with polyphonic aftertouch. In the studio, it integrates smoothly with DAWs and ROLI's own Studio Player and Dashboard software, and also physically with other hardware; each LUMI 'unit' features ROLI's proprietary magnetic 'DNA' connectors along its edges, as used on their innovative Blocks control hardware, so ROLI's control Blocks, Lightpads or Seaboards can be instantly attached if required. What's more, if you want or need a larger keyboard, you simply snap LUMI keyboards seamlessly together (up to maximum of four).
LUMI in action.LUMI in action.
The keyboard itself and its action have been carefully designed for playability by pros as well as beginners, with a 'plunge' almost as deep as that of a grand piano and keys corresponding to the Donison Steinbuhler 5.5 standard, seven-eighths of the width of a standard piano keyboard (for those unfamiliar with DS5.5 keyboards, their dimensions are widely believed amongst music educators to be more approachable and playable than standard-sized piano keys). Measuring 282x141mm, only 27mm thick, weighing 600g per 'unit' and with an approximate battery-powered life of six hours when fully charged, LUMI also fits into a rucksack for easy use outside the studio. How many other controller keyboards are portable and modular, allowing you to assemble a backpackable 96-key 'Imperial' controller?

Even if the educational aspects of LUMI's light-up design are unimportant to you, there are many possible pro applications for the coloured keys in a live or performance context. Because the colour of each key is individually customisable in ROLI's Dashboard software, you could colour keys depending on the samples assigned to each key during live performances as an unforgettable aide-memoire, or colour different zones of the keyboard to highlight split points... or, yes, if you like, draw attention by giving your keyboard a completely different colour scheme for every song in your set, simply because you can. It's surely only a matter of time before LUMI is a major visual component in someone's super-hip video...

Reflecting the new keyboard's broader appeal to learners and non-technical musicians as well as the pro musicians that have formed most of ROLI's customer base since their launch, LUMI is initially being sold using a crowdfunding model, via Kickstarter, rather than through pro-audio distribution channels or via the main company site. At the time of writing, a few days after its launch, LUMI has over 5000 backers and has exceeded by more than tenfold its initial funding goal of £100,000, which suggests this model was a shrewd approach! It's expected to be on sale from October (with one eye on the Christmas stocking market, perhaps?) and will retail then for $249 in the USA, although as of the start of July, it's still possible to secure LUMI for under $200 by signing up as a backer on Kickstarter. See the link below for details.

by (SOS) 2019

Friday, November 22, 2019

Q. Why does my Mackie Control make strange noises in Cubase?

By Sam Inglis
The Mackie Control works via MIDI, so keep an eye on the input assignments of your MIDI tracks.The Mackie Control works via MIDI, so keep an eye on the input assignments of your MIDI tracks.
I'm using a Mackie Control control surface with Cubase SX, and it works fine on audio tracks. However, whenever I select a MIDI track within Cubase, pressing buttons on the Mackie Control seems to trigger random MIDI notes, and using the other controls sometimes seems to make my synths go out of tune. What's going on?

Jeremy Carter

Features Editor Sam Inglis replies: Mackie Control and similar control surfaces communicate with Cubase via MIDI, and they use ordinary Note On and Continuous Controller messages to tell the computer that a button has been pressed or a fader moved — but not ones that will have any musical relevance to your song! Meanwhile, the default preference in Cubase SX is that whichever track is selected is automatically record-enabled, and all MIDI tracks default to accepting MIDI input from all connected sources. This means that if you have, say, a controller keyboard and a Mackie Control connected, Note On and Controller messages from both will be recorded on the selected track. Even when you're not recording, all MIDI messages from all sources will be routed to whatever synth is attached to the selected track.

The solution to this is to change the input selection for each of your MIDI tracks. InCubase's track Inspector, change the MIDI input from 'All' to a specific device that's not the Mackie Control, or 'None' if you don't want them to accept any MIDI input. If you're not planning on recording any MIDI, you could also achieve the same result by visiting Cubase 's Preferences and deselecting the 'Record enable selected track' box. 


Published January 2006

Wednesday, November 20, 2019

Cubase Pro: Riff Maker

By John Walden
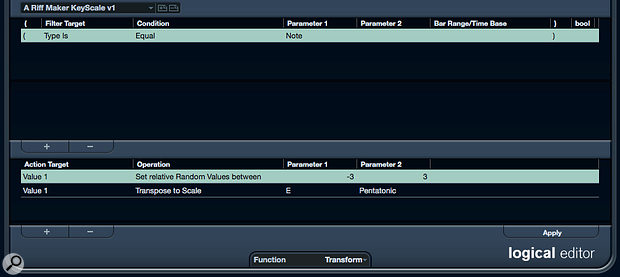
Don't fear the Logical Editor! Even a  simple preset can help generate some interesting musical ideas.Don't fear the Logical Editor! Even a simple preset can help generate some interesting musical ideas.
Stuck in a musical rut? Cubase Pro might just be able to provide the inspiration you need.
A number of third-party tools aim to offer the spark of musical inspiration around which you can build a project. Nobody expects them to cough up the sort of fully formed melody that could grace the next chart-topping hit, but by combining elements of key/scale 'rules', a dose of randomisation and a little user input — to influence the general direction of the riff-making process — they can be a great source of new melodic ideas. Happily, Cubase Pro 10 users need look no further than their own DAW for a toolset that allows you to experiment with this sort of random-but-guided riff generation. To follow the examples, you'll need a MIDI clip as a starting point. Anything will do; a simple two-bar sequence of 16th notes, all set to C3 and a velocity of 80, will suffice. Use this MIDI to trigger a staccato-style synth patch.

Iterative Inspiration

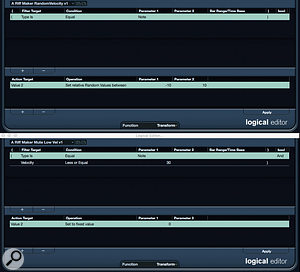
You can manipulate note velocity in various ways using the Logical Editor, whether that's subtle randomisation (above) or note muting (below).You can manipulate note velocity in various ways using the Logical Editor, whether that's subtle randomisation (above) or note muting (below).


Published November 2019

Monday, November 18, 2019

Cubase Pro: Key Commander

By John Walden
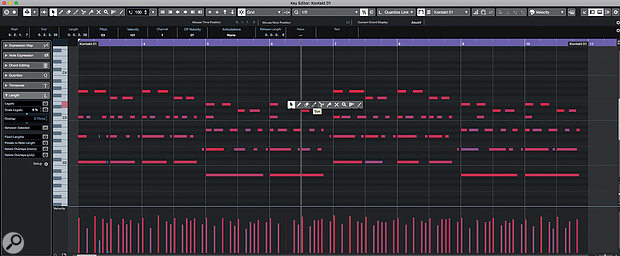
The Key Editor is packed with MIDI editing features but the trick to a faster workflow is training yourself to access them as efficiently as possible.The Key Editor is packed with MIDI editing features but the trick to a faster workflow is training yourself to access them as efficiently as possible.
With some DIY Smart Controls for Cubase's Key Editor, you could become a MIDI-editing ninja.
Cubase Pro 10's VariAudio Smart Controls bring all the main VariAudio functions within easy reach when you hover the cursor over a pitch segment. It saves you time, and makes you less likely to lose your musical focus. Seeing the concept applied so brilliantly in VariAudio made me hanker after a similar 'smart toolset' for the MIDI Key Editor. When editing MIDI data here, repetitive tasks include: entering and selecting notes, changing note positions or lengths, transposing notes and muting or deleting notes. The potential for streamlining things is obvious, so — in the absence of VariAudio-style Smart Controls here — just how close to hand can we bring the tools and settings required to perform these sorts of tasks?

Tool Utility Belt

The most frequently used MIDI editing tools (eg. Draw, Erase, Trim) are available in the Tool Buttons Palette of the Key Editor's toolbar. This is easy to access, but going back and forth between this Palette (to select each tool) and the notes you wish to edit means a lot of 'mouse travel', particularly if you're working in a floating Key Editor, perhaps expanded to give you more screen space in which to work (rather than the compact Lower Zone).


Published October 2019

Friday, November 15, 2019

Q. How can I attach acoustic foam to the wall?

By Chris Korff
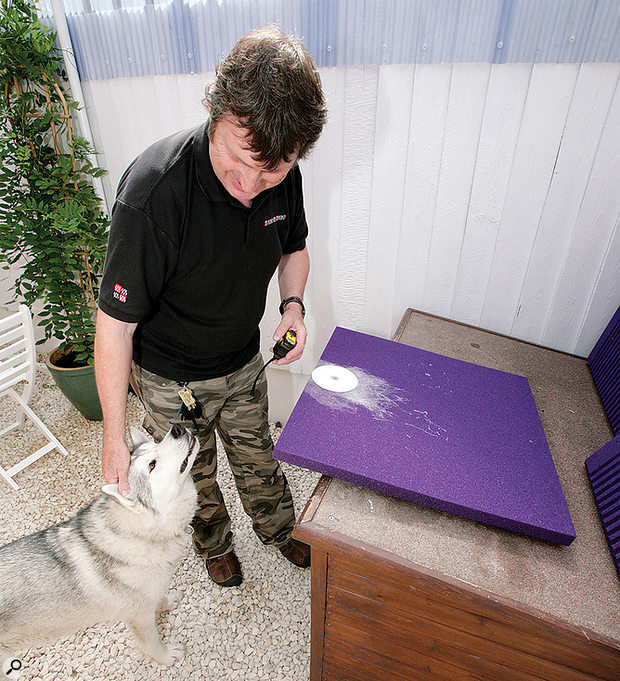
Gluing acoustic foam to walls can be impractical, which is why Paul White hit on the idea of gluing old CDs to the foam and using those to hang the foam on nails or hooks. The dog is, reportedly, not essential to the process...Gluing acoustic foam to walls can be impractical, which is why Paul White hit on the idea of gluing old CDs to the foam and using those to hang the foam on nails or hooks. The dog is, reportedly, not essential to the process...
I have bought some Auralex LENRD bass traps and I wondered if anyone at SOS has had any success fixing them to a soundproof plasterboard wall/ceiling without them dropping off in a matter of minutes! Any help would be much appreciated.

Ray Parkes

SOS Reviews Editor Chris Korff replies: Auralex sell their own brand of spray-on adhesive (there may be a cheaper alternative, but I'm afraid I can't remember what type of glue it is!), and as you'd expect it works very well. But depending on where you want to fix the foam it might actually work rather too well; you won't be able to peel the foam off the walls again without destroying the foam and the paintwork!

Our very own Editor In Chief Paul White came up with an ingenious solution that he's used in a number of our Studio SOS visits: he uses the adhesive to attach old CDs to the foam, and then uses the holes in the centre of the CDs to hang the foam on nails or hooks, just as you would with a picture frame. That way you can always move the foam to another location if needed.


Published November 2019

Wednesday, November 13, 2019

Q. Can I flatten out my finished tracks using a hardware compressor?

By Mike Senior
TC Triple*C multi-band compressor.
In my hardware-based setup, with my TC electronics Triple*C compressor, is it possible to do the kind of limiting on a full mix where you end up with a waveform that is levelled off at the top and bottom, 'brick wall'-style? Also, when recording the co-axial digital output from the Triple*C onto my hi-fi CD recorder, what should the Triple*C's dither setting be if my source is a 24-bit Tascam 788?

SOS Forum Post

Reviews Editor Mike Senior replies: If you're after a waveform which is levelled off at the top and the bottom, then simply clip the output of the processor by cranking up the make-up gain control. To make this slightly less unpleasant on the ear, make sure that the Soft Clip option is on. However, you've got to ask yourself why you're wanting to do this. Although short-term clipping usually doesn't degrade pop music too much, it's really easy to go overboard and do serious damage to your audio if you're not careful. I'd advise doing an un-clipped version as well as the clipped version for safety's sake. You've got to ask yourself just how well your monitoring system compares to the one in a dedicated mastering studio — you should always let your ears be the judge, but remember that your monitors, combined with the room they are in, may not be giving you sufficient information to make an informed decision.

If you're after maximum loudness, then clipping isn't going to get you all the way there in any case. Use the Triple*C's multi-band compressor as well — set an infinity ratio, switch on lookahead, and make the attack time as fast as possible. Adjust the threshold and release time to taste. Make sure that you're aware of what the thresholds of the individual compression bands are doing as well (they're set in the Edit menu), as you might want to limit the different bands with different thresholds. Switch on Soft Clip and set the low level, high level, and make-up gain controls for the desired amount of clipping. Once again, make sure to record an unprocessed version for posterity as well, because you may well overdo things first time, or in case you get access to a dedicated loudness maximiser such as the Waves L2 in the future.

The Triple*C's dithering should be set to 16-bit, because you should set it according to the destination bit-depth, not the source bit-depth. The CD recorder will be 16-bit, so set the dithering to the 16-bit level.


Published December 2003

Monday, November 11, 2019

Q. How do I create a stereo mix from mono material?

By Hugh Robjohns
Finger on Mono button of console.
I want to remix some old mono tracks in stereo. Can you offer any advice or suggest any tricks to achieve this?

Jon Bennet

Technical Editor Hugh Robjohns replies: The first thing to accept is that you cannot create a true stereo (or surround) mix from mono material; you can only give an impression of greater width. In other words, there is nothing you can do to separate instruments and pan them to specific points in the stereo image, as you could if mixed originally for stereo.

One of the best ways to create fake stereo from mono is to make an M&S (Middle and Sides) stereo mix from the mono source. You'll need to treat the mono source as the 'M' element of an M&S stereo matrix, and decode accordingly, having created a fake 'S' component.

This fake 'S' signal is simply the original mono signal, high-pass filtered (to avoid the bass frequencies being offset to one side of the stereo image) and delayed by any amount between about 7ms and 100ms, according to taste. The longer the delay, the greater the perceived room size — but I would only recommend delays over about 20ms for orchestral or choral music.

Here's how to do it practically: take the mono signal and route it to both outputs on the mixer equally, or, in other words, pan it to the centre. Take an aux output of the mono signal and route it to a digital delay. Ideally, high-pass filter the signal before the delay. A 12dB-per-octave high-pass filter set at about 150Hz should do the job, but this figure isn't critical and will affect the subjective stereo effect, so experiment. Alternatively, high-pass filter the output from the delay.

You now need to derive two outputs from this delayed and filtered signal, which may be possible directly from the delay processor, if it's of the mono in, stereo out variety, for example, with the same delay dialled into both channels. If not, use a splitter cable or parallel strip in a patch bay to produce two outputs.

Route this pair of filtered and delayed signals back to the mixer, ideally into a stereo channel, or, if not, into two mono channels panned hard left and right. Invert the phase of one of the channels. If using adjacent mono channels, fix the faders together and match the input gains so that the gain is the same on both channels.

Now, with the original mono signal faded up, you should hear the central mono output, and if you gradually fade up the fake 'S' channels, you will perceive an increase in stereo width. The length of delay, the turnover frequency of the high-pass filter and the relative level of mono 'M' and fake 'S' channels will determine the perceived stereo width.

If you overdo the amount of 'S' relative to 'M', then you will generate an ultra-wide stereo effect, and if monitored through a Dolby Pro Logic decoder, this will cause a lot of the signal to appear in the rear speakers.

The advantage of this fake stereo technique is that if you subsequently hit the mono button, the fake 'S' signal cancels itself out and disappears completely, to leave the original mono signal unaffected.


Published December 2003

Friday, November 8, 2019

Q. How can I attach acoustic foam to the wall?

By Chris Korff
Gluing acoustic foam to walls can be impractical, which is why Paul White hit on the idea of gluing old CDs to the foam and using those to hang the foam on nails or hooks. The dog is, reportedly, not essential to the process...Gluing acoustic foam to walls can be impractical, which is why Paul White hit on the idea of gluing old CDs to the foam and using those to hang the foam on nails or hooks. The dog is, reportedly, not essential to the process...
I have bought some Auralex LENRD bass traps and I wondered if anyone at SOS has had any success fixing them to a soundproof plasterboard wall/ceiling without them dropping off in a matter of minutes! Any help would be much appreciated.

Ray Parkes

SOS Reviews Editor Chris Korff replies: Auralex sell their own brand of spray-on adhesive (there may be a cheaper alternative, but I'm afraid I can't remember what type of glue it is!), and as you'd expect it works very well. But depending on where you want to fix the foam it might actually work rather too well; you won't be able to peel the foam off the walls again without destroying the foam and the paintwork!

Our very own Editor In Chief Paul White came up with an ingenious solution that he's used in a number of our Studio SOS visits: he uses the adhesive to attach old CDs to the foam, and then uses the holes in the centre of the CDs to hang the foam on nails or hooks, just as you would with a picture frame. That way you can always move the foam to another location if needed.


Published November 2019

Wednesday, November 6, 2019

Q. Why does 'Class' matter in an amplifier?

By Hugh Robjohns
I saw a mic preamp advertised as 'Class A' and 'Transformerless.' What do these terms mean and why exactly are they a good thing?

SOS Forum Post

Technical Editor Hugh Robjohns replies: The 'class' of an amplifier refers to the circuit topology used, and is independent of whether the circuit uses valves, transistors or FET as the active devices. 
Buzz Audio MA2.2 preamp.In a Class-A circuit the output device is arranged to pass the entire audio waveform — both the upper and lower halves of the signal waveform. This provides the cleanest, most transparent sound, but the necessary biasing arrangements makes this kind of circuit power-hungry, and it tends to generate a lot of heat as a result. 
Focusrite ISA220 features Class-A circuitry.

A more efficient circuit design is the Class B, which uses two output devices, one to handle only the upper portion of the sound waveform and another to handle the lower half. The benefit is that only one device is working at any time, and when there is no input, both are switched off, allowing huge savings in power consumption and heat generation. The drawback is that at the zero crossover point between the positive and negative halves of the waveform, one device might have switched off before the other has come on, and that results in 'crossover distortion' — which isn't a good thing in high-quality audio circuits.
The Buzz Audio MA2.2 (top), Focusrite ISA220 (middle) and TL Audio VP1 (above) all feature Class A circuitry, sacrificing efficiency for superior sound quality.The Buzz Audio MA2.2 (top), Focusrite ISA220 (middle) and TL Audio VP1 (above) all feature Class A circuitry, sacrificing efficiency for superior sound quality.

The compromise solution is a combination of both topologies (Class A and Class B), and it's called... Class AB. This also employs separate devices to handle the upper and lower portions of the sound waveform, but they are biased in such a way that both are operating when the signal is close to the zero crossover region, and thus crossover distortion is much less of a problem.

These basic circuit topologies can be employed in any amplifier design, whether it's a power amplifier to drive loudspeakers, a microphone preamplifier, or a line driving amplifier, as well as in discrete-component or integrated (IC) circuits. However, Class A remains the best choice for audio systems where the power consumption can be tolerated. 

The term 'transformerless' refers to the absence of a transformer within the circuit. Transformers can be useful things in audio systems, providing 'galvanic' isolation between circuits and systems, or impedance-matching and the balancing (or unbalancing) of audio circuits, or even providing a 'free' voltage gain, depending on the application. However, transformers also have disadvantages, such as large size and weight in audio applications, and the introduction of large phase shifts which can become audible under some circumstances and therefore undesirable. 

Many modern electronic circuits have been developed to replicate some of the desirable characteristics of transformers, without their associated disadvantages, and this is often championed as an overall advantage. Hence the 'transformerless' term is generally seen as a good thing, along with Class A. However, there are some circumstances where transformers still provide the best solution, and the inherent sonic qualities are often deliberately sought.


Published October 2003

Monday, November 4, 2019

Q. How do audio and video stay in sync?

By Hugh Robjohns
Video and audio sync.
I'm having some problems understanding exactly how audio-to-video synchronisation works. I know that the clock generates a pulse — it gives off a voltage at a certain frequency. But how does this keep the sound and the pictures in time?

SOS Forum post

Technical Editor Hugh Robjohns replies: The pulses generated by the clock generator are just that — pulses — but at a very precisely controlled rate. These are intended only to control the rate at which pictures or audio samples are taken, or the speed at which an analogue tape is dragged past the recording heads.

The missing link that provides the positional information is the timecode generator, and all this does is count the pulses from some arbitrarily agreed starting point, and keep track of that count as timecode within the recording medium somewhere.

When replaying, the replay clock generator provides more pulses to determine the replay speed of the medium, and the timecode numbers identify which bit of sound is supposed to align to which pictures.
Let's consider the example of pictures on a video tape, and sound on a separate digital recorder of some sort, imagining that you want to replay both together in perfect sync.

The 'rules' for this kind of material are that there must be 25 picture frames every second (sticking with European standards here for simplicity — the US ones are different) and 1920 audio samples every second (for the standard 48kHz sample rate), and that the first of each batch of samples must align precisely with the start of each picture frame. This last point is to facilitate editing, so that when cutting on a picture boundary you don't end up cutting halfway through an audio sample!

To maintain these rules when recording, both the video camera and the digital sound recorder have to be running at the same very precisely controlled rate, and this is provided by something called a 'sync pulse generator' or SPG. It provides a continuous series of very precise pulses at the rate(s) required by the equipment to ensure that they capture 25 picture frames and sample 1920 audio samples every second.

In a studio setting, there will be one SPG which originates all the required timing pulses which are then distributed as required. On location, this is a little impractical as it is often desirable to have camera and sound moving independently of each other, so sync cables connecting the two back to a central SPG is not a great idea. In this case, the usual solution is to equip the camera and the sound recorder with their own internal SPG systems, and to synchronise these to each other at regular intervals. Crystal oscillators are extremely stable these days and once matched to each other, they will drift relative to each other very slowly indeed. Provided they are re-sync'ed every couple of hours (usually whenever changing batteries or tapes, in practice) they will remain sufficiently close to each other's timing to be fixed together.

So that takes care of the rate at which pictures and sound are captured. The next step is to make sure that if separated, the pictures can subsequently be linked to the correct sound. This is achieved by using timecode. Timecode is simply a series of numbers (generally in the time format of hours, minutes, seconds and frames, but it could just as easily be a continuous stream of consecutive numbers. The timecode simply counts the SPG pulses in order to allocate each picture frame (or each block of 1920 audio samples) with a unique number from which it can later be identified.

When the camera and sound SPGs are synchronised to run at the same rate, their associated timecode generators are also synchronised so that they start counting picture frames (or blocks of 1920 samples) from the same point. After that, the camera and sound recorder can do their own thing, safe in the knowledge that the rate at which the picture frames are being shot, and sound samples are being captured are identical, and that each is being identified with the same timecode number sequence.

It is worth noting that the pulses and counting have to continue whether the recorders are actually recording anything or not. In practice, and purely for convenience the timecode numbers are usually aligned to the actual time of day (TOD) when working in this mode, and hence this is often called 'TOD working'. Obviously, this practice will result in discontinous timecode sequencing on the recorded tape as the recordings are started and stopped throughout the shooting day. Most editing controllers or workstations don't like that much, so it is usual to record for at least 10 seconds before the wanted material to make editing easier (although it is not disastrous if this can't be achieved).
In post-production, when it comes to putting the pictures and sound together, the rate at which the pictures are reproduced will be controlled by the pulses from the studio's SPG. The same SPG will also provide suitable pulses to control the rate at which the digital sound system produces audio samples — so we know that pictures and sound are being replayed at exactly the same rate that they were filmed at.

Now we just need to make sure they both start at the appropriate place, and this is where the timecode comes in. A suitable start point will be identified on the video source and the corresponding timecode noted. The sound system will then search for the same timecode number within its recordings and position itself accordingly. When the picture and sound replay is started, the speed of the two sources is controlled by the SPG, and the system will 'nudge' one of them (usually the sound, but not always) backwards or forwards slightly until the timecode information aligns precisely. Once aligned, the only thing controlling the speed is the pulses from the SPG.

In the case of video equipment, the required pulses from the SPG are provided in the form of a composite combination of pulses called 'video B&B' (Black and Burst) or 'Colour Black'. This signal contains the vertical sync pulses that define the start and end of each picture frame, the horizontal sync pulses to define the start and end of each picture line, and the colour subcarrier which is used to make sure the colour information is coded correctly. In the case of digital audio equipment, the required pulses from the SPG are usually simple pulses at the sample rate — a signal called 'word clock'. Some systems will also use the AES or even S/PDIF composite signal, which embeds the word-clock information with the audio data.

Some video SPGs can also generate digital word clocks directly. In most cases, though, a B&B signal from the sync pulse generator has to be used as a reference to a digital clock generator, which then generates suitable digital word clocks for the digital equipment, locked to the video sync pulse generator.


Published October 2003