Cubase Tips & Techniques
Technique : Cubase NotesCarsten Kaiser

To receive multiple channel signals, your analysis Group track needs to be configured as a 5.1 surround channel.
Let's assume you've recorded and edited your next hit single in Cubase, and now you'd like to construct a mix whose instruments go hand in hand, complementing each other tonally but not treading on each other's toes. When frequency clashes between different parts are occurring, EQ is the traditional starting point, but modern DAW projects, which can comprise a huge number of tracks, group channels, send effects and so on, complicate the job of equalisation considerably. This is where frequency analysis tools come into play, and there's a perfectly good one built into Cubase 7's Studio EQ plug-in.
If you want to compare even just five or six main tracks (or groups) in your project, though, your screen will soon become unworkably crowded using this sort of analyser. A better option for such comparative analysis jobs is a tool that can monitor frequency activity on several channels at once, within a single plug-in instance. There are various such third-party plug-ins, including Melda's MultiAnalyzer, Blue Cat's FreqAnalystMulti, Vertex DSP's MultiInspector and Voxengo's SPAN Plus. In this workshop, I'll explain how to use SPAN Plus for the job, but while the setup might change for some of those other plug-ins, the same principles will still apply.
SPAN Plus is very reasonably priced ($49.95), but I appreciate that not everyone wants to open their wallet every time they read an SOS Cubase column! Fortunately, Voxengo also offer a freeware version of SPAN. Despite its stripped-down range of functions, this freebie plug-in provides enough analytical capabilities in many cases. Even if it just helps you to get the kick and bass out of each other's way by suggesting where to apply EQ cuts, it could help you take your mixes to the next level.
Project Prep

Naming the SPAN Plus input channels and choosing appropriate group names makes this process much more intuitive.
First, you'll need a Cubase Project containing multitrack audio. The examples use multitrack drums and bass guitar, and it will be easier to follow my instructions if your Project uses similar audio.
To use SPAN Plus, you'll need a dedicated 'analysis channel' in Cubase. SPAN Plus can be fed with up to eight channels using, for example a 7.1 source, but the maximum number of input buses for a single channel in Cubase is six. Start by creating a group channel, and in the configuration dialogue, choose 5.1. Name this group channel SPAN. Now configure the group channel to provide your six distinct input buses, as follows:
1. Create buses: Choose Devices/VST Connections and select the Group/FX tab. Then right-click on the bus named SPAN and choose Add Child Bus to SPAN/Add All Mono Child Buses to SPAN. You've just created six new input buses for your frequency-analysis group channel.
2. Rename buses: Rename these buses according to your own analysis needs. I've used shorthand for various instruments (KK for kick, BS for bass, and so on).
3. Assign outputs: In the 'output routing' column, set the group channel's output bus routing to 'no channel'. This ensures that the analysis channel's audio stream won't screw things up by reaching your master bus!
Setting Up SPAN Plus

Adding child buses to your Group channels will make each channel in the group available as an individual send destination.
Now you're ready to load SPAN Plus into one of the SPAN group channel's insert slots. Before the fun part starts, we just need to organise this plug-in's routing — because otherwise it's easy to lose your way while doing the multi-channel analysis. Here's how:
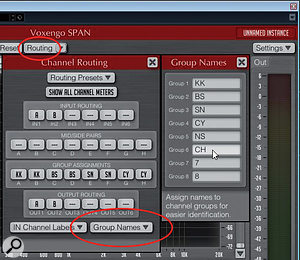
1. Set up inputs: Click on the 'routing' label (not the arrow on the right-hand side of the label, but the label itself). Then click on the IN Channel Labels button and rename the first two channels In1 and In2.
2. Set up groups: Open the Group Names dialogue box and rename the groups to match the input-channel names on your SPAN group channel.
3. Route inputs to groups: Inside the Channel Routing dialogue, route SPAN's inputs to different groups (A to F).
4. Assign channels to groups: still inside the Channel Routing dialogue, set the group assignment for channel A to group KK, channel B to group BS, and so on. You can now see these separate groups at the bottom of the plug-in.
On With The Show!

To feed the plug-in with the corresponding channels, route send signals from those tracks you wish to compare into the dedicated inputs you've created for SPAN Plus. Do not forget to activate these send routings on the instrument channels! In my example, I've routed sends from several drum instruments (kick drum, snare drum, and so on) to their respective input buses.
As you let your song play, activate the KK group button at the bottom of the SPAN Plus GUI. You'll instantly get a visual representation of the frequencies present in your kick-drum signal. From the Underlay menu above the spectrum window, you can choose another signal with which to compare your kick. In the example, I've chosen BS, which is the bass guitar, so I can check whether the bass and kick might be interfering with each other. Armed with this information, I can then use EQ on either or both tracks, knowing precisely where I'm most likely to be able to cut frequencies to make the tracks sit rather better together and avoid undesirable masking.
It doesn't take a great leap of imagination to see that you can do similar analyses to see if your bass notes and guitar chords are struggling in the mid-range and upper octaves, or if the cymbal sound and any special effects are occupying the same parts of the frequency spectrum. Using this method, you have countless possibilities for really digging deep into the frequency analysis of your productions. Yes, you still need to use your ears and your EQ tools as normal, but it should become much easier to zoom in on problem areas in your mix.
More Power

SPAN Plus Enables you to underlay the frequency plot from one channel beneath another, and to colour code the plots. Here, you can see three channels being analysed.
If you find this a useful tool, you might find yourself wanting yet more analytical power. Despite the six-input limitation of Cubase's buses, it's possible to use SPAN Plus for more extensive analysis, because it provides up to 48 virtual import/export slots — and these can be used across different instances of SPAN Plus. Start by opening an instance of SPAN Plus in the insert slots of each of the channels that you'd like to analyse. Then:
1. Rename: Open the plug-ins' GUIs and rename each new instance of SPAN Plus in its top-right corner to reflect the track in question (Kick, Bass, Snare, and so on). Don't forget to give the analysis graph of each instance a different colour!
2. Export Graphs. Open the GUI of your first SPAN Plus instance (Kick, for example). Press the Import/Export button and click on 'Export to'. Choose entry 1. Your kick-channel analysis is now ready to be imported into other instances of SPAN Plus. Repeat this procedure for each Cubase channel you'd like to analyse.
3. Import Graphs: Open a plug-in instance of your choice and click on the Import/Export button. Then choose Import From > Bass (stereo) in the first import slot. Choose the Snare (stereo) entry in the second slot and Cymbal (stereo) in the third slot. You will now see the analysis graphs of the kick, bass, snare and cymbal tracks.
Even More Fun
Need even more graphs? No problem. Go back to the multi-channel instance of SPAN Plus you set up earlier.
1. Rename main instance: In your SPAN Plus group channel, open the SPAN Plus GUI and, in the top-right corner, rename it Analyser Group.
2. Export graphs: Click the Import/Export button and, at the bottom, choose the third group (SN, for example). You will now see the analysis graph for the snare signal as well as the underlying graph of the cymbal signal. Click on 'Export to' and choose a free slot. Choose the fifth group and export it to another free slot.
3. Import Graphs: At the bottom of the Import/Export settings, click on the first group and import the graphs of both groups you've just exported to the available import slots. You will now see all six of the different analysis graphs at once.
If you really want to, you could choose to combine both techniques: setting up several multi-channel analysis instances, you could compare a maximum of eight different signals at once. These would include your chosen analysis group, its underlying graph and up to three imported stereo groups, along with their accompanying underlying graphs.
0
No comments:
Post a Comment