Cubase Tips & Techniques
Technique : Cubase NotesJohn Walden
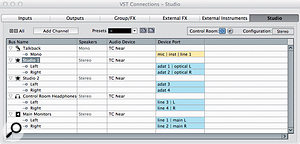
The Studio tab of the VST Connections window allows you to configure the Control Room Mixer. The Studio tab of the VST Connections window allows you to configure the Control Room Mixer.
Most sophisticated pieces of software include functions that remain mysterious to most users: you're not quite sure what they're there for but, as long as they don't get in the way, you can happily ignore them and get on with your work. However, if you spend the time really getting to grips with what such functions offer, they can make life so much easier! One such feature in Cubase (there are plenty more to explore!) is the Control Room, and that is the focus of this month's column. Get to know it well and the Control Room can become very useful, not least when it comes to creating monitor mixes for the various artists you're recording.
As many of you will be aware, in traditional recording studios, the hardware mixer was the main tool used to create and manage monitor mixes that could be sent to the headphones of each of the musicians in the recording session. In the more upmarket systems, you could also adjust the relative levels of the different tracks, allowing you to emphasise the elements that each artist needed to be able to give their best performance. Cubase's Control Room allows you to replicate this functionality in software. If you record your own music as a solo musician in a small domestic studio, the ability to create a monitor mix might seem less critical than on a pro session recording a full band or orchestra, but monitor mixes can also be really useful for the one-person-band — as I'll explain later in this article.
Building A Control Room
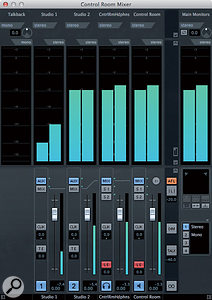
The Control Room Mixer. The Control Room Mixer.
The Control Room is activated (and deactivated) via the Studio tab in the VST Connections window. Once it has been activated, a number of different channel types can be added using the Add Channel button. In the example screenshot, four stereo outputs have been specified; the main monitors, the control-room headphones, and two 'studio' outputs. The Studio channels are the ones used to create your artist monitor mixes, and up to four of these are available. A single input channel has also been added, to which you can route a talkback microphone. Each of the virtual outputs created in this process can be assigned to a different hardware output. (Note that this does, of course, require you to use an audio interface with multiple hardware outputs!) These physical outputs would, in turn, feed monitor speakers or, via suitable headphone amps, various sets of headphones.
I'll come back to the issue of benefits for those with more modestly endowed hardware later. Meanwhile, if this is you, just make the Main Monitor connection active and leave everything else 'not connected' for the time being.
Any channels created in the VST Connections dialogue will appear in the Control Room Mixer. This is a separate window from the standard Cubase mixer, though, as we will see in a minute, the two are linked. In the screenshot example, the upper portion of the Control Room Mixer is set to display level meters, but it can also be toggled to show insert effect slots. One obvious use for these is to add limiting to your headphone monitor mixes, giving a little extra protection to your artist's eardrums.
Mix To Taste
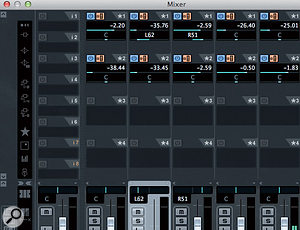
Studio Sends in the main Cubase Mixer allow the monitor mixes to be created. Studio Sends in the main Cubase Mixer allow the monitor mixes to be created.
Having set up a Studio channel, you need to get some audio into it, and the eagle-eyed amongst you will have noticed the star icons beside the Studio channels in the VST Connections window. A similar star icon exists in the upper-left vertical selection strip of the main Cubase mixer. Clicking on this one displays the mixer's four Studio Sends for each mixer channel (although in this example, only the first two sends can be activated, as I've only created two Studio channels in the VST Connections window).
If you wish to feed audio from a track to one of the headphone mixes, you simply switch on the send's power button and adjust the level and pan of the signal being sent. You can, therefore, create any balance of the various tracks that you wish in a particular Studio channel — it doesn't have to reflect the mix you hear in the main studio monitors at all, and each Studio channel mix can be different from the others. Usefully, pan positions can also be set independently for each instrument, and each Studio Send features a pre-/post-fader switch. Pre-fader means that changes made to the levels in the main mixer during your mix do not alter the balances in the headphone monitor mixes. Of course, if you want the headphone mixes to follow those balances, then the post-fader option is also available.
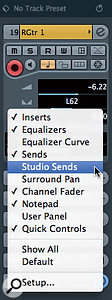
The Studio Sends are also available via the Project window's Inspector, but they're not visible by default. Right-click on the Inspector, and you'll then be able to toggle them on/off, along with any of the other standard Inspector sections.
Ready Mixed
 For a complex mix, setting up four such monitor mixes from scratch in this way would be time consuming. Fortunately, the process has a short cut that allows you to use the mix balance of the main mixer as a starting point. In the Project window, first select all the tracks that you wish to create sends from. Leave them selected and switch to the Control Room Mixer. Then, right-clicking on a Studio channel will bring up menu options to 'Use Current Mix Levels' or 'Use Current Pan Settings'. These options do exactly what you'd expect, and once selected, all you then need to do is adjust the send levels of a few key tracks to meet the needs of each musician.
Each channel in the Control Room mixer also features a Click button, and pressing any of these passes Cubase's standard-tempo click-track to the channel (although note that it needs to be engaged on the Transport Panel first). Usefully, you can choose to send it only to the outputs that require it. So for example, you might feed the click to a drummer but not to the vocalist or through the main monitors. Click level and pan can be set individually for each Control Room Mixer channel, which allows you, for example, to send the click to one ear and the musical elements of the monitor mix to the other.
Do Talk Back
Studio Send levels can also be accessed via the Project Window's Inspector panel. Studio Send levels can also be accessed via the Project Window's Inspector panel.
 In a studio, the talkback mic allows the engineer to communicate to the musicians via their headphone monitor mixes. That's obviously useful if the artist is in a different room, but even within the confines of a single-room home-recording setup, the approach can save a lot of hassle. If you've set up a Talkback channel in the VST Connections window and have a mic connected to your hardware, the Talk button engages this option (it turns green when on). Immediately beneath the button is a level control, which allows you to reduce the overall monitor mix level reaching the musician's headphones while you are trying to talk to them.
Talkback can be engaged for individual Studio channels via the TE buttons (which also glow green when engaged). So if you want to talk to the guitarist, drummer and bass player about how dreadful the vocalist is without the vocalist knowing about it, this can easily be achieved! Different levels of talkback can be specified for each monitor mix using the level control beneath each TE button (for example, perhaps the drummer can't hear you but you don't want to deafen everyone else).
Playing With Yourself
The main mix balance can be used as a starting point for building your monitor mixes.The main mix balance can be used as a starting point for building your monitor mixes.
All this is great for those with lots of audio outputs and lots of musicians, but how does it help the solo artist with an audio interface that only has a single stereo output and a headphone socket that gets the same mix as the main monitors? Well, even solo artists can benefit from an alternative mix balance when tracking. It might be useful to have more drums and bass, to help you lock more tightly to the groove, for example, or even just 'more me' — whatever you feel might help you achieve the best performance of the next track to be laid down. You could just adjust all the levels via the main Mixer window to create this alternative mix, but then you have to reset them to return to your 'proper' mix balance.
A better option is to set up a Studio channel, which you can temporarily assign to your main outputs via the numbered 'S' buttons in the Control Room channel of the Control Room Mixer (these buttons glow orange when engaged). You can then create your required alternative mix via the Studio Sends as described above and monitor this while tracking. To then return to the 'proper' mix balance, you simply select the Mix button (blue when engaged). Essentially, what you are getting here is the ability to create different mix balances: one via your main Mixer, and others via the Studio Sends, and you can switch between them as required.
And There's More...
There are a few more monitor mix features that I haven't had space to describe here, such as the ability to reset the Studio Send levels globally, but the Control Room also has other features up its sleeve. For example, it can be used to switch between multiple monitoring systems, and it offers a 'listen' mode (where you can hear a single channel at normal volume but with everything else at a lower volume) and the ability to monitor external audio sources — all of which are a topic for a future column.
No comments:
Post a Comment