Cubase Tips & Techniques
Technique : Cubase NotesJohn Walden
If you want to breathe new life into your drum loop library, Cubase has the tools. You just need the know‑how! This is the second part of a three-part series. Read Part 1 and Part 3.

Last month, in the first part of this short series on getting more mileage out of your audio drum loops, we looked at cataloguing a loop collection in Cubase's Mediabay, slicing it using the Sample Editor and then exploiting these sliced sounds via Groove Agent One (GAO). This time, we'll run through ways to use Beat Designer to exploit sliced loops in GAO.
Beat It
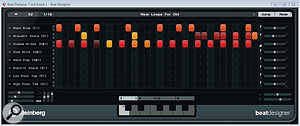
The Beat Designer window has been resized to show all 32 steps used in the current pattern. The Beat Designer window has been resized to show all 32 steps used in the current pattern.
As its name suggests, Beat Designer is a tool for creating drum patterns. It can be inserted as a MIDI plug‑in on a track that's sending MIDI to GAO. Much as I like the Cubase Drum Editor, pattern‑based drum programming can often be quicker, more intuitive and allow easier experimentation. The patterns themselves are created in the central grid, where beats can be added to trigger specific drum sounds at particular positions in the pattern. Beat Designer can hold 48 patterns, organised into 12 banks of four, and selected via the mini‑keyboard‑style buttons at the bottom of the window or triggered via MIDI. Pattern Banks can be saved and then re‑used in other projects.
Names On The Map
By default, Beat Designer shows eight drum lanes, with sounds that default to GM mapping (for example, kick drum on C1, snare on D1, closed hi‑hat on F#1, and so on). When your GAO drum sounds are based on slices from a drum loop, this GM mapping is unlikely to match your GAO pads. GAO allows you to change the MIDI note associated with a particular pad but, unfortunately, this is not the best strategy, because it means that the MIDI loop created by GAO no longer triggers the original loop correctly.
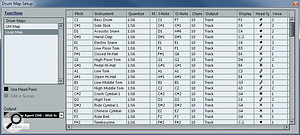
There are a couple of simple ways to improve matters. First, you could create a Drum Map (see the screen shot, opposite). You'll find more detail on this back in SOS February 2009, but essentially this maps input notes ('I-notes') to output notes ('O-notes') that drive your drum module. With only three or four GAO slices/pads to configure, the process takes only a couple of minutes.
Equally as quick, another approach involves putting a second copy of your best hit for each drum sound onto the appropriate pad to fit the GM convention. However, to retain the maximum flexibility, it's also worth going back a step: make sure that when you first drag and drop your sliced loop from the Audio Part Editor to GAO, you drop it in one of the higher pad groups, well away from the key MIDI notes used for the GM drum mapping between C1 and B2. If you then re‑open your sliced loop in the Audio Part Editor you can perform a second drag‑and‑drop operation for just the best slices onto the appropriate pads to match the GM convention (the most common ones are in group two of the GAO pads). You then have access to the MIDI trigger loop (based on notes in the higher octaves) and the key individual slices. Of course, it would be easier if you could just copy a pad to another pad in GAO but, for some reason, you can't do that (only swap or move samples from one pad to another). There's something small for a Steinberg GAO programmer to work on!
In The Bank

In this Drum Map, only three O‑Notes needed adjustment to use the best kick, snare and hi‑hat slices to map correctly between Beat Designer and the sliced loop in GAO. In this Drum Map, only three O‑Notes needed adjustment to use the best kick, snare and hi‑hat slices to map correctly between Beat Designer and the sliced loop in GAO.
Basic pattern creation in Beat Designer is a doddle, but two settings are worth checking before starting; the number of steps, and the step resolution. Both of these are located at the top left and, together, they dictate how long (in beats and bars) your patterns will be. For example, if you set the number of steps to 32 and the step resolution to 1/16, you end up with patterns that are two bars in length, with 16 steps in each bar. Usefully, the Beat Designer window can be resized, and if your screen real‑estate allows, it's well worth making it wide enough to show all the steps in a pattern, to avoid the tedium and confusion of scrolling while you're programming.
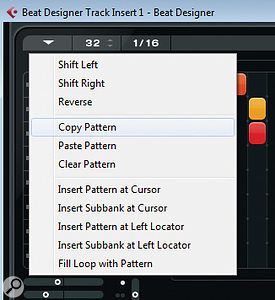
The best way to quickly create some patterns is to generate a basic starting pattern, copy it a few times, and then create variations using each of those copies. The drop‑down Pattern Functions menu (the downwards-pointing arrow-head located at top left) includes Copy Pattern and Paste Pattern options, so this is easy to do. Patterns can be triggered via the buttons located centre‑bottom of the window or from MIDI notes. To ensure that the MIDI note data intended as pattern‑change information is correctly interpreted, make sure the Jump button (top right) is lit. By default, Beat Designer waits until the next bar when changing patterns, but if you also engage the Now button, changes become instantaneous.
Creative Tools

The Pattern Function menu allows patterns to be copied and pasted within the Beat Designer pattern bank or pasted into the Project window as MIDI parts.The Pattern Function menu allows patterns to be copied and pasted within the Beat Designer pattern bank or pasted into the Project window as MIDI parts.
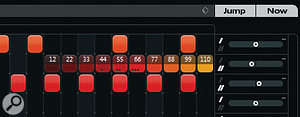
Beat Designer includes a few tools that make it easy to do some creative experimentation with your patterns. For example, while you have some control over the velocity of a step depending on the vertical position that you click in the lane when you create it (higher velocities at the top), if you click and hold on a step and then drag vertically, you can set an exact velocity (the velocity is displayed as you move the mouse). In addition, if you hold the Shift key while dragging vertically, this will adjust the relative velocity of all the active steps in that lane — which is useful if you need to adjust the overall balance of a single drum without losing any dynamics you might already have programmed. Finally, on the velocity front, if you hold down Alt (PC) or Option (Mac), click on a step and drag up or down to change its velocity, but then also drag left or right while moving up or down, you can create velocity ramps. This is great for programming things like snare rolls that build in level towards the end of a bar.
Experimenting with the timing of the beats for particular drum sounds can also provide some useful variations. If you want to move the positions of beats in a particular lane, this can be done in whole‑step divisions by holding the Shift key down and dragging left or right. If you want a slightly more subtle positional shift, the horizontal Offset sliders (located to the right of the lanes), can be adjusted to either push or drag the beats in a lane relative to the absolute grid. These sorts of shifts can really change the feel of a pattern and are worth experimenting with.
For a somewhat more unpredictable result (well, musically unpredictable at least), holding the Alt/Option key and dragging over a lane will 'invert' it — existing steps are removed, empty steps have a beat created. It is, of course, also possible to copy an entire lane: hold down Alt/Option and then click and drag in the name column on the left of the window. This is useful for doubling things like kick drums, so you can trigger two different kick-drum slices to add some bottom‑end beef.
In this example, a velocity ramp is being added to a snare roll (the middle of the three populated lanes). Note that three of the snare beats also have flams added (indicated by the small dots), while both the snare and hi‑hat (lowest populated lane) have had both some timing offset adjustment and type 2 swing added.In this example, a velocity ramp is being added to a snare roll (the middle of the three populated lanes). Note that three of the snare beats also have flams added (indicated by the small dots), while both the snare and hi‑hat (lowest populated lane) have had both some timing offset adjustment and type 2 swing added.
Clicking right at the base of an existing step button allows a flam to be added (a tiny dot appears at the bottom of the step button. If you continue to click, this cycles through single, double and triple flams, before returning to no flams again. The small set of controls located at the bottom left of the window allow the positions of the flam relative to the beat grid, and the relative velocity of the three flams, to be set. These settings operate at the pattern level, so you can create different flam effects for each pattern.

Finally, if you want to add a little swing to particular lanes, you can chose between two settings using the very small slash‑like switches located next to the Offset sliders to the right of each lane. By default, all lanes use setting 1 and, also by default, this is set to zero swing. The amount of type 1 and type 2 swing can be set using the two horizontal sliders located at bottom right. Again, these operate in a pattern‑based fashion, so there's plenty of flexibility here.
MIDI Matters
When creating drum parts from scratch, I prefer the pattern‑based approach of Beat Designer to using a MIDI editor, but your own mileage may vary. If you do create some Beat Designer patterns and have a hankering to edit them further with the MIDI or Drum Editor, patterns can be exported to your project by dragging and dropping from the pattern buttons to a MIDI track or via the drop‑down Pattern Functions menu we used earlier for copying patterns. Either way, if you want the actual MIDI data, make sure you turn off the Jump button before exporting. If you don't, the MIDI part created will simply contain a single MIDI note for triggering the pattern in Beat Designer.
And Finally…
In the final part of this series, we'll turn our attention to the new and improved Loopmash and see what tricks that has up its sleeve for… well… mashing loops.
Read Part 1 and Part 3.
No comments:
Post a Comment