Cubase Tips & Techniques
Technique : Cubase Notes
John Walden
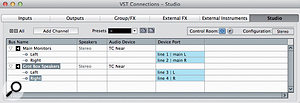
Configuring two sets of stereo monitors in the VST Connections dialogue. Configuring two sets of stereo monitors in the VST Connections dialogue.

In last month's Cubase workshop, we looked at how you can create up to four unique headphone monitor mixes for your recording musicians, using the Studio channels in Cubase 6's Control Room, and we saw how the ability to create these alternative monitor mixes can be just as useful for the solo musician. Artist monitor mixes are not the only trick up Control Room's sleeve, though, and this month we'll focus on how it can be used in place of a traditional console or hardware monitor controller to switch between multiple monitoring systems in your studio.
Mix Translation
Having spent lots of time lovingly crafting your mix to the point of perfection, it's a great feeling when you feel the hairs on your neck tingling. So you take a copy to your band-mate's house... and experience the nastiest of surprises when it sounds horrible on their playback system. What went wrong? One obvious answer that we often explore in these pages is that you need to improve your studio acoustics; but it could also be that you need to check your mixes on different speaker setups. For example, the bass might sound and feel amazing on your full-range monitors, but be inaudible on someone else's speakers.
The Control Room Mixer can be used to switch between the different monitoring systems via the A and B selection buttons located at bottom right. The Control Room Mixer can be used to switch between the different monitoring systems via the A and B selection buttons located at bottom right.
Look at the top-notch studios that are often featured in the pages of SOS, and you'll usually see more than one set of speakers in the control room. You might also see a mono grot-box, and there's probably a decent set of reference headphones on hand somewhere too. By checking your mix on these different speakers, the aim is to pick up problems that you miss on the others, and thus to produce a mix that works well on various playback systems.
If the pros need to do this in studios where cash has been splashed on creating the perfect listening environment, you can bet that it's even more essential in an average home or project studio, housed in a spare bedroom or a garage!
Hardware Matters
To work with multiple monitoring systems, you could juggle lots of patch cords, or invest in a mixer or outboard monitor controller, but assuming you have a multi-output audio interface, Cubase's Control Room can plug the gap, allowing you to switch between systems with nothing more than a mouse click.

We'll look at a simple example: switching between a main set of nearfields and a pair of domestic hi-fi speakers — but the more ambitious amongst you should note that the Control Room allows you to switch between surround sound, stereo and mono systems if you need to. I'll come back to the issue of mono a little later.
Assuming you have the necessary speakers, you'll need to make sure you have sufficient physical outputs available on your audio interface into which you can hook up your amps and/or speakers. For my example, my setup requires four outputs (two stereo pairs).
Control Room Setup

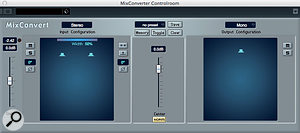
The MinConvertor provides a downmixing facility, to check mono compatibility.The MinConvertor provides a downmixing facility, to check mono compatibility.
With your various speakers connected to your audio hardware, you need to configure the Control Room to allow them all to be used. To do so, you need to open the VST Connections window (from the Devices menu), select the Studio tab and then ensure that the Control Room is switched on (when it is, the power button icon becomes blue).
Then add the necessary output channels for your various speaker sets. In the illustrated example, I've added two stereo outputs; one for my main nearfield monitors and one for my hi-fi speakers. I've then clicked in the Device Port column to assign each speaker to the appropriate output on my interface. For this example, that's all I needed to do.
Time To Switch
The appearance of the Control Room Mixer (also opened from the Devices menu) will change to reflect the settings made in the VST Connections window. In the example, I've again kept this simple (for example, there are no Studio, Talkback or Headphone channels shown). Located at the bottom of the Main Monitors channel is a tiny box that lists the different output channels you have configured in the VST Connections window. In this screen, this list comprises my Main Monitors (output configuration A, highlighted in blue here as this is the currently selected output) and my grotbox speakers (output B).
Switching between the different speakers is then simply a matter of clicking on the appropriate button (A or B) and, usefully, this can be done on the fly during playback. Note that you can also click on the larger button located immediately to the left, to toggle between each of the output sets in turn. Usefully, the buttons light up in orange for your additional monitor sets, rather than the blue used for your main monitors, and this is a useful visual reminder of which is currently selected.
A DAB Hand

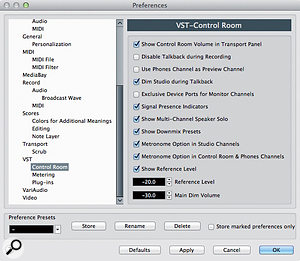
The Preferences page for the VST Control Room.The Preferences page for the VST Control Room.
If you plan to have your music used in a broadcast context, the odds are that some listeners, either via a radio (weak FM signals collapse to mono, and the world's biggest selling DAB radio has only a single speaker!) or older TV set, will hear at least some of your mix in mono — so just as it's important to cross-reference your mix between different monitoring systems, it's important to check that the mix works well in mono. This can be particularly problematic if you use lots of hard panning, stereo widening or modulation effects, as these can often respond unpredictably when things are mashed down to a single mono speaker, with elements sounding dulled or even disappearing completely, due to phase-cancellation. There's always some trade-off between mono and stereo mixes, but you need to be able to hear what's happening to find the right balance.
Fortunately, the Control Room Mixer makes it easy to check mono compatibility. Just above the monitor-selection box is a second box. In the example screenshot, this presents two options: stereo (numbered 1, currently selected and shown in blue) and mono (numbered 2). There might be others there if you have, for example, a surround-sound playback system as well. If you select the Mono option, Cubase makes use of its MixConverter settings to downmix the stereo into mono: essentially, the same signal is sent to both speakers, creating a phantom mono image that appears to sit between the two speakers. (View and configure the MixConverter settings by clicking the small downward arrowhead located just above the box itself). You can use this downmixing function for any of the monitoring systems that you've configured in the Control Room.
There is one further trick here, though. As described by Hugh Robjohns in the Q&A/Sound Advice section of SOS February 2011, listening to a simulated mono mix is not quite the same thing as listening on a single mono speaker, where all sound is coming from the same source: the latter approach paints a more reliable picture. If you have sufficient audio outputs and speakers, you could configure a further Control Room output to feed a mono signal to a single speaker, but if you don't have enough outputs or speakers it's possible to use just one of an existing stereo pair.
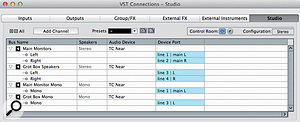
Configuring the Control Room outputs to provide a mono monitoring system using just a single speaker from your standard stereo monitoring system. Configuring the Control Room outputs to provide a mono monitoring system using just a single speaker from your standard stereo monitoring system.

To configure such a system, you need to visit the VST Control Room section of the Preferences dialogue box. Here, you need to uncheck the 'Exclusive Device Ports For Monitor Channels' option, which is switched on by default. Unchecking this allows you to assign the same hardware audio output to more than one of your monitor setups within the VST Connections dialogue. You might do this if, for example, your main stereo monitors were also used as the front left/right monitors in a surround system. You can then return to the VST Connections window, create a new mono output channel and assign it to the hardware output using either your left or right monitor. As shown in the screenshot, I've done this both for my main nearfield monitors and my grotbox speakers. These monitoring setups get added to the list in the Control Room Mixer, and you can switch between any combination of stereo, simulated mono and true mono, as required. Neat!
On Me Head, Mate!
Headphones provide a very useful alternative monitoring reference, and good headphones can be particularly useful for hearing tiny details in the mix. In many audio interfaces, the headphone and main stereo outputs are fed the same signal, so to 'switch' to that, you just stick the headphones on your head, and maybe turn up the headphone volume knob. The Control Room, though, features a dedicated headphone channel, and if you have the appropriate hardware, you can configure it as part of the Control Room switching system — and keep your headphones at a consistent level without them leaking into your speaker mix or you ever having to reach for the volume knob!
Cubase 6.5 Update
Shortly before we went to press, Steinberg released Cubase 6.5 which, unlike previous 'incremental' releases, is a paid update and is available from Steinberg's web site, priced €49.99 (about $55 in the US). Not only are there a number of bug fixes (which are also available for free in a v6.06 update), but there are quite a number of major new features. Top of the bill are two new synths, Retrologue and Padshop, and other additions include the DJ-EQ and MorphFilter plug-ins, improvements and refinements to the VST Amp Rack, the lane-based comping system and AudioWarp, and the inclusion of 64-bit Rewire support. We'll review v6.5 once we've had a chance to explore it in greater detail, and we'll also look at how to get the most from the new features in future Cubase columns.
No comments:
Post a Comment