Cubase Tips & Techniques
Technique : Cubase NotesYour Cubase project is recorded, mixed and mastered... but is it secure?
John Walden
Any long-standing SOS reader will be only too aware of the evolutionary nature of recording technology. Whether it’s two-inch multitrack tape, four-track cassettes, ADAT, dedicated hard-disk systems, SD cards or — as is currently the case for most of us — hard drives or solid-state storage within desktop computers, this evolution includes changes and redundancy in recording formats over time. This is a significant issue and, while digital hard-disk-based recording might be ‘better’ in terms of convenience and flexibility, I’m not so sure it is ‘better’ in terms of longevity or portability. Fortunately, Cubase 8 has a pretty comprehensive set of tools to both back up and future-proof your projects. Matt Houghton last looked at this topic in September 2010, when Cubase was at version 5.5. Five years is a long time in Cubase and computing terms and while some things have remained the same, there are some new options. So, if you’re using Cubase 8 and want to back things up so you can revisit them in the future, read on...
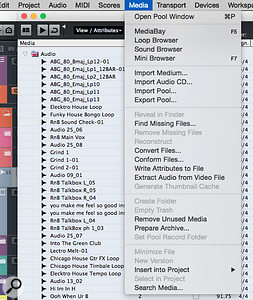
The Prepare Archive command will ensure you have (almost!) all your project data in one place.The Prepare Archive command will ensure you have (almost!) all your project data in one place.
Strategy Meeting

When it comes to your (recording) data security, there are two aspects to address. First, you want to ensure that your entire recording project exists in a self-contained form in at least two discrete places (that is, on your primary computer’s hard drive and on a second, physically separate, hard drive) in case the primary drive fails; in other words, you need a backup. Ideally, you want a third backup somewhere off-site — otherwise, if, perish the thought, your studio suffered a fire, you’d lose everything.
Second, you need protection against incompatibilities caused by upgrades or casualties with your OS, audio plug-ins and virtual instruments; you need to future-proof your project. Creating an audio-only render of each track within your original project is probably the best current solution. It also brings the added benefit that you would also have a version of your project that could, with minimum fuss, be imported into another DAW should you need to work with it on another computer system or in a different studio.
Copy Right
The backup phase can, itself, be split into two main stages. Before you can actually create the backup copy, you have to ensure all the media (audio, MIDI and video) associated with the project resides in a single folder. With the project open, execute the Media/Prepare Archive command. When executed, Cubase checks to ensure that all the media files used within the project actually reside within the project folder and, if not, you are offered the opportunity to copy them to the project folder.
Music-to-picture composers often stream their video files from a dedicated drive so, by default, they may not reside within the project folder. If that’s the case, a ‘copy to project folder?’ prompt appears. Be careful though; video files can be large and, once copied, if you continue to work on the project, the clip will stream from the project folder rather than any dedicated video drive.
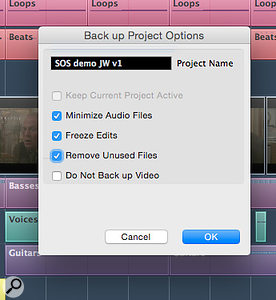
Having formed your self-contained project folder, the second step is to execute the File/Back up Project command. The dialogue box allows you to specify a new folder location for your backup copy (preferably on a dedicated, separate drive used for backup purposes) and to rename the backup copy of the project. It also provides an opportunity to spring clean the project’s media files. The combination of the Minimise Audio Files option (which excludes any portions of audio files not currently used in the project) and Remove Unused Files option (unused media files are removed from the working project and, therefore, are also not included within the backup version) can pare the project’s size down considerably. The downside is that the process is non-reversible; once those unused takes are gone, they’re gone. Whether you apply these options will depend on how decisive/ruthless you are about a project being ‘finished’.
The Back up Project dialogue can both create a backup and tidy up some media-file clutter.The Back up Project dialogue can both create a backup and tidy up some media-file clutter.There’s a further catch. If your project contains any of Steinberg’s VST Sound content (held in the VST Sound folders you can view from MediaBay and including, for example, any Steinberg loop packs or LoopMash content), note that this is copy-protected and not present in either your project folder or any backup copy. If you eventually have to use the backup copy on your own system, this should not be an issue. However, if you try to open it on a different host system, you will need to ensure that the same VST Sound content is installed for things to work smoothly.
Limited Shelf Life

The backup process described above provides you with security against hard-drive failure. However, it will not protect you — a few years down the line, perhaps — from the possibility that several of the virtual instruments or effects plug-ins used in a project may no longer exist.
While it’s not a completely future-proof solution, rendering out each track of your finished project as a standard audio file (including any track-level plug-ins) is probably as good as it currently gets. If you use the ‘Pro’ version, Cubase offers you two ways of doing this; the channel batch option within the Export Audio Mixdown (EAM) system or the newer Render In Place (RIP) options. I touched on the latter in SOS October 2015 and as I mentioned then, there’s some overlap between the older EAM and newer RIP functions, so let’s consider their differences for the task at hand — a track-level audio archive of our project. (Incidentally, Cubase also has the Track Archive function but this is a somewhat different beast and a topic for another day.)

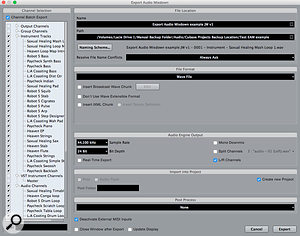
The Channel Batch Export option in the Export Audio Mixdown dialogue box makes audio-only archives very easy to generate.The Channel Batch Export option in the Export Audio Mixdown dialogue box makes audio-only archives very easy to generate.While EAM provides a suitable means of generating your final stereo mix file from a finished project, or for creating stems from any Group Channels, it can also be used to generate a full, track-level, audio-only version of your project. And, if you’re using the full (Pro) version of Cubase, the Channel Batch Export option within EAM allows you to create all those channels in a single pass.
In the example shown in the screenshot, I’ve enabled Channel Batch Export and selected all the Instrument Tracks and Audio Channels for export. I’ve also selected a new folder in the Path field. With a new folder, you get a Create New Project option in the Import Into Project section. Select this and, when you hit the Export button, Cubase will create a new version of your project in the folder you specify and open it in Cubase. Each of the original tracks will have been replaced by an audio track running from bar 1 beat 1 to the end of the project. While this means you get lots of sections of silence in the audio files, it’s about as universal a format as it’s possible to have — if you had to open the files within another DAW, it would be very easy to line everything up to start with.
There are a few things worth noting. First, the EAM dialogue doesn’t allow you to mix and match audio file formats. In the screenshot, I’ve created stereo files for each track but you can also opt for mono or split stereo. If your original project includes a mixture of stereo and mono audio tracks, you could easily do two passes to render the stereo and mono tracks separately in their correct formats. Second, note that this is an audio-only process so, while it works with Audio, Instrument, Group and FX tracks, if your project includes a video track, you’ll have to handle that manually.
Render In Place gives you more control than Export Audio Mixdown but is perhaps better suited to audio-only archives that are only intended for use in Cubase itself.Render In Place gives you more control than Export Audio Mixdown but is perhaps better suited to audio-only archives that are only intended for use in Cubase itself.Finally, it’s worth noting that the created audio files are rendered with all the track-level processing (Pre-section, Inserts, EQ and Channel Strip) applied but without any send effects or master channel processing. This is probably a good thing but it does mean that, should you have to use this audio-only archive at some stage, you will need to reapply any main stereo output processing in order to fully recreate the original mix, and that you’ll not have access to the send effects for individual tracks — if two vocal parts have been sent to a reverb, you can print that FX channel, but you can’t separate the reverb for the two parts.
I covered the basics of the alternative RIP approach in SOS October 2015 so I’ll not repeat that here, but it’s worth highlighting the differences between the two methods. On the plus side, RIP provides more control over how far you can go down the effects processing food chain than EAM (although, that said, the Channel Settings option is still the most sensible for this application) when rendering. In addition, RIP handles the mono/stereo status of the original tracks in a single pass.
On the downside (well, a downside if you’re looking to create an audio-only archive to open in something other than Cubase), unlike EAM, the rendered audio files don’t all start at bar 1 and finish at the end of the project; they only span their length/position in the original project. Cubase will time-stamp WAV files, so they can be aligned in another DAW, but relying on this method will make your backup that bit less bullet-proof! Finally, like EAM, RIP will not deal with any video files used in the project so you’ll need to manage these manually. On the whole, while I like the direction that Steinberg are heading with RIP, for this kind of total project audio rendering, at present, I think EAM is still the more efficient solution.
Insurance Policy
Bad stuff beginning with ’s’ happens even in the most well-looked-after computer recording system. When it does, if your projects are securely backed up, and also exist as audio-only archives, at least you can ensure that ‘bad’ doesn’t go to ‘worse’. The one loose end to tie up is to recommend that you also export all the MIDI data from Cubase as a MIDI file. Amongst other things, that will enable you to revisit instrument sounds in the future, and to quickly establish the project’s tempo, should you wish to add new parts to your audio project.

No comments:
Post a Comment