Steinberg Cubase Tips & Techniques
Technique : Cubase Notes
Learn how to avoid frequency clashes in your mix, with our tutorial on advanced ducking techniques in Cubase.
Mike Senior

Here you can see Cubase's compressor set up to achieve the ducking effect in our demo project: note the very low Threshold and Ratio settings, and that the Make‑up control's Auto button is switched off. The mouse is currently hovering over the Activate Side‑chain button, which needs to be lit if signals from other audio channels are going to trigger the compressor's gain reduction.Here you can see Cubase's compressor set up to achieve the ducking effect in our demo project: note the very low Threshold and Ratio settings, and that the Make‑up control's Auto button is switched off. The mouse is currently hovering over the Activate Side‑chain button, which needs to be lit if signals from other audio channels are going to trigger the compressor's gain reduction.
In mixing these days it seems that more is always more: more vocals, more guitars, more drums, more bass... more everything! Clearly, though, there's only so much space and headroom available in any given mix, so it's not really possible to just keep turning things up. The only way, in fact, that you can make the most important elements of your mix stand out is to turn down something less important to make space.
However, there is a way you can, to an extent, have your cake and eat it too. Let's take an example of an all‑too‑common mixing difficulty to illustrate what I mean. You have electric guitars in your mix, which you want to be big, bright, and powerful, but you also want your vocals to cut through them and be audible. You've tried what you can to separate these conflicting parts with EQ, panning, and effects, but no matter what you do you can't shake the nagging urge to keep shunting one or the other fader upwards.
One of the issues here is likely to be that the guitars need to be louder when the vocalist isn't singing (to remind everyone how much of a rock god your guitarist is), but then they need to be a little quieter when the vocals are delivering those all‑important melodic and lyrical hooks. Not too tricky a concept to grasp in principle, but it'd be a pain in the arse to put into practice if you had to keep dipping the guitar faders for every vocal phrase, even if you fired up Cubase's automation facilities. Fortunately, you can set up this kind of level‑riding so that it happens automatically, a process often called 'ducking', and in this column I'm going to demonstrate a couple of different ways you can do this in Cubase.
Ducking At Mixdown: Using A Compressor
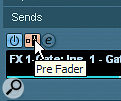
. After switching the send on and fading it up, it's worth clicking the Pre‑fader switch (bottom screen, right) to avoid problems with the ducking should you alter vocal fader levels later.")
Once the Guitars track's compressor plug‑in's side‑chain is activated, you can access it from the Sends pane on the Vocals track's Inspector (top screen, right). After switching the send on and fading it up, it's worth clicking the Pre‑fader switch (bottom screen, right) to avoid problems with the ducking should you alter vocal fader levels later.Once the Guitars track's compressor plug‑in's side‑chain is activated, you can access it from the Sends pane on the Vocals track's Inspector (top screen, right). After switching the send on and fading it up, it's worth clicking the Pre‑fader switch (bottom screen, right) to avoid problems with the ducking should you alter vocal fader levels later.
To remain with our vocals/guitars example, the basic requirement is to be able to turn down the guitars in response to the vocals. The first way you can do this is to route all your guitars through some kind of processor and then send vocal signal to the processor's side‑chain inputs to trigger gain reduction whenever the vocalist is singing. Although there is a dynamics processor, called a ducker, which is specially designed for this task, no sequencer I've ever used (Cubase included) has ever provided one built‑in. As a result, most people who pull this stunt in software tend to use the next best thing: a compressor.
In order to show you how to set this up, I've put together a little demo project which you can download from /sos/may09/articles/cubasetechmedia on the SOS web site. This contains four submixes from my recent Mix Rescue remix of James Elder and Mark M Thompson's song 'English Actor', which I wrote about back in SOS February 2009: dry lead vocals, lead vocal effects, electric guitars, and the rest of the backing track. The first thing to do is select the Guitars track in the Project window and put a Cubase Compressor plug‑in in one of its insert slots. When the plug‑in window pops up, click the little Activate Side‑chain button, which is parked to the left of the preset selector in the top bar of the plug‑in window.
Now highlight the Vocals track in the Project window and open its Sends in the Inspector. Click in any free slot and you should see your freshly activated side‑chain available as one of the available destinations. Once you've created this Send allocation, switch it on in the Inspector and set its little fader to unity gain with a swift Control‑click. I'd also recommend that you set the Send to pre‑fader mode using the switch to the right of the Send on/off button. What this means is that if you decide to adjust your global vocal levels after setting up the guitar compressor (perhaps to create a 'vocal up' version of your final mix) it won't impact on the amount of guitar ducking taking place.
Suggested Settings
Ducking At Mixdown
Using a compressor as a ducker usually requires slightly different settings than you'd expect when compressing normally. First of all, you'll want your compressor to reduce the guitar gain pretty much whenever the singer opens their mouth, so you'll want to use a pretty low threshold. As long as the noise floor of the vocal parts is low enough, this could be down at the ‑60dB extreme of the control's travel if you like. While you're at it, switch off the Auto button alongside the Make‑up control, otherwise the compressor will attempt to compensate for its anticipated gain reduction, and although this can be handy in some situations it'll just mess with the overall guitar levels in the mix here.
There's only so much you want the compressor to turn down the guitars underneath vocal phrases, because if you overdo the gain reduction not only will the guitars seem too weedy during those moments, but there'll also be obvious and unmusical transitions between the compressed and uncompressed guitar levels as the vocalist begins and ends phrases. On this basis, it makes sense to go for a very low ratio, and something like 1.04:1 makes a good starting point with the ‑60dB threshold in our demo project. Of course, if you try this technique within your own mixes you'll probably need a different ratio setting, but as long as you aim for a reading of no more than 2dB on the compressor's gain‑reduction (GR) meter you shouldn't overcook things.
The only other control you need to worry about now is Release, which, at a default of 500ms, is way too long for this kind of subliminal mix balancing. Instead, pull it all the way anti‑clockwise to its minimum 10ms setting, so that it tracks the vocal levels as quickly as possible. Now you should be able to play the track and hear the effect in practice. If you're not sure what you're listening for, then whack the guitar‑track's compression ratio up to 2:1. This will pretty much mute the guitars whenever the vocals come in if you've set everything else up correctly. As long as you can hear that things are working, you can then progressively turn down the compression ratio to see how different amounts of gain reduction work within the mix. Remember that it's quick to compare the ducked and un‑ducked guitar levels by clicking the compressor's bypass button. Double‑check that you have the Make‑up control's Auto button switched off, though, or you'll get a distracting overall level change when you do this.
A More Powerful Method: The Gated Send

In these screens, you can see a more flexible and powerful way of implementing side‑chained ducking within Cubase, by setting up a Gate plug‑in in an FX Channel, to operate as a send effect.In these screens, you can see a more flexible and powerful way of implementing side‑chained ducking within Cubase, by setting up a Gate plug‑in in an FX Channel, to operate as a send effect.
If you wanted to duck multiple tracks in your arrangement from the same source, you could expand the setup we've just looked at quite easily. However, a disadvantage of this approach is that you need to set up a compressor plug‑in for each track to be ducked. Although it's unlikely that this CPU load will topple your machine (given the CPU efficiency of Cubase's built‑in plug‑ins), setting up all these compressors, sends, and side‑chains quickly becomes a bore. Furthermore, ducking using compression isn't really ideal functionally, because in our example the guitar gain‑reduction will kick in less when the vocals are quietest, and this is the opposite of what you'd want in some respects.

For these reasons, I usually use an alternative ducking approach, which also offers some even more advanced processing options. The way it works is by using a Gate plug‑in set up in an FX Channel, with the gating triggered from the vocal signal via the plug‑in's side‑chain input. You then send from your guitar tracks (and anything else you want to duck) to the FX Channel. Doesn't this do exactly the opposite of what you want, though? Yes, of course it does, but if you then invert the signal polarity of the FX Channel, this gated signal cancels out the direct signals from the guitar tracks, bringing about the desired ducking effect. Let's look at the specifics in a bit more detail by working through this rig in our demo project.
Create an FX Channel by right‑clicking on the track list and, in the FX Track Configuration dialogue box, open the Effect pull‑down menu, and choose Gate from the Dynamics sub-menu. The plug‑in window's Activate Side‑chain button can be enabled as before, but you might as well turn off the button labelled Sidechain in the plug‑in's interface — that just engages side‑chain filtering, which shouldn't be necessary here. Set up a Send to this effect's side‑chain from the vocal channel, switch the send on and set it to unity gain. Now head over to the guitar track and set up a send to the FX Channel itself, again checking that you've switched the send on and set it to unity gain.
Ducking At MixdownThe final stage is to flip the polarity of the FX Channel, which you can do from the routing pane in the Mixer window. The button you're after has a Greek letter Phi on it (like an 'o' with a diagonal line through it) and will display an 'Input Phase' tool tip if you hover your mouse pointer over it — you may need to use the little arrow at the top left of the Mixer window to show you more controls if you can't see this button straight away. The polarity of the gated signal needs to be inverted, so make sure the Input Phase button is lit for the new FX Channel.
If you now just play back the demo mix, you should already be able to hear the vocal ducking the guitar levels after a fashion. (You might want to mute the backing track in the Project window if you want to hear more clearly what's going on.) However, there's a bit we can still do to refine the way the gate is responding. First we need to set the Threshold so that it opens for all the vocal sections, and turning it down to ‑40dB pretty much does the job for the demo audio.
. You can access this button from the Mixer window, although you may have to click the Show Routing arrow at the top left of the window first if you can't spot it straight away.") Then we need to reduce the release time again to track the vocal levels more quickly, as with the compressor, and you can go down to around 40ms here, I reckon. You'll notice with these settings that the gate isn't triggering particularly cleanly (the odd little bit of guitar occasionally breaks through during the vocal line), but that doesn't matter a tremendous amount in practice, because once we've toned down the ducking effect to more reasonable levels this won't be nearly as audible as it is while the guitar track is being completely muted by the vocal.
Then we need to reduce the release time again to track the vocal levels more quickly, as with the compressor, and you can go down to around 40ms here, I reckon. You'll notice with these settings that the gate isn't triggering particularly cleanly (the odd little bit of guitar occasionally breaks through during the vocal line), but that doesn't matter a tremendous amount in practice, because once we've toned down the ducking effect to more reasonable levels this won't be nearly as audible as it is while the guitar track is being completely muted by the vocal.Having confirmed that the ducking action is working as required, you can dial in more moderate gain‑reduction settings. The way to do that in this setup is to adjust the level of the send from the Guitars track to the ducker FX Channel: the higher the level, the more ducking, which is why at unity gain we're getting complete muting of the guitars when the vocal signal is detected. Without going into the maths, in practice you'll find that a send level of around ‑20dB will give you around 1dB of ducking, while a ‑11dB send will yield around 3dB of ducking, so you'll typically be looking for a figure somewhere between these two in most cases.
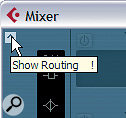
In order for the gated‑send ducking setup to operate correctly, you need to invert the signal polarity of the gated FX Channel track using its Input Phase button (top). You can access this button from the Mixer window, although you may have to click the Show Routing arrow at the top left of the window first if you can't spot it straight away.In order for the gated‑send ducking setup to operate correctly, you need to invert the signal polarity of the gated FX Channel track using its Input Phase button (top). You can access this button from the Mixer window, although you may have to click the Show Routing arrow at the top left of the window first if you can't spot it straight away.Because you're using a gate, not a compressor, the gain‑reduction will be the same for both high‑ and low‑level vocal signals — still not the perfect state of affairs, but better than you'll get when using the compressor‑based ducking method. However, this is where the power of the send configuration begins to become apparent, in letting you tweak the way the ducking occurs. If you wanted to achieve the ideal 'less ducking for louder vocal signals', you could follow the gate in our FX Channel with a compressor, again triggered via its side‑chain from the vocal channel. Set this to compress a few decibels on the loudest vocal notes and its gain‑reduction will reduce the FX Channel level, and hence the amount of ducking.
Ducking At MixdownBut it doesn't end there, by any means. Perhaps you only want to cancel out the centre of a synth pad sound when the vocals come along: use a similar setup in a mono FX Channel, and this will only duck the mono component of the synth pad. Another variant would be to use a high‑pass filter in the FX Channel so that it only ducks the high‑frequency content of any tracks conflicting with the lead vocal. This stuff can get pretty freaky pretty quickly...
So if your Gate plug‑in has been gathering the virtual equivalent of dust, then here's a great excuse to bring it out of retirement. You may not need these kinds of powerful ducking techniques on all your mixes, but once you get the hang of how they work, you'll be surprised how often they can help you out of a jam.
Other Ducking Combinations
I've used this article to concentrate on a specific example of where you might want to use ducking within your mix, but lead vocals and guitars aren't the only conflicting instruments that can benefit from this approach. Kick drums can often be encouraged to poke through your mix better if you duck various other elements to clear the way, particularly as the most audible part of a kick drum in a lot of listening systems can actually be found in the mid-range frequencies where there's a lot of competition from other instruments. If you're working in commercial dance and rock styles, you may also find it desirable to go for more clearly audible ducking in this instance, both by increasing the amount of gain reduction and by lengthening the release time so that you begin to hear a more audible 'swell' between kick hits as the ducking resets. This loudness‑simulation effect is similar to the 'pumping' effect you can get from a mix‑bus compressor, but I find it more controllable in a lot of ways.
Snare drums could also be used to trigger a ducker when you need them to cut through. I'd advise against ducking the other drum parts in a multitrack drum recording, though, as a lot of the snare sound comes from the overheads in these situations — so you'll risk throwing the baby out with the bath water that way.
Effects returns are another potential candidate for ducking, particularly where lead vocals are concerned, because heavy delays and reverbs, in particular, can have a tendency to blur the consonants and articulation that make any lyrics intelligible. Now that you can freely send from one FX Channel to another (in Cubase 4.5 onwards), ducking a delay effect shouldn't be any more difficult to achieve than ducking a recorded track, but if you have problems in a previous version of Cubase, you might need to set up the delay effect in a Group Channel Track, which will give you the ability to send on to the gated FX Channel.
And, of course, if you're after more adventurous effects, you might consider a ducking fuzz. Or should that be a fuzzing duck?
No comments:
Post a Comment