Cubase Notes & Techniques
Technique : Cubase Notes
Waves' ground‑breaking Vocal Rider plug‑in takes the pain out of vocal level‑automation, but if your budget can't stretch, you can get part of the way there using nothing more than Cubase 5's built-in processors.
Mike Senior
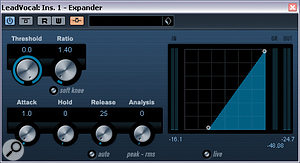
Here's you can see some suggested settings for Expander at the centre of this month's setup. Notice that the external side‑chain input (the orange button at the top) is activated.Here's you can see some suggested settings for Expander at the centre of this month's setup. Notice that the external side‑chain input (the orange button at the top) is activated.
I was intrigued to hear about the launch of Waves' Vocal Rider vocal-level automation plug‑in, because vocal micro‑automation is a regular part of my normal mixing process; particularly intrigued, in fact, because I'd already implemented a similar scheme using Cockos Reaper's dynamic parameter modulation. So when I noticed the plug‑in's price‑tag, my low‑fat cinammon frappucino almost spurted out of my nose! I'm sure that Waves' boffins have put some very whizzy technology under Vocal Rider's bonnet, but there's just something in me that rebels against parting with the cost of curry for 12 in return for something that simply adjusts gain, especially when I'm already pretty happy with my home‑brew alternative.
If you're wondering what the hell any of this has to do with Cubase, well, I'm also a Cubase user and, spurred on by memories of frappucino catastrophe, I recently began wondering if it would be possible to implement a similar automatic vocal‑riding scheme in Cubase too... and it turns out that it is! So here's how you do it.
Automatic Vocal Riding Basics

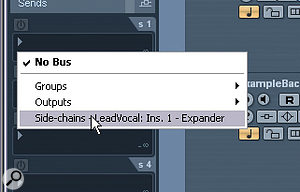
In order to get the lead‑vocal Expander to respond to the backing track, you need to send to the plug‑in's side‑chain input. You can see roughly what it should look like in the drop‑down Send menu here.In order to get the lead‑vocal Expander to respond to the backing track, you need to send to the plug‑in's side‑chain input. You can see roughly what it should look like in the drop‑down Send menu here.
In case you don't see the point of riding vocal levels, the basic concept is this: even if you compress a vocal heavily, its subjective level will nonetheless appear somewhat inconsistent because the backing track will mask the vocal more the louder it gets, and the amount of masking will change rapidly from moment to moment; a loud drum hit will mask the vocal more than a quieter acoustic‑guitar strum, perhaps. Because of this, a lot of effort goes into the micro‑automation of vocal levels in professional productions, and if you want to compete on that level, you can't afford to ignore the issue.
However, there is a way to take the sting out of this frequently tedious job, and that is to set up some processing that monitors the level of the backing track and then applies corresponding gain changes to the vocal track to compensate for the masking effects. In Cubase, the trick to managing this is to send signal from your lead‑vocal channel to a Group Channel with the VST3‑format Expander plug‑in inserted, and then configure that plug‑in to respond (via its side‑chain) to the level of the backing track. Once this is operational, you can mix in the expanded vocal signal alongside the unexpanded one to achieve the desired degree of automatic gain‑riding. When that loud drum hit comes along, the expander responds to it by letting more of the lead vocal through, thereby boosting the overall level of the vocal in the mix for that instant and defeating some of the drum's masking effect.
The Basic Setup

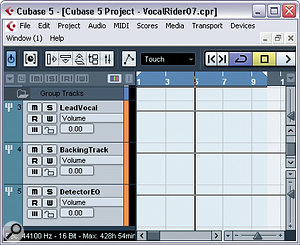
The final, refined setup: group channels for lead‑vocal and backing‑track signals, and another to enable equalisation of the lead‑vocal Expander's side‑chain signal.The final, refined setup: group channels for lead‑vocal and backing‑track signals, and another to enable equalisation of the lead‑vocal Expander's side‑chain signal.
Right, let's get onto the specifics. First of all, right‑click in the Track List and select Add Group Channel Track. To start with, you'll want two stereo ones, so adjust the pop‑up dialogue box accordingly. Label these two LeadVocal and BackingTrack, and then reassign all the tracks in your song, with the exception of your lead vocal, to the latter group channel track. You can save time by doing this in bulk: highlight a series of tracks and then hold down the Shift key while you select the required destination from the Inspector's top pane. To feed the LeadVocal group channel, select it from the lead‑vocal track's Sends menu, switching on the send and Control‑clicking its little fader to set it to unity gain (0.0dB).
Now pop Cubase's VST3‑format Expander plug‑in into the LeadVocal channel's top Insert slot, and set it up as shown in the screenshot above. It's a bit of an unusual‑looking setting, because it's a very fast‑acting and with a maximum threshold, so on its own it sounds rather odd and stuttery. However, you'll never hear it on its own, so this is not really a concern — it's what the expanded signal does in combination with unexpanded lead vocal that matters. Note that the Activate Side‑chain switch at the top of the plug‑in window is selected (lit orange), to show that the plug‑in is expecting an external side‑chain signal.
The next stage is to create a Send on the BackingTrack channel, routed to the Expander's side‑chain input. You're looking for something like 'Side‑chains — LeadVocal: Ins. 1 — Expander' in the Send's drop‑down menu. Again, make sure the send is switched on and set to unity gain. And that's it. If you now play back your mix, the vocal should hold a more consistent subjective level against the backing track.
Refining The Outcome

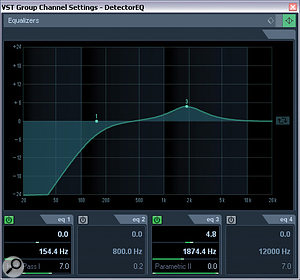
Here are some suggested EQ settings for the lead‑vocal Expander's side‑chain signal. The processing needs to be applied to the DetectorEQ group channel in this month's setup.Here are some suggested EQ settings for the lead‑vocal Expander's side‑chain signal. The processing needs to be applied to the DetectorEQ group channel in this month's setup.
As with a lot of mixing techniques, there's a fair bit you can do to refine the settings to achieve the best results. Indeed, the Waves plug‑in has a number of variable parameters as well, for this very reason. First of all, you'll almost certainly find that the additional vocal signal from the Expander track makes your overall lead‑vocal level appear too high. This is simply dealt with using your lead‑vocal track's fader, as you'd normally do — no need to tamper with any of the LeadVocal or BackingTrack group channel settings. The Vocal Rider plug‑in's output level fader serves a similar purpose.
Even with the vocal at the right overall level, you might feel that my suggested start‑up Expander plug‑in settings don't give the right amount of gain‑riding for you. Adjusting the level of the LeadVocal group channel helps here: the higher in level this is, the greater the range of the level riding. Bear in mind, though, that this will also affect the perceived overall level of the lead vocal in the track, so you may need to revisit your main vocal‑channel fader setting in tandem. If you're feeling confident, you could even adjust the response of the Expander, perhaps increasing the ratio for more extreme compensation, or tinkering with soft‑knee mode or Attack/Release/Analysis settings for a smoother outcome. These kinds of changes will give you some of the control you get from Vocal Rider's Vocal/Music Sensitivity controls, Fast/Slow switch, and Range sliders.
Apparently, Vocal Rider also automatically ignores background noise between vocal phrases, to prevent the plug‑in from riding this, and you can simulate that in this setup if you like, too: chuck a suitably configured Gate into an insert slot on the LeadVocal group channel, preferably before the Expander in the chain and triggered from the vocal signal, not the backing track. Finally, if you want to automate the vocal level manually, in addition to the automatic process, just ride your lead‑vocal fader as normal.
Bonus Points!
So far, we've primarily been offering Waves the sincerest form of flattery. However, because we've built our setup from first principles, we actually have some additional processing potential here: we can EQ the feed to the Expander's side‑chain input. Why would we want to do this? Well, if you think about it, the low frequencies of a bass sound are unlikely to mask a vocal as much as an electric guitar with lots of energy in the very 1‑5kHz range that's most important to vocal intelligibility, which means that EQ'ing the Expander's detector signal to reduce low frequencies and increase the 1‑5kHz range can help improve the subjective musicality of the automatic level‑riding. I'm guessing that Waves are already doing something akin to this within the code of Vocal Rider, but they don't give any control over it either way, whereas we can have full control of such an EQ if we refine our existing setup a little.
This is what we need to do. Create another group channel called DetectorEQ. It might as well be mono too, come to think of it, as this will give more preference to centrally panned backing‑track signals, which are also more likely to mask a typical lead vocal. Now reassign the BackingTrack group channel's send (it's feeding the Expander's side‑chain at the moment, if you recall) and route it to the DetectorEQ group channel instead. Then use the top pane of the DetectorEQ group channel's Inspector to assign its output to the Expander's side‑chain, in place of the default assignment (usually to Cubase's main mix buss). You can now EQ the side‑chain signal using the DetectorEQ channel's built‑in EQ. Check out the suggested settings shown in the screenshot on the left, and work from there.
No comments:
Post a Comment