Cubase Tips & Techniques
Technique : Cubase NotesHave you ever wondered how best to use the different automation modes in Cubase? Then read on...

John Walden
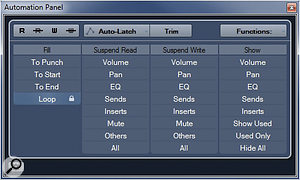
The re‑vamped Automation Panel, with the Fill 'loop' mode locked on.The re‑vamped Automation Panel, with the Fill 'loop' mode locked on.
The automation features form some of the most powerful mixing tools in Cubase's arsenal, and in this workshop I'll explain how to get the best from them. For the most part, the examples I describe will automate track volume settings — but the same techniques can easily be applied to many other parameters. I'll also discuss some of the new aspects of the Automation Panel, which was revamped in v5.5.
Mix 101
Let's start with an example. I've done my basic recording, and each of my main instruments is routed to a suitable Group Channel (drums, bass, rhythm guitars, vocals, and so on). I can now use some hardware faders or my mouse (or its scroll-wheel) to adjust their relative volumes.
From this starting point, one of the fundamental elements of the mix process is to get the right balance between the various instrument groups. Unless you're very lucky, your mix will require some changes in this balance as the song progresses — and these changes are most likely to be required firstly between the major song sections (verse, chorus, and so on), and secondly within a song section (for example, a build in level as a chorus reaches its most dramatic point). There are all sorts of different ways to approach these two automation tasks, but here's a method that deals with the two stages in turn.
Panel Beating

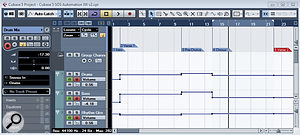
Volume‑automation curves added for a series of Group channels, using the 'loop' fill mode.Volume‑automation curves added for a series of Group channels, using the 'loop' fill mode.
Opening the Automation Panel (via the Project menu) puts all the key automation settings at hand. Some of the changes in Cubase 5.5 simply altered how various options were accessed. For example, the key automation modes (touch, auto‑latch and crossover) are now available from a drop‑down button/menu positioned in the top‑centre of the panel. However, a new feature is the 'Fill' section (positioned on the left side of the panel), and we'll use this in the first stage of our basic mix‑automation process.
Four fill modes are provided ('to punch', 'to start', 'to end' and 'loop'), and these define what happens when you punch out of an automation pass. For example, if you're writing automation data to a track with the 'to end' mode engaged, when you stop moving the fader (that is, when you 'punch out' of doing automation), the final automation value is 'filled' through to the end of the project. This overwrites any existing automation data from the point of punch out to the end of the project. This might not always be such a good thing, of course, but as we'll see in a minute, some of the other fill options are a little more subtle.
Take Your Fill

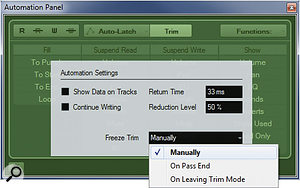
The Automation Settings dialogue box can be used to alter the way trim automation data is handled.The Automation Settings dialogue box can be used to alter the way trim automation data is handled.
For our purposes, the most useful fill mode is 'loop', which provides a simple way to start building a mix. First, we need to identify the key sections of the project (in the screenshot below, I've defined these using markers). Then the left and right locators can be set around the first of the sections we want to work on. From the Automation Panel, the 'loop' fill mode can be selected, along with auto‑latch. We then need to switch on the automation write buttons for the tracks we're going to control, and set Cubase to cycle playback through the chosen song section.
If we adjust our controllers for these tracks while playback progresses, the normal automation data is added. However, when playback reaches the end of the cycle region, the final value set by the automation curve is then 'filled' across the whole cycle region for any track where the control was adjusted during that pass. You can continue to adjust the levels as Cubase cycles through the song section and, on each pass, if a control is adjusted, the new value is again 'filled'.
Working in this way, you can gradually adjust the balance between your tracks, until you find exactly the combination of levels that works best for that song section. Once you've finished the process for one song section, the same steps can be followed for the others. At this point, you might not have finished 'finessing' the mix — but the broad brush-strokes will be in place.
The 'loop' fill button stays active until you stop playback. This allows you to leave Cubase cycling through the song section until you've finished adjusting your levels. Once playback is stopped, the fill mode automatically disengages. Usefully, fill modes can be locked on, by clicking twice on any of the buttons (a small padlock icon appears). Clicking again will both unlock and switch off the mode.
Keeping Trim

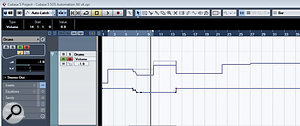
Three automation curves result from using trim automation. In this example, the trim curve (blue, with break‑points shown) causes the 'sum of automation' curve (dark blue) to drop below the original automation data (light grey) from about bar six. However, an additional pair of break‑points has been added at the start of bar 14 to correct this.Three automation curves result from using trim automation. In this example, the trim curve (blue, with break‑points shown) causes the 'sum of automation' curve (dark blue) to drop below the original automation data (light grey) from about bar six. However, an additional pair of break‑points has been added at the start of bar 14 to correct this.
Having got the broad mix balance set for each section, the second stage of the process is to write in some more detailed tweaks. Using automation in Trim mode provides a suitable (although, as described below, not perfect!) way to approach this, but before we start, we need to consider one of the global automation settings. The Global Automation Settings dialogue box can be opened using the button located at the bottom‑left of the Automation Panel. A number of general settings can be adjusted here (including the automation data Reduction Level). In this dialogue — for reasons that will become clear in a moment — the Freeze Trim setting should be set to 'Manually'.
Trim mode is engaged using the Trim button (top centre of the Automation Panel). In this mode, all the adjustments are made relative to the existing automation data, and this provides a means of fine‑tuning our 'first stage' automation in each song section.
When you add additional automation data in Trim mode, two more curves are added to the original automation curve for a track. The original curve is shown below in light grey, while the 'trim' data is light blue, with the usual break points shown. The third curve — shown in a darker blue — represents the actual automation that will be applied, by adding together the original data and the trim data.
The one down side of Trim mode is that it can't be set to only operate between the left and right locators — if you use Trim mode to raise volume slightly, that rise is applied from that point forward to the end of the project, not just the end of the song section. This is where the 'manual' trim setting comes into play. For example, when Freeze Trim is in 'On Pass End' mode, as soon as you stop playback the Trim automation and original automation are replaced by their sum — and the original automation data is lost (although it can be retrieved via undoing). If you apply 'trim' data to a section at the start of your song in this mode, the carefully crafted balances in later sections would be lost.
However, in manual mode, the three separate curves are retained until you manually freeze the trim data (this is done via the Functions drop‑down menu located top‑right of the Automation Panel). This means that, having added some trim data for any song section, you can grab the last automation break‑point on the trim automation curve (or create a new break‑point for this purpose) and drag it so that the dark blue 'sum of automation' curve sits back on top of the original (light‑grey) automation curve. You can also do this via the Info Line, by setting the value of this break‑point on the trim automation curve to zero. One further thing to note is that if you turn off Trim mode via the Automation Panel, the original automation curve becomes editable (displayed with break‑points) but the trim curve and the 'sum of automation' curves are also still visible.
Final Tweaks
This second stage of Trim‑mode automation allows you to make finer adjustments to your mix, while all the time being able to easily return to the broad mix balances you set up for each song section. Once you've completed both of these stages, the mix ought to be (in terms of level, at least!) in pretty good shape.
While all three automation curves generated above are saved with a project (and restored upon re‑opening), when you think you have completed all your automation editing, you can then use 'Freeze All Trim Automation In Project' (via the Functions drop‑down menu) to combine the original and trimmed automation data into a composite automation curve. If you do subsequently decide that some additional tweaks are required, a further 'trim mode' pass can always be made.
No comments:
Post a Comment