Cubase Tips & Techniques
Technique : Cubase NotesMatt Houghton
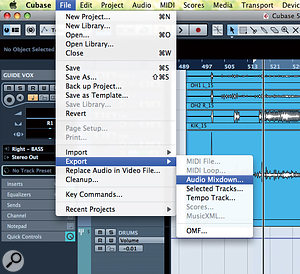
The batch export function is found in the same location as the Audio Mixdown options in previous versions of Cubase.

The inability of Cubase to export multiple audio channels at once — in other words to 'batch export' — used to be a huge source of frustration for many users... but Cubase 5 provided us with exactly that feature, and there have been further refinements in the latest free update to v5.5. If you're still running a previous version of Cubase, you can read about some workarounds in the columns I wrote back in SOS December 2006 (/sos/dec06/articles/cubasetech_1206.htm) and September 2008 (/sos/sep08/articles/cubasetech_0908.htm). But for those of you who've invested in Cubase 5, I thought it might be useful to explore the new functionality, and to discuss in which scenarios it might prove useful — or, for that matter, in which it could remain frustrating!

Why Batch?
It pays to be methodical about naming your new files, and the new Naming Scheme dialogue box makes that process easier than ever.
The most obvious applications for batch exports are project archiving, and preparing files for transfer to another DAW — perhaps you want someone else to mix your track in Pro Tools, for example. In these situations there are several options. For example, you could try using the OMF export function, which exports regions and timing information, level settings and a few other parameters. Alternatively, you could try exporting the clips as time‑stamped broadcast wave (BWF or BWAV) formats, which can be automatically aligned in the target DAW.
However, not all DAWs work as well as they should with either approach, and for some you have to invest in expensive add‑ons to use the OMF function. In any case, I've found OMF to be a bit hit‑and‑miss, and neither of these approaches takes account of the various MIDI, virtual instrument and send‑effect channels. So the safest, most inclusive approach — and that which, in my experience, is the most commonly used — is to bounce everything down as individual audio tracks, all starting at the same point, so that you'll be able to load every part, whether virtual instrument, audio, effects or group channels in the other software. In other words, you just archive everything as audio.
Other than project archiving or transfer to another DAW, there are plenty of situations in which you might want to bounce only a few parts at a time: maybe you're composing or sound‑designing for picture and want to send several stems to a dubbing mixer, by exporting only your group tracks; alternatively, you might want to provide a few selected parts for a remixer to play with; or perhaps you want to do your own mastering and wish to export three separate mixes, each using different master-bus processing, for comparison in another application, or a new Cubase project.
A fully featured batch‑export function, then, needs to be flexible, and as a minimum to include options that suit each of the above scenarios. Thankfully, the facility introduced in Cubase 5 ticks all of those boxes — although there are still one or two limitations, which I'll discuss later.
Basics

This single screen to show the progress towards bouncing all of your tracks might look simple, but Cubase users have been waiting for it for a long, long time!
The basic approach to batch exporting is the same as with any normal bouncing of your stereo mix: go to File / Export / Audio Mixdown and click, which will bring up the new Export dialogue box. By default, this is set to export only the main stereo output on mixdown, but on the left of the panel there's now a list containing each audio output in your project (whether VST instrument, audio, group, FX or output bus). MIDI channels aren't included, as they don't emit audio, though anything they're controlling, such as VST instruments, will have an audio output that can be bounced. For archiving puposes, it might be useful to have the option to export MIDI and audio tracks simultaneously, but it's not a huge omission.
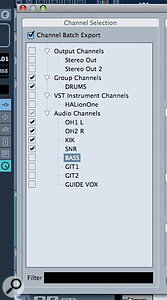
The available tracks are organised in a two‑tiered 'menu tree' (pictured top right), with individual tracks listed by channel type, and next to each track or group of tracks is a tick box where you define which channels you wish to export. At the very top of the list is a Channel Batch Export tickbox, which is effectively a 'select all' option — though you're also able to de‑select them individually. That's particuarly useful if you've imported reference tracks into your DAW, or use a 'scratch' track for loops or reference material, but don't want them included in the export.
Options
 In the right‑hand part of the screen, there are a few handy options that add flexibility. First, you get the usual export options to define the audio file type you want to export (AIFF, WAV, BWF, MP3 and so on), as well as bit depth, sample rate and the like. This selection applies to all elements at once, though: you can't bounce, say, a backing‑track guide mix as an MP3 and a lead vocal part as a WAV at the same time — but that's no great limitation in practice, and I can't think of any other major DAW that currently includes this option.
Anyone who finds their computer struggling to keep up with the resource demands of a complex project should be happy to find that there's an option to export all audio files and then open them automatically in a new project. Imagine you've created your meisterwerk, for example, with an army of synths, samplers, amp modellers, and other processors and effects, and the whole thing is beginning to place quite a strain on your computer. Rather than go through and freeze each track, one by one (come to think of it, wouldn't it be lovely to have a 'Freeze Manager' facility that took care of this?), you can save your project as a backup, and then export all the tracks to create a new project, freeing up all that processing power to focus on the mix.
That approach can be quite liberating, compared with freezing, because you're committing to decisions — and I find that can help me to switch 'modes' from composer to mix engineer. Alternatively, this could be a way of creating stem mixes to send to a mastering or dubbing engineer, or remixer, who happens to be working in Cubase or Nuendo.
At least that approach should be useful. Although the Create New Project function did indeed create a new project, and worked fine on my Win 7 studio machine, when I did this on my MacBook Pro in OS 10.5.7 with Cubase 5.5, the audio wasn't placed on the arrange page: the tracks had been created, but I had to manually move the audio files from the Pool on to the relevant tracks. That's an annoying bug, but at least the files and tracks were created in the same order, so it was a simple case of selecting all and dragging them in one action.
Mono To Stereo
The new channel selection windown gives you plenty of control over which tracks are exported, and in what format, at any given time.
By default, any mono tracks in your project will be bounced as stereo files — and in versions earlier than v5.5, that was the only option. The reason for this is that your mono audio tracks have a stereo panner on them, so if you've left your mono channel centrally panned, you get the same signal at equal power on the left and right channel of a stereo track; and if you've used panning, then your panning decisions are reflected in the level of the signal in each channel. If that's a source of annoyance, and you're not yet prepared to upgrade to v5.5, you could always use one channel of the mono track and boost the level accordingly, or sum the two in a group channel in the target DAW.
In v5.5, there's a tick box to specify whether you want the tracks bounced down to mono. Unfortunately, this applies globally to whatever tracks are being exported, and this is potentially an issue if you're exporting a large project to a limited track‑count environment like Pro Tools LE. I suppose it's not that much of an effort to perform two separate bounces, though: one pass for the stereo channels, and another for mono ones.
One handy feature, particularly when archiving, is an automatic file-naming facility, which allows you to include the track name, project name and other track-specific parameters, and add incremental numbers at any point in the name. It's a pretty standard sort of tool in the computing world, but you'd be surprised how many times this sort of useful facility is omitted in music software: it's invaluable if you want to keep your exported projects organised, and can take the hard work out of importing them into a different DAW later.
All Out Winner
Despite a few quirks, the new multitrack export function in Cubase is welcome. It's a far more elegant route to multi‑channel export than the previous techniques of routing channels to inputs, using TapeIt‑style plug‑ins, or using the third‑party MEAP macro. Importantly, it's a much quicker route to exporting all your tracks, particularly if you're running Cubase on a multi‑core or multi‑processor machine, where the offline bounce is nice and quick. I hope I've been able to point out some of the potential uses, as well as some less‑than‑obvious pitfalls!
No comments:
Post a Comment