Cubase Tips & Techniques
Technique : Cubase Notes
Knowing how to interpret and act on Cubase's level meters can help you to make better mixes.

Matt Houghton
Cubase allows you to change the appearance and behaviour of its meters.
Every DAW package worthy of the name includes digital peak meters, whether in a mixer, on individual channels or both — but how often do you actually use them for anything more than an animated red and green light show? Paying more attention to your meters — and looking beyond simply where they 'clip' — can lead to better mixes.
When I say 'clip', Cubase doesn't actually clip the signal during processing: its 32- or 64-bit engine can accommodate much higher levels. But when you bounce any processing down to 24-bit (or maybe 16-bit) files, or when the signal passes through any A-D or D-A conversion stages (if you're using external effects, for example), the audio file can't store all that information — and you'll end up with clipping. It's this I have in mind when talking about clipping in this article.
In Cubase 5, the channel level‑meters are digital peak meters: they show you how near to clipping the highest peaks of each track are, and if they clip, there's a 'virtual‑LED' indicator at the bottom of the meter that will remain red — an indication that you should pull things back a bit. They're tweakable to some extent, as I'll explain later, and setting them up so you know what they're telling you is important.
But however you calibrate them, such meters tell you very little about how 'loud' things are. Even the briefest, inaudible transient can clip without you really noticing, and it may be that the average level is actually quite low. In other words, you could have two channels, both with the same meter reading, but one much louder than the other; or one signal only reaching ‑20dBFS and the other reaching 0dBFS, but the ‑20 one actually sounding louder! To monitor loudness, you need a different sort of meter that works on average levels — a VU or PPM meter. Cubase doesn't include such meters, but it's easy enough to add third‑party plug‑ins to do the job (I'll discuss a few options later).
You also need to know where any meter is taking its reading from: is it at the channel input, before all the insert slots, after the inserts, or after the fader? It makes a huge difference!
A final thing to say about peak meters in general is that they're quite a blunt tool and won't always tell you if a signal is going to clip. It's perfectly possible for there to be material that doesn't register as clipping on a conventional peak meter, yet will distort when run through a D‑A converter, as the converter 'draws' the the peak of the curve represented by the digital audio signal.
In this article, I'm going to run through a few strategies for getting the best out of Cubase's built-in level meters, and will recommend a few free or inexpensive plug‑ins that can help you plug the gaps where Cubase falls short.
The Built-in Meters
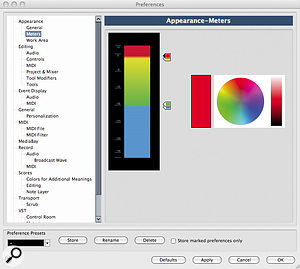
 Who needs to see red, unless they're approaching clipping? By changing the colours and calibrating Cubase's meters as shown in the previous screen, I'm easily able to see when a signal reaches ‑18dBFS, as well as when it clips.
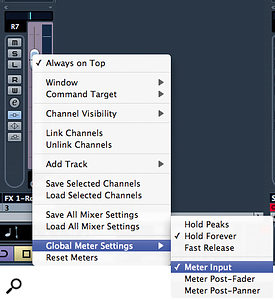
By default, Cubase's meters are set to show the input level on each channel. This can be changed by right‑clicking on any fader, at which point you're presented with the option to set all meters as pre‑ or post‑fader, or post‑pan. There's no option to do this individually for each meter; such an option could quickly become confusing, but it would be nice to be able to change the master and group channels independently, so you could monitor channel inputs and bus outputs, or vice‑versa. The pre‑fader option displays the input level before any processing; the post‑pan option displays the signal level after the inserts and pan 'pot', and post‑fader displays exactly what you'd expect. Each setting has its uses at different stages in the recording and mix processes.

Conventionally, with an analogue mixer, you'd monitor the channel inputs, to make sure the signal wasn't clipping on the way in, and set each processor so that the signal was at roughly unity gain. That way, you could patch things in and out without affecting the level, and would hear (or see on the group meters) if you were overcooking things: you wouldn't really need post‑fader channel metering. The stereo‑bus meter, though, would be set to post‑fader, so you could see what was going out of the desk.
It's a sensible approach to follow in Cubase, though I do find things slightly different in any modern DAW. For one thing, you probably can't see all your channel and bus meters at once — so it makes sense to display the channel levels post‑panner or post‑fader when mixing. That way, you know you're not overcooking things with processing before the signal goes to the fader, or from the fader to the bus. On the master bus, group or effects channels, I'll also want to know whether the signal is clipping on the way in, and will often rely on a dedicated meter on the last insert on the stereo bus to monitor the output level.
Colour & Calibration
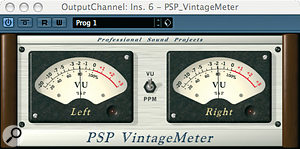
Cubase lacks any VU or PPM‑style metering, and PSP Audioware's freeware Vintage Meter plug‑in can fill that gap.
All Cubase's level meters are presented as virtual‑plasma columns, with four different colours and a dedicated virtual clip LED. If you go to Cubase/Preferences/Appearance/Meters (Mac) or File/Preferences/Appearance/Meters (PC), you'll find the option to change any of the four colours, and to move the point at which the colours 'cross over'.
This isn't just an aesthetic option. For example, if you leave the 'turnover points' spaced apart, the transition between colours is quite gradual, getting redder (using the default colour scheme) as the signal gets hotter. If, instead, you pull them close together into pairs you can get a much clearer indication of when a certain (non‑peak) level has been reached. It's far from conventional, but I find that latter approach handy, because I can calibrate things so that I can easily set up individual drum tracks to peak no higher than around ‑12dB post‑fader, without having to look at the numeric values on each track. That way, I can be more confident that I'm leaving sufficient headroom on the drum bus, without having to scroll along a busy mixer and look at the bus itself.
Plug‑in Meters: Pay Attention!
Each channel in Cubase has an input gain control, a level fader and six pre‑fader and two post‑fader inserts. There are more opportunities than I'd care to count to push signals into clipping. So, with metering only available directly in Cubase at three points in the chain, it pays to look more closely at gain structure in your plug‑in chains.
The unity‑gain approach discussed earlier is a good practice to get into, but it's not the only way of working. Some manufacturers offer an input and output meter as standard on their plug‑ins, and these can help you to get a cleaner, more satisfactory result from your processing: the bottom line is that you shouldn't really be 'clipping' at any stage, because whereas analogue gear might distort in a muscially pleasing way, and while analogue‑modelling plug‑ins can imitate this behaviour, real digital clipping (unless used as a deliberate effect) will offend your ears.
If your plug‑ins don't include the necessary meters, try inserting Cubase's Compressor with the threshold set to maximum (so that it doesn't act on the audio), and use its meter: simply drag it around your project to the appropriate insert slot when you want to check levels.
Third‑party Metering Tools

Right‑clicking on a meter reveals options for selecting the point in the signal chain from which the meters take their readings.
As I mentioned, peak metering isn't the only form of metering. Some form of average‑level metering, such as a VU or PPM meter, will give you a much better indication of the relative loudness of different signals, because they're not measuring the full‑scale transients. So as long as you leave enough headroom to allow for those transients, the averaging meter is a much more useful mix tool. PSP Audioware's cross‑platform freeware Vintage Meter (www.pspaudioware.com/plugins/tools_and_meters/psp_vintagemeter) can be configured in much the same way you would an analogue meter.
When it comes to inter‑sample distortion, SSL offer another freeware meter called X‑ISM (www.solid‑state‑logic.com/music/x‑ism/index.asp), which simulates the process performed by a D‑A converter, and warns when the recreated analogue signal would go above 0dBFS, even though the digital peak‑meter would tell you that the signal remained within that limit.
There are many commercial offerings you could look at if you feel the need, from the likes of RNDigital and Waves, for example, but it's also worth looking at the range of other plug‑ins you already own: some of them include quite sophisticated metering options. For example, I use Universal Audio's Precision Limiter as often for metering as for its intended function as a limiter.
The Master Stereo Buss
The gain strategy I've described is similar to the one you'd use on an analogue console, and if you work in this way, you should find that you have plenty of headroom on the master channel, which means that you're able to bounce your mix, or any part of your project, without fear of clipping. You'll have plenty of scope to process the full mix during mastering. To work in this way, you should be aiming for an average level of something in the order of ‑18dBFS at the input stage on the master bus, and pretty much the same at the output stage — unless you're trying to do any mastering, or 'finalising' at this stage; usually, you wouldn't do that, as you need fresh ears for those tasks.
Nonetheless, you may sometimes find that your mix is clipping at the bus‑input stage, and Cubase gives you a few options for handling this. First, you could reduce the level of all the channels feeding the bus — but, whichever way you choose to do this, it's a faff once you've started to use automation, or threshold‑sensitive processing on groups or effects channels. Alternatively, you can use the input trim control at the top of the bus to attenuate the signal before any processing. Given the floating-point processing, that's a perfectly acceptable approach — though unecessary if you get the levels right in the first place! Finally, you can use the input gain of the first insert plug‑in on the bus to attenuate the signal, which is essentially the same thing. Also, don't forget the advice I've already given about monitoring the input and output levels of your insert plug‑ins, because this applies as much to your master‑bus plug‑ins as it does to any others.
But It's So Quiet!
If you're used to running everything very hot and start to work in the way I've described, you may find that things seem to be rather quiet — and thus less impressive than usual. The remedy is to turn up your amp or monitors, not to raise Cubase's faders! You can get the levels back during the mastering process, and a better mix will be the result.
Meters can only help you so much, and there's really no substitute for using your ears — but the meters in Cubase are there for a reason, and it pays to understand what they and any other meters are telling you: not only can they help you avoid the undesirable sound of digital clipping, but they really can help you to create a better mix of any track.
No comments:
Post a Comment