Steinberg Cubase Tips & Techniques
Technique : Cubase Notes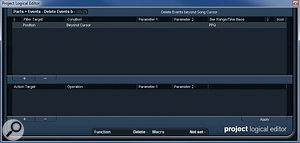
Administration is a bore, but Cubase 5's Project Logical Editor can take the hard work out of keeping your projects tidy.
John Walden
The PLE preset for deleting events beyond the project cursor is about as simple as it gets.The PLE preset for deleting events beyond the project cursor is about as simple as it gets.
I often find that in my rush to capture the creative flow before it dries to a trickle, my Cubase projects can end up in a bit of a mess, and although that's not a problem while the jumbled assemblage of tracks and parts remains fresh in the mind, it can be confusing and frustrating when returning to the project weeks, or even months later. What we need is something to help keep things organised without interrupting the creative flow. Cubase has a number of features that can help in this regard, the most powerful of which is the Project Logical Editor. This versatile tool is capable of far more than 'tidy up' tasks, but it can certainly be used to bring a little order to a complex project.
Analysis, Mr Spock?

Identifying all muted audio and MIDI parts requires a more complex set of filter conditions.Identifying all muted audio and MIDI parts requires a more complex set of filter conditions.
At first sight, you'd be forgiven for thinking you need to be Mr Spock to use the Project Logical Editor (PLE), but if you invest a little time up front, it will pay dividends in pretty short order. Available from the Edit menu, the PLE window is dominated by two sections. The upper portion allows you to set up filter conditions — in other words, to specify a set of criteria to identify which objects in the project you wish to perform some operation upon. As you'll see in the examples, it's possible to combine several criteria using Boolean operators such as AND or OR. The lower portion of the window, including the Function setting (which can be toggled between Delete, Transform and Select), is where you specify the action(s) that you want to apply to the objects that are selected by your filter.
Imagine we want to do a combination of things to clean up the project: first, we'll delete any events that occur beyond the end of the song (I'll often drag groups of alternative takes beyond the end of my arrangement in the project window while I try something else), then delete all empty or muted tracks and/or elements, and finally rename and colour-code all the tracks belonging to each main instrument group. Cubase 5 includes PLE presets that are suitable for some of these tasks, and examining a couple will help illustrate how to roll your own.
Unwanted Events
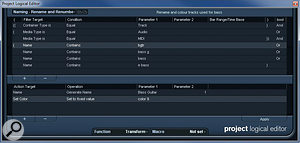
Example PLE settings for a preset to rename and colour-code all bass guitar tracks.Example PLE settings for a preset to rename and colour-code all bass guitar tracks.
The 'Parts + Events — Delete Events beyond Song Cursor' preset provides a simple starting point. Only one filter condition is specified, and this finds all objects that lie beyond the project cursor's position on the timeline. The Function box is set to 'Delete', so no entry is required in the action list pane (I'll come back to this pane later). As long as you've correctly positioned the cursor prior to applying this PLE preset, any object that occurs beyond the end of your song will be deleted.
The 'Parts + Events — Delete muted elements' preset is more complex. The Function setting (set to Delete) and the action list pane both remain the same as in the previous example, but the filter conditions, shown below, are a little busier. There are three different conditions shown here, and they're 'nested' in the three sets of brackets. The first, which occupies the top two lines, identifies any media that is MIDI data AND held in a part (I'll stick with capital letters for the logical terms to avoid confusion). The second, on lines 3‑5, finds any media that is audio AND an event OR a part. The third, on the final line, identifies any object that has been selected by the first two conditions that is currently muted. Expressed in another way, the filter operates as follows: identify any MIDI part (condition 1) OR an audio event or part (condition 2) that is also currently muted (condition 3).
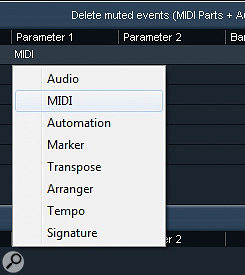
The PLE provides plenty of options when renaming tracks.The PLE provides plenty of options when renaming tracks.This ability to combine different filter conditions makes it possible to select all sorts of combinations of objects for processing within the PLE. As shown in the screen at top right, each of the main columns in both the filter conditions and action list pane features a drop‑down list, making it easy to experiment with the options. The 'Delete Empty Tracks' and 'Delete Muted Tracks' presets operate in a very similar fashion to the two we've just looked at, and a combination of these four presets provides a simple way of removing unused clutter from your project window.
The Name Game
The PLE allows a number of different 'object' types to be identified within the filter conditions pane.The PLE allows a number of different 'object' types to be identified within the filter conditions pane.
So what else can the PLE do to make our projects more organised? Track names obviously serve as useful memory-joggers when returning to an old project, and the PLE can help tidy things up here. The screenshot above shows one example, where the filter conditions are finding audio or MIDI tracks where the name contains any of my usual shorthands for 'bass guitar'. Again, the positions of the brackets and the use of the AND and OR terms are worth noting. In summary, this preset is identifying only items that are tracks (line 1) AND are either audio or MIDI tracks (lines 2 and 3 — this therefore excludes group channels or FX channels) AND have any of 'bgtr', 'bass g', 'bass' or 'e bass' in their names (lines 4‑7). You could, of course, customise or add to this list of shorthand names to suit your own needs for different instruments, and save these as a series of PLE presets.
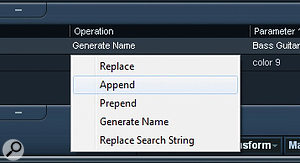
In this example, the Function option is set to Transform, as we are going to change something about the objects identified by the filter conditions. Within the action list, the first action specified (line 1) simply generates a new name for every track that matches the filter conditions. These will all start with 'Bass Guitar' (entered in the Parameter 1 column) and then be numbered sequentially starting from 1 (as specified in the Parameter 2 column). As shown in the screenshot below left, Generate Name is only one of several naming options provided, so there is plenty of flexibility here.
Colour Me Bad
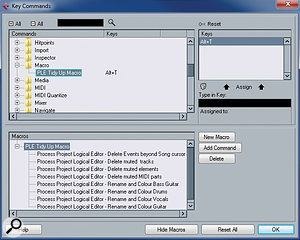
PLE presets can be chained together into a macro, so that one key command can execute several at once.PLE presets can be chained together into a macro, so that one key command can execute several at once.
Many Cubase users like to colour‑code tracks of different types, to provide an extra visual guide showing which objects and tracks contain which types of instrument. The eagle‑eyed amongst you will have spotted a second action specified in the screenshot for the renaming example. With filter conditions set to identify all my bass tracks, and having changed the track names (line 1), it is a simple task to add a second action (line 2) that specifies a certain colour.
The Right Key
You can, of course, make all these sorts of changes by hand, but once you've created some suitable PLE presets, it requires nothing more than a few clicks to do the bulk of the tidying up, no matter how large your project. Two small, additional steps can make it even quicker, though. First, PLE presets can be assigned to key commands, so each of your stored presets can be executed via a single keystroke. Second, as shown in the final screenshot, it's possible to combine multiple PLE presets into a single Macro — which means the whole lot can be executed via a single key command or via the Edit/Macros menu option. Very neat!.
No comments:
Post a Comment