Cubase Tips & Techniques
Technique : Cubase NotesJohn Walden
Whether you're adding some music to your best mate's wedding video or you've just received a call from Spielberg's people about his next mega‑film project, writing music for picture can be a tremendously satisfying creative process. Cubase has an excellent suite of tools for this sort of work so, for those about to score, we will guide you….
In The Box

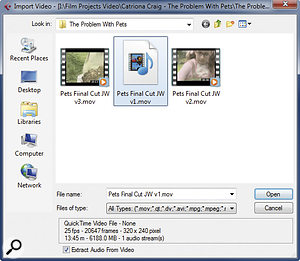
The Import Video dialogue box provides information on the format of the video file selected and a self‑explanatory option to 'Extract Audio From Video'.The Import Video dialogue box provides information on the format of the video file selected and a self‑explanatory option to 'Extract Audio From Video'.
Mark Wherry explained, back in SOS November and December 2005, how composers can work with video played back on an external device (locked to Cubase via MIDI timecode) or using a digital video file in the Cubase Video pane. Five years is a long time in music technology, and with film and music collaborators increasingly delivering video and audio files via the Internet, the 'internal' approach is becoming much more common. It also has the practical advantage that we media composers require no additional kit!
Whether on Mac or PC, Cubase supports a range of video formats. Nonetheless, access to some dedicated video format‑conversion software can save a lot of hassle. There are plenty of options for such software, but as v5.5 of Cubase adopted the QuickTime engine for video playback, the full version of QuickTime Pro (at about £20) seems, to me, to be a sensible starting point.
Going In
If your video file plays back successfully in the QuickTime Player, importing it into Cubase should be straightforward. The most direct route is via the File/Import/Video File menu option, which imports video into the Pool and places it on a Video track in the Project window. If you tick 'Extract Audio From Video' in the 'Import Video' dialogue box (see screen above), you will also get the audio from the video file — perhaps dialogue and sound effects — placed onto a separate audio track.
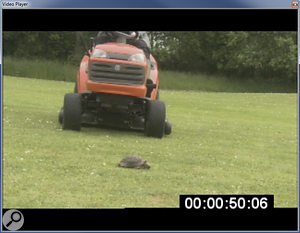
Cubase will automatically set the Project frame rate to that of the imported video file (this can be checked and set manually via the Project Setup dialogue box). From v5.5 onwards, an error message is displayed if the frame rate is unsupported (which is one reason why format-conversion software is useful). The Device/Video Player menu option opens the Video window. This is resizable, so you can customise both size and position to best suit your screen real‑estate. The example shown in the screenshot left includes 'burnt‑in' SMPTE time code, with playback here at 50 seconds and six frames. If your film‑making collaborator can include this in the digital video file, life becomes much easier for you, as it provides an exact frame of reference for placing music cues and sound effects.
Once the film is imported, you should also use the Set Timecode At Cursor dialogue (from the Project menu) to match the Project timecode to that of the burnt‑in timecode. If you do this once anywhere within the project, the two should be in sync throughout, and you can then lock the position of the video track and its associated audio track, so that they don't get moved accidentally.
One Project, Many Projects?

The thumbnail view stills give you a visual cue of scenes in the overall project. (The Preferences dialogue box allows you to allocate more space to the thumbnail cache, and can be helpful if screen redraws become sluggish.) Note also that both the video and its associated audio track are locked in position to avoid accidentally moving them. In addition, a Ruler track is displaying timecode and a Marker track has been used to identify key positions along the timeline, such as scene changes or visual hit points.The thumbnail view stills give you a visual cue of scenes in the overall project. (The Preferences dialogue box allows you to allocate more space to the thumbnail cache, and can be helpful if screen redraws become sluggish.) Note also that both the video and its associated audio track are locked in position to avoid accidentally moving them. In addition, a Ruler track is displaying timecode and a Marker track has been used to identify key positions along the timeline, such as scene changes or visual hit points.
If the video project is longer than 15 minutes or so, and it is likely to feature multiple musical cues, there is a practical question to consider before starting work: do you create a separate Cubase project for each cue, or do you have a single project and create all the cues within it? While the latter might seem the obvious choice, there are pros and cons to both approaches. That said, given the gradual improvements that Steinberg have made in how Cubase can handle video playback (for example, the ability to use multiple video clips on a Video track), my instinct now is always to start with a single project containing all cues. I would, however, qualify that by encouraging a scrupulous attitude to backing up project versions as the work develops.
Hit Points & Hitpoints
The Marker track can be used to identify all the key visual points within the film. In composer speak, these are often referred to as 'hit points' — that is, key visual events that the music has to 'hit' in some fashion — scene changes or particularly dramatic moments. These are not, of course, the same as Steinberg's use of the term 'hitpoints', which refers to transients within an audio file that can be used to create audio slices in, for example, drum loops.
Given that these hit points (composer speak) represent fixed time points in the film (well, fixed until you are supplied with yet another edited cut of the film where scenes have been made shorter, longer or re‑ordered just to make the composer's life more fun!), the Marker track should be changed to Linear mode (see the screenshot — a small clock icon is displayed within the Track List). This locks the markers to their SMPTE timecode position rather than the bar/beat position, so if you make lots of tempo adjustments, as described below, the markers stay locked at the correct timecode location.
Slow, Slow, Fast, Slow

The Video Player window showing a video containing burnt‑in timecode.The Video Player window showing a video containing burnt‑in timecode.
Tempo plays a very significant role when producing music to picture, not just in setting a tempo suitable for the musical mood, but also because subtle shifts in tempo are often used to get a musical 'hit' to synchronise with a visual hit point. For example, in the main screen shot, scene three starts just before bar 57, but for musical purposes, I might require the scene start to coincide exactly with a bar start. A small tempo increase prior to bar 57 could bring the two events into sync. Therefore, before doing any significant musical creation, composers will generally spend some time creating a tempo map for the project.
Using a combination of the Tempo track (Project/Add Track/Tempo Track) in the Project window and the Time Warp tool allows you to add tempo-curve points to develop tempo changes suitable for each of your cues. For example, with the Time Warp tool selected, I can easily grab the bar 57 gridline and drag it so that it's aligned with the marker placed on the first frame of scene three. This process works by automatically adjusting the tempo value at the previous tempo-curve point.
This is fine — unless, of course, that previous tempo was essential for the timing of an earlier cue! In practice, what this means is that you need to add additional tempo points just after the end of each musical cue, so that any tempos set within the cue itself are not altered when you use the Time Warp tool further along the timeline. It's also not a bad idea to add an additional tempo-curve point just before the start of a cue. When in Time Warp mode, these extra tempo-curve points can be added by simply clicking at the required grid point in the Project window.
Creating tempo maps in this way is simple in principle, but it usually seems rather more difficult in practice. It's quite easy to get yourself in a tempo tangle and add all sorts of unmusical tempo changes in an effort to 'make the cue fit' the musical bar/beat grid. Practice makes perfect, but it's worth spending time on this before you start any audio recording. MIDI data can be made to follow subsequent changes to the tempo map, but you don't want to splash out on a real string section, only to find out later that you need to adjust the tempo of a cue to make it 'fit' the visuals better. Yes, I know that it's possible to manipulate recorded audio with time‑stretching or audio warping, but it's much easier — and, more importantly, you'll get much better results — if you can avoid this.
Safe Delivery

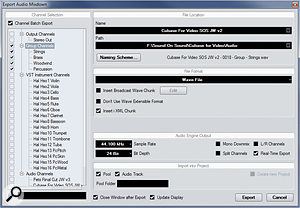
The Export Audio Mixdown menu allows stems of particular instrument groups to be created. In this orchestra‑based project, the Channel Batch Export has been selected and a stereo mix will be generated for each of the four Group channels selected. Providing all the individual instruments are routed to the appropriate Group channel, this will create an audio stem for each of the main orchestral sections.The Export Audio Mixdown menu allows stems of particular instrument groups to be created. In this orchestra‑based project, the Channel Batch Export has been selected and a stereo mix will be generated for each of the four Group channels selected. Providing all the individual instruments are routed to the appropriate Group channel, this will create an audio stem for each of the main orchestral sections.
Of course, with all the above technical details resolved, writing the perfect score is a breeze. OK, even if that's not really true, let's assume that you've written a score you're happy with; the final technical issue is getting the music out of Cubase and back to the client (or your mate who just got back from his honeymoon...). You might share previews with them by embedding the audio into a QuickTime movie and sending that, but for the final delivery of the sound files, you'll need to fully understand what format they require for the audio.
Ignoring the whole issue of surround mixes, this might be as simple as a single stereo mix starting from frame one and, if so, export your final mix as you would any song‑based musical project. However, make sure you check the required sample rate: 48kHz (not 44.1kHz, as on music CDs) is the standard in the world of film, as it ensures an integer number of samples per frame.
In more professional contexts, you might also be asked to provide stems (separate stereo mixes for each instrument group) so that the sound mixer and/or director can adjust the music to their own taste and balance it better with the dialogue and sound effects mixes. Fortunately, the Export Audio Mixdown dialogue from the File/Export menu (see screen above) provides all the options you might need, allowing you to generate a series of stereo mixes, each based on particular sets of tracks.
No comments:
Post a Comment