Cubase Tips & Techniques
Technique : Cubase NotesMatt Houghton
I’ve long wished Steinberg would implement true VCA–style automation in Cubase — it is, for me, a critical omission, and it’s one that’s nearly led me to jump ship a couple of times. Sure, Cubase’s grouping, routing and track–linking facilities are better than they ever have been, but it just doesn’t offer anything quite like automatable VCA master faders. What do VCA masters offer that standard automation doesn’t? For one, you can ‘group’ any channels together, even if they’re routed to different outputs. For another, each channel can be a member of multiple VCA groups at the same time which, again, isn’t possible, at least not without implausible aux–send setups to multiple groups.
Outside Assistance
Help is at hand, though, in the form of a freeware plug–in by Blue Cat called BC Gain. The plug–in comes in three versions, bundled together in their Gain Suite (www.bluecataudio.com/Products/Product_GainSuite), and it enables you, with a little lateral thinking, to add VCA groups and master faders to pretty much any DAW that lacks them. Unlike most ‘gainer’ plug–ins, different instances of BC Gain can be assigned to one (or none) of nine groups, and each instance can be controlled via MIDI. When you change the gain on one instance of the plug–in in a group, all other instances move accordingly. It doesn’t take a great leap of the imagination to realise that you could place instances in any insert slot you wish, assign them to a group, and then create a dedicated MIDI track whose fader may be used to control the group level.
Basic Setup
Although simple in concept, my experiments suggested that there are good ways and less good ways to implement this system in Cubase. Let me take you, step by step, through the way I find works best.
1. Open a new Cubase project and create a handful of audio tracks. In the example, I’ve made four stereo and four mono tracks.Use a ‘spare’ audio, FX or Group channel to host your ‘VCA Master’ instances of BC Gain — but be sure to choose the stereo version of the plug‑in.
 2. Create one more track. It can be an audio, Group or FX channel. It doesn’t really matter which, but you may find that it’s more easily identifiable in the mixer if you make it a Group or FX Channel, as these will appear to the right of your mixer by default. Call this channel ‘VCA Master’.
3. Now, create a MIDI channel and label it ‘VCA Group A’. This channel’s fader will become your VCA Group A master fader.
We now have all the channels we need to test this out, so let’s put some sound through that first group of audio channels. You could import or record some audio, of course, but you can alternatively use Cubase’s Test Generator plug–in, just to get the level meters showing something. Now to wire all this mess together so it works as a VCA system...

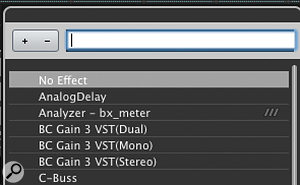
1. Insert an instance of the BC Gain plug–in in the first insert slot of your VCA Master channel. Whether the channel you created is mono or stereo doesn’t matter, but be sure to choose the stereo version of BC Gain (there are also mono and dual–mono versions), as I was unable to link mono and stereo plug–ins in a single group successfully.
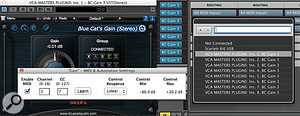
2. Click both the cog (settings) and chain (link) icons at the top left of the plug–in to reveal some hidden features. Click the pointer that just appeared under the gain knob and select ‘settings’ to bring up the MIDI control dialogue. Make sure MIDI Enabled is ticked, and click the MIDI Learn button. In the Group section of the plug–in select ‘A’.
3. On your MIDI channel, VCA Group A, set the output destination to the gain plug–in on your VCA Master channel. It should be easy to identify in the drop–down list. Waggle the fader on your VCA Group A MIDI channel and the plug–in’s gain control should respond. If the Learn function isn’t working properly, you might need to set the plug–in to receive on the correct MIDI channel, which is listed on the MIDI channel in the Routing section of the Cubase Mixer.
4. Insert another BC Gain stereo plug–in instance on your next audio channel. Click the link button and assign the plug–in to Group A. There’s no need to do any MIDI assigning this time. Just waggle your MIDI fader again, and you should see the control of both instances reacting to your fader movements.
Congratulations: you just used a VCA Master channel to control the level of two separate channels in Cubase! But we can take things a little further...
VCA OK1. In the MixConsole, Alt–drag and drop the second plug–in instance to copy it to any other channels you want to be part of the same VCA group. All of the plug-in’s settings will be copied, including the Group assignment. In this way you can quickly assign several channels to a single VCA group.
2. Now create a second VCA Master fader in exactly the same way —ie. create a new MIDI channel and call it VCA Group B.
3. Put another instance of BC Gain in the VCA Master channel’s second insert slot, set it up to respond to your second MIDI channel fader, and assign the plug–in to Group B.
4. Then insert yet another instance of one of your audio channels — it can even be in another slot on the same channel as before. Change the routing to group B and Alt–drag to create new instances on other channels. All these instances will now respond to your second MIDI Fader.
It’s much less hassle the second time around! Note that by placing multiple instances on a channel, that channel’s level can be influenced by more than one VCA Master Fader at a time. So far, so good, then — it works. But there are a few issues we need to overcome.
Overcoming Obstacles

First, although a single channel can be assigned to multiple VCA groups (as just described), you’re limited by the number of insert slots on each channel, which is fixed at six pre–fader and two post–fader. There’s no elegant way around this: if you need more slots, you’ll either have to route the channel in question to another channel and use the inserts on that one (you can always hide the second channel if you want), or use a third–party plug–in chainer such as DDMF Metaplugin.

Link the VCA Master instances of BC Gain to a MIDI channel’s fader, either using MIDI Learn, or programming the values by hand. Setting the plug–in’s Control Max value to 20.2dB results in a more useful gain range and near–unity position.Link the VCA Master instances of BC Gain to a MIDI channel’s fader, either using MIDI Learn, or programming the values by hand. Setting the plug–in’s Control Max value to 20.2dB results in a more useful gain range and near–unity position.Second, you might have noticed that the MIDI protocol’s 0–127 settings are causing a couple of issues: by default, the ‘zero’ point (ie. no gain, no attenuation) lies somewhere in between values 63 and 64 — your plug–in’s gain control can be set to +0.47 or –0.47 dB, but not unity. There’s no getting around the resolution of the MIDI fader itself, but you can tweak how the BC Gain plug–in responds. I found that restricting the maximum gain to 20.2dB (leaving the minimum at –60) gave a more useful control range that placed an almost no boost/attenuation position (–0.01dB) of the MIDI channel fader at about the same place (MIDI value 95) as unity gain on the regular audio channel faders, leaving you with around 20dB of gain and 60dB of attenuation available. What’s more, if you make sure you create and set up all of your VCA Master instances of the BC Gain plug–in first, and only add new instances as you need them for each channel, the grouping will be relative — so as it loads at unity by default, you’ll always be able to return to that value by placing your MIDI fader at 95. Neat!

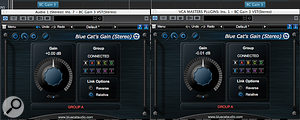
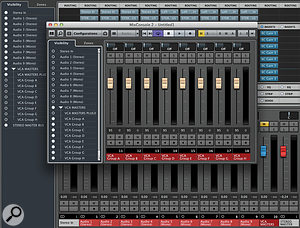
Despite the slight (–0.01dB) offset on the Master instance, the knob on the channel instance can be set precisely to 0.00dB gain/attenuation. Assigning the channel instance on the same group as the master means it, and any other instances in the group, will be controlled by your MIDI Fader.Despite the slight (–0.01dB) offset on the Master instance, the knob on the channel instance can be set precisely to 0.00dB gain/attenuation. Assigning the channel instance on the same group as the master means it, and any other instances in the group, will be controlled by your MIDI Fader.You can use the Visibility controls of Cubase’s second (or third) Mixer to create a dedicated VCA mixer, which you can assign its own shortcut key (‘V’ for VCA, perhaps?).You can use the Visibility controls of Cubase’s second (or third) Mixer to create a dedicated VCA mixer, which you can assign its own shortcut key (‘V’ for VCA, perhaps?).With all these extra channels and instances, your project can soon start to feel very cluttered. You could, if you wished, abandon the MIDI faders and use your VCA Master channel’s Quick Controls to govern the VCA group master levels. Personally, I prefer to have the option of having the VCA faders in the MixConsole. You can take advantage of Cubase’s multiple mixers, though. Go to Devices/MixConsole 2 (you can assign a keyboard shortcut to this). Use the mixer’s Visibility function (on the mixer’s left, or revealed using the mixer’s Setup Window Layout icon, top left, if hidden) to hide all channels except those you wish to see. This doesn’t affect what you see on the main MixConsole, but on MixConsole 2 you can see only your dedicated VCA controls. In the Project page, you can hide all these MIDI channels inside a collapsed Folder track if you wish.
And there we have it. While it may not be the most elegant VCA system ever implemented — you can’t merge the VCA automation with the track automation, as in Pro Tools, for example — it’s free, it solves a genuine problem many users have with Cubase and Nuendo, it’s both easy to configure and reliable in use, and you can save the setup as a project template, in which assigning a channel to a VCA group is as easy as inserting a plug–in and clicking a letter. I’ve created a template project with all the VCA Master side of things set up, so I just have to insert an instance on a channel when required. As luck would have it the ‘V’ key isn’t assigned to a shortcut by default, so I was able to assign that to MixConsole 2, which I’d set up to show only the VCA faders — you can find it along with a short demonstration video on the SOS web site at http://sosm.ag/oct14-cubase-media, though you may need to set up your own keyboard shortcut for the mixer, as these are stored in your own Cubase preferences.
No comments:
Post a Comment