Cubase Tips & Techniques
Technique : Cubase Notes
Bouncing Cubase's MIDI and VSTi parts down to audio opens up a whole new world of processing possibilities.
Rob Talbott
In what now seems like a bygone era, recording the parts played by hardware MIDI sound modules as audio was often the only practical option available to producers when making a record, especially if a synth's limited polyphony meant it couldn't play back all the parts that were required of it. Playing all parts straight from MIDI often just wasn't an option.
Nowadays, the processing grunt of modern computers and the 'in the box' approach to production have made it possible for people to keep their MIDI parts 'live' throughout the project. This has the advantage that notes, instrument or effects parameters can be changed at any time in the production process. In many ways, this step is a positive one: the user is free to change his or her mind about MIDI parts much later into the production process, modifying melodies in response to additional parts added later, for example, and it makes layering other instruments to play the same melody a breeze.
However, there's still something very good to be said for the old‑school approach of bouncing your parts to audio (rendering a MIDI instrument section to disk as an audio file). The first and most obvious benefit is the reduced load on your computer: reading an audio file from hard drive will usually require much less power than running complex instrument and effects algorithms live. This means you're able to build a more technically complex track than would otherwise be possible.
For me, the principal benefit is that there's a whole world of audio manipulation techniques to which you gain access only once a part is rendered as audio, or that would at least be very difficult or fiddly to employ when working with MIDI data. The techniques I'll demonstrate by way of example are probably best suited to electronic music producers, particularly those wishing to do more experimental work, but there are also ideas in here that could be integrated into any form of composition. And although I'm focusing mainly on Cubase, you should be able to mimic these techniques in pretty much any other DAW.
Bounce Steps

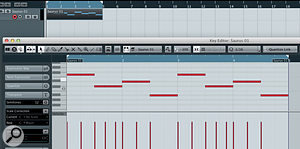
First, create a simple MIDI melody pattern. My example uses an organ bass lineThe original MIDI part., created with a preset from Tone2's Saurus called 'Can't Do Without', which is a classic garage organ‑bass patch. If you don't have Saurus, you can use any synthesizer — in fact you'll probably find a similar patch in Cubase's HALion One. Now to turn the MIDI instrument into an audio part.
1. Set locators: Set your left and right locator markers to the beginning and end of the MIDI part (either use your mouse to set each locator where you want, or click on the MIDI event and press 'L'). Make sure the channel is soloed.

2. Export as audio: Some sequencers have functions allowing you to 'bounce in place' at the press of a key, but in Cubase it's a little less straightforward. Navigate to File / Export / Audio Mixdown — just as if you're about to bounce your mix. You'll have the option of selecting only the track you want to export (you wouldn't need the track soloed for this, but it wouldn't export any send effects), whether you want to bounce as a mono or stereo file, and where you want the bounced file to end up. Importantly, there's a tick box that tells Cubase to import the exported audio into a new audio track With a soft-synth part soloed, you can export via the stereo mix bus, complete with any aux send effects if you wish.. Make sure this is ticked, then press 'OK'. Cubase will export the audio and return you to the project.

 3. Tidying up: You'll find your new audio part on its own track, but your MIDI part will still be active. You don't want both to play together, so mute the MIDI or Instrument track(s) and any associated effects you included in your bounce. People often have concerns about losing flexibility when bouncing to an audio file in this way, but by keeping the source material, you always have the option of going back to the original MIDI if you need to change anything. If you're only bouncing to audio to save CPU, and wish to remove the MIDI or Instrument track entirely, I'd recommend saving the
  project under a new file name so that you can retrieve your original MIDI section later if required. (Note that a simpler approach to simply freeing up CPU would be to use Cubase's Track Freeze function.)
With our original MIDI or Instrument part now turned to audio, we can get creative — and you might be surprised at just how much flexibility you now have. I can't possibly explore all of the creative options here, but to show you the sort of things that are possible, I'll work through an example.

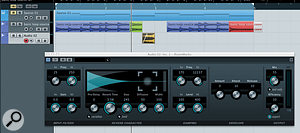
In the screenshot below, you can see how I've chopped the audio up to isolate the eighth note on the third beat of bar 1 (I've coloured this green), duplicate it and then reverse it (orange). I've also drawn in a downwards pitch‑bend envelope (Audio / Process / Pitch Shift) onto the red section to simulate a vinyl stop on the last note. Because I've not selected the option to keep the audio length the same, this will extend the length of the last note, and I've chopped the unwanted 'tail' off at the end of the bar.Amongst the processes performed was a pitch envelope on the last note, which made the note longer.
Next, I moved a section of audio that I'd chopped out (coloured orange, above) onto a new audio channel, and inserted a reverb plug‑in on the channel, using a big plate‑style reverb setting. I bounced the result to audio, Multing out a note to another track allows effects and processes to be performed on a per‑note basis.once again muting the source channel after the bounce to avoid duplication, and trimmed the resulting (pink‑coloured, below) bounced audio so that I was left with only the reverb tail. For further creative effect, I duplicated this section and reversed the second occurrence. Taking the creative processing a little further.
Don't worry if some of this seems confusing or overwhelming to follow, because there's not a particular outcome I was trying to achieve with the process. My aim was purely to experiment and to achieve an unusual texture by manipulating what was previously, in terms of its articulation, a fairly static‑sounding melody.
You should be able to see that this approach enables you to do things that would not be possible when working with MIDI. For instance, by copying (or 'multing out') audio onto different channels, you can process individual notes differently — you can add distortion to certain notes, for example, or even just process the reverbs of certain notes. You can achieve a very interesting effect in this way without necessarily having to change the notes of a melody, and without being limited to the automation of whatever synth or effects parameters your instrument offers. Even where automation may be possible, I find that it's often much easier when working with audio, simply because you can see at a glance everything you've done!
Often, the key to getting good results lies in experimentation. Some experiments will create great results, some will require tweaking, and others will just not work at all. Whatever the results, don't be afraid to try things out that you're unsure of — it's the only way to create something new.
As well as the experimental, there are a few tried‑and‑tested techniques you can play with. For example, the 'resampling' technique has its roots in this approach. This label commonly refers to exporting a single note or a looped single note to be reloaded into a sampler, often over and over, while modifying the sound every time. The aim is to create an increasingly modified sound, and the effect is most commonly found within more aggressive forms of dance music. Noisia and KOAN Sound are both great examples of producers who create sound palettes (in particular, bass noises) by repeatedly exporting and mangling audio within a sampler in a way that would be very hard or impossible to get live out of a synthesizer. (Cubase includes loop-editing plug‑ins such as Steinberg's Loopmash, into which you could load your exported loop.)
Another popular technique is the reverse reverb, where a reversed audio fragment is exported, a reverb applied to this reversed part, and the result reversed once again. What you end up with is a 'forward facing' audio part with a reverb that appears to 'suck' into it in a ghostly manner.
Next Steps
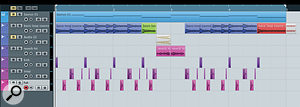
This is just a very short introduction to inspire you to experiment with audio manipulation; it's impossible to explore every process this technique opens up. But to demonstrate how the end result of this tutorial could look (and sound if you've been following along online: http://sosm.ag/jun14‑cubaseaudio) in the context of a track, I've added some basic garage‑inspired drums to the pattern.Building on the processed melody to create the beginnings of a garage‑style track. If you find that you're stuck for ideas with a melody, or that you want to add interest without layering loads of instruments, why not give audio exporting and manipulation a try? .
No comments:
Post a Comment