Cubase Tips & Techniques
Technique : Cubase NotesAdd DJ–style effects to your Cubase projects with LoopMash FX.
John Walden
In SOS November 2014 (http://sosm.ag/nov14cubase), I demonstrated how you could use Groove Agent SE or Groove Agent One to slice a vocal phrase and experiment with sample–based stutter, glitching and pitch–related effects. This month I’ll look at another way to achieve such ‘notice me!’ effects: LoopMash FX, introduced in Cubase 7.5, takes the DJ–style effects-processing options of LoopMash (which I looked at back in November 2011: http://sosm.ag/nov11cubase) and makes them available for processing any audio signal. You don’t get a huge degree of control, but LoopMash FX can be triggered in real time, so there’s plenty of instant gratification to be had.
Press The Button
LoopMash FX is very easy to use; just like any other audio plug–in, it can be used as an insert or send effect. Just how noticeable its results are in your overall mix depends largely on where you position the plug–in in your signal chain. The plug–in window is split into two sections, the upper portion showing a live view of the audio waveform after passing through the plug–in, and the strip at the base showing 19 different effects buttons, organised into four colour–coded groups.

The LoopMash FX plug-in; instant gratification but very obvious, so use with caution! The LoopMash FX plug-in; instant gratification but very obvious, so use with caution! The red group provides reverse, tape–stop, scratch and slow–down effects; the green group gives stutter and slur effects with different timebases; the blue group offers cycle effects of different lengths; and the yellow group provides staccato and mute options. All the timebased effects are linked to the current note setting (with four options), found just above the various effects buttons. Let’s look at the main options.
Mini Mash
The obvious starting point is to place the plug–in as an insert effect on an individual track. It can work with almost any individual instrument to which you wish to add a little audio trickery, but vocal and drum tracks are particularly good candidates. How ‘in your face’ the effect will be is to some extent determined by which instrument you choose to process: applied to vocals or drums the effect can be very obvious, but process a more supportive instrument (for example, a guitar or synth pad) and the result can be just a little subliminal variation, which nonetheless helps to hold the listener’s attention.
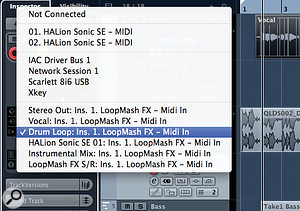
You can configure a MIDI track to send data to the MIDI In of an instance of LoopMash FX, and then control the plug-in from your keyboard or a MIDI track. You can configure a MIDI track to send data to the MIDI In of an instance of LoopMash FX, and then control the plug-in from your keyboard or a MIDI track. You can trigger individual effects via the mouse, but LoopMash FX also allows you to apply multiple effects (one from each colour-coded group), and to automate the application of the effects if you configure a MIDI track to control things. So, insert an additional MIDI track, give it a suitable label as a reminder of its function, and then, via the Inspector panel, set the MIDI output from the track to the appropriate instance of LoopMash FX.

On your MIDI keyboard, a series of four notes from C2 will set the note length timebase, while the effects themselves cover the note range from F2 to G3. There are all sorts of DJ–style clichés that can be created here, both by combining multiple effects and by switching between the different note lengths. As you can easily record your performance as a series of MIDI notes, it’s easy to edit that performance too — so creating the effects you want and getting their timing right is relatively straightforward.
Multi Mash
You don’t have to restrict yourself to applying LoopMash FX to individual tracks, though: a good trick is to apply it to a group of tracks. For example, you might like to try applying your DJ–style LoopMash FX to your complete backing track while leaving your vocals unprocessed. This can be a very effective way to place some spot effects into a standard verse or chorus section without disrupting the flow of the top–line vocal/lyric itself.
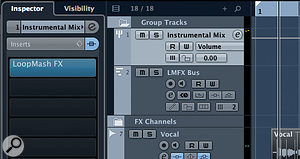
The most straightforward way to organise this is via a Group Channel. First, create a new Group Channel, give it a suitable name, and leave its output at the default ‘stereo output’ setting. Then, for each element of your arrangement — audio tracks or virtual instruments — that you want to pass through this ‘global’ instance of LoopMash FX, assign the output of the track to the Group Channel. You can do this via the Routing panel within the Track Inspector of the Project window, via the Routing panel at the top of the Mixer window, or via the Output selection drop–down menu in the top strip of the Channel Settings window.
You then simply place an instance of LoopMash FX as an insert effect on your new Group Channel and, if you want to record/automate the effects, add a MIDI track as described above when processing an individual audio track. Used in this way (especially if you have pretty much everything in your mix going through this Group Channel, bar your lead vocal) then spot effects are definitely the best way to go. Otherwise you can just lose too much of the track’s overall flow. However, for just a split–second’s worth of attention–grabbing ear candy, this technique often works a treat.

Sending several instruments from your mix to a Group Track and then applying a single instance of LoopMash FX can be very effective. Sending several instruments from your mix to a Group Track and then applying a single instance of LoopMash FX can be very effective. If you want to try something where the result is likely to be a little more subtle, set LoopMash FX up as a send effect. There are a couple of ways to approach this, but one is simply to configure things using the Group Channel approach described above, but instead of adding an insert instance of LoopMash FX, configure a send from that Group to an FX Channel containing LoopMash FX. It’s easy to automate this single send level from the Group Channel, enabling you to vary the relative balance between the ‘dry’ and ‘LoopMashed’ elements of the sound with minimum hassle. In this configuration, even when you apply LoopMash FX you’ll still get some of the unprocessed audio at your main output, so the effect will be much more subtle — which means you can perhaps get away with more frequent application and variation of the effect.
Monster Mash!
Of course, it’s perfectly possible to apply LoopMash FX to your entire mix. If you want to do this, simply insert an instance of the plug–in on your main stereo output bus. For MIDI keyboard control or automation, just configure a suitably labelled MIDI track to send its output to that instance. Used in this way, some rapid, short stutter effects can work really well and the tape–stop effects (for which users have been asking for some time) can be very effective. They’re also very noticeable, so make sure you spend some time getting the timing spot on.
It Takes Two

Finally, while the colour–coded effects groups mean you can apply multiple effects within a single instance of LoopMash FX, the more adventurous of you can take things yet further: simply insert a second instance of LoopMash FX and control it from a second MIDI track. There is a catch, though: if you want to experiment in real time with two instances of LoopMash FX (whether applied to the same track or on two separate tracks) you need to be able to send MIDI data to two separate MIDI channels at the same time.
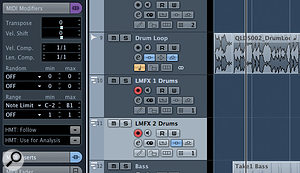
If you want something a little subtler, then use LoopMash FX and a send effect rather than an insert. If you want something a little subtler, then use LoopMash FX and a send effect rather than an insert. If you have two MIDI keyboards hooked up to your computer then this isn’t a problem. However, if you only have a single MIDI keyboard, you need to be able to create a keyboard split. If your keyboard doesn’t offer that function, you can achieve the same end result by following Mark Wherry’s suggestions in his October 2005 Cubase workshop (http://sosm.ag/cubase–keyboardsplit). The first of Mark’s two methods involves setting up two MIDI tracks and using the MIDI Modifier section of each track’s Inspector panel to limit the note–range each track responds to (LoopMash FX’s trigger notes start at C2, so this is a better ‘split’ point than the C3 example Mark offered).
For our purposes, there’s one extra trick required, though. For the track whose split point is below C2, you need to add an instance of the MIDI Modifier MIDI plug–in in the MIDI Insert panel (so, essentially, you end up with two sets of MIDI Modifier controls on that track). Then, in this MIDI Modifier plug–in, which is processed after the note filtering has ‘split’ the incoming MIDI, you can add a suitable transpose value (+24 notes) so that the MIDI notes match those required to trigger the LoopMash FX C2 to G3 note range. Record–enable both MIDI tracks, and you should be able to control one instance of LoopMash FX from each side of the ‘ keyboard split’ you just created.

If you want to control two instances of the plug–in at the same time from a single MIDI keyboard, you need two separate MIDI tracks and to use Cubase’s MIDI Modifier options to create a keyboard split. If you want to control two instances of the plug–in at the same time from a single MIDI keyboard, you need two separate MIDI tracks and to use Cubase’s MIDI Modifier options to create a keyboard split. I’ve provided an audio example to illustrate the various options described above (http://sosm.ag/feb15media). While LoopMash FX can produce some great results, it’s still a fairly limited palette of tricks. Such ‘special’ effects can feel old very quickly so, unlike my audio demo, in which I’ve tried to make things as obvious as possible, you might find you want to exercise just a little restraint!
No comments:
Post a Comment