Cubase Tips & Techniques
Technique : Cubase NotesCubase has all the tools you need to add vocal glitching effects to your pop or EDM tracks.
John Walden
Listen to almost any contemporary pop music, particularly electronic dance music, and you’ll notice just how often vocal sampling techniques are used. The samples can serve all sorts of useful purposes, but they’re most often used as ‘ear candy’ — effects to keep the listener engaged, and to create rhythmic interest. This idea has been around for as long as sampling itself, of course, and you can do a lot of it with nothing more than judicious audio editing in Cubase’s Project window. But Cubase offers all sorts of other useful tools which can get you where you want to be rather more quickly.
The Special Agent
I find that the fastest method is to use Cubase’s bundled drum machine, Groove Agent (SE4 or ONE). This may have been designed for working with drum sounds, but it allows you to load any samples you wish and associate them with individual drum pads — so there’s nothing to stop you using it to trigger vocal phrases.

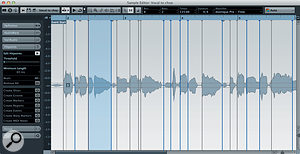
The Sample Editor’s Hitpoint system can be used to divide vocal loops, not just drum loops.The Sample Editor’s Hitpoint system can be used to divide vocal loops, not just drum loops.Groove Agent also allows you to import audio slices that you’ve created from a single audio event using the hitpoint system in Cubase’s Sample Editor, and to map those slices onto a continuous series of drum pads. Again, this feature is primarily intended for slicing an audio drum loop into individual hits, but although the slicing process can require a little more hands-on attention for vocals, the same approach can be used to map individual words or syllables from a vocal part onto Groove Agent’s pads pretty quickly. Once you’ve done that, you have control of the vocal elements at your fingertips — quite literally, if they’re sitting on your MIDI keyboard or drum pad!
There are two stages to this process: first, the mapping of your vocal part to Groove Agent’s pads; and second, the creative exploitation of your samples in a musical context.
Master Your Vocal Chops
Pick a suitable phrase for this ‘chop shop’ treatment. You don’t have to tackle the whole vocal recording, so just start with a key phrase or hook that has a bit of character. If you’ve not done so already, perform any routine editing that you might usually do in terms of tightening the timing or pitching, so that you have a ‘finished’ phrase, ready to be given the chop.
Once happy with your selection, open the phrase in the Sample Editor, select the Hitpoints tab, and then adjust the Threshold setting so that each obvious transient (typically the start of each word) has its own hitpoint. This will require more tweaks than when working with a drum loop, as drum transients tend to be quite obvious, and thus easy for the detection algorithm to identify. With vocals more than any other source, that tends not to be the case.
The odds are that you’ll need to audition each possible slice between the hitpoints to verify that it’s correctly positioned, so start by activating the Edit Hitpoint option (the small arrowhead icon). Now, when you hover your mouse over an audio slice, the cursor will become a speaker icon — and you can click and hold to audition the slice.

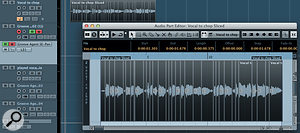
Having created slices from your hitpoints, you can select them in the Audio Part Editor and then drag and drop to Groove Agent. Having created slices from your hitpoints, you can select them in the Audio Part Editor and then drag and drop to Groove Agent. Your aim is to ensure there’s a hitpoint exactly at the start of each word in the phrase. The automatic detection should work well for any obviously separate words, but manual editing will be required where words run into one another, or where hitpoints are placed at each syllable within a word. In the latter case, it’s easier when you come to play with the phrase if you remove the additional hitpoints within the word, but slicing to syllables can also create some useful creative options. You could always repeat this process later if you decide you want to include some individual syllables.
The hitpoints are easy to move, add and disable, so your tweaks needn’t take too long, but do make sure that you spend enough time on this because the more precisely the hitpoints are placed, the easier it will be for you to play the slices via Groove Agent. As you move across a hitpoint at the top of the Sample Editor window, the cursor will change to a double-headed arrow, allowing you to move a hitpoint by clicking and dragging. Holding the Alt (Windows) or Option (Mac) key will bring up the Add Hitpoint tool, and to disable a hitpoint just hover over the hitpoint line and press Shift. With your hitpoints placed correctly, select the Create Slices option in the Sample Editor’s Hitpoints tab. An audio Part will replace the original Audio Event on your audio track. Inside this Part is an Audio Event for each slice that’s defined in the Sample Editor.
Luxury Pad
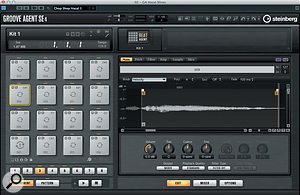
You’re now ready to get these slices into Groove Agent (SE4 or ONE), so open an instance of this instrument via the VST Instruments rack, link a MIDI track with it, and double-click on your Audio Part to open it in the Audio Part Editor. Select one slice with the mouse and hit Command+A/Ctrl+A (Mac/Windows) to select all slices automatically. All you now need to do is drag the selected slices to an empty pad in Groove Agent and, as you release the mouse, each slice will be placed on a separate empty pad. The slices should be assigned in order to adjacent pads, each with its own MIDI note.
Get Creative
That’s the technical stage completed, so now it’s time for the fun part. If all you want to do is use MIDI to trigger your new vocal samples, just select the MIDI track that’s linked to Groove Agent and start playing. Even at this level, there’s plenty of fun to be had. You can create all the usual stutter effects, and experiment with different combinations of words. Indeed, picking a few key words and repeating them in a rhythmic fashion is a good basic option if you just want to get a feel for things. But you’d be missing out on some of the more ear-catching options that Groove Agent SE4 or Groove Agent ONE offer you, and can start to sound a bit tired quite quickly. So here are a few suggestions to help you start making more interesting effects...

Once placed into Groove Agent, each slice appears on an individual drum pad and can be edited as a separate sample. Once placed into Groove Agent, each slice appears on an individual drum pad and can be edited as a separate sample. Both Groove Agent SE4 and ONE can generate a MIDI sequence that you can copy to the Project window. You can use that to play back the pads in sequence, thus reassembling your original vocal part. Why? Well, you can edit this MIDI sequence to do all sorts of interesting things with the timing and sequence of the vocal part. One important point to note, though, is that you must set Groove Agent’s tempo to match the Cubase project tempo before you generate the MIDI sequence. This ensures you get perfect sync when the MIDI is played, and if you fail to do so it can cause a lot of head-scratching!

If you also have MIDI data for your track’s drum part — as you almost always will for pop or EDM tracks — try taking some key sounds from your vocal line and use the MIDI timing of the drum part to trigger them. The effect is rather like creating a vocal-sample beatbox. It takes a little experimentation to identify the vocal samples that will work best for snare, kick and hi-hat replacements — you only need to trigger them for a short time for a rhythmic effect like this, so not all sounds are suitable — but a very effective trick is to drop out the main drum parts for a bar, substitute in your ‘vocal drums’, and trigger them using the same MIDI rhythm.
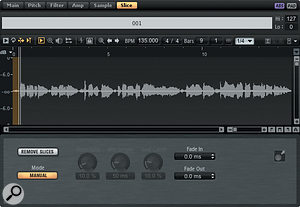
In Groove Agent SE4, the Slice window includes a tiny ‘Drag MIDI Phrase To Host Sequencer’ button (bottom right). Grove Agent ONE has a similar function.In Groove Agent SE4, the Slice window includes a tiny ‘Drag MIDI Phrase To Host Sequencer’ button (bottom right). Grove Agent ONE has a similar function.If you have some spare pads on Groove Agent, you can copy some of the samples to empty pads, but this time play around with their settings, such as tuning, pan and reverse. Drop these into your rhythmic vocals phrases for additional variation.
 Groove Agent has lots of automation options so you can apply real-time control to parameters such as pan and pitch in your new vocal sequences. Groove Agent has lots of automation options so you can apply real-time control to parameters such as pan and pitch in your new vocal sequences. Groove Agent allows you to automate a number of playback controls on a per-pad basis so, next, try building a MIDI phrase from just two or three key words, and then add automation data for things such as pan or pitch to add some additional effects. It’s really easy to find interesting effects this way if you have a suitable hardware controller to generate the automation data.
Finally, having created your chopped and glitchy alternative vocal lines, using any of the approaches suggested above, solo the MIDI track and use the Export option to render this new vocal as an audio event. Then, open the audio and experiment with VariAudio to create some pitch-based effects. These can be subtle (essentially a shift in ‘melody’) or more extreme (obvious ear-candy). The difference with this approach is that any pitch shifting doesn’t also slow down/speed up sample playback and VariAudio attempts to preserve the formants, resulting in a more natural sound.
These are, of course, just suggestions; once you have your vocals sitting in Groove Agent (SE4 or ONE) you can let your experimental side lead you on. Rhythmic, stutter, chopped or glitchy; vocal effect clichés are all within your reach.
No comments:
Post a Comment