Cubase Tips & Techniques
Technique : Cubase NotesMake full use of your speakers with these stereo enhancement tips for Cubase.
John Walden
Stereo enhancement techniques are commonly used to give music productions a little extra 'seasoning'. There are two obvious, very different scenarios here. First, while mixing, you might want to give a mono source (a lead vocal or a strummed acoustic guitar, say) a greater sense of stereo width. Second, you might have a stereo source (perhaps a guitar or piano recording made in stereo, or a complete stereo mix) and want to extend the stereo width somehow, or make it more interesting in some way. In this workshop, I'll focus on the first of these: giving a mono source a sense of 'stereoness'.
It Takes Two
So, we have a mono recording and want to give it a sense of stereo spread. An obvious example might be a vocal or something like a guitar recording where a single mic has been used to capture the sound. There are a couple of classic DIY approaches here that can be easily achieved in most DAWs — EQ‑based widening and pitch‑shift, delay‑based widening — and Cubase includes all the tools you need for both. As a first step, both approaches require you to start by duplicating your mono track and then (if you're to make the effect obvious, which you'll usually want to do) pan the two identical versions hard-left and hard-right.
Join The EQ
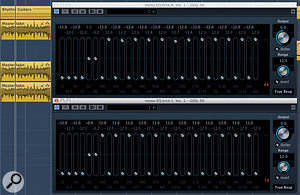
For the EQ approach, insert anThe settings for the two instances of GEQ‑30 are set as mirror images — except in this example I've also rolled off the bottom end and left the lower‑mid frequencies flat. instance of GEQ‑30 (Cubase's 30‑band graphic EQ plug‑in) on each track and configure the settings as shown in the screenshot. The idea is to create a pattern of EQ settings that are exactly opposite to each other in the two channels, so that different elements of the audio's frequency content are placed in the left and right speakers. The overall effect is a gentle widening of the audio. Usefully, when played back via a mono system, the two tracks sum back to mono without causing phase‑cancellation problems. You can, of course, do this with fewer EQ bands (for example, using the GEQ‑10 plug-in) but using a larger number of narrower EQ bands tends to produce a more natural‑sounding result.
Note that in the example, I also rolled off the lowest four bands (simply to get rid of a little boominess on the original acoustic guitar recording) and that I also left the next two bands flat so that the stereo widening applied only to the mid/high frequencies. The lower‑mid frequencies of the sound remain solidly placed in the centre of the stereo image; too much stereo widening of lower frequencies can leave the centre of your mix sounding a little thin.
Feeling Shifty
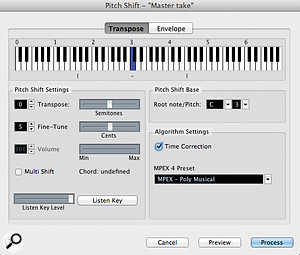
Our second approach involves pitch‑shifting both of the two mono audio clips (the original and the copy) by a small amount. This can be done in a number of ways, but the most straightforward is simply to select the Audio/Process/Pitch Shift option and configure the settings as shown in the screenshot.
There are three things to note. First, it's important that you apply only a smallThe Pitch Shift processor: keep the pitch shift to 5‑15 cents for the most natural end result amount of fine‑tuning (five to 15 cents). Second, this example featured a strummed acoustic guitar so I used the 'MPEX - Poly Musical' algorithm, but you'll want to select the algorithm that's best suited to the material you're processing. For a vocal, you might want to experiment with 'MPEX - Solo Musical', for example. Third, once you click the Process button, make sure you choose 'New Version' in the pop‑up that appears. This creates a new copy of your audio clip before applying the processing. Repeat the process with the second clip, but set the pitch‑shift an equal amount in the opposite direction (ie. if the first process was a five cent drop in pitch, now apply a 5 cent upwards pitch shift).
On playback, the effect is something between a subtle double track and a light chorus effect. However, if you want a more obvious 'double-track' sound, in the Track Inspector, adjust the Track Delay settings of both tracks in opposite directions by a very small amount (10ms is a good starting point). Hey presto; instant (if faked) double-tracked guitars (or vocals) panned left and right.
Three's A Crowd
For something like a strummed acoustic guitar, it's often quite useful to get it out of the centre of the stereo image, away from other mix elements such as your lead vocal. However, if trying to widen a vocal itself you really want such a central element of your mix to be, well, in the centre. A simple variation on both the methods outlined above is to work with three versions of your original mono clip. One can be left unprocessed and panned centrally while the other two can be panned hard left/right and processed as described above. If you drop between 3‑6dB of gain from the two panned tracks, you still get a clear sense of stereo enhancement but your vocal stays firmly in the centre of the stereo image.
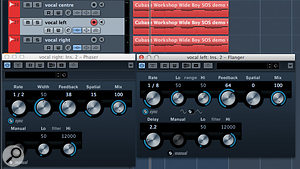
For a more dramatic effect, insert one of Cubase's modulation plug‑ins on each of the panned tracks. For example, using a combination of Flanger and Phaser plug‑ins can work well. You can push these processors gently or more fully depending upon how obvious you want the effect to be and, for maximum effect, add the minor adjustments to the Track Delay setting outlined earlier to create a greater sense of stereo width to the two panned tracks.
Off The Shelf
The nice things about the DIY methods described here are (a) thatIf you want to further emphasise the stereo effect, add a little Time Delay to each track using 10 and ‑10 ms as a starting point. they're all tried‑and‑tested approaches, and (b) because you are building them yourself, you know precisely what processing is being applied. However, Cubase also has a number of plug‑ins whose primary function is stereo enhancement and these are well worth exploring too. The Stereo Enhancer would seem an obvious candidate, but this only works with stereo files, so I'll save a discussion of this for another time. Two others, though, are designed to work with mono sources: Mono To Stereo and Cloner.
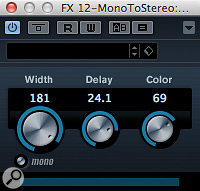
As its name suggests, Mono To Stereo is designed to give mono tracks a stereo presence. Used as in insert effect, the plug‑in has to be applied to a mono audio clip placed onto a stereo audio channel. However, you can also use it as a send‑return effect on an effects channel. There are three controls — Width, Delay and Color — and higher values of all three parameters increase the overall depth of the stereo enhancement. Steinberg's documentation says almost nothing about how this plug‑in works, so you have to make an educated guess at what each control does (presumably pan, time delay between left and right, and EQ contrasts between left and right...). However, it certainly works — in fact, the effect is quite pleasant and generally subtle. This plug‑in has one otherWith the three‑track vocal widening approach, try adding a Phaser and a Flanger (in this example, to the right and left panned versions) to add some detuning. control: the Mono button. Enabling this allows you to check what the processing will sound like when down‑mixed to mono, which is very useful where delays are involved, as they can often introduce undesirable phase cancellation when things are summed to mono.
The Cloner plug-in sits in the modulation group of effects and uses a combination of detuning and delay to create up to four additional voices from a mono signal. While you can use all four voices, if you just use a couple — and choose the static detune and delay options — you get something very similar to the pitch‑shift‑plus‑delay approach described above. The 'Widespread' preset provides a good starting point, and produces a very wide, very noticeable stereo effect when applied to a vocal. Disabling the static options adds a little real‑time variation to the processing and, with more voices used, the modulation nature of the processing becomes more obvious.
The MonoToStereo plug‑in; works well on a mono source even if you are not quite sure exactly how it does it.Incidentally, if you want an alternative approach based on delay alone, the StereoDelay plug‑in can produce a very nice result when applied to a mono source on a stereo track.
Mono Matters
All the approaches outlined here essentially employ one or more of EQ, delay and pitch‑shift with different settings applied to the left and right channels. However, there isn't a 'best' way to do this and each approach outlined above will produce somewhat different results; try each and see what works best with your material and in the context of the particular project.
Finally, a word of warning: stereo enhancement can be addictive but, used to excess, it can cause all sorts of weird audio effects when the mix is heard via a mono playback system (some radios for example). Before you get too attached to how good your super‑wide guitars or vocals sound, it is, therefore, very important to check mono playback compatibility.
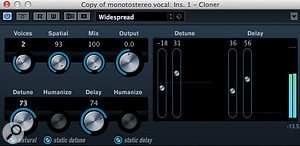
Used with a little care, the Cloner plug‑in can create some very usable stereo-widening effects with sources such as guitars and vocals.Fortunately, if you are using the full version of Cubase, the Control Room makes this easy to configure and I covered this topic back to the May 2012 issue. Even if you only have a single pair of stereo speakers, the Control Room will allow you to check the mono compatibility either by creating a pseudo‑mono downmix (you hear the same audio from both speakers creating a phantom‑mono signal that appears between the two speakers) or by sending a mono mix to just one of your speakers. The latter is easy enough to set up and is probably the more reliable way of checking.

No comments:
Post a Comment