Cubase Tips & Techniques
Technique : Cubase NotesCubase's built-in VariAudio pitch processor isn't just for vocals...
John Walden
I often use Celemony's Melodyne pitch-processing software because it boasts some useful functionality that Cubase's built-in VariAudio doesn't (not least polyphonic detection/correction), but with VariAudio being built into Cubase's editor, I find that the latter is often much more convenient to use. So, after watching an inspiring tutorial video demonstrating how Celemony's Melodyne software can be used on a lead guitar part, for both corrective and creative applications, I decided that I'd find out just how good VariAudio is for the same tasks. And it turned out that VariAudio is actually rather good for this!
Detective Inspector
Before I launch into the processing side of things, I need quickly to touch on the pitch‑detection side of things. As with most pitch‑detection systems, VariAudio is more accurate when dealing with clean, well‑recorded audio. For this reason, when working with guitars, I found that it was better where possible to start with a DI'd guitar part rather than an amplified and miked one (or, for that matter, one smothered in fuzz, chorus, reverb and delay!). Don't worry — amp modelling can be applied downstream, to shape your tone to taste, and if you're particularly fussy about your tone, you could always monitor through your amp while taking a DI feed, and re-amp the result later on.
My first guitar part — and probably the worst guitar solo ever!To keep everything 'in house' I set up a mono audio track with Steinberg's VST Amp Rack installed as an insert effect. While tracking the original part, I simply toggled the track's Monitor button on so I could hear the processed sound (with all the fuzz, chorus, reverb and delay!) while recording a 'dry' DI signal. You really need to be working with a low latency for this sort of monitoring, so be sure to set your audio card's buffer to a low number for this stage.
Stand Corrected
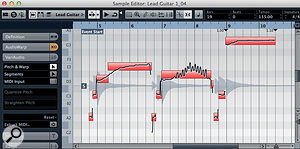
Let's start with the corrective side of things. The first screenshot shows a short, three‑part phrase that contains three typical issues that require correction (they're for illustration only, I promise — my playing is not usually this bad!): in the first phrase, the bend into the first note is too slow; in the second, the vibrato is a bit over the top in the sustained note; and, finally, in the third element, the bent note didn't quite hit the target pitch correctly. The second screenshot shows the same set of phrases after applying VariAudio tweaks in the Sample Editor.
To deal with issues in the first phrase, I did two things. First, with VariAudio's Pitch & Warp mode selected, I hovered the cursor at the lower half of the left edge of the longest segment in the phrase. Doing this turns the cursor into a double‑headed left/right arrow with which you can then drag the start of the segment to change it's timing. Moving it to the left lengthens that segment at the expense of the previous one and, as a result, the bend to the sustained note is shortened. Second, with just that (now even longer) segment selected, I adjusted the Straighten Pitch setting (in the VariAudio tab) to about a third of its range. This flattens the pitch of the note's sustain somewhat. In combination, these adjustments serve to shorten the bend of the note, so that it reaches the target pitch more quickly but without changing the length of the phrase.
For the second phrase, there were two problems with the vibrato: as well as vibrato, there's an odd underlying pitch bend (up and then down again; and the degree of vibrato is excessive. To solve both issues, I split the segment into three shorter segments (as shown in the second screenshot). To split a segment, select the Segments option from the VariAudio tab and hover the cursor along the lower edge of the segment, where it will change to a pair of scissors. Then just click where you want the split.
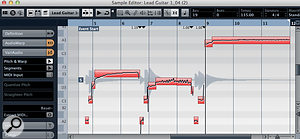
After all three phrases have been corrected, the guitar part is almost respectable. I left the first of the resulting three segments unchanged, but to cure the underlying pitch bend in the second and third segments (upwards in the second and downwards in the third), I used the tilting tool. If you select Pitch & Warp mode again, holding the cursor either top‑left or top‑right of the segment to be edited turns the cursor into an up/down double-headed arrow. Use this to click and drag, and the small‑scale pitch variation in the curve will be preserved, but the underlying trend in the pitch can be tilted. I just made these two segments a little bit straighter before applying a little bit of the Straighten Pitch control to both, to reduce the amount of vibrato. I then finished with just a touch of the Quantize Pitch control.
In the third phrase, where the bend never quite made its target pitch, I started by selecting the segment and applying a healthy dose of Quantize Pitch — but that didn't solve the problem to my satisfaction. As an alternative approach, in Segments mode, I split the segment into two (where the short pitch bend into the sustained part of the note ends). I extended the longer segment, so that it covered more of the sustain of the note. Be aware that, when in Segments mode, this actually extends the length of the whole segment, rather than time‑stretch the audio within a segment (as in Pitch & Warp mode).
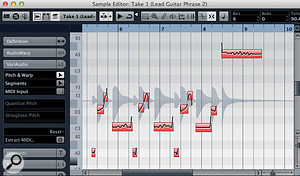
Finally, I switched to Pitch & Warp mode, held down the Shift key (which overrides any pitch snapping) and manually pitch‑shifted the two segments so that my bend sounded good to the ear (the main part of the note ended up at A3). It may not be the most inspiring guitar solo I've ever played, but it's much improved, and it illustrates the principles involved in patching up the odd duff note pretty well.
Creative License
The third screenshot shows a second short lead‑guitar phrase. This time, there's very little wrong with the performance so, instead of correcting the part, I'm going to use it to demonstrate how VariAudio can be used more creatively. I'm going to replicate two things from the aforementioned Melodyne tutorial: adding in some artificial pinch harmonics to certain notes and transforming the long sustained note at the end of the phrase into a multi‑note hammer on/off phrase.
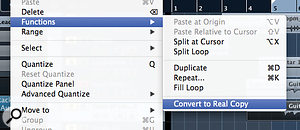
This second short solo phrase is fine but needs a little ear candy. The pinch harmonics trick requires two notes to be overlaid. Unlike Melodyne, VariAudio can only process monophonic audio, and this means that you'll need to duplicate the DI guitar track (complete with the VST Amp Rack plug‑in). When you've done that, convert the duplicated clip into a 'real' copy, which can be edited independently of the original version, by using the Edit / Functions / Convert To Real Copy command.
Next, the copy must be edited so that only those notes that you want for overlaying a pinch harmonic effect remain. For a short phrase, the easiest way to do this is to select each bit of audio you don't want in the Sample Editor and apply Audio / Process / Silence, so that the audio clip eventually contains just the notes that are to be converted into the pinch harmonics.
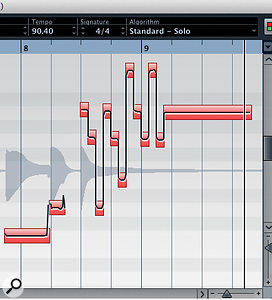
All that remains is to select the Pitch & Warp option in VariAudio, and drag the segments up by either one or two octaves, depending on where the original notes were played on the fretboard. In my short example I had to shift the notes from D3/E3 up to D5/E5. Finally, you just blend the volume of this 'pinch harmonics' track with the original and the effect is complete.
With pinch harmonics added to some notes (in a separate track) and the short 'tapping' section at the end, the lick is much more interesting. Just make sure you convert your duplicate audio clip into a 'real copy' before isolating the notes to create the pinch harmonics!For the simulated hammer on/off lick, you can return to working with the original single DI guitar part in the Sample Editor. Zooming in on the final sustained note in the original phrase, use the scissor tool in Segment mode to divide the original segment into a number of smaller ones. I chose to do this at 16th‑note intervals for three beats, leaving the final portion of the note to fade out.
Switching to Pitch & Warp mode, change the pitch of these smaller segments as required. You can do pretty much anything you like here, including creating harmonically correct arpeggios. Once the segments are pitched as required, select them all and apply a good dollop of Straighten Pitch. This makes the pitch transitions between each note almost instantaneous, just as they would be when a guitar player hammers on or off. If you have the patience to do it, then you could easily use this approach to create a whole Eddie Van Halen‑style performance, starting with nothing more than a few long sustained notes. Some might call it cheating; I call it good fun!
Flat Out
While VariAudio doesn't offer all the options found in Melodyne — in particular, the potential to tweak the pitch of an individual string in a polyphonic guitar part — when used to correct and embellish lead guitar parts, it can actually do a pretty good job. There are, of course, plenty of other creative possibilities including creating harmony lines or experimenting with note bends to simulate the long slides of bottleneck playing. Whatever you're doing, just remember that after spending any length of time using VariAudio to correct or create in this way, you should visit the Process tab in the Sample Editor and execute the Flatten option, to avoid any accidental unpicking of your work.
No comments:
Post a Comment