Steinberg Cubase Tips & Techniques
Technique : Cubase NotesWith even a basic hardware MIDI controller, Quick Controls make writing automation in Cubase much more convenient.
John Walden
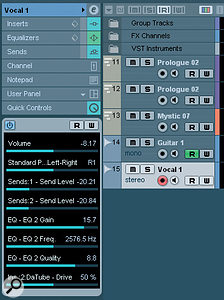
The Inspector's Quick Control panel provides slots for eight parameters.The Inspector's Quick Control panel provides slots for eight parameters.
Whether it's for mixing audio tracks or tweaking synth parameters, the ability to record, edit and save automation data as part of your music projects is now a powerful feature of all but the most basic of DAWs. Even a simple hardware control surface, such as a bank of sliders or rotary knobs on a MIDI keyboard, makes the whole process more tactile. The ease with which you could do this took a big leap forward with the Device Panels that were introduced in SX3 (see SOS March 2005), but Cubase 4 took things further by adding Quick Controls. These are much easier to configure than Device Panels, and offer some of the same functionality, though they are not full replacements. So, if you have a suitable collection of knobs to twiddle, let's work through some examples of Quick Controls in use.
I Want It Now
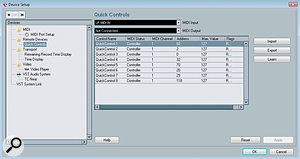
The Quick Controls dialogue box allows you to link your MIDI hardware's controls to the eight Quick Control slots.The Quick Controls dialogue box allows you to link your MIDI hardware's controls to the eight Quick Control slots.
Quick Controls is one of the panels that appears in the Inspector for both audio and MIDI tracks, and has eight parameter slots available. Setting up your Quick Controls is a three‑stage process, and I'll start with an overview of these stages before looking more closely at each in turn, offering some practical examples along the way. I'll also discuss a couple of less positive aspects.
The first task is to link a series of knobs or faders on your external hardware controller to the Quick Control slots. You can do so via a dialogue box found at Devices / Device Setup / Quick Controls (see screenshot opposite). Once made, these links are global, and apply to all tracks in all projects. So, if you've assigned QC1 to be controlled by the first knob on your MIDI hardware controller, that assignment will be consistent for any track that uses Quick Controls. This consistency is a big advantage of this approach.
The dialogue box also includes a 'learn' facility. Once you've chosen the correct MIDI input, attaching a specific hardware controller to each Quick Control simply involves selecting a Quick Control from the list, moving the required hardware control (be it knob or slider) and then pressing the Learn button. Once all the entries are complete, pressing Apply, followed by OK, should complete this first stage of the process.
Assign Of The Times
A context‑sensitive menu makes parameter selection very easy.A context‑sensitive menu makes parameter selection very easy.
The second stage involves selecting target parameters for the eight Quick Controls in the Inspector display for a particular track. When you open the Quick Controls panel in the Inspector, you'll see the eight Quick Control slots, all initially blank. Clicking on any one of them opens a context‑sensitive selection menu from which any of the available target parameters can be selected. For audio tracks, this includes obvious parameters such as volume and pan position, but also parameters for any insert effects and send levels to FX channels — although note that the last of these only becomes active if the send is switched on for that track in the Sends panel of the Inspector.
For MIDI tracks, the available options include any parameters of a VSTi that can be automated — but there's a bit of a catch. For any of Steinberg's bundled VST Instruments, the menu lists all the parameters by name, which makes it easy to find the key parameters you want to put under Quick Control. With most third-party ones, however (at least, most of those that I've used with QCs), you get a rather unhelpful list of controller numbers instead — so either some hit‑and‑miss experimentation or consultation of the VSTi technical documentation will be required.
Control What?
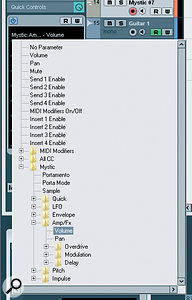
MIDI tracks pointed at a particular VSTi offer that instrument's key parameters for Quick Control in a named subfolder, as shown here for Mystic.MIDI tracks pointed at a particular VSTi offer that instrument's key parameters for Quick Control in a named subfolder, as shown here for Mystic.
There are some obvious targets for Quick Controls. For audio tracks, the most useful parameters include volume, pan (using the Standard Panner Pan Left‑Right control) and send levels. For example, if you're dealing with a vocal track, you might have send levels to both a reverb and a delay configured as Quick Control targets. A further possibility is to assign three Quick Controls to the gain, frequency and Q of one band of the track EQ. This gives you a single, sweepable band under Quick Control, which can be very useful when making initial EQ adjustments during a mix. Doing all of the above still leaves a single slot available, and this might be used for a particular Insert effect parameter, such as the threshold on a compressor or the drive level for a distortion or tube-emulation plug‑in.
For MIDI tracks, the selection is likely to be more varied, depending on which VSTi is involved, but volume and pan are again obvious candidates. Some care is needed, though. As shown in the screenshot on the following page for a Mystic‑based track, there are two parameters for both volume and pan: one pair at the top of the list, and a second under the Amp/Fx section. Both volume options would work, but to control pan you need to select the second, which links directly to the Pan parameter on Mystic's main GUI. Indeed, it's generally best to use options from the named section of the Quick Control selection menu, as these all link to the specific controls found on the VSTi interface.
For synths such as Monologue, A1 (if you have it installed from an earlier release), Prologue or Spector, the other obvious targets are in the filter section, or the key parameters for any built‑in effects. For example, controlling the delay level for the identical effects sections found in Spector, Mystic and Prologue allows you real‑time control over the loudness of repeated notes — which is perfect for another dance cliché, where the delay is raised in level for the last note of any melody line.
Preset Pleasure
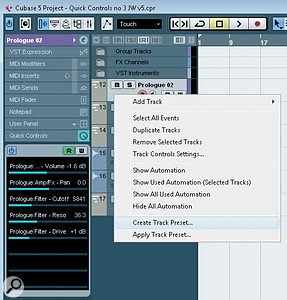
Once you've created a useful set of Quick Controls, these can be saved to a Track Preset — in theory at least!Once you've created a useful set of Quick Controls, these can be saved to a Track Preset — in theory at least!
Once you've created a useful Quick Control setup for an audio or MIDI track, the third and final step ought to be to create a Track Preset that you can load into future projects. I say 'ought' because — for PC users at least (I'm not sure whether this problem exists on the Mac version) — saving Quick Control settings in projects or as Track Presets can be problematic. Although Quick Control settings used in audio tracks seem to be saved and restored correctly via the usual Track Preset system (right‑clicking on the track within the Track List allows the Create Track Preset option to be selected from the pop‑up menu), for users of Cubase 4 or the initial v.5.0.0 release of Cubase 5, things can be less predictable for MIDI‑based tracks. The Quick Control parameter labels appear when a new track is created from the MIDI Track Preset, but the controls are not responsive (no blue value bar appears under each control), and the only way to restore operation is to choose each parameter again via the selection menu — which makes Quick Controls rather less quick than they might otherwise be!
This seemed to be a genuine bug for MIDI‑based tracks (a quick search of the Cubase Forum at www.cubase.net will bring up a number of threads on the topic), but fortunately, it is one of the issues that Steinberg have dealt with in the recent Cubase 5.0.1 release which became available just as I was finishing this column. Incidentally, for those using a pre‑ 5.0.1 version, the Duplicate Track option suffers from the same problem, and some users even report that Quick Controls 'disappear' in the same fashion when reloading a project. While I've only had a short time to experiment with 5.0.1, things now seem to work perfectly, both when applying Track Presets and re‑loading projects that use Quick Controls. However, Quick Controls are still not 'active' if you duplicate an existing track. Once the new track has been assigned to its own instance of a VSTi, a Track Preset has to be applied to the duplicate to bring the Quick Controls to life.
A Few I Made Earlier
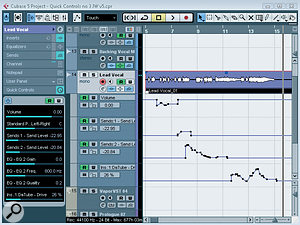
Use the Show All Used Automation option if you need to manually edit any Quick Control automation data for a particular track.Use the Show All Used Automation option if you need to manually edit any Quick Control automation data for a particular track.
This issue notwithstanding, I've created some example Track Presets that can be downloaded from the SOS web site at /sos/jul09/articles/cubasetechmedia.htm. These include a few alternatives for audio tracks and (fingers crossed!) MIDI tracks, aimed at a number of the VSTis that come bundled with Cubase. Each of these presets is suitably named, so it ought to be obvious what their intention is.
The files need to be placed in the user Track Presets folder. The exact location of this folder can vary depending on the operating system and your configuration, and it's also separate from the folder containing the factory‑supplied Track Presets. If in any doubt, the best way to find the correct folder is to create a dummy Track Preset with a distinctive name and then search your file system for the folder containing that file.
Automation
Obviously, the main application of Quick Controls is for the automation of key parameters, and the inclusion of the Read and Write automation buttons in the Inspector's Quick Control panel makes this very easy. Having engaged the 'W' (write) button during playback, any controller movements are then recorded — and engaging the 'R' button will then reproduce those parameter changes on subsequent playback. If you want to see and manually edit any of the automation data created, right‑clicking on the track and selecting the Show All Used Automation option will open up each parameter in a separate lane, which is very neat. One final point is that Quick Controls work for a particular track whenever that track is selected in the Track List: they don't require the Quick Control panel to be open in the Inspector.
Send Control?
Despite the bug I described earlier, Quick Controls are an excellent, and genuinely useful feature in Cubase — and ideally I'd like to see the same convenient means of control extended to control other aspects of Cubase. Currently, although Quick Controls can be used to control parameters on Insert effects for audio, MIDI and instrument tracks, they can't be used to change parameters on send effects other than send levels and pan. It would be great to have the same sort of functionality available to control, for example, FX channels, Group channels and the audio output channels of VSTis — but I'm afraid that's something that for the time being will have to remain on the wish‑list.
Advanced Compression Control
In this column in SOS April 2009, Mike Senior described a parallel compression method using five different compressors, each placed on a Group channel and fed by sends from the original vocal track, in order to mix and match the tonal characteristics of the various compressors. While the overall level of the final vocal can be controlled at a number of points in such a signal chain, varying the send levels to each of the compressors will dictate how hard each compressor is driven and this might, for example, be used to provide contrast between different song sections. As Quick Controls can be used to control send levels from an audio track, they provide a simple and convenient way to tweak these settings while experimenting.
Published in SOS July 2009

No comments:
Post a Comment