Steinberg Cubase Tips & Techniques
Technique : Cubase NotesBreathe new life into your loops with Cubase's LoopMash.
John Walden

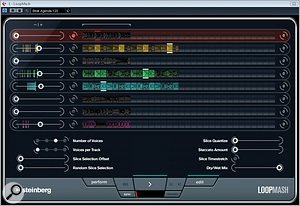
The LoopMash window with the Edit options displayed.The LoopMash window with the Edit options displayed.
LoopMash was, for me, probably the best new feature introduced in Cubase 5. This natty little plug-in uses one 'master' loop (of your choice) to trigger sliced segments from up to seven other loops. Operation is very intuitive, which makes this an excellent tool for creating new and off‑the‑wall rhythm loops. All the basics of LoopMash's operation are well covered in the Cubase Plug‑In Reference PDF, so I'll focus here on giving you a few practical hints and tips to help make the most of what this great little plug‑in has to offer, as well as offering one or two observations on aspects of LoopMash that could be improved in a future update.
Getting Started
If you want to experiment, the supplied LoopMash presets are a very good place to start, but eventually most users are going to want to load their own loops or import them from third‑party sample libraries. Loops can be dragged and dropped onto a LoopMash track from a number of different locations (for example, from an operating system file browser or from the Cubase Project window, if they've already been imported into the current Project). However, occasionally LoopMash's automatic tempo recognition doesn't get things quite right, which results in a loop that doesn't contain the correct number of slices. If you come across this problem, I've found that the most consistent results seem to be obtained when dragging and dropping from the Pool — so it's probably a good idea to add any loops to the Pool first, and then move to LoopMash from there.
Another little oddity that could confuse new users is identifying which LoopMash track is acting as the 'master'. This is generally indicated by two things: the whole track being highlighted; and the illuminated button to the left of the waveform display. In the vast majority of the 'factory' presets, the topmost track is configured to act as the master loop, but you can select any of the others if you prefer. Indeed, I'd encourage you to do this, because for any given set of loops it will produce yet another set of possible variations. However, if you do change the master track, and then use one of the Scene buttons to flip back to a different set of LoopMash settings, the display doesn't update to identify the new master track associated with that scene. While this is a bit irritating, it's purely a graphical issue; you need to look out for the coloured bars that appear above and below the current step on the master track to identify it. These coloured bars appear whenever a slice in the master track is not being played, but they are masked by the white bars that appear on any track when a slice is being used. The Step button (to the right of the Play button in the LoopMash transport panel) can be useful here, to move through the loop step‑by‑step and identify the master. This button is also very useful for seeing which slices in other loops are being triggered for each step of the master loop when you're making changes to the settings on the Edit page.
More Control

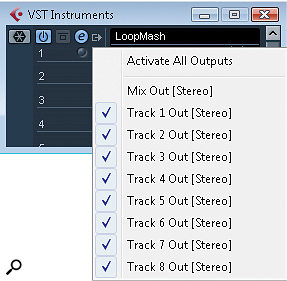
Activating individual outputs for each of LoopMash's tracks can be done via the VST Instruments panel.Activating individual outputs for each of LoopMash's tracks can be done via the VST Instruments panel.
The Edit section includes a dry/wet mix slider, which allows you to adjust the level of the master track relative to that of slices played from loops on other tracks, which is useful, but you're not able alter the levels of the individual tracks in LoopMash. Instead, you have to use LoopMash's multiple outputs: you can activate these from the VST Instruments panel, which will create an audio channel in the mixer for each track. If you opt to work in this way, it's also best to de‑activate the stereo mix output, so you don't duplicate the output from each track.
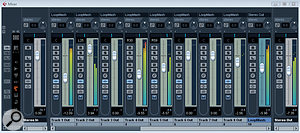
To then control the overall output from LoopMash, you need to create a Group channel and route the individual track outputs to that (as shown in the screenshot above). This arrangement allows the levels of the individual LoopMash tracks to be balanced, and the level of the overall LoopMash output to be controlled within the mix for the project. Of course, it also allows other basic mixing techniques to be used, such as panning different loops across the stereo image, or sending different parts to delays. Sadly, though, using multiple outputs in this way means that you won't be able to make use of the wet/dry mix slider, which is a shame.
A further advantage of this setup is that it makes it very easy to bounce down the output from LoopMash to an audio track. All that is required is that the LoopMash Group channel is solo'ed and then the usual File / Export / Audio Mixdown menu option can be used to generate the required audio file, for the whole arrangement, or just for a short section defined by the Project cycle markers. This audio file can then be subjected to further processing or exported to another software tool if you like to do your loop processing outside Cubase. In addition, while I haven't found LoopMash to be particularly CPU intensive, if your overall project is pushing your system limits, converting your LoopMash output to a single audio track can give you a little more breathing space.
While using LoopMash's multiple audio outputs is very straightforward and, as described below, provides other processing possibilities, it would be nice if Steinberg added simple level and pan controls to each of LoopMash's tracks at some point. This would be just the ticket when all you need is to bump the volume of one or two loops up or down a bit, to achieve a better balance. The obvious down side of using the Cubase mixer as described above is that these mixer track settings don't change if you use the Scene buttons to flip between different LoopMash configurations — although this is more likely to be an issue if you're using LoopMash 'live' in a performance context rather than in the studio.
Chop Chop

Setting each LoopMash track to output to a separate mixer channel allows level and pan to be controlled in more detail, with the overall output level handled via a Group channel.Setting each LoopMash track to output to a separate mixer channel allows level and pan to be controlled in more detail, with the overall output level handled via a Group channel.
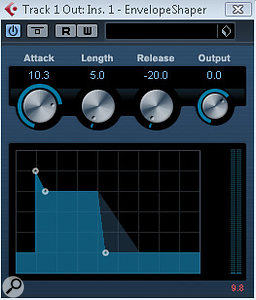
The Edit page also features the Staccato Amount slider, which is used to control the length of the various slices on playback. Using shorter times (with the slider towards the right) gives a much more percussive feel to the performance. This is a 'global' control, however, and, using the multiple outputs as described above, the same sort of effect can be achieved with a little more control by inserting an instance of the Envelope Shaper plug‑in (or whatever third‑party equivalent you might prefer) on each track. As shown in the screenshot below, a combination of high attack, short length and short release settings can produce a more percussive sound, but experimentation is the order of the day.
Where Are My Drums?

Using the mixer also provides additional processing options for each LoopMash track, via Cubase audio plug‑ins such as the Envelope Shaper.Using the mixer also provides additional processing options for each LoopMash track, via Cubase audio plug‑ins such as the Envelope Shaper.
While the slice replacement produced by LoopMash is great, at times you might want your master loop to be playing all the time, to ensure that the overall rhythmic feel is maintained, and simply have the slices from any other loops layered on top. Most of the time, this can be achieved entirely within LoopMash by a careful balance of the Similarity Gain sliders — in particular, having the slider for the master track quite high — and setting the 'Number of Voices' control to two, three or four. This combination ensures that slices from the master track are very likely to be picked for playback and that there are enough voices in total for slices from other tracks to be selected for layering on top. However, if you want to be sure your master loop plays back at all times, or want to get as many replacement slices from your additional loops as possible, the simplest solution is to copy your master track loop to a standard audio track and play it back from there. If you then turn the master track's Similarity Gain slider down to zero (which also frees up a 'voice' to be used by other tracks), while it continues to control the rhythm and influence the selection of slices from other loops, its slices are not output via LoopMash. The relative levels of the master loop and the various LoopMash slices can then be controlled via the Cubase mixer.
Breath Of Life
A quick search on the Steinberg Forums soon brings up a number of other 'wouldn't it be nice if LoopMash could….' comments from users, relating to issues similar to some of the ones I've covered above, so it will be interesting to see if Steinberg do develop the plug‑in further. That said, even as it stands, LoopMash is both a lot of fun and a powerful creative tool. Given the new life it can breathe into a tired loop collection, if you're willing to experiment but have an older version of Cubase, it's probably worth the upgrade price on its own! Happy mashing...
No comments:
Post a Comment