Cubase Notes & Techniques
Technique : Cubase NotesUnlike other DAWs, Cubase has no dedicated support for phase‑locked timing correction of multitrack drums. But with a little imagination, it is possible...
Sam Inglis
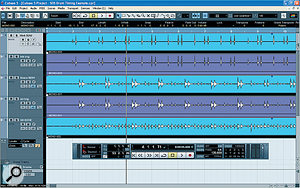
One of the plus points of the method described in this article is that it will work with any number of drum tracks, but for this example I'm using a simple recording with kick and snare close mics and a mono overhead. Here, I've created copies of the kick and snare parts (purple), which will be hard gated to prevent false triggers in the Hitpoint detection.
Despite all the features that Steinberg have added to Cubase over the years, it has always lacked a direct equivalent to Pro Tools' venerable Beat Detective. We have Audio Warp, which can do amazing things to audio on a single track, but we still have no easy way to correct timing across a multitrack drum recording. Surf the Web and you'll find workarounds, but most of them involve tricking Cubase's Sample Editor into believing your multitracked drums are actually a single multi‑channel file — which is messy, and as Cubase only officially supports surround up to 5.1, useless if you have too many drum tracks. In this workshop I'm going to share an alternative approach to recreating Beat Detective‑like functionality in Cubase.
In case you're not familiar with Beat Detective, its great advantage is that allows you to derive a single 'collected' set of triggers and apply this set to any number of tracks. This means that you can analyse, say, your kick and snare drum tracks to find out where the hits are, then use this information to apply exactly the same edits to overheads, toms and room mics too. The consistency is crucial, because it avoids messing up the phase relationships between your carefully placed drum mics, as inevitably happens when you Audio Warp each track individually. Some people also like the fact that Beat Detective doesn't use time‑stretching, as drums are very prone to generating audible artifacts when stretched.
Before we start, I should warn you that this method makes extensive use of Cubase's markers, so if your Project already contains markers, it would be a good idea to export the drum tracks to a fresh Project for editing. I'm also assuming that your Project tempo (or tempo track) is set to the actual tempo of the song, so that your drum parts correspond at least roughly to Cubase's bars and beats grid.
It's A Hit
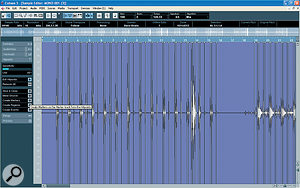
Having generated Hitpoints on my duplicate kick part, I now hit 'Create Markers' to copy them to the Marker track.After repeating the Hitpoint generation on my duplicate snare part, I now have markers corresponding to every kick and snare hit.
 Even Cubase's biggest fans will, I think, have to acknowledge that its Hitpoint detection has always been a weakness. For some reason it never quite seems to get things right, even on a well recorded close‑miked drum track with minimal spill. So the first stage is to help it out by using the Duplicate Tracks command to create copies of the drum tracks from which you want to generate triggers. This would normally mean the kick and snare, though you could include other important close‑miked tracks. Right‑click on the audio events on these duplicate tracks and you'll be able to apply Cubase's Gate plug‑in off‑line. The aim is not to create something listenable, but to eliminate absolutely everything that might provoke false triggering in the Hitpoint detection algorithm, so be brutal, with a very fast attack and release. Alternatively, you could use the Detect Silence function to remove spill.
When you're confident that your duplicate kick and snare events contain nothing whatsoever apart from kick and snare, double‑click the duplicate kick event to open the Sample Editor. Click Hitpoints on the left‑hand pane to open the Hitpoints panel (assuming you are using Cubase 4.5 or later), then raise the Sensitivity slider until Cubase detects and shows Hitpoints at every drum hit. Now hit the button labelled Create Markers. The Marker track will appear, if it's not already visible, showing markers that line up with all your kick‑drum hits. Repeat the process with the duplicate snare part, and when you hit Create Markers again, you'll have a single Marker track containing markers at every kick and snare hit.
Chop Chop
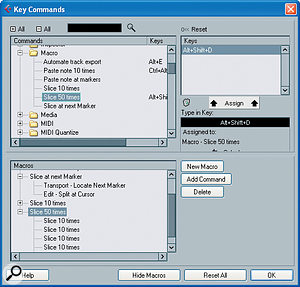
Because Macros can contain other Macros, it's easy to set up one that repeatedly moves to the next marker and slices there.The next stage: I've moved my drum parts slightly to the right, and my Macro has chopped them at each marker.
 The next stage is to translate those markers into edits, and for this purpose we'll need to use a Macro. The creation of Macros is covered pretty well in the Cubase documentation, so I won't go into detail, but in essence, what you need is a Macro that consists of two commands — 'Locate Next Marker' from the Transport section, followed by 'Split at Cursor' from the Edit section — repeated over and over again. The easiest way of doing this is to create a Macro with these two commands in it, a second Macro that repeats the first 10 times, and a third that repeats the second, say, five times, as in the screenshot to the left. Give this last Macro a suitable key combination and it will allow you to create 50 edits at a stroke.
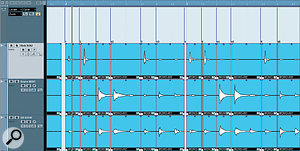
At this point, it's a good idea to select and group (Ctrl-G) all the drum events to which you want to apply the editing. And for pragmatic reasons, it's also a good idea to temporarily shift them all a little to the right within the Project window, so that each marker falls into the space just before a drum hit, rather than actually on the transient at its start. (This will make it easier to apply natural‑sounding crossfades later.) Now return the transport cursor to the start of the song and hit your Macro keystroke. You should see Cubase work its way along the drum parts, chopping them up at every marker point. Repeat the Macro until the section of song you want to edit is fully chopped (as with Beat Detective, it's a good idea to work in manageable sections of a few bars at a time, rather than attempting to tackle an entire song at once).
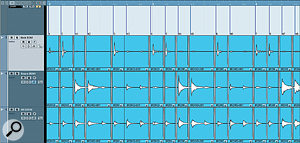
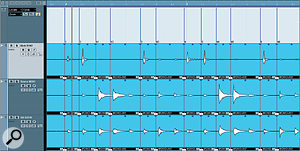
I hit the 'Q' key and voila! My chopped‑up events have been quantised exactly as if they were MIDI notes.The end result: I've hit 'X' to generate crossfades automatically, then slid the parts slightly to the left. My wonky drumming is now perfectly in time with the grid.Now comes the magic part. Select all of these chopped‑up fragments of drum recording, choose Over Quantise from the MIDI menu, and hey presto! You should see all of the events jump into line. Note that it's vital to use MIDI quantise rather than the Audio Quantise command, as the latter will attempt to analyse and apply Audio Warping to your carefully chopped files. Visit the Quantise Setup dialogue and you can even apply swing and randomisation to your quantised drums. Unfortunately, though, you can't use the Iterative Quantise command, which would allow us to recreate Beat Detective's graduated timing correction. (A theoretical limitation of the MIDI quantise function is that the quantise resolution is parts per quarter note rather than samples, but I suspect that the margin of error in Cubase's Hitpoint detection is greater than 1ppqn in any case.)
If you play back your multitrack drums at this stage, they should now be in time, but there will probably be lots of gaps and clicks where the edits have been made. It's at this stage that Beat Detective's 'Fill Gaps and Crossfade' command is so useful. Cubase has no direct equivalent, but does at least make it easy to create many crossfades in one go. Select all the chopped, quantised events and hit 'X'. Cubase will crossfade between all adjacent events, filling any gaps. However, unlike Beat Detective, it will deal with long gaps by creating long crossfades, which isn't always what you want. Depending on how badly out of time your drums were in the first place, then, you'll probably need to go in and do a bit of manual tidying up at crossfade boundaries. You'll also need to slide them all back in time, to compensate for having moved them forward prior to slicing. However, with a couple of minutes' work, you should end up with results very similar to what you get from Beat Detective: multitrack drums that are not only perfectly in time, but perfectly in phase. Result!
No comments:
Post a Comment