Cubase Tips & Techniques
Technique : Cubase NotesJohn Walden
Groove Agent ONE's main display.Groove Agent ONE's main display.
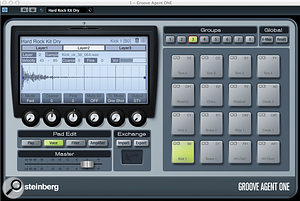
Software may be great for programming sample-based beats, but recreating the sound and feel of a good drummer playing an acoustic kit can be quite a challenge. The good news is that Cubase puts all the tools you need at your disposal, and in this article I'll explain how to use them to program acoustic drum tracks with a genuinely human feel.
There are three main things to consider: constructing a realistic virtual acoustic drum kit; creating suitable MIDI parts to trigger the drum samples; and what you can do at the mixing stage. Groove Agent ONE (GAO) can help with the first of these, and that's what I'll focus on here. As it's a large topic, we can look at the programming and mixing stages next month.
Preset Pains
The first step in building your perfect kit is to get some samples organised in GAO. While you could start with an existing preset (the Hard Rock Kit Dry and Maple Kit are the best of the supplied acoustic presets), this approach has limitations, as GAO doesn't make it easy for you to mix and match drum sounds from different presets. For example, you can't access the individual samples that make up the presets, drag and drop a drum pad's settings between two instances of GAO, or duplicate a pad within a single instance (you can only move or swap between pads). Fingers crossed that Steinberg have these issues on a 'to do' list for improving the user workflow.
Roll Your Own
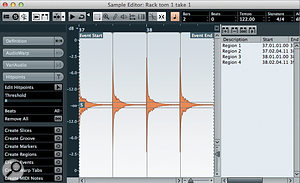
If you have recorded your own drum-hit samples, the Sample Editor can be used to divide them into audio regions.If you have recorded your own drum-hit samples, the Sample Editor can be used to divide them into audio regions.
Things get more flexible — and more interesting — if you build your own GAO instrument from scratch. When you first load an instance of GAO, all the pads are empty, so to build our kit we'll need to find some samples. Ideally, multiple samples of each drum are required, ranging from soft to forceful hits, allowing you to use GAO's sample layers to mimic the tonal changes in a drum when it is hit with different stick velocities. There are plenty of places to find samples, including free online libraries (if you're happy with mono sounds, I can recommend Analogue Drums' Big Mono at www.analoguedrums.com/details-bm.php), but if you have any acoustic drum-loop libraries in your collection, some might also include single-hit samples that you can use. Alternatively, if you know a friendly drummer, you could always record your own — it's not too daunting a task, given that you're only going to need to record one drum at a time via a single mic. Do record plenty of hits, though, as while GAO only allows eight velocity layers for each pad, some extra alternative hits can come in handy, as I'll explain below.
High Velocity
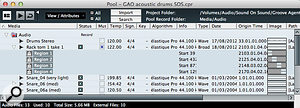
Multiple audio regions from an audio clip can be dragged and dropped from the Pool on to a single GAO pad. Multiple audio regions from an audio clip can be dragged and dropped from the Pool on to a single GAO pad.
Once you have your multiple samples for each drum, they can be dragged and dropped to a GAO pad. I find that this works best when dragging from Cubase's Pool, but a little care is needed. If you are using individual samples, perhaps imported from a third-party sample library, these will be listed individually (each represents an audio clip) in the Pool's Audio section. You can select multiple clips and drag and drop these to an individual GAO pad. All of which is great… but if you recorded each drum in turn directly into Cubase, each clip is likely to contain multiple hits, and to be able to drag and drop the individual hits, you'll need to open each clip in the Sample Editor, add Hitpoints to mark the start of each drum hit and then press the Create Regions button. This will turn each drum hit into a separate audio region and, as shown in the screenshot, a list of these regions will be viewable in the Pool underneath the clip to which they belong. You can then select multiple regions and drag and drop these to a single pad, where they'll automatically be converted to sample layers.
Once they're placed on a pad, you can change the order of the layers by clicking and dragging in the Pad Edit window. By selecting an individual layer, you can adjust its overall playback volume, as well as the MIDI velocity range that triggers it. A little bit of work will be needed here, but the key aim is to achieve a smooth transition between the layers as you move up through the MIDI velocities, so that the transitions between the layers don't jump out during playback as 'there's a new sample' moments to the listener.
You can, if you wish, also adjust the Filter and Amplifier controls. These operate at the pad level (ie. they apply to all layers in the pad), but can be useful if you want to tweak either the overall EQ or the Amplifier Release control as a quick means of reducing any unwanted room ambience on the tails of your samples — although this, of course, could also be done when editing your samples, if you're not using regions as described above.
The Clone Wars
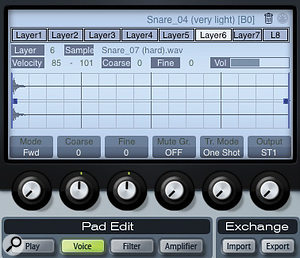
Layers can be edited within the Voice section of the Pad Edit display where you can also adjust the 'Mute Gr' and Output settings for the pad. Layers can be edited within the Voice section of the Pad Edit display where you can also adjust the 'Mute Gr' and Output settings for the pad.
Creating duplicates of all (or just the key) drum pads is useful, as it allows you to use two hardware keys or pads when programming your drum parts. You can't duplicate a pad in GAO, though, so this is a little labour intensive, as you have to build each pad twice, but it's still well worth the effort. However, there's another way you can use multiple pads for particular drums to improve the realism of the performance, and it works particularly well with a snare, which I'll use as my example...
Eight sample layers give you useful tonal and dynamic variability, and a pair of identical pads improves playability, but you can add further subtle variations by building an 'alternative' snare pad from a different set of samples which, on playback, can be blended with the main snare pad. For what I have in mind, it's best to build this second snare from medium and hard hits only, and with somewhat different tones to the main snare pad(s). Having placed these alternative snare samples onto a separate pad, set the Amp Mod setting (in the Amplifier section) to zero percent, so that MIDI velocity no longer adjusts the volume of the sample playback, but will still dictate which sample layer is triggered. You might be able to guess where I'm heading with this, but we'll cover how to put this to use next time, when we look at performance programming.
Kit Completion
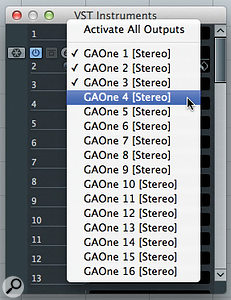
You can activate any of GAO's 16 stereo outputs via the VST Instruments panel.You can activate any of GAO's 16 stereo outputs via the VST Instruments panel.
Two other steps are required before we can save our new kit as a GAO preset. The first helps to ensure that playback realism is maintained by placing particular kit pieces (pads) into Mute Groups. GAO only allows one pad in such groups to be played at any one time. This is particularly useful for sampled hi-hats, because you might have several pads assigned for different performance options (closed, part-closed and open, for example) but, of course, a real drummer could not play more than one of these sounds at any one time. Assigning a pad to a Mute Group is done via the Voice page in GAO; just edit the Mute Gr setting so that all pads in a group share the same number. Up to eight Mute Groups are available.
The second step is to assign your various pads to different GAO outputs. By default, all pads are routed to GAO's main stereo output (ST1), but you can change this via the Output setting in the Voice page. You'll also need to activate the outputs via the VST Instruments panel (click on the little box/arrow icon just to the left of the plug-in name). Any activated outputs will appear in the main Cubase Mixer, and as GAO supports 16 outputs in total, the most flexible approach is to have a separate output for each kit piece. If you've used multiple pads for some drums (the hi-hat, for example), make sure all these pads are assigned to the same output — although if you created the alternative snare as described above, make sure you give that its own dedicated output.
Pack & Go
Having put a lot of work into creating your new virtual drum kit, make sure you save it! You can use the standard preset menu, but it is also a good idea to create a GAO archive (this has a GAK file extension). This archive has the advantage of including all the samples required to recreate the kit, so you can move the file to a different computer system if required. To create the GAK file, simply click on the Export button in the Exchange section, pick a file name and location, and the job is done.
Next month, then, I'll explain how you can put your new instrument to good use in the programming/performance and mixing stages of your production to create something that sounds like a real drummer.
No comments:
Post a Comment