Cubase Tips & Techniques
Technique : Cubase Notes
These simple steps in Cubase 5 will make your programmed acoustic drum tracks sound more authentic.
John Walden
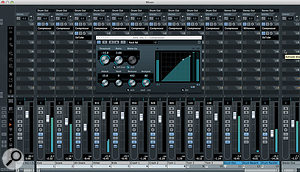
Assigning each of your GAO kit pieces to a Cubase mixer channel gives you a huge degree of control.Assigning each of your GAO kit pieces to a Cubase mixer channel gives you a huge degree of control.
Last month, I explained how you can construct a realistic-sounding acoustic drum kit in Cubase's Groove Agent ONE (GAO), and now we'll learn to how to put the kit to good use by programming a realistic performance, and applying some mix processing. I've placed a number of audio examples on the SOS website.
Desk Job

Having configured GAO, your goal is to assign each kit piece to its own channel in the Cubase mixer, in much the same way as you would for a real multitrack recording. As well as level balancing, this will give you control over pan position, EQ, dynamics and ambience, which are all important.
You can choose to pan things from an audience or a drummer perspective. I tend to use the audience perspective, and assume the imaginary drummer is right-handed. (Whatever you pick, just make sure you're consistent, as nothing else will sound convincing.) So, facing the kit, and sitting a little distance from it, I end up with the kick and snare drum placed in the centre, the hi-hat central or very slightly offset to the right, the crash and ride cymbals set right and left respectively, and the toms panned from small to large going from right to left. A drum kit in the centre of a stage won't fill the panorama, so unless you really want tom rolls or cymbal crashes spanning the full stereo field (yuk!), keep the panning subtle, or route all channels to a bus which you can narrow to taste.
Half the point of using samples is that you can choose the sounds you want, so your EQ requirements will probably be modest, with perhaps a high-pass filter on the toms to tame any low-end ring. Placing a compressor on each channel is generally a good idea, though, as half the processing battle is about getting the sounds to fit the groove. Start with a low ratio (2:1), while adjusting the threshold to produce just a few dB of gain reduction on the loudest hits. Let the attack 'breathe' a bit (start at 10-20ms and adjust to taste), otherwise the drums can become a little lifeless.
With no overhead or room mics in our GAO drum kit, we need to fake some ambience to gel the kit together, so set up an instance of REVerence as a (100 percent wet) send effect, and load one of the small studio impulses, such as 'LA Studio'. Then add some pre-delay (start with roughly 20ms), apply a little low-cut EQ to the reverb, and adjust the time-scaling to suit. All you need to do now is set the send levels from each channel to taste. You're not looking for an obvious reverb tail, just a little cohesion — it's surprising how little you can usually get away with. For the sake of clarity, though, keep the kick drier than the rest.
I mentioned the idea of a drum bus for panning, but the bus can give you more control over the overall drum kit in other ways. Any further compression applied here should be subtle, just knocking a couple of dB off the peaks. If you decide that you want to be more aggressive, I'd advise that you don't push this compressor harder, but instead create another effects channel, this time with a compressor inserted in it. This can be driven quite hard via the channel sends, and you can even add tape-saturation and distortion efffects, and shape the return channel with EQ. You then blend in the channel at a low level compared with the main drum output. This isn't the place to go into how parallel compression works, but you should find that this fattens things up nicely without squeezing all the life out of your drum sound.
Keep It Simple

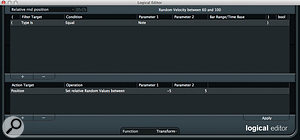
The Logical Editor makes it easy to add subtle random velocity or (as in this case) timing variations to the drum performance.The Logical Editor makes it easy to add subtle random velocity or (as in this case) timing variations to the drum performance.
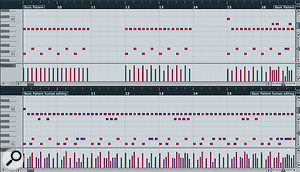
Rory Dow's article about programming your own drum parts in SOS September 2010 (/sos/sep10/articles/drum-prog.htm) is well worth a read, but two salient points are worth noting. First, keep your patterns simple before you start adding touches of 'flash': a drummer only has four limbs, so use no more than four sounds at once; and try to think like a drummer when playing simultaneous hits. (for example, most drummers don't hit the hi-hat when playing a crash). Second, you can avoid obvious repetition by applying Rory's 'doubling up' approach. In essence, start with a two-bar loop, then copy it and tweak it very slightly (velocity, timing, fewer/more/different hits) to give a four-bar loop. Repeat the process to create an eight-bar loop, and so on. In this way, even a metronomic eighth-note hi-hat with kick and snare on alternate beats can become less robotic.
While such editing can be done by hand, Cubase has plenty of tools to help you. You can apply a groove quantise (as described in the July/August 2012 columns), just add a little 'quantise swing', or apply a Logical Editor preset, for example. The last technique can be applied to an entire pattern or just to selected notes. For instance, the 'downbeat accent' preset increases the velocity only of the MIDI notes falling on, or close to, a beat. This can be great for programmed hi-hats, as it adds a nice dynamic to the playing.
While repeated timing variations from the grid help to create a groove, even the best drummers also exhibit some random variations. The Logical Editor can also help simulate this, by adding a random relative change in timing and velocity to selected MIDI notes. Provided you keep the amount of randomness small, what you end up with is subtle variation, rather than something that screams 'sloppy programming'!
Adding Bling

Even the simplest of drum patterns, such as a metronomic eighth-note hi-hat with a kick and snare on alternate beats (top left), can easily be transformed into something less robotic with the tiniest bit of editing, as shown in the other two-bar loops and the final eight-bar version (bottom).Even the simplest of drum patterns, such as a metronomic eighth-note hi-hat with a kick and snare on alternate beats (top left), can easily be transformed into something less robotic with the tiniest bit of editing, as shown in the other two-bar loops and the final eight-bar version (bottom).
By now, we're halfway towards a convincing sound, but we still need a few embellishments to make things truly realistic.
Ghost notes, particularly ghost snares (hits at a low level and generally off the beat), and a few fills at song section transitions, are good places to start. The screen shot shows a how a typical two-bar MIDI pattern has been transformed from something very simple (and mechanical) to something much more natural sounding. Doing this simply involved applying a tiny bit of swing to the hi-hat, copying to give eight bars, a very modest randomisation of the timing and velocity of all notes and then the addition of a few left/right 16th-note hi-hat frills, the occasional ghost snare hit (see the much lower velocities for these notes), a short snare fill in the last bar and a crash cymbal replacing the hi-hat at the start of bar 1. In a list like that, it can seem like a lot to do, but it's actually really quick and easy!
Sneaky Snare
If you read last month's column, you'll remember that I created an alternate snare pad in my GAO kit. I set the Amp Mod to zero percent for this pad, so that velocity didn't control volume but did control which sample layer was triggered. If you make a copy of your MIDI drum track and mute (or delete) all but the snare notes, you can then transpose this note so that it now triggers the alternate snare pad. You can then randomise the velocity of the MIDI notes on this track, effectively varying which sample layer is triggered — and when layered at a suitable level beneath the main snare, it will add a useful dimension to the tone.
It's easy to randomise the MIDI velocities using the Logical Editor 'random velocity (60 – 100)' preset. Simply adjust the MIDI range to span from 1 to 127 (rather than 60 to 100) before applying. However, you need to listen for any flam effect, which will occur if the attack of the two snare samples doesn't match perfectly (some editing in GAO might be required), or for masking of more subtle hits of the main snare (perhaps ghost notes). In this case, you might need to mute the second snare layer.
Tempo & Playing Dynamics
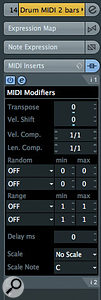
 The MIDI Modifier plug-in allows you to automate the Velocity Shift parameter, adding an overall sense of dynamics to the performance. The MIDI Modifier plug-in allows you to automate the Velocity Shift parameter, adding an overall sense of dynamics to the performance.
If you're adding drums to a live recording, you'll also need to get to grips with constructing a tempo map (something we'll investigate next month). However, even if the programmed drums are the starting point of your recording, consider adding some tempo variations, via a Tempo track, to give the song a more human feel. This might be as simple as a small tempo gradient in the two bars leading up to a chorus, with the chorus itself being a couple of bpm faster than the verse. Again, this just helps to make the performance feel a little less machine-like.
A final touch is to add variation in the overall playing dynamics. While this can be done to some extent via volume automation, it's often not enough, because the drummer playing harder in the high-energy song sections makes the drums sound not only louder, but also slightly different.
Cubase makes this very easy to mimic. The MIDI Modifier plug-in includes a Velocity Shift parameter that applies a relative reduction or increase to a note's MIDI velocity. If you insert the plug-in on the main drum MIDI track, you can automate this parameter to ride the velocity shift as the song plays. This is a great way to add emphasis to particular song sections, or even to certain beats with individual bars. Who'd have thought that Cubase's built-in tools and plug-ins could breathe so much life into your programmed drums?
No comments:
Post a Comment