Cubase Tips & Technique
Technique : Cubase NotesSteinberg's Padshop can be used to create excellent rhythmic effects.
John Walden

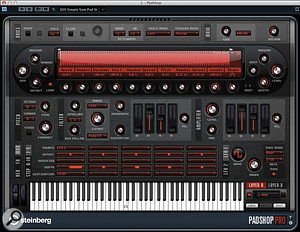
The Padshop interface, with probably the most boring pad sound ever programmed to serve as a starting point for experimentation.
If you're a Cubase user and a fan of pad sounds, look no further than Steinberg's Padshop granular synth, a version of which has been bundled with Cubase since v6.5. It's available as a third-party plug-in for other DAWs, and there's also a 'Pro' version available for a modest upgrade fee and including additional features such as the ability to import samples. (The screenshots you see here are from Padshop Pro, but the two interfaces are almost identical, and all the exercises described here can be achieved with either version.)
Don't let the 'Pad' in this instrument's name fool you, though, because if you scratch below the surface of the pad-tastic presets, this synth can do much more. In fact, you could do a lot worse than Padshop for creating wonderful rhythmic effects.
Unless you're blessed with mathematical super-powers, basic tone creation using Padshop's granular engine is most likely to be a process of trial and error, using the synth's upper two panels. However, once you have a decent tonal starting point, you can start to add rhythmic effects using the more familiar controls that are found in the third panel of the interface, which hosts the modulation and FX sections (plus the additional Reverb in the Pro version of Padshop).
The Modulation Matrix, the twin LFOs, the delay effect (in the FX section) and the Step Modulator are the key tools. The delay effect should require little by way of explanation. Of the others, the Step Modulator offers the most intriguing possibilities, so in this column I'll focus primarily on that. First, though, I'll cover some of the other useful features. I've also provided some short audio examples (/sos/mar13/articles/cubase-0313media.htm) to illustrate the steps described below.
Enter The Matrix

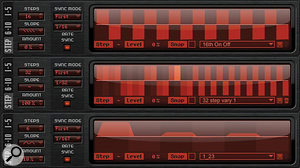
Three Step Modulator patterns. The top shows a simple 16-step on/off pattern while the middle shows a much more interesting 32-step pattern. As shown in the bottom example, you can add a slope to the step starts and tails to smooth the transitions between steps.
Let's begin with a simple starting point, Padshop's basic preset, 'Simple Sine Pad'. Next, remove all the existing sound modulation links in the Modulation Matrix, and then tweak a number of the amplifier and filter settings and switch off all the effects, as illustrated in the first screen. (And you thought the preset was boring to start with!)
Like any synth that features one, Padshop's Modulation Matrix provides a means of linking certain elements of the synth engine together — and when trying to turn our basic pad into something more rhythmic, the first thing to do is use the Matrix to link one of Padshop's low-frequency oscillators (LFOs) to the synth's volume.
For my example, as shown in the screenshot, LFO1 (the source) has been assigned to control volume (the synth's amp volume, which is the destination). With LFO1 configured to produce a perfect square wave (note the Shape control set at 50 percent), the volume is turned up and down at a rate defined by the frequency of the LFO. This, in turn, has been set to sync with the project tempo at 1/16th of a bar.
The resulting pulse-like sound is not dissimilar to a rapid tremolo-style effect, and while it's not terribly exciting at this stage, it does illustrate the basic principle of the technique and provides a good basis for further experimentation.
Now, adjusting the modulation-depth setting, try other LFO waveforms and examine how the Shape control interacts with each of the waveform shapes to change the nature of the 'pulse'. Take the 'S&H2' LFO waveform, for example, which produces alternating high and low values, but with a random element. While the pattern produced is different each time you release all the notes and then press a new one, if you use a combination of 'beat' and 1/16th in the LFO's Sync Mode controls to modulate level or volume, you'll always end up with a rapid rhythmic effect. Higher Shape values will produce smoother transitions between the alternating LFO values.
Step On It

The Modulation Matrix provides ten slots, so there's plenty of flexibility. Note that both sources and destinations can be used multiple times, and modifiers can also be inserted for additional complexity.
LFO control over the amp volume only gets you so far, though. For a higher degree of creative control over the rhythmic nature of your sound, you can explore the Step Modulation options. Instead of the LFO generating a changing pattern of values, these allow you to define your own looping step-based pattern.
Up to 32 steps are available and, as with the LFO, you can set the sync mode and rate relative to your project's tempo. If the Step Modulator is then used as a source to change level (the destination), you'll be in complete control over the timing of changes in level over the full cycle of the pattern. You can create all sorts of rhythmic patterns in this way, and place emphasis on particular steps by using higher values.
Although you can create perfectly stepped patterns in this way, you're also able to adjust the slope between the steps in various ways, to smooth the transitions between steps. Usefully, once created, step patterns can be saved, which is great, as it allows you to build up a collection of such patterns that you can dip into and tweak for repeated use.
You don't have to sync your step-modulation pattern to the project tempo, though, as its frequency is also available as a destination in the Modulation Matrix. This is where you can start to create much more complex rhythmic effects. For example, you could use an LFO to modulate the step frequency, which can generate some fun, although sometimes of dubious musical merit! With a little experimentation, starting with low depth settings, you can achieve interesting and useful results by 'playing' the step-modulation frequency (destination) via the mod wheel (source) — and this often produces more 'human'-sounding effects than automating everything via an LFO.
As in the case of the LFOs, there are three different triggering modes for the Step Modulator — Beat, First and Each — and these can be useful for different effects. Beat is the most straightforward, as the Step Modulator's position is locked to the bar/beat structure of the track (for example, if your step pattern is set to loop over a single bar, step 1 always coincides with the first beat of the bar).
In First mode, the pattern starts as soon as the first note is played. If other notes are added while that first note is held, they follow the pattern from whatever point it has currently reached. However, if you release all notes, the pattern then starts afresh with the next note played. This behaviour can be used creatively if you have programmed a longer step pattern, as it allows you to use the length of time for which a note is held to control how far you get into the pattern.
Finally, Each mode starts the pattern again each time a new note is played. Don't try to combine complex step patterns with lots of notes here, as things just get messy very quickly! Keep it simple, however, and you can achieve worthwhile results.
Layer Slayer

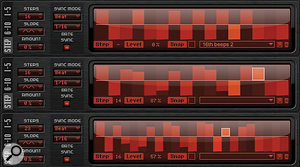
As demonstrated via the audio examples, the top two step-patterns could be placed in different layers, their interaction adding interest to the overall sound. As shown in the bottom pattern, you might also choose to use a different step-length in one of the layers, to increase the rhythmic complexity.
Using the Step Modulator to control the volume in this way allows you to transform any pad into a full-on rhythmic groove... but you can create more interest in a few ways, the most useful of which is probably to repeat the trick — because Padshop allows you to blend two layers. Using the layer Copy and Paste buttons, you can duplicate your rhythmic creation from layer A to layer B. You can then tweak layer B (perhaps selecting a different sample and adjusting the filter settings) to give some tonal variations and use the layer mix fader to blend between the two.
Even more rewarding results can be produced by creating some differences in the behaviour of the Step Modulator between the two layers. For example, start with otherwise similar layers and, using the same pattern within the Step Modulator, simply change the emphasis of a small number of the steps. As you adjust the balance between the two layers, you'll notice a shift in which Step Modulator pattern is dominant. Here's a second example. Use two identical layers, but with the Step Modulator sync rate in layer B set to half or double that in layer A. You can then either quickly switch between layers or try to blend them together. There are lots of other possible permutations, including using different step numbers in the Step Modulator patterns of the two layers. Once you have a feel for how things work, the key is to experiment.
Vanishing Pad
Using the Step Modulator to control the volume of a sustained sound allows you to create all sorts of tremolo and/or gate-like effects in Padshop. But while this automatic control lies at the heart of rhythmic, stuttering and swell effects, bear in mind that you can apply the same logic to the manipulation of other synthesis parameters, such as filter cutoff frequency or amplifier-envelope release settings. Such options enable you to combine your new-found rhythmic sounds with timbral changes that follow the rhythm. It's well worth investing an hour or two in pure experimentation: I guarantee you'll find a way to turn Padshop into much more than a source of drones or ethereal pad sounds!
No comments:
Post a Comment