Cubase Tips & Techniques
Technique : Cubase NotesTry out some '80s-style high-frequency enhancement by recreating the famous 'Dolby A' trick with Cubase's bundled plug-ins.
Carsten Kaiser
Back in the '70s, when the new 'high-fidelity' playback systems were revealing more detail to listeners, and increasingly complex production techniques led to a loss of high end (for example, through analogue tape generation loss) on many recordings, music-production facilities must have yearned for ways to enhance high-end detail in their records. It may be no coincidence that dedicated high-frequency enhancement tools with which we're all now familiar, such as the Aphex Aural Exciter — initially so secret in its workings that it was available only to rent — began to appear.
A rather more cost-effective way to lend signals extra shine and shimmer emerged from Dolby A noise-reduction, using only the encoding stage of a Dolby A unit (see the 'Dolby A Background' box). The effect sounds rather different from Aphex-style processing, and it can be as useful in a Cubase production as it was in the days of hardware.
Creating A Dolby-A Enhancer
Psychoacoustic processors usually add clarity and sparkle to the mix either by regenerating high-frequency harmonics or by combining dynamic equalisation and phase-shifting. This Dolby A setup uses the dynamic equalisation principle, by utilising a virtual multi-band splitter and different compression intensities. If the level of the audio signal rises above the threshold, the respective band's compressor applies gain.
This may sound like a conventional multi-band compressor, but the filters are configured slightly differently, and the first step is to create a four-band splitter using Group and FX channels. I've used a lead vocal for the examples, but you can use a signal of your choice.
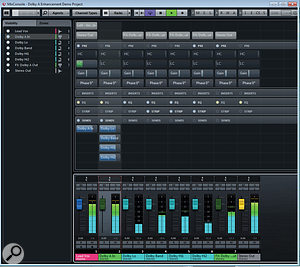
1. Create channels. Create four FX channels and two group channels. Name one group channel 'Dolby A in' and the other 'Dolby A out'. Then label the FX channels 'DA lo', 'DA band', 'DA hi1' and 'DA hi2'. To keep your project tidy, you can move these all into one 'Dolby A' folder if you wish.
2. Signal routing. Route 'Dolby A in' to all four FX tracks, using send controls, but ensure that this channel's output is not routed anywhere. Route the output of each of the four FX tracks to the group channel 'Dolby A out'. Then, feed your lead vocal to the 'Dolby A in' channel via another send control.
3. Add gain. Finally, add 5dB of gain to the 'Dolby A out' channel using the input gain control (in the Pre section of the mixer).This is what your virtual Dolby A routing system should look like in Cubase 7.This is what your virtual Dolby A routing system should look like in Cubase 7.
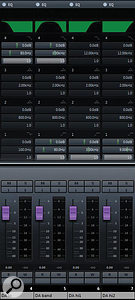
You've now created the basic routing 'canvas', but you still need to set up the filters to complete the splitter. You can use Cubase's built-in EQ to set up the filters as described below:
1. DA Lo: An 80Hz low-pass filter.

2. DA Band: A band-pass filter from 80Hz to 3kHz (using both a low- and a high-pass filter to 'bracket' the band).
3. DA Hi1: A high-pass filter at 3kHz.
4. DA Hi2: Another high-pass filter, this time at 9kHz.
The overlapping zone of the two high-pass filters is what makes this different from a standard multi-band splitter. Make sure the slopes are set to 12dB per octave if you want to make this emulation sound as authentic as possible, though similar effects can be achieved using other slopes.Creating the multi-band environment for the enhancer effect.Creating the multi-band environment for the enhancer effect.
With this routing now complete, it's time to add compression. Insert an instance of Cubase's standard compressor on each of the band-pass and high-pass filtered channels, but not the low-pass one, ensuring that the compressors are inserted after the filters in the signal chain. If you're using insert plug-ins, you can drag the inserts into the desired position. If you're using the Strip section of Cubase 7's mixer, as in my example, you need to drag and drop the EQ Position placeholder in the Mix Console channel strip instead.
Select a 2:1 ratio for the first two compressors, and a less aggressive 1.5:1 ratio for the one on 'DA Hi2'. Set the attack times for all compressors to 1ms and their release times to around 10ms. Adjust the compressors' gain to +10dB on the first two channels, and +5dB on 'DA Hi 2', making sure that the automatic make-up gain is turned off.The carefully adjusted dynamics section of our virtual Dolby A setup.The carefully adjusted dynamics section of our virtual Dolby A setup.
Levels & Thresholds
 If you've stumbled across descriptions of this technique previously, while trawling the Internet, it's possible that you've absorbed some well-intentioned misinformation, and with that in mind, I'd better put a few things straight!
For example, you may have read that you need to set the thresholds of your compressors to -40dB in relation to a fixed reference level. You can ignore that advice, because while this was the case when working with the hardware units, the reason for it was to ensure that the decoding side of the process worked correctly — and seeing as this effect only makes use of the encoding stage, it's not really relevant here. In any case, back in the day, the reality was that the drive level would vary as people routinely varied the actual level they recorded to tape. Recording 'hot to tape' would in effect lower the Dolby reference level threshold down by anything up to about 10dB (resulting in more HF compression).

But you do, of course, need to set the thresholds somewhere, so where? Well, professional engineers will usually work with plenty of headroom — with signals averaging around -20dBFS, and peaks will be somewhere around -10dBFS. In this scenario, you're going to need to work with compressor thresholds somewhere in the region of -60dB (ie. 40dB below -20dBFS) — which you'll find is the lowest setting available in the standard compressor in Cubase 7's new Strip section of the mix console.
It's not at all uncommon for levels on home-brew recordings to be rather higher than this, though (despite there being no real need or practical benefit — quite the opposite, in fact, but that's a discussion for another time!). Perhaps your signals are peaking at 0dBFS, with an average of -10, and if this is the case then you'll want to set the thresholds as high as -50dB to achieve the same amount of compression.
It's All Under Control
With your thresholds set, the effect is now ready to use — you just need to know how to use it. If you were working with the original hardware unit, you could only have changed the level structure by using your soldering iron, so if you want authenticity, leave the faders of the effect channels well alone. Clearly, though, this is the sort of effect over which you want full control — and this is why it's useful to set this up as a parallel process, as described above. This gives you independent control over the levels of the source (dry) sound and the processed (wet) signals.
The easiest way to operate this effect is to leave the source channel's send control at unity gain, and simply grab the fader of your virtual Dolby A output channel to adjust the amount of enhancement effect that you're adding. If you blend the source and parallel (ie. 'Dolbyfied') signals at a level ratio of about 1.5:1, you'll come close to the classic vocal sound of Journey — but you might prefer to experiment to find something less obviously bright!
Further Improvements
For the basic, authentic Dolby A enhancement effect, that's all there is to it. You should find it does far more than you could achieve by simply boosting harmonics with an EQ — and I'd encourage you to compare the two techniques using the same source material, so that you're able to discover and judge the differences yourself!
However, some of the early engineers developed adaptations of the trick, and you've probably heard at least one notable variation: the so-called 'John Lennon mod' (he didn't invent it, but the effect was used on his voice), in which the lower two filters of the Dolby A are disabled, so only the high-frequency portion of the signal is being compressed. If you're going for an 'old school' mastering approach instead, you could use all four bands of your virtual Dolby A setup on full mixes. Some producers use this variant on kick drum or snare channels, too.
Working in Cubase, though, you're not operating under the same constraints as those engineers, and you can easily experiment with tweaking other settings. Juggling the ratio and make-up gain controls of the compressor in the highest band, for instance, will allow you to emphasise the very top end rather more. I'm struggling to think where I'd want to do that, but you may find a use!
Proceed With Caution!
It's easy to get carried away when you learn a new trick, and when applying high-frequency enhancement of any sort you need to be on your guard: it can quickly result in ear fatigue, leading you to make poor mix judgements. So take regular breaks, keep handy some reference material that you know sounds good, and always do A/B comparisons to ensure you remain in the aural comfort zone. You'll find that you achieve the best results by waiting until the next day to double-check your enhancement, rather than rushing a potentially brittle-sounding mix off for feedback!
Also, bear in mind that this effect became popular in days when equipment and recording media (analogue tape) could sound rather dull by comparison with much of today's ultra-clean recording gear, which is far less 'forgiving' of harsh, brittle sounds. Because of this, you need to be picky about when to use the Dolby A trick. Nevertheless, there are plenty of occasions when it can be exactly what you need: for example, it's worth a try when mixing U47/U67-style mics, ribbon microphones or acoustic guitars with dead-sounding older strings. If you are going for an authentic sound, you could also try inserting a tape emulation run at 15ips to add some extra tape hiss, or to smooth the edges of your bright new top end.
No matter which application you choose, watch out for over-enhancement of certain elements of your sound. You don't want any high-frequency noise to be raised too far, for instance, and keep an ear out for what's happening to vocal sibilance — you can always use a de-esser before sending the vocal signal to your virtual Dolby A, but you may need to adjust settings in light of this effect.
Dolby A Background
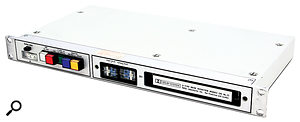
 The original hardware Dolby 361 noise-reduction processor that accidentally spawned this enhancement effect.Photo: PJ
The
Dolby A noise-reduction system was introduced in 1965. The full system
consisted of a main unit and several special-purpose module cards — and
for our enhancement technique, a typical setup would have consisted of
a Dolby 361 unit with a Cat 22 Type A card. Inside this module,
a four-band 'compander' (compressor-expander) operates on the source
signal at the processor's encoder/decoder stages, pre-emphasising high
frequencies before the signal is recorded onto tape, and compensating
for that pre-emphasis in the decoding stage. Used in this intended way,
Dolby A systems attenuated the sound of tape hiss, which was always
introduced by the recording medium. To execute the 'enhancement trick',
producers simply recorded a Dolby A-encoded signal onto tape but left
out the decoding stage during playback.
Leaving
out the decoding stage results in an artificially bright-sounding
signal, with an over-emphasised high-mid range and a compressed top end —
particularly so for high-frequency sounds at lower levels. The main
benefit is that the degree of added brightness decreases as the source
gets louder. So, for example, when applied to a vocal track, the
encoding only slightly enhances high frequencies in passages with louder
vocals (strident choruses, for example) but adds much more
high-frequency enhancement in passages with quieter vocals. This is why
the sound character resulting from this technique is so 'pleasing' to
the ear, relative to harmonic-distortion-based enhancement or standard
EQ shelving boosts.
To illustrate the sonic character of the Dolby A trick, I've provided some audio examples you can find on the SOS web site (/sos/may13/articles/cubase-technique-media.htm),
and you can hear the effect on many commercial recordings: if you
listen to George Martin's later recordings of the Beatles, you'll hear
Dolby A-encoded vocals, and producer Bruce Botnick once confirmed that
The Doors' single 'Light My Fire' had been (accidentally) mastered with
the Dolby A trick. For a more extreme example, listen to Journey's
'Don't Stop Believing'; you'll instantly recognise the 'musical
brightness' of Steve Perry's vocals.
Where might
you find yourself wanting to use the Dolby A trick? Whenever signals
seem to lack presence in the big picture, aren't cutting through the
mix, or simply sound way too dull, it's worth trying. Adding a parallel
signal in the 'Dolby A style' could lend the voice some extra definition
and brilliance, without overdoing things. Bear in mind, though, that at
heart this is dynamic equalisation: there's no added harmonic content.
You're simply enhancing existing high-frequency detail and tightening up
the mid-range.
No comments:
Post a Comment