Cubase Tips & Techniques
Technique : Cubase NotesIf you want to overdub programmed parts to a performance that varies in tempo, Cubase has all the tools you need.
John Walden

Playing The first stage is to create a 'tapping' track that follows the varying tempo of the performance. The first stage is to create a 'tapping' track that follows the varying tempo of the performance. to a click is not always the most musical thing to do, and when a band gets into full swing, subtle (and sometimes not-so-subtle) tempo variations can form an important part of the musicality of the performance. These tempo variations can make it difficult if you then want to overdub programmed MIDI parts. However, if you can capture the variations on Cubase's Tempo track, so that its bar/beat grid matches what the musicians actually played, you'll be free to program and edit without damaging the vibe of the original performance.
Tempo Tools
In the 'full fat' version of Cubase, there are two different tools that can help with this task. First, the Merge Tempo From Tapping command allows you to create a Tempo track from a track on which you've tapped in notes in time with the initial tempo-varying performance. Second, the Time Warp tool allows you to stretch or compress the Cubase beat/bar grid (rather than the audio itself) to match the timing of the recorded performance. In both cases, Cubase automatically adds suitable tempo events to the Tempo track, which can then be manually refined if required.
While either tool can be used on its own, I find that the quickest and most effective approach is to start with the more straightforward Merge Tempo From Tapping tool, using the Time Warp tool for any final adjustments.
Tempo On Tap

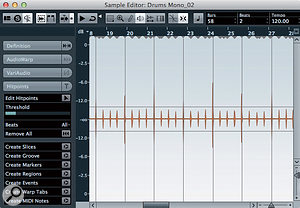
If you record your DIY click track using audio, you can convert it to a MIDI track in the Sample Editor. Here, the louder first beat of each bar has been identified but a lower Threshold setting would capture every beat if required. If you record your DIY click track using audio, you can convert it to a MIDI track in the Sample Editor. Here, the louder first beat of each bar has been identified but a lower Threshold setting would capture every beat if required.
Before you can apply the Merge Tempo From Tapping function, you need to record either a MIDI or an audio track where you tap along, keeping time with the original performance. In principle this is a straightforward task, but there are a few pointers worth considering that can help smooth the process.
1. Before you start, set the Cubase tempo to something memorable (120bpm will do). If you need to repeat any of the steps described below, it's useful to be able to return the beat/bar grid back to its initial starting point.
2. If you're using MIDI notes for this task, tap for each beat of the bar but use a different MIDI note for the first beat of each bar.
3. If you have any drum skills, try using MIDI drum pads or a MIDI drum kit rather than a standard MIDI keyboard: you may feel more comfortable and therefore produce a better result.
4. If it feels easier, record an audio track rather than a MIDI track. This can mean tapping on a desktop or playing along with a drum kit, but make sure you use sounds with a well-defined attack (no flappy kick drums) such as a hi-hat, rim click or snare.
5. Finally, don't be afraid of recording several passes; you might find you lock a little more firmly into the groove once you have played through it a few times.
If you've recorded an audio track, before going further, open it in the Sample Editor and then adjust the Hitpoint Threshold to add a hitpoint at the attack of each hit. If you then click on the Create MIDI notes button, this will then generate a track with a MIDI note at each hit point. Incidentally, if you use a louder sound for the first beat of each bar, you can then adjust the Threshold setting to catch just these louder hits. In some cases, this makes the next stage a little easier.
Test Your Tapping

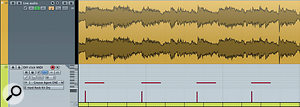
Once the 'tapping' MIDI track is recorded, the Edit In Place option makes it easier to line up the MIDI events to obvious transients in the audio.Once the 'tapping' MIDI track is recorded, the Edit In Place option makes it easier to line up the MIDI events to obvious transients in the audio.
The next step is the most important: you need to listen to, and carefully edit, your DIY MIDI 'click' track to ensure that the timing is as tightly aligned as possible with that of the original performance. While there's no real short cut, it can be done more quickly if you're only trying to edit the MIDI notes that correspond to the start of each bar, rather than those on every beat. Unless there are some very complex tempo changes, this usually provides sufficient information for Cubase to calculate the tempo.
There's no place for timing quantisation here, but prior to editing, it can be useful to quantise the note lengths. Open the part in the MIDI editor and, using the Quantize panel, set the Grid to either half or eighth notes (for 'first beat' or 'every beat' MIDI tracks respectively) and apply Quantize Lengths. While these note lengths will have no relationship to the current beat/bar grid, having each note the same length provides a useful visual clue as to the evenness of their timing during the manual editing stage that will follow. Also, turn the Snap function off — you don't want your DIY MIDI click track notes to snap to the current grid, which does match your original recording!
It's then a simply a question of doing any manual editing to fine-tune the MIDI note timing. If your rhythmic skills are good, this probably won't involve much work, but take your time to get this right. Using the Edit In Place option can be useful, as it allows you to view the MIDI notes alongside the target audio performance in the main project page. Zooming in both horizontally and vertically can also help if the audio contains strong rhythmic elements, as you can check the visual alignment between waveform transients and MIDI notes.
Tempo Extraction

The Merge Tempo From Tapping dialog box generates a series of tempo events on the Tempo track that, hopefully, follow any tempo variations in the original freeform performance. The Merge Tempo From Tapping dialog box generates a series of tempo events on the Tempo track that, hopefully, follow any tempo variations in the original freeform performance.
Once you're happy that your MIDI click track follows the variable performance as accurately as possible, select the Merge Tempo From Tapping command (from the MIDI / Functions submenu) which will extract the tempo data. The dialogue box allows you to specify the tapping frequency you've used, and whether the first bar should start with the first beat (usually best engaged). Once executed, the function creates a tempo event at each MIDI note position and, if you add a Tempo track to your project, you can see all the shifts in tempo alongside your original audio.
Finally, you need to check that the Tempo track provides an accurate reflection of what's in your original recording. The easiest way to do this is to activate the Tempo track and set your favourite virtual drum instrument playing a simple snare/kick/hi-hat pattern alongside it. Hopefully, if you took your time with the MIDI editing, things should already be pretty well locked but, if not, you can note any problem areas that still need further attention.
Get Warped
If there are still one or two spots where the Tempo track doesn't feel quite right, you have two options. First, you can step backwards and do further editing to the DIY MIDI click track before repeating the Merge Tempo From Tapping process. Alternatively, you can dip into the second set of tools offered by Cubase: the Time Warp functions.
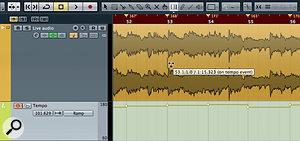
While I personally find the Merge Tempo From Tapping approach much more straightforward than using Time Warp when creating a full tempo track, Time Warp can be very useful indeed for tidying up the odd spot. Once you engage the Time Warp tool via the Project window toolbar, the timeline changes colour and all your tempo events are displayed along it. If you then choose a suitable zoom level, you can focus in on any problem areas. If the beat/bar grid doesn't quite match the transients in the audio, then you can simply grab a grid line and drag it left or right as required. The tempo events will adjust accordingly. This tool does need using very carefully, as you can easily create quite dramatic tempo changes with what seem like relatively small adjustments, so keep it very subtle or go back to the Merge Tempo From Tapping stage.
Follow You, Follow Me

The Time Warp tool can be useful for any final editing required.The Time Warp tool can be useful for any final editing required.
Freeing yourself from your sequencer's fixed tempo is a liberating experience. It is obviously not appropriate for some dance-based genres but, for more organic forms of music — guitar bands, singer/songwriter types and so on — it can be the difference between capturing the performance vibe in the studio or letting a metronomic click track kill it. Capturing the tempo variations in the original performance then allows you to make the most of Cubase's MIDI editing tools as you overdub other parts. It does require some initial effort but the rewards can be well worth it. Let Cubase be a slave to your rhythm rather than the other way around.
No comments:
Post a Comment