We delve into Live’s sophisticated new audio delay effect, Echo.
Echo, Live’s newest and most sophisticated audio delay effect, opens the door to sound design possibilities beyond the reach of Live’s other delays. And owing to the advanced graphics in its user interface, Echo is also one of the easiest to use. For coverage of Live’s other delay‑based effects check out the December 2010, January 2012, March 2014 and May 2017 SOS Live columns.
Early Reflections
Echo’s control panel is split into three sections. On the left you’ll find typical delay settings along with a couple of less obvious options. On the right is an output section that also offers reverb and the choice of stereo, ping‑pong or mid/sides processing modes. The large graphic display in the centre has three tabs: Echo, Modulation and Character. You can click‑drag the graphics in the Echo and Modulation sections and also edit them using the knobs and numerical displays. The small white dots in the Echo tab’s graphic always represent eighth notes, and the semicircles in the display indicate echoes in the left and right channels.
To get started, insert Echo on an audio track and place a short, non‑looping, single‑event audio clip in a clip slot on that track. If you start with the default Echo settings (the settings you get when you insert the audio effect rather than one of its presets), you’ll hear echoes a dotted‑eighth‑note apart that slowly die out owing to the left panel’s rate and feedback settings. The yellow button between the Left and Right rate knobs links their settings — changing either knob or the two settings below the knob affects both channels.
The drop‑down showing ‘Dotted’ has four note‑value options: ‘Note’ (the note value displayed beneath the knob), ‘Dotted’ (1.5 times that value), ‘Triplet’ (2/3rds of that value), and ‘16th’ (the number of 16th notes shown beneath the knob). You use the numerical below that drop‑down to create an offset of as much as 33 percent above or below the time setting. The Offset settings are never linked and are reflected in the centre graphic. The Input and Feedback knobs at the bottom work as usual. The ‘D’ button between them determines whether the Dry portion of the output is affected by the Input setting and the ‘Ø’ button inverts the phase of the feedback signal. Finally, notice that you can click‑drag in the Echo graphic to change the knob values in both linked and unlinked mode. When unlinked, dragging in either side of the graphic affects only that side’s settings.
On the right panel, the Stereo, Output and Dry/Wet knobs work as expected. (The Stereo knob has the same function as the Width knob on Live’s Utility effect — it performs a mid/sides volume scaling of the sides channel relative to the mid channel.) The Reverb knob adds reverb at the point in the signal path (Pre, Post or Feedback) selected on the drop‑down menu below the knob. At the bottom of the panel, you select from three processing modes. In Mid/Side mode, the left and right time knobs set the delay for the mid and sides signals.
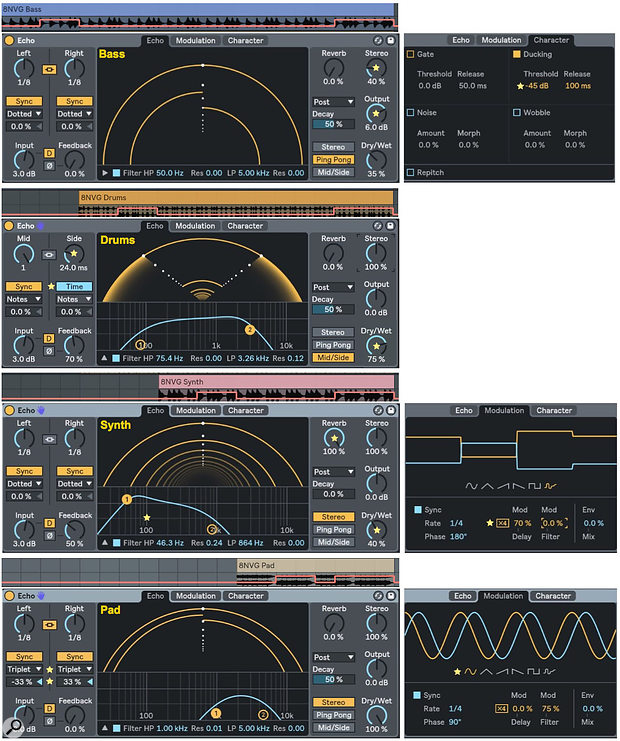
 Screen 2: Four Echo effects process the tracks shown above their panels. Stars indicate modifications to Echo’s default settings.
Taming The Beast
Heavy delay gets old fast, but Echo provides a variety of tools for creating subtle modifications to your tracks. In Screen 2, I’ve placed four short clips (8NVG Bass, Drums, Pad and Synth from Live’s Vinyl Classics Pack) on separate tracks and inserted an Echo effect on each track. The clip being processed together with Echo Device‑On automation is shown directly above the Echo panel. Changes to each Echo’s default settings are indicated by gold stars in Screen 2. In all instances, the input is boosted by 3dB and the Clip Dry (‘D’) button is activated.
Echo First
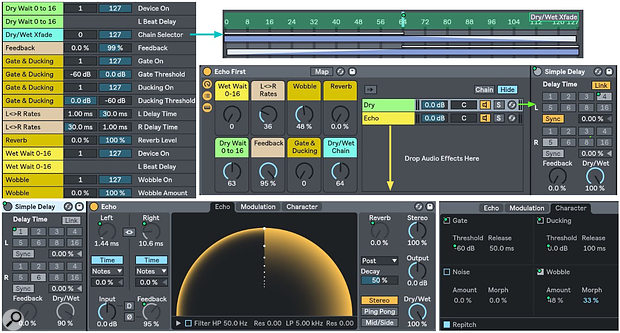
Echoes, of course, happen after the fact, but there’s no reason you have to stick to that. The Echo First two‑chain Instrument Rack in Screen 3 is one way to control the relative timing of the source and echo. Both chains hold a Simple Delay with its two channels linked and set for 100‑percent wet output with no feedback. The Dry/Wet Chain Macro knob (bottom‑right) uses the Rack’s Chain Selector to crossfade between the chains. The two Macro knobs on the left side control each Simple Delay’s Delay Time in 16th‑note steps. When full‑left, the Simple Delay device is turned off. The second chain, labelled ‘Echo,’ has Echo inserted after the Simple Delay. The remaining Macro knobs control various Echo settings.
 Screen 3: This two‑chain Rack features a Simple Delay effect in each chain to offset the pre‑ and post‑Echo signals. The Macro knob assignments are shown at top‑left.
This setup works well with almost any Echo preset. In Screen 3 I’ve used unlinked, very short delays for a flanger‑like sound that works especially well with percussion and short sound effects as a source — try it with your favourite Drum Rack. The ‘L<>R Rates’ Macro knob controls the delay times with inverted ranges: 1.0 to 30.0 ms versus 30.0 to 1.0 ms. The ‘Feedback’ Macro knob restricts Echo’s feedback range to 0.0 to 99 percent to avoid runaway feedback. The remaining three Macro knobs control Wobble, Reverb and Echo’s Gate and Ducking thresholds. Raising the ‘Gate & Ducking’ knob reduces the level and likelihood of echoing. Wobble is random modulation of the delay times. Also experiment with the Delay Mod settings in the Modulation section, and be sure to try both normal and x4 modes.
Here are a few ways you might use this Echo Rack:
Published November 2018

No comments:
Post a Comment