We dish the dirt on Distroyer, the new distortion plug-in introduced in Cubase 10.
Cubase boasts several impressive distortion tools and whether you want saturation, overdrive, fuzz or lo-fi effects, there's something for the job. But Cubase 10 brought Pro and Artist users a new toy called Distroyer, so let's see (and hear — you'll find audio examples at www.soundonsound.com/cubase-distroyer-plugin-audio-examples) what it can do.
Scene Of Destruction
 Distroyer's somewhat unconventional Mix control presents some interesting creative options — but note that you'll need to use the plug-in as a send effect if you want to do true parallel processing.While users of Cubase's older Distortion will instantly recognise Distroyer's heritage, Distroyer offers more controls and, like Quadrafuzz 2, makes it possible to aim the processing at a specific frequency range. Distroyer also has some design quirks, most notably in terms of the Mix control as I'll discuss below, but these also give this tool a distinct character and feel.
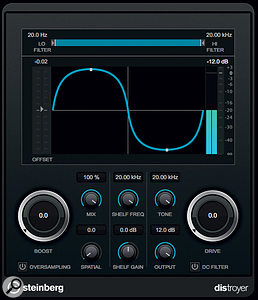
The first screen shows the settings required to 'zero' Distroyer's controls, so the audio sounds the same as when the plug-in is bypassed. This is a useful starting point, especially if you intend a fairly subtle effect. As explained in Cubase 10's Plug-in Reference PDF, some of the controls apply to the 'wet' signal only, and the wet/dry balance is adjusted via the Mix knob. These include the Lo/Hi Filters, which allow you to restrict the distortion effect to a specific frequency range. Incidentally, once set, if you click and hold in the blue zone that defines the frequency range, you can drag the whole range left/right to find the sweet spot. Drive adjusts the distortion character, going from a gentle overdrive to something more full-on, while the Offset control, which you can adjust via the graphic or the slider display, can tweak that character further. The Spatial control changes the left/right characteristics of the distortion and can generate some very cool stereo effects when applied to individual instruments.
Interestingly, the Boost, Shelf Freq, Shelf Gain and Tone controls operate on both the wet and the dry signals. Boost acts as a distortion gain control, while you can also adjust the frequency and gain of a high-shelf filter. Tone is actually a low-pass filter and, of course, Output sets the overall output level. As these controls come after the Mix knob, they can influence the overall sound regardless of the Mix knob setting. This somewhat unusual configuration makes for some very interesting creative options when Distroyer is used as an insert processor; if you want more conventional 'wet/dry' parallel processing, simply deploy the Distroyer as a send effect.
Kick It
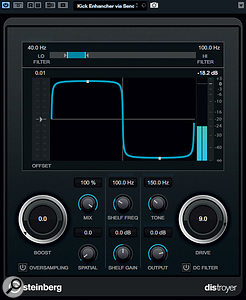
 With filter settings like these, Distroyer can really add some punch to your kick's low end, even when working with a pre-mixed drum loop.Because you are able to restrict the frequency range to which distortion is applied, Distroyer is a particularly useful tool for manipulating kick drum sounds, whether of the acoustic or electronic variety. It's particularly helpful if you're working with pre-mixed loops and finding the kick in need of a little 'something extra' to get it to punch through in your mix. While some focused EQ might also do the trick on occasion, adding new harmonic content with distortion can often be more effective — and in this role, Distroyer is a powerful tool.
The second screen shows some suitable settings to get you started: the Lo/Hi Filter is set to span just the 40 to 100 Hz range, and the Offset is set to neutral but the Drive to 9, to give quite a strong distortion effect. While Mix is set to 100 percent (so the full drum loop is subject to processing), the Tone (low pass) filter is set at 150Hz so that the bulk of the high-frequency content (eg. snare and cymbals) doesn't actually reach the output. Leaving Boost at zero also means that Distroyer won't colour the sound outside the frequency range bracketed by the Lo/Hi filters. And with the Shelf Gain set to zero, the high-shelf filter is also essentially bypassed.
I've used Distroyer as a send effect, so the balance between the unprocessed drum loop and this 'kick enhancement' is dictated by the send level from the drum loop's track. Distroyer's various filters mean that any distortion applied to the higher-frequency elements doesn't reach the plug-in's output, but if you want to get even more aggressive with your kick you can gradually roll up the Boost and experiment with the Offset.
If, instead of using a mixed loop, your kick has its own dedicated channel in Cubase's MixConsole, you can push Distroyer harder — and turn even an underwhelming kick into a cone-ripping monster in a way no amount of EQ could achieve alone. If it's thump enhancement you want, the settings described above will again serve as a starting point — just tweak the Boost, Offset and Drive controls to take things from subtle saturation to more daring decimation.
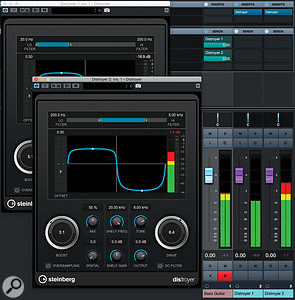
Of course, the Lo/Hi Filter can also be used to focus Distroyer's processing on the click (beater) element of your kick too — to bring out more of its percussive attack. The third screen shows a possible send-return effect starting point for this application. The click of the beater is generally found in the 2-4 kHz range so I set the Lo/Hi Filter accordingly, dialled in plenty of Drive and Boost, and gradually increased the Mix from zero until I started to hear the effect. After that, the fine-tuning is a matter of taste.
Bass Enhancer
In SOS May 2018's Cubase workshop, I discussed band-splitting your bass sounds to apply different processing to the low, mid and high-mid frequency ranges, and one option is to distort to the mid/high-mid components — with the aim of improving the definition of the bass in the mix. I used Cubase's VST Bass Amp plug-in in that earlier workshop and Quadrafuzz 2 could also be used, but the principle works just as well with Distroyer. And Distroyer's control set offers some different and potentially useful options.
 With two Distroyer instances configured as send effects, you can target processing on your bass track's low end to add girth, while treating the low/hi mids differently, to help the part cut through.
Don't Stop Me Now
Of course, it doesn't have to be just kicks and basses! The principles are the same for other applications — just restrict the frequency range you want to focus the processing on and set the distortion to be as subtle or as brazen as you want — but the somewhat unconventional control set always seems to help make Distroyer an interesting creative tool. While I've just about filled my allotted space for this month, I've included in the audio examples on the SOS website a couple of other potential applications for Distroyer: vocal processing and master-bus processing.
Finally, it's perhaps worth me repeating that Quadrafuzz 2 also offers frequency-specific distortion options — so it could just as easily be used as Distroyer in the above examples. I'd suggest that you experiment and see what works best for you, but whatever your thoughts, I reckon Distroyer is a very worthwhile creative addition to Cubase's plug-in suite.
Published December 2019

No comments:
Post a Comment