Live has a few tricks up its sleeve to add variety to your drum patterns.
Adding variation and interest to MIDI drum parts has been taxing programmers for as long as it’s been possible to program drums. Fortunately, Live has a number of tricks to help you out... Perhaps the easiest way to add variety is to occasionally suppress some of the hits for a particular kit piece. The simplest way to do this is to use Live’s Session view Follow Actions to change the clip playing that kit piece. I’ll start there and then move on to explore AutoBeat, a Max For Live sequencer designed specifically for generating drum patterns with randomised triggering. With either method, you’ll usually need to do some editing to the resulting parts for them to make musical sense.
Variations On A Theme
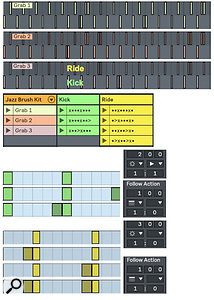
 Screen 1: Follow Actions trigger clips that alternate between basic and push‑beat patterns on the kick and ride tracks. The ‘Grab’ clips capture eight‑bar loops for manual editing.Screen 1 shows one way to generate kick and ride eight‑bar drum loops with push beats (accents before quarter‑note hits). Separate MIDI tracks for the kick and ride clips are routed to the drum kit track. The top kick clip has hits on the first and third beats and the two clips below it add a push beat before one of those hits. Using two Follow Actions for the top clip allows you to use the numerical values below the Follow Action drop‑downs to set the probability of a repeat versus a different clip — higher numbers raise the probability. The push‑beat clips always play once and then return to the top clip. Each of the ride clips has a hit on the second and fourth beat, the two middle clips add a push beat before one of those, and the bottom clip adds a push beat before each.
The Follow Actions cause the top clip to play three times followed by one of the other clips playing once. The clips labelled ‘Grab’ on the drum track are eight‑bar recordings resulting from these Follow Actions. Those clips are expanded at the top of Screen 1 to reveal the different push‑beat patterns that result. Recording the results each time is the only way to ensure you capture the good takes, and they also give you something to edit.
The next part of the process is to add other drum parts, and one way to do this is to start with other MIDI drum clips in your library and strip out their kick and ride parts. Play those clips on a separate track routed to the drum kit. You can edit the added parts along with the grabbed clips using Live 10’s Multi‑Clip editing feature — for the details see SOS April 2018Live column.
AutoBeat
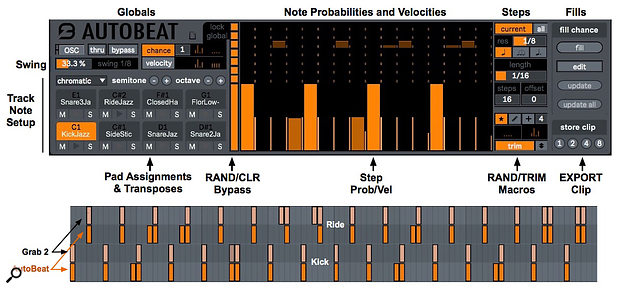
K‑Devices’ Max For Live probability‑based pattern generator AutoBeat ($39) makes fast work of including random elements in your drum patterns, and it generates editable MIDI clips at the click of a button. Screen 2 shows an annotated version of AutoBeat’s control panel along with a comparison of the ‘Grab 2’ clip from Screen 1 and a similar eight‑bar clip generated by AutoBeat.
Before getting into AutoBeat details, have a look at the occasional push beats for each kit piece in the eight‑bar examples. Their placement will change with each pass. In Grab 2 their occurrence depends on the Follow Actions, whereas in the AutoBeat clips it is the result of the probability of triggering the push beats — the shorter and darker notes in the AutoBeat display. In both examples the earlier notes are ‘swung’ a bit to the right of the preceding eighth‑note. In the Follow Actions example that’s where the notes were placed in the source clips. In the AutoBeat example it reflects the Swing setting (a third of an eighth‑note).
 Screen 2: AutoBeat offers detailed control over eight‑track drum sequencing. The clip at the bottom compares AutoBeat‑style randomisation with the clip method from Screen 1.
AutoBeat’s interface is crammed full of controls, but it is fairly straightforward. The display in the middle shows AutoBeat’s eight tracks with the track being edited taking up about half of the display. Both the Chance and Velocity edit modes use bars: the velocity bars have their usual meaning, and the chance bars determine the probability that the note will be played — full‑up is always and no bar is never. The kick‑drum track shown in Screen 2 spans two bars of eighth‑notes with hits on beats one and three of each bar. There are also 50‑percent‑chance hits before beat three of bar one and beat one of bar two. Five rows above that are the ride‑cymbal hits on beats two and four with 50‑percent‑chance hits before the last two of those. The rendered clip reflects those settings contrasted with the Grab 2 clip from Screen 1.
You set up AutoBeat with the controls to the left of the track display. In the bottom half you set the note for each track, and the name will include the associated kit piece when AutoBeat is followed by a Drum Rack. Just above the pads you can specify a scale, which is handy for using AutoBeat with pitched instruments. You can also transpose all the pads at once in semitones or octaves. Above the pads you’ll find global settings such as OSC input/output ports, swing amount, MIDI thru, AutoBeat bypass and global randomisation. You can exclude tracks from global randomisation by clicking the orange buttons to the left of the track display (they turn grey). The numerical box next to the Chance button sets how many events will be generated on each track. Next to that, the buttons with multi‑level orange bars generate the events, and the buttons to their right clear the chance bars or reset the velocity bars to 64.
You set track and note parameters using the first panel to the right of the track display. Use the Current button to make settings for the focussed track and use the All button to change all tracks’ settings. You can set note resolution from 32nd notes to whole notes and alter that to normal, triplet or dotted notes. Each track gets its own note length (again, mostly useful for pitched instruments). A track can have up to 16 steps, and with fewer than 16, you can offset track playback. Near the bottom you’ll find three buttons for randomising track Chance and Velocity bars: ‘*’ mode generates the specified number of bars with random values, ‘/’ mode simply randomises the values of the existing bars and ‘+’ mode adds bars to the track. Below these you’ll find a scroll button (up/down arrows) with a mode switch to its left. Trim mode moves all bars up and down and Continued mode also rolls bars over at the top and bottom.
Try This
Here are three ideas to try with AutoBeat:
Published October 2018

No comments:
Post a Comment