By John Walden
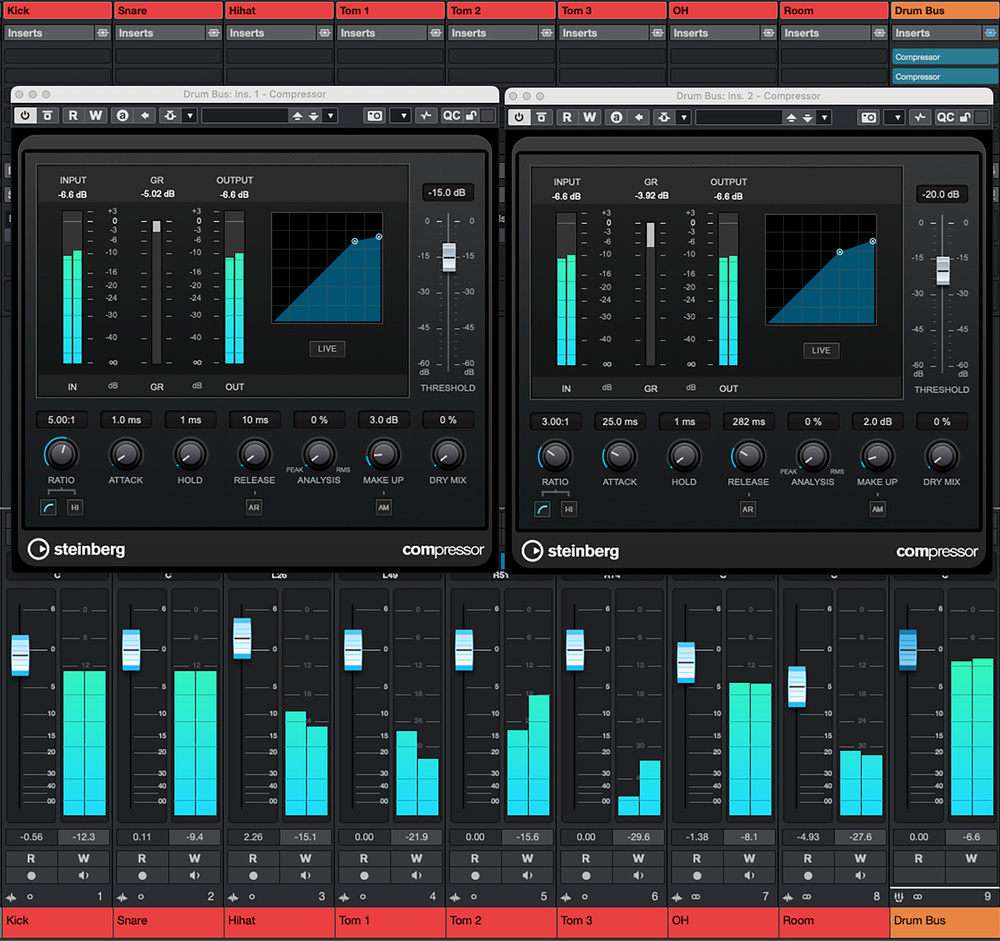 Screen 1: With two instances of Compressor on your drum bus, you can both tame transients and add some extra punch, without losing the natural sound of the kit.
Add impact and attitude to your drum parts with Cubase’s stock dynamics plug‑ins!
When you’re mixing, there are lots of processing options that can make a significant contribution to your acoustic drum sound, but dynamics processing can be particularly useful when the musical style or nature of the mix mean the drums must make a larger‑than‑life impact. Such processing might come in the form of gating, expansion, compression, limiting, transient shaping, clipping and even as a side‑effect of tape emulations, amp/speaker sims, saturation and distortion.
So what, on this front, does Cubase’s stock plug‑in collection have to offer? With the aid of some audio examples (available on the SOS website: https://sosm.ag/cubase-1225), we’ll explore all that in this article. It’s a big subject, though, so to keep things focused and ensure that all the techniques I cover below can be achieved in any Cubase versions from Elements upwards, I’ll concentrate mostly on compression, transient shaping and saturation.
And I’ll add one final note before we dive in: remember that the multitude of options at your disposal always includes doing nothing! Your first job is always to listen carefully, and if your drums were recorded well and sound great, then just balancing the faders and allowing the glorious natural dynamics of the kit and performance to be the star of the show may well be enough, particularly if you have any bus processing going on. It’s not an unrealistic prospect, if you’re happy to live without winning an award for crafting the loudest mix in history!
Drums, Naturally
Normally, though, you’ll want at least to reign in some aspects of the performance/recording just a little, even if you don’t want to overtly change the energy or character of the part. For such duties, you don’t need to look for anything special: Cubase’s standard Compressor plug‑in is a transparent and very flexible tool, and well up to the job. An instance, or possibly two in series, placed on your drum subgroup might well be all that’s required.
The first screen shows a setup with two Compressor plug‑ins, each instance having different attack and release times so they react differently. The first is intended just to catch the highest peaks in the signal. Its threshold has been adjusted so that compression is triggered only by the loudest section of a hit: the initial transient. But, the very fast attack and release times mean that as soon as the transient has passed through (and thus the signal level drops below the threshold), the compression ceases quickly — the gain reduction meter should almost just ‘flicker’ to indicate this short‑lived processing.
The ratio you can set to taste, and you can juggle the ratio and threshold controls to finesse the amount and character of gain reduction this compressor gives you. But note that generally you’ll want more assertive settings than the (roughly) 2:1 you might opt for on a mix bus; I used 5:1 in this example. Incidentally, if you crank the ratio up to 8:1 (the maximum ratio the Compressor plug‑in offers), it starts to become something like limiting, and if that’s what you’re after, you could easily use an instance of Cubase’s Limiter here instead. Personally, I like having the additional control offered by Compressor. Once configured, and you’ve noted the maximum gain reduction (around 6dB in this example), you can then apply a little make‑up gain (I used a fairly conservative 3dB here). Because we’re pulling down the peaks, the end result is a sound with less overall dynamic range, but with the sustained portion of each hit (where Compressor has fully released) sounding a little louder (because of the make‑up gain). Judge it right, and the result should be more impactful drums.
The second Compressor instance is optional. The first Compressor has already handled the highest peaks, so this one targets a different aspect of the drum sound. A slower attack time allows the transients to pass through unscathed before the gain reduction kicks in, and the combination of a longer release and a lower ratio (3:1) than on the first instance results in smoother‑sounding compression. Again, the threshold can be adjusted to refine the overall result, and if required (it depends what you want to achieve here) a little make‑up gain can be applied to restore the final level of the drum mix. As with any compressor, the various controls interact, but unless you push specific controls to an extreme, it’s relatively easy to retain a very natural sound, and the gentle compression of the kit’s overall dynamic range makes it easier to integrate into your overall mix. Compressor might not have the vibe of some more esoteric dynamics plug‑ins, but it is capable, flexible and transparent.
More Control
Sometimes, you’re going to want more detailed control over the dynamics, and if that’s the case then you might want to consider compression of the drum kit’s close‑mic channels. If a transparent result remains your aim, then the same dual Compressor configuration we used for the drum bus is a perfectly suitable starting point for individual kit pieces. But you’ll want to tailor the settings to suit the dynamics of each drum element, of course. This is particularly useful for the key kick, snare and hi‑hat or spot‑cymbal mics.
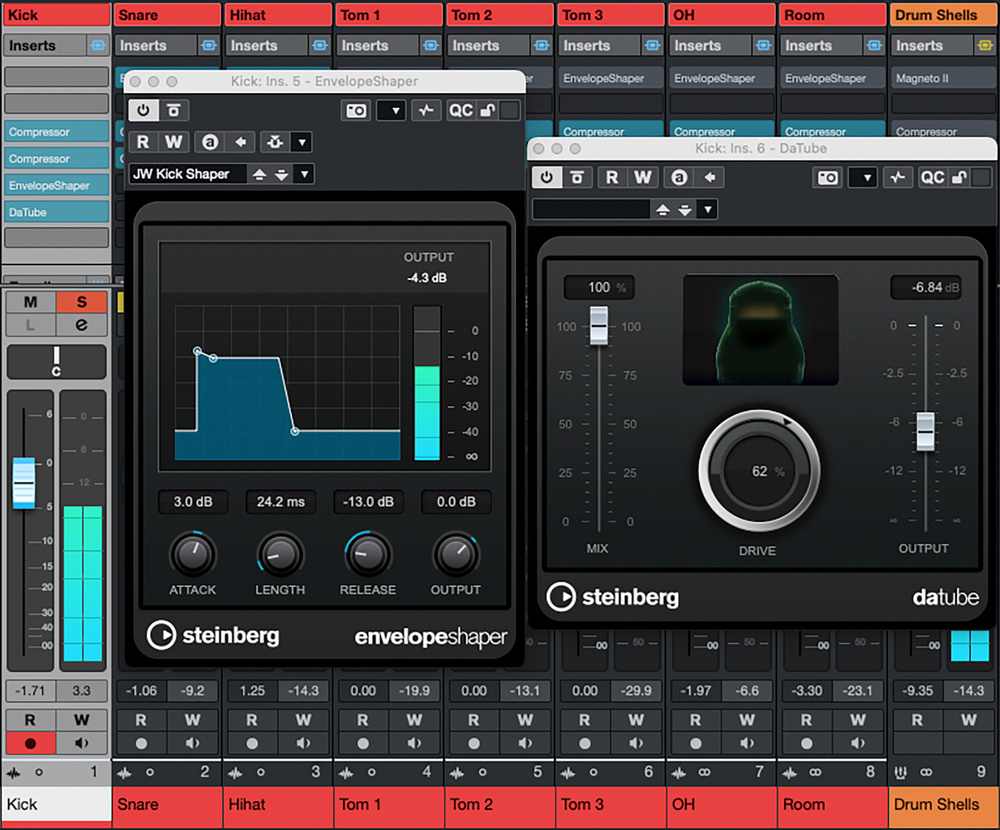 Screen 2: At the channel level, it’s pretty easy to achieve additional control over a specific drum sound — but always listen out for interactions with the rest of the kit and your bus processing.
Depending on how you’re approaching mixing your drums, you might want to configure this compression with any drum bus dynamics processing you have in place bypassed — in changing the peaks and levels of the individual mic channels, you’ll change how the bus compressor reacts. Note, though, that each mic will have captured spill from other kit pieces, so if you wish to do any of this work with your drum element soloed to better hear what the compressor is doing to the track, you’ll still need to listen to the processing in the context of the whole kit — particularly overheads and room mics, with which all the close mics will interact.
Once the individual drum dynamics have been tweaked, you can re‑engage the bus‑level processing, which might need small adjustments. For example, if your channel‑level processing is now catching the initial transients, you may be able to back off the same processing on the drum bus. Or if your kick and snare are now louder because of make‑up gain, they might be tripping the bus compressor more, and you might either want to back off the threshold a little, or use a side‑chain filter to reduce the compressor’s sensitivity to the kick’s low frequencies to avoid pumping.
Targeting individual mic channels also lets you explore additional options on a specific drum, without worrying too much about undue impacts elsewhere in the kit. Yes, as I said, there’s often spill and with it a risk of changing phase relationships other mics, but the risk of significant problems is less than with radical EQ. One of those additional options might include replacing Compressor with one of Cubase’s more characterful compressors or other dynamics processors. The bundled compressor options depend on the Cubase version you’re using, but there are plenty of free alternatives if you need one, such as Klanghelm’s DC1A and MJUC jr. In this example, I’ve gone for two additional (and I suspect often overlooked) options that are available in all versions from Elements upwards: EnvelopeShaper and DaTube.
Throwing Shapes
In the second screenshot, I’ve placed an instance of EnvelopeShaper after my dual Compressor configuration (you can also use this without the separate compression, by the way!). This allows you to shape the transient and sustained (release) portions of a typical drum hit independently and in some interesting ways.
The Length control sets the duration of the ‘attack’, so determines how much of the drum’s initial transient is influenced by gain applied using the attack knob. You can subdue the transients by choosing a negative attack value, or emphasise them with a positive one. The latter can add extra ‘click’ to a kick or initial ‘snap’ to a snare for better definition, for example. But be careful — you’re likely boosting the peaks, which could lead to the signal either overloading any plug‑ins you have downstream, or peeping above the threshold of your bus compressors, making them react differently.
The release control then applies a gain adjustment to the ‘sustain’ (non‑transient) portion of the drum sound. So positive values tend to make the ‘ring’ or ‘body’ of a kick, snare or tom more obvious, while negative values generally give you a tighter‑sounding drum. Negative values will also tend to reduce any bleed from other drums, along with any room sound, rather like a gate can. There are more sophisticated transient shaper plug‑ins out there, but do you really need them? I find EnvelopeShaper easy to use and very effective!
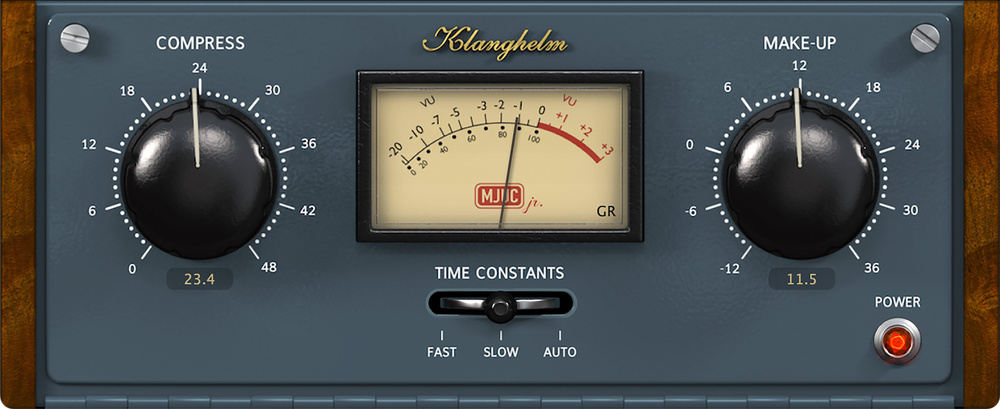 Klanghelm’s MJUC jr — one of many great‑sounding free ‘character’ compressor plug‑ins you can check out if your version of Cubase has fewer options.
What A Character!
Some compressors (in hardware or plug‑in formats) don’t just turn the signal up and down — they can also add additional character to your drum sounds, with subtle transformer‑ and valve‑like distortion that we might call ‘saturation’ or ‘harmonics’. To emulate this, there are various options in the different versions of Cubase, including in the channel strip, and plenty of third‑party options including freebies such as those mentioned above. Since all Cubase versions come with DaTube, I’ve used that here.
As shown in the screenshot for my kick drum channel, I pushed the Drive control quite hard and then backed off the output to balance (to taste, by ear) the processed and unprocessed signal. In this case, DaTube’s harmonics add a lovely warmth to the kick tone, and result it a more solid ‘thump’.
Two Buses At Once
Another technique that’s well worth exploring for acoustic drums is parallel compression. Some plug‑ins let you do this internally — that’s what a wet/dry mix control gives you — but there are often advantages to adopting the ‘old‑school’ approach of putting a duplicate signal through a compressor on a separate track, and I’ve done that here using a send to a dedicated effects track. This allows you, for instance, to EQ the ‘wet’ part of the signal different from the dry one, which can be helpful.
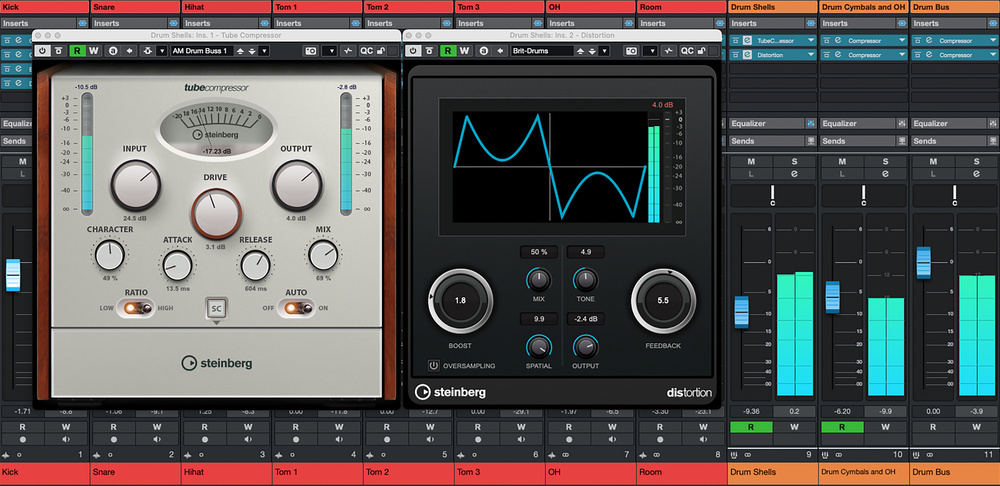 If you want to move beyond a natural sound, parallel processing of the kick, snare and tom mics can be used to dial in some additional grit without making your cymbals suffer.
In fact, as you can see in the final screenshot, I chose to create two such effects buses for this project. The first receives sends from just the drum shell channels (the kick, snare and toms), while the second gets the hi‑hat, overheads and room mics. The purpose of this separation is to allow you to be more assertive with the close‑miked drum‑shell processing than with the metalwork, which can start to sound weird if overcompressed, or when the longer sustains are compressed in response to loud close‑mic hits.
There are plenty of creative options that you might explore on the ‘shells only’ bus, but I’ve kept it relatively simple in this case with an instance of the Tube Compressor pretty much ‘slammed’, followed by the Distortion plug‑in to add extra grit. As demonstrated in the audio examples, blending just a tiny amount of the resulting signal into the overall drum mix injects a much more aggressive character to the overall kit sound. But you can easily dial in something super‑grungy if you really want to. Importantly, the cymbals, having not been subject to this OTT processing, retain their definition — they sound neither ‘splashy’ nor too harsh.
Bypass Plug‑ins, Not Taste
So whatever version of Cubase you have, you have plenty of scope to experiment. That said, it’s fairly easy to take your perfectly decent acoustic drum recording from ‘natural and dynamic’ to ‘flat and overcooked’, so make sure you avoid the potential for a taste bypass by regularly bypassing your dynamics plug‑ins for an A/B reality check. Side‑step that possibility and, with a combination of taming your transients, reduced dynamic range, and possibly a little colourful saturation, you can increase the overall level, and dial in some attitude, so that your acoustic (or multi‑out virtual instrument) acoustic drum mix delivers just what the song requires.

No comments:
Post a Comment