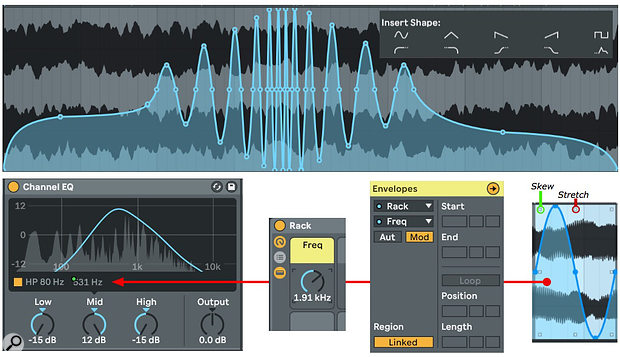
 Screen 1: The blue curve at the top modulates the Channel EQ's frequency relative to its current setting. The curves were fashioned from preset shapes using curve-shaping tools.
Ableton Live 10.1, the first incremental upgrade to Live 10, has something for everyone and multiple improvements for most users.
Live 10.1, the first incremental upgrade to Live 10, has something for everyone and multiple improvements for most users. You'll find, or perhaps stumble over, new key commands, many designed to improve Live's visuals — zoom in and out, expand and contract, expose or hide specific features and so on. Track Freezing now accommodates side-chains by allowing both incoming and outgoing audio. And you can now use VST3 plug-ins, which add many features. Here we'll concentrate on major improvements to automation and modulation, a significant upgrade to Live's Wavetable instrument and several new audio effects.
Automation & Modulation
There are two big stories here. One is that automation and clip modulation can coexist for the same parameter. The other is the bevy of new tools for drawing and editing automation and modulation curves. Before 10.1, clip modulation was limited to MIDI CC messages in MIDI clips and to volume, transposition and a few settings based on the clip's Warp mode in audio clips. All other Session view clip envelopes (mixer settings, device controls and so on) were actually track automation housed in the clip, and they were automatically transferred to the track when the clip was moved to Arrangement view. Now, when you're working in Session view, 'Aut' and 'Mod' buttons in the Clip view's Envelopes editor determine whether you create automation or modulation envelopes. If the Aut and Mod buttons don't appear when you select a parameter from the menu, automation is the only option.
Modulation envelopes are available for most parameters — exceptions include device buttons, switches and menus. Modulation envelopes are available for numerical displays, but there is no visual representation of the modulation. In all cases, a workaround is to map the control to a Rack Macro knob and clip-modulate that. When you move clips from Session to Arrangement view, modulation envelopes remain inside the clip, and automation envelopes are transferred to the track as before. The advantage of modulation is that it is subject to the parameter's manual setting or to concurrent automation, whereas automation takes full control of a parameter. That's why modulation envelope breakpoints are always calibrated in percent (usually ±50 percent or zero to 100 percent), and it's also why you may need to adjust the underlying parameter value to get the modulation range you want.
Live's new envelope tools include preset shapes, numerical editing of breakpoints and click-and-drag reshaping of existing modulation curves. When you right-click in a clip's Envelope editor you'll see an Insert Shape chooser at the bottom of the menu. Choosing a shape fits it to the current selection. (When there is no selection, the shape is fitted to the current grid size.) When you right-click on a breakpoint the top menu choice, 'Edit Value', lets you edit it numerically. If you right-click within a selection of breakpoints, you'll see a Simplify Envelope option that greatly reduces breakpoint clutter.
Also when you cursor within a selection, you'll see eight rectangular, white handles, one on each corner and one in the middle of each edge. The middle handles resize the shape and the corner handles skew it at one end. Pressing the Option/Alt key while using a handle applies its action symmetrically at both ends, in which case Option/Alt-dragging past the centre inverts the shape.
In Screen 1 (above), Live's new Channel EQ is enclosed in an Audio Effect Rack on an audio track. Channel EQ's High and Low band levels are minimised, its Mid band level is topped out at 12dB and its Frequency numerical is mapped to a Rack Macro knob in order to visualise its clip modulation. The envelope was constructed from the sine and fade-in preset shapes. They were modified by selecting different regions and using the reshaping handles. All the new features are also available for automation editing on Arrangement tracks.
Making Waves
Live's Wavetable synth now lets you import your own wavetables: simply drag any WAV or AIFF file from Live's browser or from your file system to the wavetable display for either of Wavetable's two oscillators. The User category of that oscillator's wavetable chooser will now list all samples from the same folder. The Samples tab in Live's Categories browser is an excellent source of samples, and Wavetable does the work of finding the associated folder for the User list.
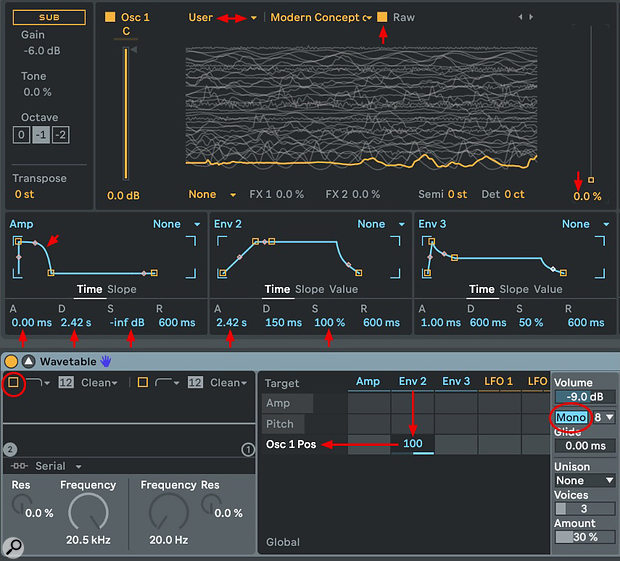
 Screen 2: This Wavetable setup will come close to reproducing the sample loaded into osc 1. The amp envelope decay and env 2 attack settings are set to the original sample length.
For samples not specifically designed as wavetables, a good first step in setting up Wavetable is to reproduce the original sound. That amounts to getting Wavetable to scan the sample the same way a sampler would. From there it's easy to focus on specific areas within the sample and warp them to fit your needs. Speech clips are one good source for experimentation, and anything from a syllable to a sentence will do. Here's one approach, starting with the default Wavetable instrument shown in Screen 2:
Once you've reproduced the original sound of the sample, here are a few tweaks to make it your own:
You'll find in-depth coverage of Wavetable in the May 2018 Live Tech column.https://www.soundonsound.com/techniques/wavetable-abletons-new-synth
Then & Now
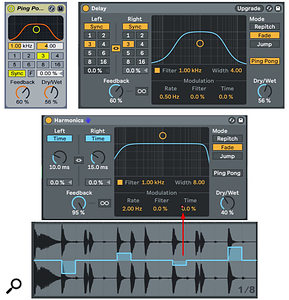
 Screen 3: Delay replaces both Ping Pong and Simple Delay. Enhancements include LFO modulation of pitch and filter, pitch distortion modes, and freezing of the delay buffer.Live's new Delay audio effect combines Simple Delay and Ping Pong Delay. When you load a track using the older versions, each will be replaced by an instance of Delay displaying an Upgrade button. Clicking the Upgrade button will preserve the original delay's free-time range and thereby replicate the original sound.
You'll find several new features in addition to being able to apply the band-pass filter to Simple Delay. You can use different right- and left-channel delay settings with Ping Pong Delay. An LFO with range 0.01Hz to 40.0Hz can be applied to both filter frequency and delay time. The Repitch, Fade and Jump buttons control how delay-time changes affect pitch for both manual and LFO-modulated changes.
Turning on Freeze () captures the current delay buffer and repeats it until Freeze is turned off. Changing most parameters with Freeze on will produce interesting if odd results. (Filter parameter changes have no effect while frozen.) For one example, try Delay's 'Harmonics' preset on a percussive clip and apply some clip modulation to the Time control of LFO pitch modulation, as shown at the bottom of Screen 3 — the affected snare hits have a pitched ring.
Published August 2019
No comments:
Post a Comment