Tuesday, November 22, 2022

Monday, November 21, 2022
Keyboard Fraud
 Chords can be added to the Chord Track with the pencil tool and edited using the Chord Editor.
With the Chord Track, even the most keyboard-phobic and ham-fisted of composers can play in their piano parts!
Like many people, I can write half-decent chord sequences on a guitar, but if I want to perform those parts on a keyboard... well, let's just say my keyboard skills are somewhat limited, and I'm therefore grateful for all the help technology can now offer. There are commercial products that can help you create a convincing performance, of course, but Cubase 7's wonderful, albeit occasionally baffling, Chord Track already includes a keyboard-playing assistant. So, if your keyboard skills are as, ahem, 'good' as mine, let me show you how the Chord Track can help you fake it...
Chord Track Basics
We've already covered a couple of applications of the Cubase Chord Track in previous workshops: using it to re-pitch MIDI and monophonic audio when you want to adjust a chord sequence but don't want to re-record existing parts (June 2013) and in creating harmony parts from audio tracks (July 2013). As a brief reminder, the Chord Track allows you to specify a chord sequence along your project timeline. Once this is done you can select a MIDI or audio track (as long as the audio contains a monophonic performance such as a vocal or instrumental melody part) and, via the track's Chord Track panel in the Inspector window, configure this to follow the Chord Track; Cubase will magically re-pitch notes to fit the chords and scale specified by the Chord Track.
 In this example, I used an audio guide track to help me position the chord changes.Much of the time this works well, but for audio tracks in particular it's not fool-proof, and a little manual editing may be required. It's worth noting that the Chord Track's documentation is not the easiest to follow, particularly with regard to the interaction between the Chord Track settings and the Inspector settings for each individual track. Thankfully, for this month's trick the settings are very straightforward.
Write It Yourself
The first step is the creation of the song's chord progression. Thankfully, that still requires a modicum of musical skill (it would be a boring world if we took everything human out of the music-making process — although the Chord Assistant can even help with this if you want it to!). Once the muse has struck, you need to add a Chord Track (Project/Add Track/Chord), and populate it with your chosen chord sequence. As I've usually developed my chord sequences on my guitar, I'll often record this to a click track as an audio guide, but you can just go straight to the Chord Track if you prefer. Creating the Chord Track events is most efficiently done in two passes. First, using the pencil tool, add blank chord events (they appear with a big X in them) for each chord change. Then, using the Chord Editor (click on a chord event to open the Chord Editor), you can enter the appropriate chord.
The key thing (other than picking the right chords!) here is the timing of your chord changes, which is particularly important if you've written and performed the chord sequence on another instrument and the natural groove plays slightly off the beat. Using an audio guide track and zooming in will allow you to position your Chord Track events to hit those chord changes more accurately — you can turn off snap to grid, or select finer quantise values if you need to.
Get Rhythm
With your Chord Track sorted, the fun can commence. First, create a MIDI track and link it to a suitable virtual instrument (I used an acoustic piano patch in Halion Sonic SE in my example project, as shown in the screenshots). Then, in the Chord Track panel of the MIDI track's Inspector, change the Live Transform setting to Chords. This will result in real-time transformation of any MIDI-note data routed to the track's input. Whatever notes you play, Cubase will re-pitch them so that they're transformed into notes that fit the current chord on the Chord Track.
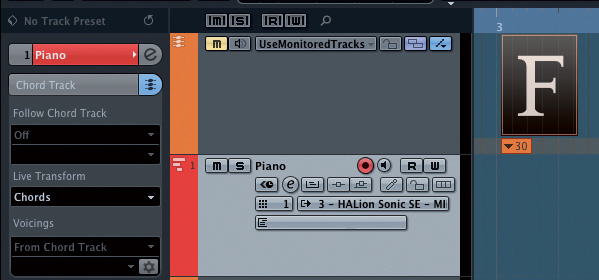 To fake some piano chords, the MIDI track's Live Transform setting needs to be set to 'Chords'.
If you set your locators around your chord progression and loop playback, you can apply almost as much keyboard incompetence as you wish! Cubase will make some sensible chords out of it and, if you record your performance, what you're left with are harmonically correct chords. The one thing to ensure is that whatever notes you play span a reasonable spread of keys: if, for example, you want the end result to be a simple three-note (triad) chord, don't just bash out three adjacent notes as Cubase might transform two of these to the same MIDI note, leaving you with a two-note chord. Instead, span your three fingers a little wider over the keys or, crass as it might sound, use the flat of your palm and play five or six adjacent notes. Amazingly, out will pop the right chords! The good thing about this approach is that it allows you to focus on the rhythmic elements of your performance, which can suffer if you're worrying too hard about fingering the chords correctly.
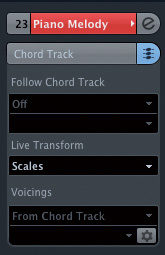 If you want to create a melodic part, the 'Scale' Live Transform setting can be used.If you change your hand position as you play, you'll find that the transformation process will produce different inversions of the required chords, which adds some useful variety to the performance. You can even play with two hands, perhaps playing a single bass note with your left hand and full chords with your right; again, the transformation process will give you a harmonically correct end result that follows the Chord Track.
Scale New Heights
Perhaps it isn't just the chords that you want help with, though… If you need some melodic parts — even if that's only a few incidental notes — the Chord Track can again be pressed into service. When you add chords to the Chord Track, Cubase will automatically add scale events based on the chords used. If you want more control (or wish to avoid some of the more esoteric scale selections), unchecking the Automatic Scales options in the Chord Track's Inspector allows you to set the scale events manually. You can set the key and choose from a range of different scale types to suit the musical style of your track.
Providing that you've specified the correct scale(s) in the Chord Track, simply switch the MIDI track's Live Transform setting to the 'Scale' option, and any notes that you play will be transformed to fit the scale.
Having It All
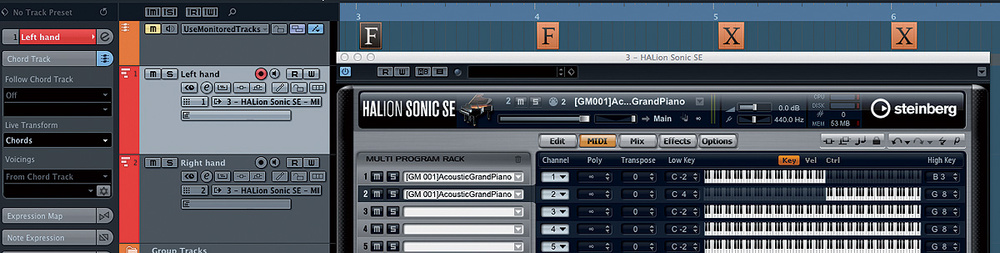 For full-on left-hand/right-hand faking, creating two MIDI tracks and a keyboard split within Halion Sonic SE will get the job done.
It's also possible to fake simultaneous left-hand chord and right-hand melody performances, and this can be done a number of ways. If, for example, your master MIDI keyboard includes a 'split' option that allows you to transmit notes above/below the split on different MIDI channel then simply configure two MIDI tracks with two instances of the same VST instrument and set each to receive the appropriate MIDI channel. If you configure the Live Transform settings of one MIDI track to 'Chords' and the other to 'Scale', you can (rather too easily) create some two-handed 'faking'
Alternatively, some VST instruments allow you to limit the range of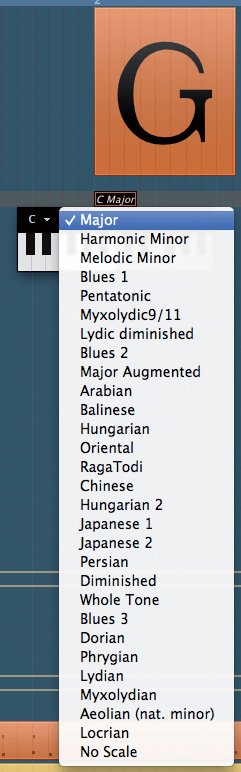 If you switch off the Automatic Scales options in the Chord Track, you can then manually configure the scales used. MIDI notes a patch will respond to. As shown in the screenshot, Halion Sonic SE allows you to do this, and I've set up two instances of a piano sound where each responds to one half of the MIDI note range. Providing you record-enable both MIDI tracks connected to these Halion Sonic SE channels, and configure the Live Transform settings as described in the previous paragraph, you can achieve the same effect.
Guilty Pleasure
While I'm all for improving my own musical skills, I have to admit that since discovering how absurdly easy the Cubase 7 Chord Track makes it to bypass my less-than-stellar keyboard chops, the incentive for me to improve said chops has decreased dramatically — and faking keyboard performances in this fashion has become a bit of a guilty pleasure! Is this wrong? I'll leave you to discuss that with your own musical conscience; I'm too busy laying down piano parts that get the job done to worry about it!
Saturday, November 19, 2022
Friday, November 18, 2022
On Your Marks
Get more done in less time, with these workflow tips for Cubase 7.
One of the main frustrations with DAW software is how long everything seems to take — often just long enough for you to lose the creative inspiration you were seeking to nurture! Wouldn't it be nice, then, if your Cubase projects benefitted from a little more flow and a lot less work? Follow this tutorial and hopefully you'll achieve that, because this month I'll offer several tips that should result in a more efficient use of your favourite DAW software.
The Curse Of The GUI
Our interaction with almost all modern computer software is through a graphical user interface (GUI). While the GUI makes it easier to access the multitude of features in today's 'bloatware', it doesn't necessarily make it faster. Certainly, when you use a feature frequently — perhaps dozens of times during a working day — being tied to a mouse and a menu is not the best way forward; you really do need to use key commands. If the keyboard shortcut takes a tenth of the time it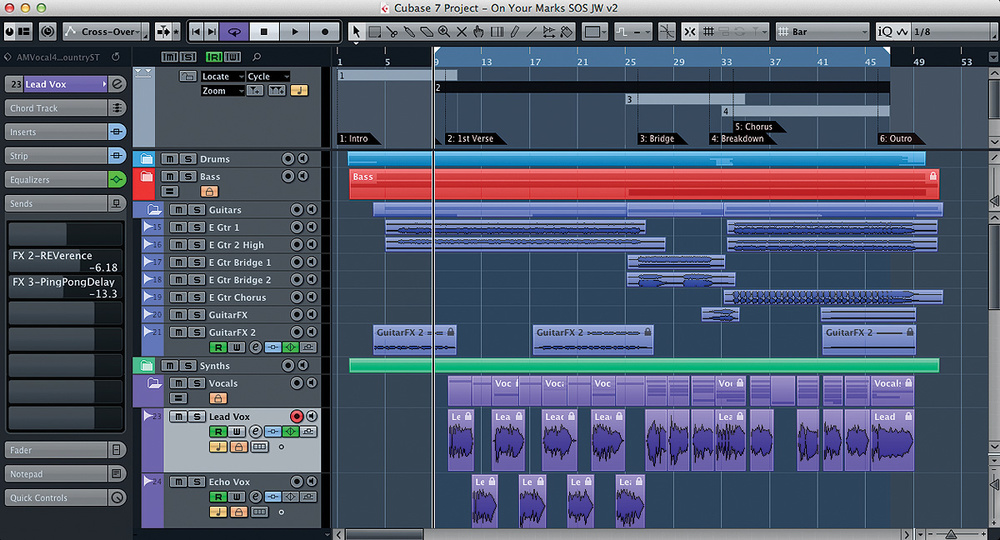 We all spend a lot of time in the project window so it's worth learning the most efficient way to work within it (and that doesn't include those pesky zoom sliders at the bottom-right). takes to execute the same command with a mouse, and this saving is totted up over the 20 or so commands you execute perhaps hundreds of times every working day... well, you do the maths. You'l certainly save a hell of a lot of time and frustration.
Every Cubase user spends a lot of time in the Project window, so for our 'workflow efficiency 101' that's a good place to start. Our main mouse-free, workflow enhancements may seem unglamorous and perhaps a little obvious, but get to grips with them fully and they'll speed up your work more than anything else: let's hear it for Markers, Zooming options and Key Commands...
Marking Time
In all but the simplest of projects, if you know you're going to spend some time working on it, it's well worth creating a Marker track. Cubase provides two kinds of markers — position and cycle — and both have their uses. Position markers simply identify a single point on the timeline. You might use these to identify important locations when, for example, composing to picture, where position markers can identify 'hit' points where the music has to synchronise with the on-screen action. For song-based work, where you have the usual array of defined song sections, cycle markers are often more useful. As the name suggests, these are paired markers that can be used to identify the start and end points of a particular song section.
You can add both types of markers via the Marker track or the dedicated Marker window. Position markers will be added at the project cursor position while cycle markers will be added at the current left/right locator positions. Initial positioning of markers is a one-off task so we can forgive ourselves some mouse work there. However, once positioned, key commands exist to either move the cursor to a marker (position or cycle) and to recall a cycle marker. The beauty of the latter function is that it  A project can contain both position and cycle markers but, for clarity, you can choose to filter their display within the Marker window if required.instantly moves the left and right locators to cycle marker positions ready for cycle playback. For moving quickly back and forth to work on different song sections, this is a huge time saver. The 'Recall Cycle Marker' key commands are not defined by default so a visit to the Key Commands window is required to configure these.
The only other issue to consider with cycle markers is whether you position them exactly on the song section boundaries, or whether you set them a bar or two pre and post those boundaries. The latter approach obviously means you get a couple of bars of pre-roll and post-roll around the song section which can be useful when doing multiple takes via cycle-based recording.
Zooming About
Aside from moving between different song sections, the other oft-repeated navigation task is zooming in or out — both vertically and horizontally — on the Project window contents. This can be done in various ways but (unless you're a glutton for self-abuse!) avoid using the horizontal and vertical zone sliders that lurk bottom-right of the Project window; they're too small and fiddly to give you sufficiently precise control (in fairness to Steinberg, similar controls in other DAWs are equally irritating).
Instead, learn just a few of the zoom-related key commands. The most obvious of these are pre-defined by default; horizontal zoom in and out uses the H and G keys respectively, Alt/Option+H or G zooms in and out in a vertical sense, while Shift+F automatically zooms horizontally to show the full length of the project.
However, there are a few other very useful ones that are not pre-defined and you ought to define for yourself. For example, Zoom To Selection Horizontally (rather than just the Zoom To Selection key command) and Zoom To Locators are both very useful. The latter is great when used in combination with the Recall Cycle Marker; two quick key combinations and you have both your song section selected and are zoomed in horizontally to view it. If you then add the To Left Locator key command (by default, 1 on the number pad), then your cursor is all ready to start playback (via the Spacebar Being able to recall preset cycle markers using key commands means you can get working on the required song section in an instant. key command, of course) of that song section.
In addition, if you need to flip back and forth between two zoom settings, it is worth defining key commands for the Redo Zoom and Undo Zoom options.
Unlock Your Potential
Even just adding these cycle-section selection and zoom key commands to your keyboard repertoire will bring significant workflow improvements, but these commands hold the key to plenty of other possibilities for further time saving. Obvious examples are the key commands for moving between tracks and selecting events on tracks. For example, in the absence of having any events selected within the Project window, the up/down cursor keys will move you through the track list, selecting each track in turn. If you hold the Shift key at the same time, you can select multiple tracks in the same fashion, adding tracks either beneath the current selection or above it.
If you then try the left/right cursor keys, these allow you to select an individual event on the currently selected track (or on the topmost track if you have several tracks selected). Again, adding in the Shift key allows you to select multiple events along an individual track while holding Shift and pressing the up/down cursor keys expands the selection of events onto tracks above/below the current one.
Used in this way, it is very easy to select a horizontal/vertical range in your project manually (perhaps a range that doesn't coincide with one of your song sections already defined by cycle markers). And once you've done that, the default Alt/Option+S key command executes the Zoom To Selection command to perfectly zoom horizontally and vertically into your selection.
Finally, if you use Folder Tracks to organise projects containing lots of tracks, there are various key commands available for folding/unfolding these, although you do have to define them for yourself within the Key Commands window.
Pretty Fly For A GUI Guy
There is nothing dramatic about any of the examples provided above except, of course, the fact that when repeated over and over again in the course of a working day, they will save you a significant chunk of time. However, nothing comes for free and, if you want to benefit from these efficiencies, you have to train yourself to use them — which often means working hard to break your existing habit of reaching for the mouse.
Creating a printout of these Project window navigation shortcuts (most easily done by making some screen grabs of the Navigate, Transport and Zoom sections of the The Zoom section of the Key Commands window has lots of options for improving your Project window navigation. Key Commands list) will help enormously. For a short while, this might feel like one step back rather than two steps forward but, if you persevere, I promise the rewards will come. It will be one less thing to get between you and the realisation of your musical/production ideas, so it should lead to quicker and more satisfying results. And if not, well, at least you'll have saved enough time destroy a few more brain cells by getting to the pub significantly earlier!
While the Cubase Transport panel contains lots of useful information and can be easily customised, there are times when it just gets in the way, especially if you work on a laptop with a modest amount of screen space. All the common Transport panel functions can be executed via key commands — toggling playback on/off, activating record, toggling cycle mode on/off, fast forwarding or reversing and returning to the zero time point, amongst other things — just consult the Transport section of the Key Commands window. You can then toggle off the Transport panel and save some screen space. Oh, and the key command for that is the F2 key!
Published December 2013
Thursday, November 17, 2022
Wednesday, November 16, 2022
Dubstep Drums
Dodge & Fuski's Rob Talbott explains how he creates the band's dubstep drum beats in Cubase.
In this column, I'll explain how I go about putting together the core drum parts for Dodge & Fuski's dubstep tracks — but don't worry if our tunes aren't your thing, as the practices and theories are applicable to many other styles! I've used Cubase 6 for the examples (you can hear these at http://sosm.ag/jan14/cubase-audio), but all my tips apply to pretty much any version of Cubase, and to other DAWs too. Also, note that the method I'll describe is by no means the be-all and end-all of drum production — but it has worked very well for me so far.
Audio Or MIDI?
For dance drum hits, most people will either use a sampler (Cubase's Groove Agent One will do the job well enough: see http://sosm.ag/dec09-grooveagentone), which they trigger via MIDI, or work with audio clips placed and manipulated directly in the Project arrangement page. There are good reasons to choose either approach. For example, using a sampler enables you to hot-swap one kick sample for another while auditioning your track, whereas working with audio provides a lot of useful flexibility, as well as instant visual feedback via the waveforms. The choice is yours, but I prefer working with audio, my key reasons being: it allows quick and easy visual editing of individual drum hits (you can make one kick hit shorter than another with a single click); the ability to see each hit's transient in relation to those on other tracks and the grid; and the ability to reverse, mangle or otherwise process audio in a way that would often be a lot more fiddly with MIDI sequencing alone.
The Beat
Let's start getting a simple dubstep beat together, using a separate audio channel for each drum sound so that each can be processed individually. I've taken some drum hits from our Prime Loops sample library, The Sound Of Dodge & Fuski (not to plug the library, but because it neatly skips any copyright issues) for my examples. Dubstep is, rather oddly, usually made at 140bpm with a half-step rhythm. I suppose that's technically 70bpm, but everyone seems to work at 140, so I'll continue that tradition.
First, pick a nice, punchy kick sample. You want something with a decent amount of low-frequency weight somewhere around 100Hz, but also with some high-frequency content around 5kHz that you can boost to get a nice 'click'. That will help you to give the kick some presence in a mix.
Next, lay out a simple pattern.  Place the kick drums at the beginning of each bar at 140bpm.Notice in the example how I've drawn in a short fade-out envelope on the hit, which is to avoid the kick sounding too 'flabby'. Dubstep being a very busy, noisy genre, having overlapping LF drum hits will cause problems with getting the track to sound powerful later on. You want everything to feel nice and tight.
You'll often find that you want to emphasise the kick sound by exaggerating frequencies around 100Hz and 5kHz, and to roll-off anything below 50Hz. Those frequencies hog headroom and are just not needed. Obviously the precise settings vary hugely and depend on your source material, but as a general rule these are good frequencies to reach for first when cutting or boosting to change a kick sound. If in doubt, listen to some well-produced tracks to get an idea of the kind of sound you want your drums to have, and try and base both your sample choice and any EQ'ing decisions on that. I've used Cubase's bundled Studio EQ for this tutorial, as you'll be familiar with that, but there are lots of other quality options out there (my current favourite being Fabfilter's Pro-Q).
Next up is a punchy snare. You want a sample with plenty of weight around 200Hz (either as it comes, or courtesy of your EQ'ing) that has a nice 'whack' tone to it. Place copies of this between the kicks  Place the snares between the kick drums to form the basis of the half-step rhythm.to get a fairly standard pattern. Again, in the example, I've shortened and faded out the snare to leave just the initial punch. Although you're going to layer the snare with a more 'toppy' clap layer, you don't want the LF punch to have too slow a release, which could make your mix sound vague and muddy. If you like, you could even go in and add a transient shaper (Cubase's Enveloper works well enough for this) to give a bit more bite to the attack of the kick and snare, but be careful not to go overboard with this as it can cause quite an unpleasant and harsh effect when overused.
Now to layer a clap/HF-snare layer on top of the punchy snare. I've chosen a nice, sharp-sounding 909-style clap and placed clips so that their transients are aligned with those of the punchy snares. EQ out anything below about 500Hz to stop it sounding ugly and muddy when you add a reverb later, and to avoid ugly phase cancellations that compromise the punch of the first snare. The two samples should sit nicely together, giving both a pleasing punch and a nice HF slap. You may at this point want to play around with different combinations of punch/HF sample layers; sample selection is one of the most important aspects of dance-drum production and is probably the most frequent problem area in the demos I get sent from inexperienced producers. There isn't a magic way of picking the right samples — it's something you just learn to hear with time. But you can train yourself by listening to as much high-quality music in your chosen genre as possible, and try to identify the characteristics in the drums they use.
Filling In The Gaps
With these basic pillars in place, it's time to start fleshing out the groove. First, place a reverb on the clap/HF snare layer. This will help the beat feel less dry and will fill the gaps in nicely. In the example, I've set the reverb up as an insert effect (nothing else will be sharing the same reverb), set to about 40 percent wet. I've also tweaked it to remove any content below around 500Hz  Insert a reverb onto the clap/HF snare channel. It's important to remove excess LF content from the reverb to avoid a muddy sound that will cause problems with the mix., just to avoid nasty muddy reverb tails that will clash with other elements when you start adding your bass line and other elements.
Now for some hats. There's no real rule as to number of layers and how complicated to make your beat; it depends on the style of the track and how much space you have to play with in the mix. I opted for a fairly standard pattern, shortened the hits until they sounded snappy and again rolled off anything below around 500Hz; there's just no need for any LF content with cymbals and hats in this genre, and it pays to clean out the clutter.
Next, I chose two similar-sounding tambourine samples, the idea being that they should play alternately, to help things groove a bit more. Add in a tambourine pattern. Using two alternate samples and slightly shuffled quantisation settings helps to give a bit of groove. I also applied a moderate swing feel using Cubase's quantisation, to make things shuffle a bit. You should notice a huge difference to the feel of the track after adding in this layer, including a bit of a lift in its apparent energy. As with a lot of dance music, the feel of the track is often in the small details, and adding or removing a layer like this from the track can change its character entirely.
To finish off this basic dubstep drum loop, duplicate what you've made so far to double its length, add a crash cymbal at the beginning of the phrase, again roll off anything below around 500Hz.
Compression?
You might have noticed I haven't discussed compression, and that might surprise you for a dubstep tutorial. But there's a good reason for this: most sample libraries will supply you with suitably compressed drum samples, which are ready to drop into your track. If you're recording the hits live yourself, you'll almost certainly want to compress them to get a more meaty tone. That said, I very rarely use compression when making my tracks, other than on live sources such as vocals or guitars; don't assume you have to compress everything for the sake of it!
I'd consider my basic example a perfectly usable starting point for a dubstep beat, and having followed it step by step, you should now be more than capable of rolling your own and play with timing, length and timbre. It's totally up to you how much more you want to do to give it your own spin!
Published January 2014