Saturday, November 2, 2019

Friday, November 1, 2019
Q. What's the difference between a talk box and a vocoder?
 In addition to its built-in microphone, the Korg MS2000B's vocoder accepts external line inputs for both the carrier and modulator signals.
I've heard various 'talking instrument' effects which some people attribute to a processor called a vocoder, while others describe it as a 'talk box'. Are these the same devices? I've also seen references in some of Craig Anderton's articles about using vocoders to do 'drumcoding'. How is this different from vocoding, and does it produce talking instrument sounds?
James Hoskins
SOS Contributor Craig Anderton replies: A 'talk box' is an electromechanical device that produces talking instrument sounds. It was a popular effect in the '70s and was used by Peter Frampton, Joe Walsh and Stevie Wonder [ see this YouTube video], amongst others. It works by amplifying the instrument you want to make 'talk' (often a guitar), and then sending the amplified signal to a horn-type driver, whose output goes to a short, flexible piece of tubing. This terminates in the performer's mouth, which is positioned close to a mic feeding a PA or other sound system. As the performer says words, the mouth acts like a mechanical filter for the acoustic signal coming in from the tube, and the mic picks up the resulting, filtered sound. Thanks to the recent upsurge of interest in vintage effects, several companies have begun producing talk boxes again, including Dunlop (the reissued Heil Talk Box) and Danelectro, whose Free Speech talk box doesn't require an external mic, effecting the signal directly.
The vocoder, however, is an entirely different animal. The forerunner to today's vocoder was invented in the 1930s for telecommunications applications by an engineer named Homer Dudley; modern versions create 'talking instrument' effects through purely electronic means. A vocoder has two inputs: one for an instrument (the carrier input), and one for a microphone or other signal source (the modulator input, sometimes called the analysed input). Talking into the microphone superimposes vocal effects on whatever is plugged into the instrument input.
The principle of operation is that the microphone feeds several paralleled filters, each of which covers a narrow frequency band. This is electronically similar to a graphic equaliser. We need to separate the mic input into these different filter sections because in human speech, different sounds are associated with different parts of the frequency spectrum.
For example, an 'S' sound contains lots of high frequencies. So, when you speak an 'S' into the mic, the higher-frequency filters fed by the mic will have an output, while there will be no output from the lower-frequency filters. On the other hand, plosive sounds (such as 'P' and 'B') contain lots of low-frequency energy. Speaking one of these sounds into the microphone will give an output from the low-frequency filters. Vowel sounds produce outputs at the various mid-range filters.
But this is only half the picture. The instrument channel, like the mic channel, also splits into several different filters and these are tuned to the same frequencies as the filters used with the mic input. However, these filters include DCAs or VCAs (digitally controlled or voltage-controlled amplifiers) at their outputs. These amplifiers respond to the signals generated by the mic channel filters; more signal going through a particular mic channel filter raises the amp's gain.
Now consider what happens when you play a note into the instrument input while speaking into the mic input. If an output occurs from the mic's lowest-frequency filter, then that output controls the amplifier of the instrument's lowest filter, and allows the corresponding frequencies from the instrument input to pass. If an output occurs from the mic's highest-frequency filter, then that output controls the instrument input's highest-frequency filter, and passes any instrument signals present at that frequency.
As you speak, the various mic filters produce output signals that correspond to the energies present at different frequencies in your voice. By controlling a set of equivalent filters connected to the instrument, you superimpose a replica of the voice's energy patterns on to the sound of the instrument plugged into the instrument input. This produces accurate, intelligible vocal effects.
Vocoders can be used for much more than talking instrument effects. For example, you can play drums into the microphone input instead of voice, and use this to control a keyboard (I've called this 'drumcoding' in previous articles). When you hit the snare drum, that will activate some of the mid-range vocoder filters. Hitting the bass drum will activate the lower vocoder filters, and hitting the cymbals will cause responses in the upper frequency vocoder filters. So, the keyboard will be accented by the drums in a highly rhythmic way. This also works well for accenting bass and guitar parts with drums.
Note that for best results, the instrument signal should have plenty of harmonics, or the filters won't have much to work on.
Published October 2003
Thursday, October 31, 2019
Wednesday, October 30, 2019
Q. What's the best way to fix a pushed-in tweeter cone?
The dome of the tweeter on one of my M-Audio Studiophile BX5 monitors has somehow got pushed inwards. Does this cause permanent damage? If it's advisable, how should I go about pulling it back out? Someone told me to use some sticky tape, but I'm concerned that this could do further damage.
Alex Dean
Technical Editor Hugh Robjohns replies: I'm afraid to say that if a soft-dome tweeter has been pushed in, it will already be creased, and that will result in increased distortion compared with an original unit. This structural damage cannot be repaired, although you can improve the looks of the thing by drawing the tweeter dome back out.
 While it may be possible to draw this pushed-in tweeter dome back out, its performance will be permanently compromised.
If you can't replace the tweeter, then you might be able to restore its shape and some of its original performance. Bear in mind, though, that the coating on the tweeter dome is delicate, and trying to pull it out by sticking tape or Blu-Tac to it is a daft idea in my opinion. Such techniques will either pull off parts of the coating (making the situation even worse) or leave residues behind (ditto).
A better way of restoring the shape of the dome is to use a vacuum cleaner, because it is a non-contact approach. This is what we did to provide a temporary fix for a damaged tweeter in a Studio SOS visit in the October 2002 issue. By carefully reducing the air pressure in front of the tweeter using the hose from the vacuum, the pressure of air behind the tweeter forces its shape back out in a fairly gentle way. Obviously, it involves a strong and steady hand to avoid the vacuum cleaner nozzle coming into contact with the tweeter in any way, but, provided that you are careful, this technique can be effective.
Published December 2003
Tuesday, October 29, 2019
Monday, October 28, 2019
Q. How can I set up my Korg Kaoss Pad to act as a pitch-bender?
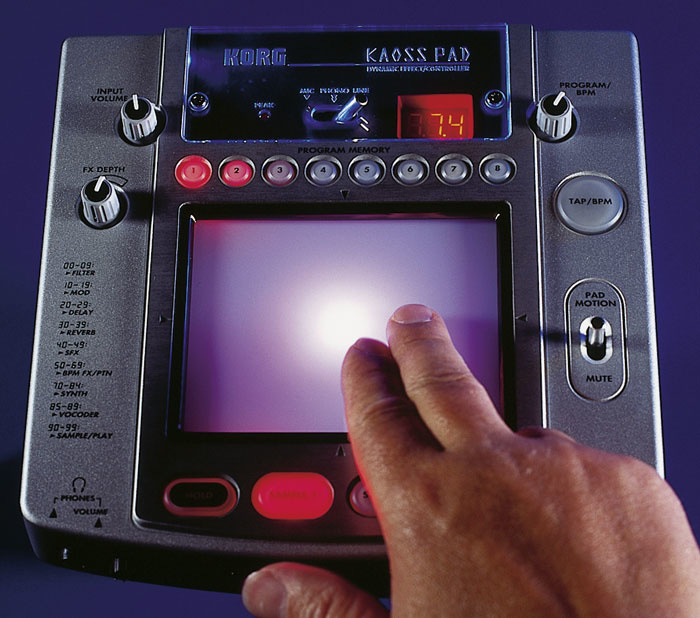
Can you please tell me how to set up the Korg Kaoss Pad KP2 as an ordinary pitch-bender?
SOS Forum Post
Reviews Editor Mike Senior replies: Hold down the Tap/BPM and Rec/Stop buttons at the same time, and after a second or so you'll enter the MIDI editing mode — various buttons will light up and the MIDI channel will be shown in the display. You can at this point change the MIDI channel as necessary using the Program/BPM dial. If you're only wanting to transmit MIDI pitch-bend messages from the Y axis of the pad, then make sure that only the Program Memory 5 button is lit. If you want something transmitted from the X axis as well, then the Program Memory 4 button should also be lit. Pressing any button briefly will toggle its lit/unlit status.
Now to get Y axis movements sending MIDI Pitch-bend messages. Still in MIDI Edit mode, hold down Program Memory 5 until the currently assigned Y-axis controller (by default MIDI Continuous Controller number 13) is displayed in place of the MIDI channel number. Use the Program/BPM dial to bring up 'Pb' on the display. If you're also wanting to set the X axis, press and hold Program Memory 4 until its controller number (by default MIDI Continuous Controller number 12) is shown, and adjust as necessary. Finally, to exit MIDI Edit mode, hold Rec/Stop until you're back in the normal operating state.
A quick bit of general advice too — the unit will automatically leave MIDI Edit mode if you leave it alone for more than 10 seconds, so don't hang around too long when making settings, or you'll be dumped back into the normal operational mode. I find that it's worth toggling a random one of the Program Memory keys on and off occasionally, as the activity keeps the unit in MIDI Edit mode and gives me time to think and consult the manual!
There is another thing to think about when setting the KP2 to transmit pitch-bend information: a normal pitch-bend wheel is sprung so that it resets the pitch whenever you let go of it. Unfortunately, the Hold button doesn't affect MIDI transmission in the same way as it does the response of the internal effects, so the degree of pitch-bend will always stay where it is when you remove your finger from the pad. (Apparently the KP1 doesn't suffer from this problem.) This isn't necessarily a problem, however, because you can effectively do a rough-and-ready pitch-bend 'spring-back' manually, especially if you're able to use both hands: one to pitch-bend and the other to tap the centre of the pad, resetting pitch-bend to zero. If you only have one hand free, you could keep one finger in the centre of the pad while pitch-bending with other fingers. However, the finger that you leave in the centre of the pad will decrease the range over which the rest of the pad operates, so you won't get the same maximum bend range.
If you really need to be able to zero the pitch-bend exactly without sacrificing pitch-bend range, I'd suggest putting a controller button in-line to do this (I'd use one of the ones on my Peavey PC1600X for this) and setting it to generate a 'centred' pitch-bend message. But, to be honest, if you're using the KP2 for subtle pitch changes, it should be adequately accurate to zero the pitch-bend manually. If you're doing mad sweeps the whole time, then it may not even matter if you're not able to zero it perfectly.
However, if you simply have to have mad pitch sweeps along with perfect pitch-bend zeroing, then consider restricting yourself to pitch-bends in only one direction, with the zero point at the top or bottom edge of the pad, so that you can accurately reset the controller manually (finding the middle of the pad accurately is tricky, but finding the edge is easy). To do this for upwards-only bending, set your synth to play an octave higher than you want it (assuming that the bend range will be an octave). This will give you two octaves' shift above whatever note you're playing, with the low edge of the pad representing the former zero-bend position. Reverse the idea for downwards-only shift. If you really want to shift both ways, then you could assign a normal MIDI Continuous Controller (CC) message to the other axis and then use that to control the other pitch-bend direction, assuming that the synth you're triggering allows ordinary controllers also to modulate the pitch — my Korg Prophecy does. You won't get the same controller resolution out of a MIDI CC, so large shifts may sound stepped, but this will at least give you both directions of bend from the pad, and with exact pitch-bend reset.
Having said all of this, there is one other workaround to this problem, which provides all the functionality of a 'sprung' pitch-bend wheel, but it requires that you use a synth with fairly flexible modulation routing. Two of the KP2's transmission types do actually exhibit a 'sprung' action: Modulation Depth One (Y=5-1) and Modulation Depth Two (Y=5-9), activated in MIDI edit mode by Program Memory buttons one and two respectively. Both of these will automatically send their minimum values when you let go of the pad, as if you had moved your finger to the centre of the pad. If you switch both of these types of transmission on in the MIDI edit mode, then the top half of the Y axis will transmit MIDI Continuous Controller number one, and the bottom half will transmit MIDI Continuous Controller number two. The problem is that you can't change the controller assignments for this transmission type, so you'll need to assign the two controllers to upwards and downwards pitch modulation respectively to make it all work. The same caveat concerning controller resolution applies as before, but you do get a true pitch-bend wheel-style action. If your synth won't allow this modulation routing, you may be able to use your sequencer or MIDI controller to convert the MIDI CC messages to MIDI Pitch-bend or Aftertouch messages to achieve the same result.
Published December 2003
Saturday, October 26, 2019
Subscribe to:
Posts (Atom)